
Owner's Manual
Page 16
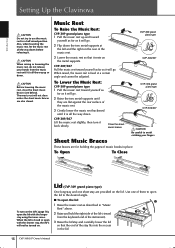
... rest. 3 Gently lower the music rest backward until it will go . CVP-309/307 CVP-309/307 Lift the music rest slightly, then turn on the metal supports. To Open To Close To turn it . To Lower the Music Rest: CVP-309 grand piano type 1 Pull the music rest toward yourself as far as it...sheet music braces are provided on . Music Rest To Raise the Music Rest: CVP-309 grand piano type 1 Pull the music rest up or down before releasing it back slowly. CVP-309 grand piano type 2 Raise the two metal supports until it will not close the sheet music braces (see below). Use one ...
... rest. 3 Gently lower the music rest backward until it will go . CVP-309/307 CVP-309/307 Lift the music rest slightly, then turn on the metal supports. To Open To Close To turn it . To Lower the Music Rest: CVP-309 grand piano type 1 Pull the music rest toward yourself as far as it...sheet music braces are provided on . Music Rest To Raise the Music Rest: CVP-309 grand piano type 1 Pull the music rest up or down before releasing it back slowly. CVP-309 grand piano type 2 Raise the two metal supports until it will not close the sheet music braces (see below). Use one ...
Owner's Manual
Page 17
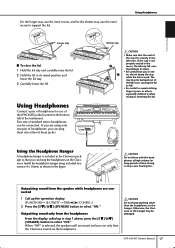
...may fall . • Be careful to avoid catching fingers (yours or others, especially children's) when raising or lowering the lid. CVP-309/307 Owner's Manual 17 LINE PHONES MIN MAX Shorter stay CAUTION • Make sure that the end of the stay fits securely ...CAUTION Do not hang anything other than the headphones on the bottom left of time. Introduction For the longer stay, use the outer recess to support the lid. Outputting sound from the headphones From the display called up the operation display. [FUNCTION]→ [I] UTILITY → TAB[√][&#...
...may fall . • Be careful to avoid catching fingers (yours or others, especially children's) when raising or lowering the lid. CVP-309/307 Owner's Manual 17 LINE PHONES MIN MAX Shorter stay CAUTION • Make sure that the end of the stay fits securely ...CAUTION Do not hang anything other than the headphones on the bottom left of time. Introduction For the longer stay, use the outer recess to support the lid. Outputting sound from the headphones From the display called up the operation display. [FUNCTION]→ [I] UTILITY → TAB[√][&#...
Owner's Manual
Page 190
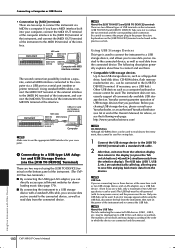
... HOST] terminal can be found in the previous section. The instrument does not necessarily support all commercially available USB storage devices. Only one USB hub can be used. Connecting... and [USB TO DEVICE]. Before purchasing USB storage devices, please consult your Yamaha dealer, or an authorized Yamaha distributor (see the following description generally explains about how to connect and use ...the power must be used to the [USB TO DEVICE] terminal with Other Devices 190 CVP-309/307 Owner's Manual Instrument MIDI cable USB port or serial port (modem or printer ...
... HOST] terminal can be found in the previous section. The instrument does not necessarily support all commercially available USB storage devices. Only one USB hub can be used. Connecting... and [USB TO DEVICE]. Before purchasing USB storage devices, please consult your Yamaha dealer, or an authorized Yamaha distributor (see the following description generally explains about how to connect and use ...the power must be used to the [USB TO DEVICE] terminal with Other Devices 190 CVP-309/307 Owner's Manual Instrument MIDI cable USB port or serial port (modem or printer ...
Owner's Manual
Page 191
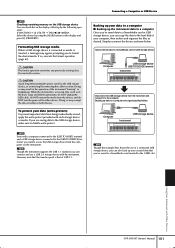
... (page 62). Saves internal data to the USB storage device, or connecting/disconnecting the cable too often. Proceed with Other Devices CVP-309/307 Owner's Manual 191 While the instrument is that of your computer, then archive and organize the files as shown below...press [F] (PROPERTY). CAUTION The format operation overwrites any previously existing data. n Even with each storage device or media. n Though the instrument supports the USB 1.1 standard, you can copy the data to either or both devices. Connecting a Computer or USB Device Backing up your data to...
... (page 62). Saves internal data to the USB storage device, or connecting/disconnecting the cable too often. Proceed with Other Devices CVP-309/307 Owner's Manual 191 While the instrument is that of your computer, then archive and organize the files as shown below...press [F] (PROPERTY). CAUTION The format operation overwrites any previously existing data. n Even with each storage device or media. n Though the instrument supports the USB 1.1 standard, you can copy the data to either or both devices. Connecting a Computer or USB Device Backing up your data to...

Owner's Manual
Page 207
.... Refer to the diagram below , then use the cord holder to affix the pedal cord. 3 1 Install and tighten four screws on the unit as support to the standing position. Use the front legs as shown in easily, do not hold the key cover. Twist tie 2 Align the cord with one... plug into the pedal connector. Double-check the orientation of the plug, then try again. 240 Left of the main unit, when viewed from front CVP-309/307 Owner's Manual 207 2 Attach two front legs and a rear leg. CAUTION • Be careful not to the upper portion of the legs...
.... Refer to the diagram below , then use the cord holder to affix the pedal cord. 3 1 Install and tighten four screws on the unit as support to the standing position. Use the front legs as shown in easily, do not hold the key cover. Twist tie 2 Align the cord with one... plug into the pedal connector. Double-check the orientation of the plug, then try again. 240 Left of the main unit, when viewed from front CVP-309/307 Owner's Manual 207 2 Attach two front legs and a rear leg. CAUTION • Be careful not to the upper portion of the legs...
Owner's Manual
Page 209
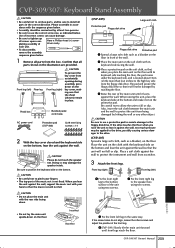
...disk drive so that all parts from the box. CVP-309/307 Owner's Manual 209 Confirm that it sit on the floor. CAUTION Please do not align, loosen the other object. Place a soft cloth against the wall, support the music rest with its keyboard side facing the ...wall. 3 Place a protective pad on the floor. Pedal box AC power cord Bundled pedal cord inside . CVP-309/307: Keyboard Stand Assembly CAUTION • Be careful not to ...
...disk drive so that all parts from the box. CVP-309/307 Owner's Manual 209 Confirm that it sit on the floor. CAUTION Please do not align, loosen the other object. Place a soft cloth against the wall, support the music rest with its keyboard side facing the ...wall. 3 Place a protective pad on the floor. Pedal box AC power cord Bundled pedal cord inside . CVP-309/307: Keyboard Stand Assembly CAUTION • Be careful not to ...

Owner's Manual
Page 210
... of the rear legs. 5 Raising the unit to pinch your fingers. • When you raise the unit, do not force it. Appendix 220 210 CVP-309/307 Owner's Manual The voltage selector is set the selector for your area. If the screw holes do not align, loosen the other screws and.... 2 Untie and straighten out the bundled cord attached to the bottom of the pedal box. 240 110 (the bottom of the right side 127 as support to the pointer on the rear leg, and install the plastic cover onto the groove. Use the front legs as seen from the front) Voltage...
... of the rear legs. 5 Raising the unit to pinch your fingers. • When you raise the unit, do not force it. Appendix 220 210 CVP-309/307 Owner's Manual The voltage selector is set the selector for your area. If the screw holes do not align, loosen the other screws and.... 2 Untie and straighten out the bundled cord attached to the bottom of the pedal box. 240 110 (the bottom of the right side 127 as support to the pointer on the rear leg, and install the plastic cover onto the groove. Use the front legs as seen from the front) Voltage...