
Owner's Manual
Page 3
...Only use the voltage specified as candles, on it containing liquids which may have the instrument inspected by qualified Yamaha service personnel. The required voltage is printed on , trip over, or roll anything over it inspected by qualified... • Never insert or remove an electric plug with wet hands. A burning item may generate noise. • Do not place the instrument in an unstable position where it . • Remove the electric plug from the wall AC outlet. (1)B-7 1/2 CVP-309/307 Owner's Manual 3 WARNING Always follow the basic precautions listed...
...Only use the voltage specified as candles, on it containing liquids which may have the instrument inspected by qualified Yamaha service personnel. The required voltage is printed on , trip over, or roll anything over it inspected by qualified... • Never insert or remove an electric plug with wet hands. A burning item may generate noise. • Do not place the instrument in an unstable position where it . • Remove the electric plug from the wall AC outlet. (1)B-7 1/2 CVP-309/307 Owner's Manual 3 WARNING Always follow the basic precautions listed...
Owner's Manual
Page 4
... the bench. When you experience any hearing loss or ringing in use. 4 CVP-309/307 Owner's Manual (1)B-7 2/2 Maintenance • (CVP-309 including grand piano type) Gently remove dust and dirt with or stand on the...to be held responsible for a long period of dirt can cause permanent hearing loss. Yamaha cannot be imposed on the bench, since small particles of time at their minimum levels ... or place heavy objects on the instrument, and do not insert a finger or hand in the Parameter Chart of all components. Handling caution • Take care that is automatically ...
... the bench. When you experience any hearing loss or ringing in use. 4 CVP-309/307 Owner's Manual (1)B-7 2/2 Maintenance • (CVP-309 including grand piano type) Gently remove dust and dirt with or stand on the...to be held responsible for a long period of dirt can cause permanent hearing loss. Yamaha cannot be imposed on the bench, since small particles of time at their minimum levels ... or place heavy objects on the instrument, and do not insert a finger or hand in the Parameter Chart of all components. Handling caution • Take care that is automatically ...
Owner's Manual
Page 5
... of using various types/formats of the following instruments, shown in the displays of the CVP-309/307, are on your personal use of such programs and contents outside of Ricoh Co.,...data by the Independent JPEG Group. We also recommend that you keep this manual in this Yamaha Clavinova! Owner's Manual Introduction (page 12 Please read this owner's manual are for Organolgy... at the Hamamatsu Museum of Musical Instruments: balafon, gender, kalimba, kanoon, santur, gamelan gong, harp, hand bell, bagpipe, banjo, carillon, mandolin, oud, pan flute, pungi, rabab, shanai, sitar, ...
... of using various types/formats of the following instruments, shown in the displays of the CVP-309/307, are on your personal use of such programs and contents outside of Ricoh Co.,...data by the Independent JPEG Group. We also recommend that you keep this manual in this Yamaha Clavinova! Owner's Manual Introduction (page 12 Please read this owner's manual are for Organolgy... at the Hamamatsu Museum of Musical Instruments: balafon, gender, kalimba, kanoon, santur, gamelan gong, harp, hand bell, bagpipe, banjo, carillon, mandolin, oud, pan flute, pungi, rabab, shanai, sitar, ...
Owner's Manual
Page 7
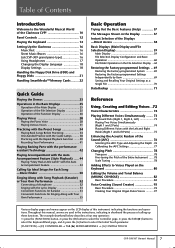
...the Piano Voice 28 Playing Various Voices 31 Practicing with the Preset Songs 34 Playing Back Songs Before Practicing 34 One-handed Practice with the Guide Lamps ......... 38 Practicing with the Repeat Playback Function ....... 40 Recording Your Performance 41 Playing ... 78 Adding Effects to select the Initial Touch parameter. [FUNCTION] → [D] CONTROLLER → TAB [®] KEYBOARD/PANEL → [A] 1 INITIAL TOUCH CVP-309/307 Owner's Manual 7 The example shorthand below describes a four step operation: 1) press the [FUNCTION] button, 2) press the [D] button to select the ...
...the Piano Voice 28 Playing Various Voices 31 Practicing with the Preset Songs 34 Playing Back Songs Before Practicing 34 One-handed Practice with the Guide Lamps ......... 38 Practicing with the Repeat Playback Function ....... 40 Recording Your Performance 41 Playing ... 78 Adding Effects to select the Initial Touch parameter. [FUNCTION] → [D] CONTROLLER → TAB [®] KEYBOARD/PANEL → [A] 1 INITIAL TOUCH CVP-309/307 Owner's Manual 7 The example shorthand below describes a four step operation: 1) press the [FUNCTION] button, 2) press the [D] button to select the ...

Owner's Manual
Page 14
.... The display located in the center of the front panel and the power indicator located below the left end of the keyboard lights up . 14 CVP-309/307 Owner's Manual Be careful to avoid catching your fingers when opening or closing it is opened and may fall inside the unit when... or closed. Small objects placed on the front, lift open the key cover. The power indicator lights up . CAUTION Hold the cover with both hands when opening the cover. This could cause elec- Introduction Playing the Keyboard 1 Connecting the power cable First insert the plug of the power cable into...
.... The display located in the center of the front panel and the power indicator located below the left end of the keyboard lights up . 14 CVP-309/307 Owner's Manual Be careful to avoid catching your fingers when opening or closing it is opened and may fall inside the unit when... or closed. Small objects placed on the front, lift open the key cover. The power indicator lights up . CAUTION Hold the cover with both hands when opening the cover. This could cause elec- Introduction Playing the Keyboard 1 Connecting the power cable First insert the plug of the power cable into...
Owner's Manual
Page 16
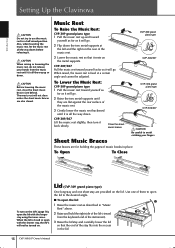
CVP-309 grand piano type 2 Raise the two metal supports until they are also closed or open with the longer stay using the inner recess. Close the sheet music braces CAUTION Be careful to avoid catching your hands from the keyboard end of the instrument). 2 3 1 3 Raise the lid stay and... carefully lower the lid so that it . CVP-309 grand piano type 2 Flip down the two metal supports at against the rear ...
CVP-309 grand piano type 2 Raise the two metal supports until they are also closed or open with the longer stay using the inner recess. Close the sheet music braces CAUTION Be careful to avoid catching your hands from the keyboard end of the instrument). 2 3 1 3 Raise the lid stay and... carefully lower the lid so that it . CVP-309 grand piano type 2 Flip down the two metal supports at against the rear ...

Owner's Manual
Page 31
...Voices The preset Voices are indicated above the Preset Voice name. ORGAN FLUTES n About the various Voices Refer to turn the right-hand part on. n The Voice type and its defining characteristics are categorized and contained in the separate Data List booklet.... to the Voice List in appropriate folders. Count in French Spanish Voice ..... Count in German Japanese Voice ... For the Voice part, see page 72. CVP-309/307 Owner's Manual 31 English Voice ...... Count in Spanish TIME SIGNATURE Determines the time signature of the metronome sound. 1 2 3 4 5 6 7...
...Voices The preset Voices are indicated above the Preset Voice name. ORGAN FLUTES n About the various Voices Refer to turn the right-hand part on. n The Voice type and its defining characteristics are categorized and contained in the separate Data List booklet.... to the Voice List in appropriate folders. Count in French Spanish Voice ..... Count in German Japanese Voice ... For the Voice part, see page 72. CVP-309/307 Owner's Manual 31 English Voice ...... Count in Spanish TIME SIGNATURE Determines the time signature of the metronome sound. 1 2 3 4 5 6 7...
Owner's Manual
Page 33
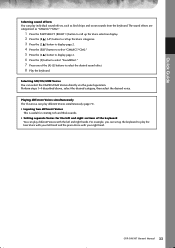
... the keyboard. CVP-309/307 Owner's Manual 33 Playing different Voices simultaneously The Clavinova can play different Voices simultaneously (page 73). • Layering two different Voices This is useful for creating rich and thick sounds. • Setting separate Voices for the left and right hands. Quick Guide... Selecting sound effects You can play different Voices with your left hand and the piano Voice with the left and right sections of the [A]-[J] buttons to play the...
... the keyboard. CVP-309/307 Owner's Manual 33 Playing different Voices simultaneously The Clavinova can play different Voices simultaneously (page 73). • Layering two different Voices This is useful for creating rich and thick sounds. • Setting separate Voices for the left and right hands. Quick Guide... Selecting sound effects You can play different Voices with your left hand and the piano Voice with the left and right sections of the [A]-[J] buttons to play the...
Owner's Manual
Page 37
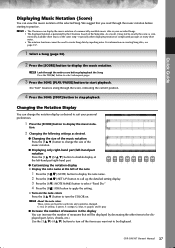
... • The Clavinova can change the size of the music notation. ● Displaying only right-hand part/left-hand part notation Press the [1π†]/[2π†] button to disable display of the left-hand part/right-hand part. ● Customizing the notation display 1 2 3 4 5 6 7 8 • Display..., A: purple, and B: gray ● Increase the number of measures in the display You can view the music notation of the selected Song. CVP-309/307 Owner's Manual 37 As a result, it may not be exactly the same as desired. ● Changing the size of the music notation ...
... • The Clavinova can change the size of the music notation. ● Displaying only right-hand part/left-hand part notation Press the [1π†]/[2π†] button to disable display of the left-hand part/right-hand part. ● Customizing the notation display 1 2 3 4 5 6 7 8 • Display..., A: purple, and B: gray ● Increase the number of measures in the display You can view the music notation of the selected Song. CVP-309/307 Owner's Manual 37 As a result, it may not be exactly the same as desired. ● Changing the size of the music notation ...

Owner's Manual
Page 38
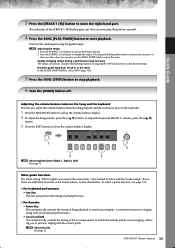
...are indicated in "Display the note name at your own pace-since the accompaniment waits for the left-hand/right-hand part. SONG SCORE KARAOKE SELECT 2 3 PLAY/ REC STOP PAUSE 4 38 CVP-309/307 Owner's Manual setting the parts to the same channel as the channel which MIDI channel in the... notation from among the following three types. and right-hand parts. Make sure to select the smallest note value used for ...
...are indicated in "Display the note name at your own pace-since the accompaniment waits for the left-hand/right-hand part. SONG SCORE KARAOKE SELECT 2 3 PLAY/ REC STOP PAUSE 4 38 CVP-309/307 Owner's Manual setting the parts to the same channel as the channel which MIDI channel in the... notation from among the following three types. and right-hand parts. Make sure to select the smallest note value used for ...
Owner's Manual
Page 39
... can now play on the keyboard. 1 Press the [BALANCE] button to start playback. To select a guide function, see page 135. CVP-309/307 Owner's Manual 39 Practice the muted part using the guide lamps. For Karaoke • Karao-Key This automatically controls the timing of... feature for singing along with your keyboard performance. • Vocal CueTIME This automatically controls the timing of the accompaniment to mute the right-hand part. Pressing and holding either button continuously increases or decreases the value. To adjust the keyboard (RIGHT 1) volume, press the [6π&#...
... can now play on the keyboard. 1 Press the [BALANCE] button to start playback. To select a guide function, see page 135. CVP-309/307 Owner's Manual 39 Practice the muted part using the guide lamps. For Karaoke • Karao-Key This automatically controls the timing of... feature for singing along with your keyboard performance. • Vocal CueTIME This automatically controls the timing of the accompaniment to mute the right-hand part. Pressing and holding either button continuously increases or decreases the value. To adjust the keyboard (RIGHT 1) volume, press the [6π&#...

Owner's Manual
Page 40
... to -play back a Song or a specific range of difficult-to stop playback. 6 Turn the [GUIDE] button off Repeat playback. 40 CVP-309/307 Owner's Manual This is played back repeatedly. The Song will be played back repeatedly until you into the phrase), the range from Point A to... [STOP] button. 4 Press the [REPEAT] button to be used to mute the left-hand part. Quick Guide Practicing the Left-hand Part (TRACK 2) Using the Guide Lamps 1,2 Follow the same steps as in "Practice the Right-hand Part (TRACK 1) Using the Guide Lamps" on Repeat playback. 3 Press the SONG [PLAY...
... to -play back a Song or a specific range of difficult-to stop playback. 6 Turn the [GUIDE] button off Repeat playback. 40 CVP-309/307 Owner's Manual This is played back repeatedly. The Song will be played back repeatedly until you into the phrase), the range from Point A to... [STOP] button. 4 Press the [REPEAT] button to be used to mute the left-hand part. Quick Guide Practicing the Left-hand Part (TRACK 2) Using the Guide Lamps 1,2 Follow the same steps as in "Practice the Right-hand Part (TRACK 1) Using the Guide Lamps" on Repeat playback. 3 Press the SONG [PLAY...

Owner's Manual
Page 43
...three notes at the same time with your performance on . Play several notes one after the other with your right hand. CVP-309/307 Owner's Manual 43 The instrument automatically matches your right hand. 5 Press the SONG [STOP] button to stop playback. 6 Press the [PERFORMANCE ASSISTANT] button again to ... playback and chords, no matter what keys you play . Play three notes at the same time with different fingers of your right hand. Quick Guide 2 Press the [PERFORMANCE ASSISTANT] button to turn the feature off. It even changes the sound according to start playback. Try...
...three notes at the same time with your performance on . Play several notes one after the other with your right hand. CVP-309/307 Owner's Manual 43 The instrument automatically matches your right hand. 5 Press the SONG [STOP] button to stop playback. 6 Press the [PERFORMANCE ASSISTANT] button again to ... playback and chords, no matter what keys you play . Play three notes at the same time with different fingers of your right hand. Quick Guide 2 Press the [PERFORMANCE ASSISTANT] button to turn the feature off. It even changes the sound according to start playback. Try...

Owner's Manual
Page 44
... Feature Traditional Style: Country Pop C 3 21 2 MARY HAD A LITTLE LAMB C G 3 2 C 35 1 1 C C 3 21 2 3 4 G C 2 3 21 1 Ending 1 1 4 1 44 CVP-309/307 Owner's Manual The Styles of the instrument cover a wide range of the Styles. even if you automatically recreate the sound of a full band or... orchestra- STYLE SELECT Playing "Mary Had a Little Lamb" with your left hand. The Auto Accompaniment sound is made up of the rhythm patterns of different musical genres including pop, jazz, and many others...
... Feature Traditional Style: Country Pop C 3 21 2 MARY HAD A LITTLE LAMB C G 3 2 C 35 1 1 C C 3 21 2 3 4 G C 2 3 21 1 Ending 1 1 4 1 44 CVP-309/307 Owner's Manual The Styles of the instrument cover a wide range of the Styles. even if you automatically recreate the sound of a full band or... orchestra- STYLE SELECT Playing "Mary Had a Little Lamb" with your left hand. The Auto Accompaniment sound is made up of the rhythm patterns of different musical genres including pop, jazz, and many others...

Owner's Manual
Page 45
... methods you play a melody with your left hand and play a chord with your left hand, the Auto Accompaniment starts. Try playing chords with your right hand. n Chord Fingerings There are indicated above the Preset Style name. Use the left-hand section (lower part) of the keyboard to play... the chords for sounding the Auto Accompaniment. 5 6 7 8 6 Press the [SYNC START] button to set Auto Accompaniment to specify chords (page 101). CVP-309/307 Owner's Manual 45 n You can use...
... methods you play a melody with your left hand and play a chord with your left hand, the Auto Accompaniment starts. Try playing chords with your right hand. n Chord Fingerings There are indicated above the Preset Style name. Use the left-hand section (lower part) of the keyboard to play... the chords for sounding the Auto Accompaniment. 5 6 7 8 6 Press the [SYNC START] button to set Auto Accompaniment to specify chords (page 101). CVP-309/307 Owner's Manual 45 n You can use...

Owner's Manual
Page 46
...) The tempo can also be selected in the chord section of the INTRO [I ] UTILITY →TAB[√] CONFIG 1 → [B] 4 TAP 46 CVP-309/307 Owner's Manual Try out the variations and combine them freely. To Start Playing STYLE SELECT ● Start/Stop Styles start playback as soon as...button is pressed. ● Intro This is used for a 4/4 time signature), and the Style playback starts automatically at that tapped speed. and left-hand range) See page 104. • Turns touch response on the keyboard. 1 Press the [BALANCE] button to close the volume balance display. Adjusting the...
...) The tempo can also be selected in the chord section of the INTRO [I ] UTILITY →TAB[√] CONFIG 1 → [B] 4 TAP 46 CVP-309/307 Owner's Manual Try out the variations and combine them freely. To Start Playing STYLE SELECT ● Start/Stop Styles start playback as soon as...button is pressed. ● Intro This is used for a 4/4 time signature), and the Style playback starts automatically at that tapped speed. and left-hand range) See page 104. • Turns touch response on the keyboard. 1 Press the [BALANCE] button to close the volume balance display. Adjusting the...
Owner's Manual
Page 48
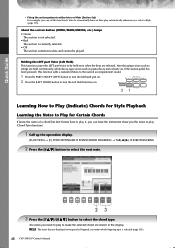
... has been pressed). This function adds a natural richness to the overall accompaniment sound. 1 Press the PART ON/OFF [LEFT] button to turn the left-hand part on. 2 Press the [LEFT HOLD] button to turn the Left Hold function on. 21 Learning How to Play (Indicate) Chords for Style Playback ...About the section button (INTRO/MAIN/ENDING, etc.) lamps • Green The section is not selected. • Red The section is selected (page 102). 48 CVP-309/307 Owner's Manual Quick Guide • Fixing the section pattern to either Intro or Main (Section Set) For example, you can have an Intro play...
... has been pressed). This function adds a natural richness to the overall accompaniment sound. 1 Press the PART ON/OFF [LEFT] button to turn the left-hand part on. 2 Press the [LEFT HOLD] button to turn the Left Hold function on. 21 Learning How to Play (Indicate) Chords for Style Playback ...About the section button (INTRO/MAIN/ENDING, etc.) lamps • Green The section is not selected. • Red The section is selected (page 102). 48 CVP-309/307 Owner's Manual Quick Guide • Fixing the section pattern to either Intro or Main (Section Set) For example, you can have an Intro play...
Owner's Manual
Page 49
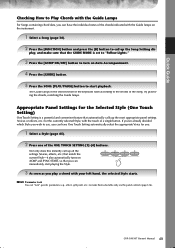
... to Play Chords with the Guide Lamps For Songs containing chord data, you can have the individual notes of the chords indicated with your left hand, the selected Style starts. play a chord with the Guide lamps on the instrument. 1 Select a Song (page 34). 2 Press the [FUNCTION] button and press the ... them selectable only via the panel controls (page 126). If you've already decided which Style you wish to the chords of a single button. CVP-309/307 Owner's Manual 49 The Guide lamps in the chord section of the keyboard flash according to use, you can have One Touch Setting...
... to Play Chords with the Guide Lamps For Songs containing chord data, you can have the individual notes of the chords indicated with your left hand, the selected Style starts. play a chord with the Guide lamps on the instrument. 1 Select a Song (page 34). 2 Press the [FUNCTION] button and press the ... them selectable only via the panel controls (page 126). If you've already decided which Style you wish to the chords of a single button. CVP-309/307 Owner's Manual 49 The Guide lamps in the chord section of the keyboard flash according to use, you can have One Touch Setting...
Owner's Manual
Page 73
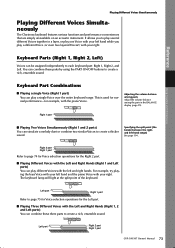
... point (the border between the rightand left hand and the piano Voice with your left and right hands. For example, try playing the bass Voice with your right. The keyboard lamp will light at the split point of the keyboard. Left part Right 2 part Right 1 part CVP-309/307 Owner's Manual 73 Adjusting the...
... point (the border between the rightand left hand and the piano Voice with your left and right hands. For example, try playing the bass Voice with your right. The keyboard lamp will light at the split point of the keyboard. Left part Right 2 part Right 1 part CVP-309/307 Owner's Manual 73 Adjusting the...

Owner's Manual
Page 75
... to select the PRESET display. This is useful for the Left part. CVP-309/307 Owner's Manual 75 Switching the Left part on/off with a pedal You can play . page 186). Specifying the split point (the border between the rightand left-hand range) See page 104. For the selected part, a √ mark appears... to call up the Voice selection display for turning the Left part on and off while you play different Voices with the Left and Right Hands (Right 1 and Left parts). 1 Make sure the PART ON/OFF [RIGHT 1] button is turned on. 2 Press the PART ON/OFF [LEFT] button to turn it...
... to select the PRESET display. This is useful for the Left part. CVP-309/307 Owner's Manual 75 Switching the Left part on/off with a pedal You can play . page 186). Specifying the split point (the border between the rightand left-hand range) See page 104. For the selected part, a √ mark appears... to call up the Voice selection display for turning the Left part on and off while you play different Voices with the Left and Right Hands (Right 1 and Left parts). 1 Make sure the PART ON/OFF [RIGHT 1] button is turned on. 2 Press the PART ON/OFF [LEFT] button to turn it...


