
Owner's Manual
Page 3
... RMS Output Power per Channel 40 W + 40 W (6Ω, 20 - 20,000Hz, 0.1% THD) • Full Operation System Remote Control • 40-Station FM/AM Preset Tuning • Multi-Function RDS Reception • SUBWOOFER Output Terminal • S-bit DAC and 8fs Digital Filter • Optical Digital Output • Random, Repeat, and Program Play • CD TEXT Display • Peak Level Search • Tape Programming The receiver (RX-E100) and CD player (CDX-E100) are the main units of trouble-free...
... RMS Output Power per Channel 40 W + 40 W (6Ω, 20 - 20,000Hz, 0.1% THD) • Full Operation System Remote Control • 40-Station FM/AM Preset Tuning • Multi-Function RDS Reception • SUBWOOFER Output Terminal • S-bit DAC and 8fs Digital Filter • Optical Digital Output • Random, Repeat, and Program Play • CD TEXT Display • Peak Level Search • Tape Programming The receiver (RX-E100) and CD player (CDX-E100) are the main units of trouble-free...
Owner's Manual
Page 4
...; Install your plug, proceed as damage or discoloration on switches, knobs or cords. • Always set the VOLUME control to minimum before you finish all discs from the unit, press STANDBY/ON to the receiver at the top, on the rear exterior. CAUTION Use of controls or adjustments or performance of this unit with this appliance, it is turned off and an appropriate 3 pin plug fitted. Use...
...; Install your plug, proceed as damage or discoloration on switches, knobs or cords. • Always set the VOLUME control to minimum before you finish all discs from the unit, press STANDBY/ON to the receiver at the top, on the rear exterior. CAUTION Use of controls or adjustments or performance of this unit with this appliance, it is turned off and an appropriate 3 pin plug fitted. Use...

Owner's Manual
Page 5
... directly illuminated by it. Operating buttons for replacement. • Be sure the polarities are correct. (See the illustration inside the battery compartment.) • Remove the batteries if the remote control will not be operated by strong lighting (especially an inverter type of them immediately. Remote control operation range NATURAL SOUND STEREO RECEIVER RX-E100 VOLUME DISPLAY MEMORY AUTO/MAN'L PRESET/BAND PRESET/TUNING STANDBY/ON PHONES TIME ADJ TIMER BASS HOUR TREBLE MIN BALANCE MIN MAX INPUT -+ -+ LR Remote control...
... directly illuminated by it. Operating buttons for replacement. • Be sure the polarities are correct. (See the illustration inside the battery compartment.) • Remove the batteries if the remote control will not be operated by strong lighting (especially an inverter type of them immediately. Remote control operation range NATURAL SOUND STEREO RECEIVER RX-E100 VOLUME DISPLAY MEMORY AUTO/MAN'L PRESET/BAND PRESET/TUNING STANDBY/ON PHONES TIME ADJ TIMER BASS HOUR TREBLE MIN BALANCE MIN MAX INPUT -+ -+ LR Remote control...

Owner's Manual
Page 6
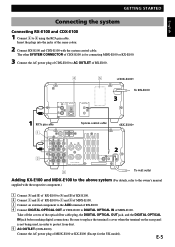
... 4 Connect the AC power cord to the wall outlet until all connections are completed. To Connect the Subwoofer (optional) You can reinforce the bass frequencies by adding a subwoofer (optional). Red: positive(+) Black: negative(-) 2 1 3 2 Connect the AM Antenna. GETTING STARTED Connecting the speakers Never plug the AC power cord to a wall outlet. • Use external FM/AM antennas if you need better reception. Right speaker 3 FM antenna 2 AM loop antenna Left speaker FREQUENCY STEP B L TAPE R OUT...
... 4 Connect the AC power cord to the wall outlet until all connections are completed. To Connect the Subwoofer (optional) You can reinforce the bass frequencies by adding a subwoofer (optional). Red: positive(+) Black: negative(-) 2 1 3 2 Connect the AM Antenna. GETTING STARTED Connecting the speakers Never plug the AC power cord to a wall outlet. • Use external FM/AM antennas if you need better reception. Right speaker 3 FM antenna 2 AM loop antenna Left speaker FREQUENCY STEP B L TAPE R OUT...
Owner's Manual
Page 7
...; of MDX-E100. 3 Connect an external component to the AUX terminal of RX-E100. 4 Connect DIGITAL OPTICAL OUT of CDX-E100 to protect from dust. 5 AC OUTLET (CDX-E100) Connect the AC power plug of the optical fiber cable plug, the DIGITAL OPTICAL OUT jack, and the DIGITAL OPTICAL IN jack before making digital connections. E-5 Be sure to replace the terminal's cover when the terminal on the rear panel is for the UK model). Take off the...
...; of MDX-E100. 3 Connect an external component to the AUX terminal of RX-E100. 4 Connect DIGITAL OPTICAL OUT of CDX-E100 to protect from dust. 5 AC OUTLET (CDX-E100) Connect the AC power plug of the optical fiber cable plug, the DIGITAL OPTICAL OUT jack, and the DIGITAL OPTICAL IN jack before making digital connections. E-5 Be sure to replace the terminal's cover when the terminal on the rear panel is for the UK model). Take off the...

Owner's Manual
Page 8
...; PRESET indicator (P.10) ! STEREO indicator (P.9) ⁄ TUNED indicator (P.9) @ AUTO indicator (P.9) ¤ MEMORY indicator (P.10) E-6 # RDS indicator (P.11) ‹ RDS mode indicators (P.11) $ PTY HOLD indicator (P.12) › TIMER indicator (P.15) % SLEEP indicator (P.16) RX-E100 NAMES OF BUTTONS AND CONTROLS Front panel NATURAL SOUND STEREO RECEIVER RX-E100 VOLUME TIMER STANDBY DISPLAY MEMORY AUTO/MAN'L PRESET/BAND PRESET/TUNING STANDBY/ON PHONES TIME ADJ TIMER BASS HOUR PTY SELECT MIN TREBLE BALANCE MIN MAX INPUT -+ -+ LR ~ STANDBY...
...; PRESET indicator (P.10) ! STEREO indicator (P.9) ⁄ TUNED indicator (P.9) @ AUTO indicator (P.9) ¤ MEMORY indicator (P.10) E-6 # RDS indicator (P.11) ‹ RDS mode indicators (P.11) $ PTY HOLD indicator (P.12) › TIMER indicator (P.15) % SLEEP indicator (P.16) RX-E100 NAMES OF BUTTONS AND CONTROLS Front panel NATURAL SOUND STEREO RECEIVER RX-E100 VOLUME TIMER STANDBY DISPLAY MEMORY AUTO/MAN'L PRESET/BAND PRESET/TUNING STANDBY/ON PHONES TIME ADJ TIMER BASS HOUR PTY SELECT MIN TREBLE BALANCE MIN MAX INPUT -+ -+ LR ~ STANDBY...

Owner's Manual
Page 9
...) fi AUX (The equipment connected to the AUX terminal) (P.5) ^ CD (CDX-E100) (P.19) fl TUNER (RX-E100) (P.10) & PRESET/PTY SELECT / (P.10/P.12) Note are operation buttons and input selectors for each component. English RX-E100 NAMES OF BUTTONS AND CONTROLS Remote control SLEEP A REP D PEAK TIME B RNDM DISP C PROG E TAPE FREQ PS/PTY/RT/CT PTY SEEK MODE START VOLUME TAPE MD AUX CD TUNER MD REC PRESET PTY SELECT TAPE REC TAPE ~ SLEEP (P.16...
...) fi AUX (The equipment connected to the AUX terminal) (P.5) ^ CD (CDX-E100) (P.19) fl TUNER (RX-E100) (P.10) & PRESET/PTY SELECT / (P.10/P.12) Note are operation buttons and input selectors for each component. English RX-E100 NAMES OF BUTTONS AND CONTROLS Remote control SLEEP A REP D PEAK TIME B RNDM DISP C PROG E TAPE FREQ PS/PTY/RT/CT PTY SEEK MODE START VOLUME TAPE MD AUX CD TUNER MD REC PRESET PTY SELECT TAPE REC TAPE ~ SLEEP (P.16...

Owner's Manual
Page 10
... remote control. 6 If desired, adjust BASS, TREBLE, and BALANCE. You can be put in stop mode and not operated for the sound from the main speakers through the headphones. TREBLE: Turn this unit to the PHONES jack. Auto power off function RX-E100 will be used to turn INPUT to select AUX. When you use headphones Connect the headphones to the standby mode. • The STANDBY indicator lights up. E-8 4 Play the source. (Refer to the owner's manual supplied with each selected component.) 5 Adjust the volume level...
... remote control. 6 If desired, adjust BASS, TREBLE, and BALANCE. You can be put in stop mode and not operated for the sound from the main speakers through the headphones. TREBLE: Turn this unit to the PHONES jack. Auto power off function RX-E100 will be used to turn INPUT to select AUX. When you use headphones Connect the headphones to the standby mode. • The STANDBY indicator lights up. E-8 4 Play the source. (Refer to the owner's manual supplied with each selected component.) 5 Adjust the volume level...

Owner's Manual
Page 11
PRESET/BAND INPUT Automatic tuning 1 Select TUNER by step. Notes • If automatic tuning search does not find radio stations automatically and manually. AUTO/MAN'L PRESET/TUNING / NATURAL SOUND STEREO RECEIVER RX-E100 VOLUME DISPLAY MEMORY AUTO/MAN'L PRESET/BAND PRESET/TUNING STANDBY/ON PHONES TIME ADJ TIMER BASS HOUR PTY SELECT MIN TREBLE BALANCE MIN MAX INPUT -+ -+ LR TUNER OPERATIONS Manual tuning 1 Follow steps 1 and 2 described in "Automatic tuning." 2 Press AUTO/MAN'L so that "AUTO" disappears from the display. 3 Press TUNING (For a higher frequency) or (...
PRESET/BAND INPUT Automatic tuning 1 Select TUNER by step. Notes • If automatic tuning search does not find radio stations automatically and manually. AUTO/MAN'L PRESET/TUNING / NATURAL SOUND STEREO RECEIVER RX-E100 VOLUME DISPLAY MEMORY AUTO/MAN'L PRESET/BAND PRESET/TUNING STANDBY/ON PHONES TIME ADJ TIMER BASS HOUR PTY SELECT MIN TREBLE BALANCE MIN MAX INPUT -+ -+ LR TUNER OPERATIONS Manual tuning 1 Follow steps 1 and 2 described in "Automatic tuning." 2 Press AUTO/MAN'L so that "AUTO" disappears from the display. 3 Press TUNING (For a higher frequency) or (...

Owner's Manual
Page 12
... PRESET/BAND and PRESET/TUNING / on the front panel or PRESET / , A/B/C/D/E and 1-8 on the remote control. Received stations are retained for a week after you can be preset in a desired station. (Refer to the previous page for about 5 seconds, use PRESET/TUNING / to A1, A2...A8 sequentially. PRESET/TUNING / NATURAL SOUND STEREO RECEIVER RX-E100 VOLUME DISPLAY MEMORY AUTO/MAN'L PRESET/BAND PRESET/TUNING STANDBY/ON PHONES TIME ADJ TIMER BASS HOUR PTY SELECT MIN TREBLE BALANCE MIN MAX INPUT -+ -+ LR MEMORY PRESET/BAND INPUT To preset stations manually 1 Tune...
... PRESET/BAND and PRESET/TUNING / on the front panel or PRESET / , A/B/C/D/E and 1-8 on the remote control. Received stations are retained for a week after you can be preset in a desired station. (Refer to the previous page for about 5 seconds, use PRESET/TUNING / to A1, A2...A8 sequentially. PRESET/TUNING / NATURAL SOUND STEREO RECEIVER RX-E100 VOLUME DISPLAY MEMORY AUTO/MAN'L PRESET/BAND PRESET/TUNING STANDBY/ON PHONES TIME ADJ TIMER BASS HOUR PTY SELECT MIN TREBLE BALANCE MIN MAX INPUT -+ -+ LR MEMORY PRESET/BAND INPUT To preset stations manually 1 Tune...
Owner's Manual
Page 13
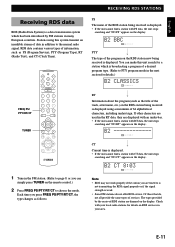
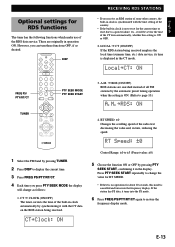
... the normal radio signal. SLEEP A REP D PEAK TIME B RNDM DISP C PROG E TAPE FREQ PS/ PTY/RT/CT TUNER FREQ PS/PTY/RT/CT PTY SEEK MODE START VOLUME TAPE MD AUX CD TUNER MD REC PRESET PTY SELECT TAPE REC TAPE MODE DUBBING START RECEIVING RDS STATIONS PS The name of services. You can simply press TUNER on the remote control.) 2 Press FREQ PS/PTY/RT/CT to PTY program mode in addition...
... the normal radio signal. SLEEP A REP D PEAK TIME B RNDM DISP C PROG E TAPE FREQ PS/ PTY/RT/CT TUNER FREQ PS/PTY/RT/CT PTY SEEK MODE START VOLUME TAPE MD AUX CD TUNER MD REC PRESET PTY SELECT TAPE REC TAPE MODE DUBBING START RECEIVING RDS STATIONS PS The name of services. You can simply press TUNER on the remote control.) 2 Press FREQ PS/PTY/RT/CT to PTY program mode in addition...

Owner's Manual
Page 14
RECEIVING RDS STATIONS PTY SEEK mode You can simply press TUNER on the remote control.) 2 Press PTY SEEK MODE once so that "PTY" and a PTY program flashes on the display. SLEEP A REP D PEAK TIME B RNDM DISP C PROG E TAPE To locate a station 1 Tune in the FM station. (Refer to page 9, or you select, "NO PTY" appears on the display, then the Program Service name or frequency appears on the display. MODE DUBBING START List...
RECEIVING RDS STATIONS PTY SEEK mode You can simply press TUNER on the remote control.) 2 Press PTY SEEK MODE once so that "PTY" and a PTY program flashes on the display. SLEEP A REP D PEAK TIME B RNDM DISP C PROG E TAPE To locate a station 1 Tune in the FM station. (Refer to page 9, or you select, "NO PTY" appears on the display, then the Program Service name or frequency appears on the display. MODE DUBBING START List...
Owner's Manual
Page 15
... station being received employs the local time (summer time, etc.) data service, its time is cancelled and turns into the PS mode. 6 Press FREQ PS/PTY/RT/CT again to restore the frequency display mode. E-13 SLEEP A REP D PEAK TIME B RNDM DISP C PROG E TAPE DISP FREQ PS/ PTY/RT/CT TUNER FREQ PS/PTY/RT/CT PTY SEEK MODE START VOLUME TAPE MD AUX CD TUNER MD REC PRESET PTY SELECT TAPE...
... station being received employs the local time (summer time, etc.) data service, its time is cancelled and turns into the PS mode. 6 Press FREQ PS/PTY/RT/CT again to restore the frequency display mode. E-13 SLEEP A REP D PEAK TIME B RNDM DISP C PROG E TAPE DISP FREQ PS/ PTY/RT/CT TUNER FREQ PS/PTY/RT/CT PTY SEEK MODE START VOLUME TAPE MD AUX CD TUNER MD REC PRESET PTY SELECT TAPE...

Owner's Manual
Page 16
... display. DISPLAY HOUR MIN NATURAL SOUND STEREO RECEIVER RX-E100 VOLUME DISPLAY MEMORY AUTO/MAN'L PRESET/BAND PRESET/TUNING STANDBY/ON PHONES TIME ADJ TIMER BASS HOUR PTY SELECT MIN TREBLE BALANCE MIN MAX INPUT -+ -+ LR Adjusting the brightness of the display You can adjust the brightness of the display. The current time appears for about 8 seconds, then the normal display returns. Control Range: ±0 to -6 (Preset value: ±0) E-14 If you use the timer functions. To display the clock Press DISPLAY. USING...
... display. DISPLAY HOUR MIN NATURAL SOUND STEREO RECEIVER RX-E100 VOLUME DISPLAY MEMORY AUTO/MAN'L PRESET/BAND PRESET/TUNING STANDBY/ON PHONES TIME ADJ TIMER BASS HOUR PTY SELECT MIN TREBLE BALANCE MIN MAX INPUT -+ -+ LR Adjusting the brightness of the display You can adjust the brightness of the display. The current time appears for about 8 seconds, then the normal display returns. Control Range: ±0 to -6 (Preset value: ±0) E-14 If you use the timer functions. To display the clock Press DISPLAY. USING...
Owner's Manual
Page 17
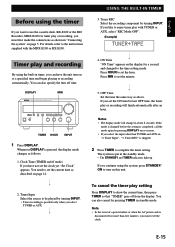
USING THE BUILT-IN TIMER 3. If you like to enjoy timer play with the MDX-E100 or KX-E100. DISPLAY MIN NATURAL SOUND STEREO RECEIVER RX-E100 VOLUME DISPLAY MEMORY AUTO/MAN'L PRESET/BAND PRESET/TUNING STANDBY/ON PHONES TIME ADJ TIMER BASS HOUR PTY SELECT MIN TREBLE BALANCE MIN MAX INPUT -+ -+ LR TIMER HOUR INPUT 1 Press DISPLAY. Whenever DISPLAY is pressed, the display mode changes as above. Press HOUR to set the hour. Notes • The display mode will...
USING THE BUILT-IN TIMER 3. If you like to enjoy timer play with the MDX-E100 or KX-E100. DISPLAY MIN NATURAL SOUND STEREO RECEIVER RX-E100 VOLUME DISPLAY MEMORY AUTO/MAN'L PRESET/BAND PRESET/TUNING STANDBY/ON PHONES TIME ADJ TIMER BASS HOUR PTY SELECT MIN TREBLE BALANCE MIN MAX INPUT -+ -+ LR TIMER HOUR INPUT 1 Press DISPLAY. Whenever DISPLAY is pressed, the display mode changes as above. Press HOUR to set the hour. Notes • The display mode will...

Owner's Manual
Page 20
CDX-E100 NAMES OF BUTTONS AND CONTROLS Remote control SLEEP A REP D PEAK TIME B RNDM DISP C PROG E TAPE ~ TIME (P.20) Ÿ REP (Repeat) (P.21) ! PROG (Program) (P.21) ⁄ RNDM (Random) (P.20) @ PEAK (Peak Search) (P.22) ¤ TAPE (P.25) # POWER (P.19) ‹ Numeric buttons (P.19) $ CD input (P.19) › $/! (Skip/Seach Backward) (P.19 Skip/Seach Forward) (P.19) fi ^ (Play/Pause) (P.19) ^ & (Stop) (P.19) FREQ PS/PTY/RT/CT PTY SEEK MODE START VOLUME TAPE MD AUX CD TUNER PRESET MD REC PTY SELECT TAPE REC TAPE MODE DUBBING START E-18
CDX-E100 NAMES OF BUTTONS AND CONTROLS Remote control SLEEP A REP D PEAK TIME B RNDM DISP C PROG E TAPE ~ TIME (P.20) Ÿ REP (Repeat) (P.21) ! PROG (Program) (P.21) ⁄ RNDM (Random) (P.20) @ PEAK (Peak Search) (P.22) ¤ TAPE (P.25) # POWER (P.19) ‹ Numeric buttons (P.19) $ CD input (P.19) › $/! (Skip/Seach Backward) (P.19 Skip/Seach Forward) (P.19) fi ^ (Play/Pause) (P.19) ^ & (Stop) (P.19) FREQ PS/PTY/RT/CT PTY SEEK MODE START VOLUME TAPE MD AUX CD TUNER PRESET MD REC PTY SELECT TAPE REC TAPE MODE DUBBING START E-18

Owner's Manual
Page 21
... play a specific track on the remote control in order to operate the CD player by the remote control. 4 Press ^ to start playback. NATURAL SOUND COMPACT DISC PLAYER CDX-E100 NATURAL SOUND COMPACT DISC PLAYER CDX-E100 STANDBY/ON STANDBY/ON STANDBY/ON $/! ⁄/› SLEEP A REP D PEAK TIME B RNDM DISP C PROG E TAPE POWER $/!/›/⁄ FREQ PS/PTY/RT/CT PTY SEEK MODE START VOLUME TAPE MD AUX CD TUNER MD REC PRESET PTY SELECT TAPE REC TAPE MODE DUBBING START Numeric buttons CD ^ & To play CDs 1 Press STANDBY...
... play a specific track on the remote control in order to operate the CD player by the remote control. 4 Press ^ to start playback. NATURAL SOUND COMPACT DISC PLAYER CDX-E100 NATURAL SOUND COMPACT DISC PLAYER CDX-E100 STANDBY/ON STANDBY/ON STANDBY/ON $/! ⁄/› SLEEP A REP D PEAK TIME B RNDM DISP C PROG E TAPE POWER $/!/›/⁄ FREQ PS/PTY/RT/CT PTY SEEK MODE START VOLUME TAPE MD AUX CD TUNER MD REC PRESET PTY SELECT TAPE REC TAPE MODE DUBBING START Numeric buttons CD ^ & To play CDs 1 Press STANDBY...

Owner's Manual
Page 24
... can be used during program play to skip to search for the peak level. PEAK SLEEP A REP D PEAK TIME B RNDM DISP C PROG E TAPE To change program data 1. To cancel searching Press &. E-22 To check program data 1. Press the numeric button of the recording volume level. COMPACT DISC PLAYER OPERATIONS To stop program play. 2. Then each time you press › / $, the track number and the program number are displayed in "To check program data." 2. Press...
... can be used during program play to skip to search for the peak level. PEAK SLEEP A REP D PEAK TIME B RNDM DISP C PROG E TAPE To change program data 1. To cancel searching Press &. E-22 To check program data 1. Press the numeric button of the recording volume level. COMPACT DISC PLAYER OPERATIONS To stop program play. 2. Then each time you press › / $, the track number and the program number are displayed in "To check program data." 2. Press...
Owner's Manual
Page 28
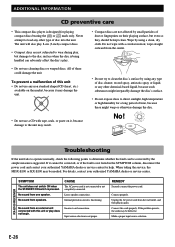
... fails to operate normally, check the following points to determine whether the fault can adversely affect the disc's play 8-cm (3-inch) compact discs. • Compact discs are not affected by using a clean, dry cloth. When taking the service, the MDX-E100 or KX-E100 may be needed. Loose speaker connections. E-26 Internal protection circuit is pressed. Connect the cords properly. Make a proper input source selection. wipe straight...
... fails to operate normally, check the following points to determine whether the fault can adversely affect the disc's play 8-cm (3-inch) compact discs. • Compact discs are not affected by using a clean, dry cloth. When taking the service, the MDX-E100 or KX-E100 may be needed. Loose speaker connections. E-26 Internal protection circuit is pressed. Connect the cords properly. Make a proper input source selection. wipe straight...
Owner's Manual
Page 29
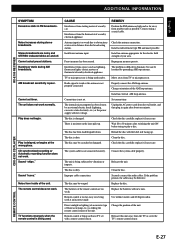
Cannot select preset stations. The remote control does not work . Interference from sources such as possible. Radio signal is weak or the antenna is not connected securely. Properly connect the AM loop antenna. Install an external AM loop antenna. Unplug the AC power cord from inside of your area. replace it if necessary. Reload the disc with low voltage. Improper cable connections. Replace the disc. Stereo broadcasts are too weak. Play is delayed, or begins at an incorrect...
Cannot select preset stations. The remote control does not work . Interference from sources such as possible. Radio signal is weak or the antenna is not connected securely. Properly connect the AM loop antenna. Install an external AM loop antenna. Unplug the AC power cord from inside of your area. replace it if necessary. Reload the disc with low voltage. Improper cable connections. Replace the disc. Stereo broadcasts are too weak. Play is delayed, or begins at an incorrect...


