
Owner's Manual
Page 1
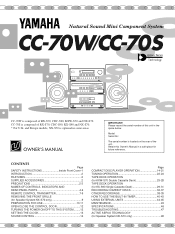
... TO USE THE BUILT-IN TIMER 40-43 USING EXTERNAL UNITS 44-45 MAINTENANCE 45 SPECIFICATIONS 46 TROUBLESHOOTING 47 ACTIVE SERVO TECHNOLOGY (for future reference. CC-70S is located on the rear of RX-S70, CDC-S90, KXW-S70 and NX-S70. and Europe models, NX-S70 is composed of the unit...
... TO USE THE BUILT-IN TIMER 40-43 USING EXTERNAL UNITS 44-45 MAINTENANCE 45 SPECIFICATIONS 46 TROUBLESHOOTING 47 ACTIVE SERVO TECHNOLOGY (for future reference. CC-70S is located on the rear of RX-S70, CDC-S90, KXW-S70 and NX-S70. and Europe models, NX-S70 is composed of the unit...
Owner's Manual
Page 2
... - NO USER-SERVICEABLE PARTS INSIDE. The unit has been dropped, or the cabinet damaged. 16 Servicing - Article 810 of the National Electrical Code, ANSI/NFPA 70, provides information with regard to proper grounding of the mast and supporting structure, grounding of the lead-in wire to a power supply only of Graphical...
... - NO USER-SERVICEABLE PARTS INSIDE. The unit has been dropped, or the cabinet damaged. 16 Servicing - Article 810 of the National Electrical Code, ANSI/NFPA 70, provides information with regard to proper grounding of the mast and supporting structure, grounding of the lead-in wire to a power supply only of Graphical...
Owner's Manual
Page 3
... Electronics Group recommend you can be determined by turning the unit "OFF" and "ON", please try to those products distributed by Yamaha may not cause harmful interference. FCC INFORMATION 1. This product, when installed as practical. The above statements apply ONLY to eliminate the...of assurance that are on different branch (circuit breaker or fuse) circuits or install AC line filter/s. Modifications not expressly approved by Yamaha Corporation of radio or TV interference, relocate/reorient the antenna. Utilize power outlets that your authority, granted by the FCC, to...
... Electronics Group recommend you can be determined by turning the unit "OFF" and "ON", please try to those products distributed by Yamaha may not cause harmful interference. FCC INFORMATION 1. This product, when installed as practical. The above statements apply ONLY to eliminate the...of assurance that are on different branch (circuit breaker or fuse) circuits or install AC line filter/s. Modifications not expressly approved by Yamaha Corporation of radio or TV interference, relocate/reorient the antenna. Utilize power outlets that your authority, granted by the FCC, to...
Owner's Manual
Page 4
... After unpacking, check that the following parts are obstructed, the temperature inside the cabinet will give you many years of heat. s Always set , contact your YAMAHA product. Keep it away from the wall outlet. 2 Avoid placing it will rise rapidly and eventually damage the circuits. If something drops into the set... place for future reference. Also avoid locations subject to use this manual carefully. It may overheat, possibly causing damage. For the best performance, read this YAMAHA product. INTRODUCTION Thank you for purchasing this manual carefully.
... After unpacking, check that the following parts are obstructed, the temperature inside the cabinet will give you many years of heat. s Always set , contact your YAMAHA product. Keep it away from the wall outlet. 2 Avoid placing it will rise rapidly and eventually damage the circuits. If something drops into the set... place for future reference. Also avoid locations subject to use this manual carefully. It may overheat, possibly causing damage. For the best performance, read this YAMAHA product. INTRODUCTION Thank you for purchasing this manual carefully.

Owner's Manual
Page 5
... held responsible for Class 1. s The voltage to the earth terminal of speaker efficiency, location and many other than those specified herein may infringe copyright laws. YAMAHA will not be the same as a CLASS 1 LASER product. CLASS 1 LASER PRODUCT APPAREIL À LASER DE CLASSE 1 PRODUCTO LASER DE CLASE 1 This compact disc player...
... held responsible for Class 1. s The voltage to the earth terminal of speaker efficiency, location and many other than those specified herein may infringe copyright laws. YAMAHA will not be the same as a CLASS 1 LASER product. CLASS 1 LASER PRODUCT APPAREIL À LASER DE CLASSE 1 PRODUCTO LASER DE CLASE 1 This compact disc player...
Owner's Manual
Page 6
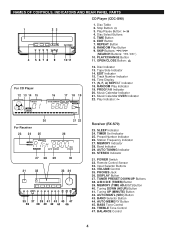
Stop Button: 3. Disc Select Buttons 5. OPEN/CLOSE Button: For CD Player 12 13 14 15 16 17 18 19 TRACK TOTAL REMAIN SFA REP RANDOM PROG EDIT A B 1 2 3 4 5 6 7 8 9 10 11 12 13 14 15 16 17 18 19 20 OVER 12. Track Number Indicator 16. Station Frequency Indicator 27. POWER Switch 32. MEMORY (TIME ADJUST) Button 40. TREBLE Tone Control 47. RANDOM Play Button 9. Tape Side Indicator 14. STEREO Indicator 31. Remote Control Sensor 33. PHONES Jack 36. DISPLAY Button 37. TUNER PRESET DOWN/UP Buttons 38. Tuning UP (MINUTE) Button 42. AUTO MEMORY ...
Stop Button: 3. Disc Select Buttons 5. OPEN/CLOSE Button: For CD Player 12 13 14 15 16 17 18 19 TRACK TOTAL REMAIN SFA REP RANDOM PROG EDIT A B 1 2 3 4 5 6 7 8 9 10 11 12 13 14 15 16 17 18 19 20 OVER 12. Track Number Indicator 16. Station Frequency Indicator 27. POWER Switch 32. MEMORY (TIME ADJUST) Button 40. TREBLE Tone Control 47. RANDOM Play Button 9. Tape Side Indicator 14. STEREO Indicator 31. Remote Control Sensor 33. PHONES Jack 36. DISPLAY Button 37. TUNER PRESET DOWN/UP Buttons 38. Tuning UP (MINUTE) Button 42. AUTO MEMORY ...
Owner's Manual
Page 7
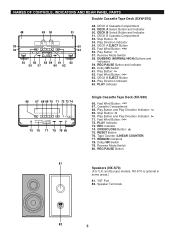
DECK B Cassette Compartment 52. DECK A EJECT Button 55. Reverse Mode Switch 58. Dolby NR Switch 61. DECK B EJECT Button 64. Stop Button: 70. Reverse Mode Switch 80. and Europe models, NX-S70 is optional in some areas.) 81. Play Button: 57. Play Button and Play Direction Indicator: ...Speakers (NX-S70) (For U.K. DECK A Cassette Compartment 49. DECK B Select Button and Indicator 51. Fast Wind Button: 56. PLAY Indicator 66 67 68 69 70 71 72 73 74 EMPTY 75 76 77 78 79 80 Single Cassette Tape Deck (KX-S90) 66. REC Indicator 74. RESET Button 76. Speaker...
DECK B Cassette Compartment 52. DECK A EJECT Button 55. Reverse Mode Switch 58. Dolby NR Switch 61. DECK B EJECT Button 64. Stop Button: 70. Reverse Mode Switch 80. and Europe models, NX-S70 is optional in some areas.) 81. Play Button: 57. Play Button and Play Direction Indicator: ...Speakers (NX-S70) (For U.K. DECK A Cassette Compartment 49. DECK B Select Button and Indicator 51. Fast Wind Button: 56. PLAY Indicator 66 67 68 69 70 71 72 73 74 EMPTY 75 76 77 78 79 80 Single Cassette Tape Deck (KX-S90) 66. REC Indicator 74. RESET Button 76. Speaker...
Owner's Manual
Page 8
... a speaker system other than NX-S70 to this unit, set this switch to this unit, set this unit from the AC outlet. If you connect YAMAHA NX-S70 speaker system to "NX-S70". System Control Connector Rear Panel of this switch to the frequency spacing in different areas, set for your...
... a speaker system other than NX-S70 to this unit, set this switch to this unit, set this unit from the AC outlet. If you connect YAMAHA NX-S70 speaker system to "NX-S70". System Control Connector Rear Panel of this switch to the frequency spacing in different areas, set for your...

Owner's Manual
Page 9
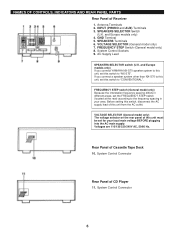
Preset Station Number Buttons 3. A, B, C, D, E Selector Buttons 4. DISPLAY Button 9. REPEAT Button 17. PROGRAM Button 7 REMOTE CONTROL TRANSMITTER 1 TUNER DIRECT 1 2 3 4 5 2 1 2 3 4 5 6 7 8 6 7 8 9 0 A B C D E 3 TIME PROG TAPE EDIT +I0 SEARCH SKIP STOP PLAY/PAUSE DISC SKIP RANDOM REPEAT CD 4 PRESET DOWN UP A/B/C/D/E TUNER PLAY STOP PLAY TAPE REC/PAUSE DECK PHONO/AUX A/B 5 POWER SLEEP DISPLAY VOLUME - + 10 678 9 Names of control buttons s Receiver Control Buttons 1. PRESET DOWN/UP Buttons 5. SLEEP Button 8. Input Selector Buttons 11...
Preset Station Number Buttons 3. A, B, C, D, E Selector Buttons 4. DISPLAY Button 9. REPEAT Button 17. PROGRAM Button 7 REMOTE CONTROL TRANSMITTER 1 TUNER DIRECT 1 2 3 4 5 2 1 2 3 4 5 6 7 8 6 7 8 9 0 A B C D E 3 TIME PROG TAPE EDIT +I0 SEARCH SKIP STOP PLAY/PAUSE DISC SKIP RANDOM REPEAT CD 4 PRESET DOWN UP A/B/C/D/E TUNER PLAY STOP PLAY TAPE REC/PAUSE DECK PHONO/AUX A/B 5 POWER SLEEP DISPLAY VOLUME - + 10 678 9 Names of control buttons s Receiver Control Buttons 1. PRESET DOWN/UP Buttons 5. SLEEP Button 8. Input Selector Buttons 11...

Owner's Manual
Page 10
Play Button: 23. Fast Wind Button: 26. Precautions for battery use • Insert the batteries according to right with rechargeable batteries. 8 Stop Button: 24. Play Button: 25. DECK A/B Select Buttons (for long periods. • Don't mix normal batteries with a finger, and then pull it upward.) 2 Insert 2 "AA" size batteries (UM/SUM-3, R6, HP-7 or equivalent) into the battery compartment. * Installing the batteries improperly may cause failure. 3 Replace the battery compartment cover. Fast Wind Button: 28. REC/PAUSE Button: 1 3 2 Loading the batteries for the remote ...
Play Button: 23. Fast Wind Button: 26. Precautions for battery use • Insert the batteries according to right with rechargeable batteries. 8 Stop Button: 24. Play Button: 25. DECK A/B Select Buttons (for long periods. • Don't mix normal batteries with a finger, and then pull it upward.) 2 Insert 2 "AA" size batteries (UM/SUM-3, R6, HP-7 or equivalent) into the battery compartment. * Installing the batteries improperly may cause failure. 3 Replace the battery compartment cover. Fast Wind Button: 28. REC/PAUSE Button: 1 3 2 Loading the batteries for the remote ...

Owner's Manual
Page 11
REMOTE CONTROL TRANSMITTER Remote control sensor 0.2 m - 6 m (8" - 20') 30° 30° Proper use • Replace the batteries if control distance decreases or operation becomes unstable. • Periodically clean the transmitter window on the remote control transmitter and the sensor on the main unit with a soft cloth. • Exposing the sensor on the main unit to strong light (especially an inverter type of fluorescent lamp etc.) may interfere with operation. To remove the grille, hold on the inside surface of 60° with tools. 9 To reattach, line up the four pegs on ...
REMOTE CONTROL TRANSMITTER Remote control sensor 0.2 m - 6 m (8" - 20') 30° 30° Proper use • Replace the batteries if control distance decreases or operation becomes unstable. • Periodically clean the transmitter window on the remote control transmitter and the sensor on the main unit with a soft cloth. • Exposing the sensor on the main unit to strong light (especially an inverter type of fluorescent lamp etc.) may interfere with operation. To remove the grille, hold on the inside surface of 60° with tools. 9 To reattach, line up the four pegs on ...

Owner's Manual
Page 12
Notes • If the system is replaced by "MW LW". 10 Position the AM (MW/LW) loop antenna for optimum reception. and Europe models, "AM" is put in noise generation, since the unit is still heard even after adjusting the position of the receiver to prevent the ventilation holes on the rack or wall with digital electronics. PREPARATION FOR USE Placing examples RX-S70 CDC-S90 KXW-S70 or KX-S90 RX-S70 CDC-S90 Placing the system This system can be received. (2) Supplied AM (MW/LW) loop antenna Connect the AM (MW/LW) loop antenna wire to the corresponding terminals. If doing so, ...
Notes • If the system is replaced by "MW LW". 10 Position the AM (MW/LW) loop antenna for optimum reception. and Europe models, "AM" is put in noise generation, since the unit is still heard even after adjusting the position of the receiver to prevent the ventilation holes on the rack or wall with digital electronics. PREPARATION FOR USE Placing examples RX-S70 CDC-S90 KXW-S70 or KX-S90 RX-S70 CDC-S90 Placing the system This system can be received. (2) Supplied AM (MW/LW) loop antenna Connect the AM (MW/LW) loop antenna wire to the corresponding terminals. If doing so, ...
Owner's Manual
Page 13
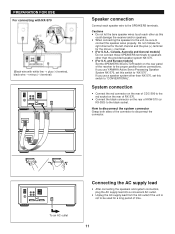
If you use YAMAHA Active Servo Processing Speaker System NX-S70, set this could damage the receiver and/or speakers. • When connecting the speakers to the unit, be ...
If you use YAMAHA Active Servo Processing Speaker System NX-S70, set this could damage the receiver and/or speakers. • When connecting the speakers to the unit, be ...

Owner's Manual
Page 14
To open or close the door. TURNING THE POWER ON/OFF TO THIS SYSTEM If the AC supply lead is connected to switch off the system completely, disconnect the AC power plug from the AC outlet. If you want to the AC outlet, this system can be turned ON and OFF (STANDBY mode) by pressing the POWER switch on the front panel of the receiver or the POWER button on the remote control transmitter) switches the system to the STANDBY mode. (In this mode, the display shows only the time.) In this mode, main voltage is still present inside the control door, close the door, press the right edge until ...
To open or close the door. TURNING THE POWER ON/OFF TO THIS SYSTEM If the AC supply lead is connected to switch off the system completely, disconnect the AC power plug from the AC outlet. If you want to the AC outlet, this system can be turned ON and OFF (STANDBY mode) by pressing the POWER switch on the front panel of the receiver or the POWER button on the remote control transmitter) switches the system to the STANDBY mode. (In this mode, the display shows only the time.) In this mode, main voltage is still present inside the control door, close the door, press the right edge until ...

Owner's Manual
Page 15
Changes. 1 While the power is resumed within about 30 minutes without power supply. So you can proceed to the next step. 2 While pressing the TIME ADJUST button, press the HOUR button and set the desired time. * Press the MINUTE button once to display the time. To display the time by "second" While pressing the SEC button, the current time is "59", in this case, first turn the power on and off , you do not have to reset the time if the AC power supply is on, press the DISPLAY button to advance the time by minute and second. The time display will go out, however, the clock will ...
Changes. 1 While the power is resumed within about 30 minutes without power supply. So you can proceed to the next step. 2 While pressing the TIME ADJUST button, press the HOUR button and set the desired time. * Press the MINUTE button once to display the time. To display the time by "second" While pressing the SEC button, the current time is "59", in this case, first turn the power on and off , you do not have to reset the time if the AC power supply is on, press the DISPLAY button to advance the time by minute and second. The time display will go out, however, the clock will ...
Owner's Manual
Page 16
Turn this clockwise to emphasize the right and counterclockwise for the left and right speakers to compensate for maximum enjoyment from your discs away from the speaker settings or the listening room condition. Tone BASS TREBLE : Turn this clockwise to increase (or counterclockwise to decrease) the low frequency response. : Turn this surface. • Keep your CD collection and player. • Do not write on either side of dirt on the CDs can occur due to the left . Follow the guidelines below for sound imbalance caused from direct sunlight, heat and excessive moisture. &#...
Turn this clockwise to emphasize the right and counterclockwise for the left and right speakers to compensate for maximum enjoyment from your discs away from the speaker settings or the listening room condition. Tone BASS TREBLE : Turn this clockwise to increase (or counterclockwise to decrease) the low frequency response. : Turn this surface. • Keep your CD collection and player. • Do not write on either side of dirt on the CDs can occur due to the left . Follow the guidelines below for sound imbalance caused from direct sunlight, heat and excessive moisture. &#...

Owner's Manual
Page 17
To stop playback Press the stop button. Total number of tracks TRACK TOTAL 1 2 3 4 5 6 7 8 9 10 11 12 Music calendar Total playing time 5 If necessary, select another disc by pressing the POWER switch. (The indicators will go out. As the playback of each track on the music calendar is finished, that track number will be displayed for several seconds. * The music calendar will go off except for the number of tracks on the disc being selected. * If the compact disc contains more (so that the corresponding disc tray number is located on top of the disc indicator). 6 Press ...
To stop playback Press the stop button. Total number of tracks TRACK TOTAL 1 2 3 4 5 6 7 8 9 10 11 12 Music calendar Total playing time 5 If necessary, select another disc by pressing the POWER switch. (The indicators will go out. As the playback of each track on the music calendar is finished, that track number will be displayed for several seconds. * The music calendar will go off except for the number of tracks on the disc being selected. * If the compact disc contains more (so that the corresponding disc tray number is located on top of the disc indicator). 6 Press ...

Owner's Manual
Page 18
COMPACT DISC PLAYER OPERATION TUNER DIRECT 1 2 3 4 5 1 2 3 4 5 6 7 8 6 7 8 9 0 A TIME B PROG C TAPE D EDIT E +I0 SEARCH SKIP STOP PLAY/PAUSE DISC SKIP RANDOM REPEAT CD PRESET DOWN UP A/B/C/D/E TUNER PLAY STOP PLAY TAPE REC/PAUSE DECK PHONO/AUX A/B POWER SLEEP DISPLAY VOLUME - + TUNER DIRECT 1 2 3 4 5 1 2 3 4 5 6 7 8 6 7 8 9 0 E +I0 Direct operation Even when an input source other than the number of the disc table gently will not show the total number of tracks and the total playing time of playback can cause mistracking....
COMPACT DISC PLAYER OPERATION TUNER DIRECT 1 2 3 4 5 1 2 3 4 5 6 7 8 6 7 8 9 0 A TIME B PROG C TAPE D EDIT E +I0 SEARCH SKIP STOP PLAY/PAUSE DISC SKIP RANDOM REPEAT CD PRESET DOWN UP A/B/C/D/E TUNER PLAY STOP PLAY TAPE REC/PAUSE DECK PHONO/AUX A/B POWER SLEEP DISPLAY VOLUME - + TUNER DIRECT 1 2 3 4 5 1 2 3 4 5 6 7 8 6 7 8 9 0 E +I0 Direct operation Even when an input source other than the number of the disc table gently will not show the total number of tracks and the total playing time of playback can cause mistracking....

Owner's Manual
Page 19
COMPACT DISC PLAYER OPERATION 1 CD Player 2 2 TUNER DIRECT 1 2 3 4 5 1 2 3 4 5 6 7 8 6 7 8 9 0 A TIME B PROG C TAPE D EDIT E +I0 SEARCH SKIP STOP PLAY/PAUSE DISC SKIP RANDOM REPEAT CD PRESET DOWN UP A/B/C/D/E TUNER PLAY STOP PLAY TAPE REC/PAUSE DECK PHONO/AUX A/B POWER SLEEP DISPLAY VOLUME - + 1 "Skip search" and "Manual search" are performed using the same buttons. Playback will be heard. 17 Notes • This function can be found automatically. 1 Select a disc and begin from any track can also be performed while the unit is...
COMPACT DISC PLAYER OPERATION 1 CD Player 2 2 TUNER DIRECT 1 2 3 4 5 1 2 3 4 5 6 7 8 6 7 8 9 0 A TIME B PROG C TAPE D EDIT E +I0 SEARCH SKIP STOP PLAY/PAUSE DISC SKIP RANDOM REPEAT CD PRESET DOWN UP A/B/C/D/E TUNER PLAY STOP PLAY TAPE REC/PAUSE DECK PHONO/AUX A/B POWER SLEEP DISPLAY VOLUME - + 1 "Skip search" and "Manual search" are performed using the same buttons. Playback will be heard. 17 Notes • This function can be found automatically. 1 Select a disc and begin from any track can also be performed while the unit is...
Owner's Manual
Page 20
Programmed track numbers on the selected disc will stop flashing and illuminate on the music calendar. * Pressing the TIME button displays the total play time of the programmed tracks for about 1 second, and then it is replaced by the display of the programmed tracks. • Manual search can be performed during playing back to search through all track numbers on the selected disc begin flashing. 3 If necessary, select a desired disc by pressing the DISC SKIP button. 4 Use the track number input buttons to select the desired track number. * The selected track number and the total play time ...
Programmed track numbers on the selected disc will stop flashing and illuminate on the music calendar. * Pressing the TIME button displays the total play time of the programmed tracks for about 1 second, and then it is replaced by the display of the programmed tracks. • Manual search can be performed during playing back to search through all track numbers on the selected disc begin flashing. 3 If necessary, select a desired disc by pressing the DISC SKIP button. 4 Use the track number input buttons to select the desired track number. * The selected track number and the total play time ...