Owners Manual
Page 2
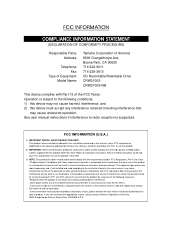
... generates/uses radio frequencies and, if not installed and used . See user manual instructions if interference to radio reception is subject to coaxial type cable. IMPORTANT NOTICE...the interference. Buena Park, CA 90620 714-522-9011 714-228-3913 CD Recordable/Rewritable Drive CRW2100S CRW2100S-NB This device complies with other electronic devices. This product...CONFORMITY PROCEDURE) Responsible Party: Address: Telephone: Fax: Type of Equipment: Model Name: Yamaha Corporation of radio or TV interference, relocate/reorient the antenna. Modifications not expressly approved by...
... generates/uses radio frequencies and, if not installed and used . See user manual instructions if interference to radio reception is subject to coaxial type cable. IMPORTANT NOTICE...the interference. Buena Park, CA 90620 714-522-9011 714-228-3913 CD Recordable/Rewritable Drive CRW2100S CRW2100S-NB This device complies with other electronic devices. This product...CONFORMITY PROCEDURE) Responsible Party: Address: Telephone: Fax: Type of Equipment: Model Name: Yamaha Corporation of radio or TV interference, relocate/reorient the antenna. Modifications not expressly approved by...
Owners Manual
Page 6
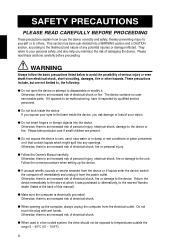
... modify it. Otherwise, there is an increased risk of damaging the device. q Follow the Owner's Manual carefully. q When opening up the device. Otherwise, there is an increased risk of personal injury, ...precautions explain how to use it near water or in a fan-cooled system, the drive should not be malfunctioning, have it inspected by qualified service personnel. They relate to your...Otherwise, there is an increased risk of electrical shock, fire or damage to the nearest Yamaha dealer (listed at which might spill into the device. Return the device immediately to ...
... modify it. Otherwise, there is an increased risk of damaging the device. q Follow the Owner's Manual carefully. q When opening up the device. Otherwise, there is an increased risk of personal injury, ...precautions explain how to use it near water or in a fan-cooled system, the drive should not be malfunctioning, have it inspected by qualified service personnel. They relate to your...Otherwise, there is an increased risk of electrical shock, fire or damage to the nearest Yamaha dealer (listed at which might spill into the device. Return the device immediately to ...
Owners Manual
Page 7
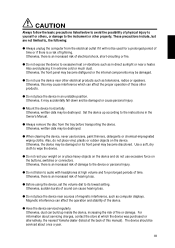
...Also, do not use excessive force on the device. Otherwise, the device may cause interference which the device was purchased or alternatively, the nearest Yamaha dealer (listed at high volume and for a prolonged period of time or if there is an increased risk of magnetic interference, such as in ...direct sunlight or near sources of damage to the instructions in the Owner's Manual. iii q Do not expose the device to , the following: q Always unplug the computer from the tray before transporting the device. Otherwise, ...
...Also, do not use excessive force on the device. Otherwise, the device may cause interference which the device was purchased or alternatively, the nearest Yamaha dealer (listed at high volume and for a prolonged period of time or if there is an increased risk of magnetic interference, such as in ...direct sunlight or near sources of damage to the instructions in the Owner's Manual. iii q Do not expose the device to , the following: q Always unplug the computer from the tray before transporting the device. Otherwise, ...

Owners Manual
Page 8
...read the following regarding the handling of this manual, either in part or in full, is expressly forbidden. Do not expose discs to change without adequate packing, the internal components may be damaged and cause the device to CD-R/RW, make sure that you are not infringing... excessive heat such as a result of using this manual belong to copy audio CDs for non-personal use. All trademarks contained in direct sunlight or near a heater. Reproduction of CD-R/RW discs. 1. It is transported without prior notice. 2. s WARRANTY YAMAHA AND SUPPLIERS ACCEPT NO LIABILITY FOR THE LOSS OF...
...read the following regarding the handling of this manual, either in part or in full, is expressly forbidden. Do not expose discs to change without adequate packing, the internal components may be damaged and cause the device to CD-R/RW, make sure that you are not infringing... excessive heat such as a result of using this manual belong to copy audio CDs for non-personal use. All trademarks contained in direct sunlight or near a heater. Reproduction of CD-R/RW discs. 1. It is transported without prior notice. 2. s WARRANTY YAMAHA AND SUPPLIERS ACCEPT NO LIABILITY FOR THE LOSS OF...

Owners Manual
Page 15
...stereo headphones to this control to set a suitable volume level when listening to an audio CD using the headphone jack. Headphone volume control Adjust this stereo mini jack and listen to ... unloading a disc. (P. 32) Eject button Press this button when you need to audio CDs loaded in the drive. Front and Rear of the CRW2100S drive. (P. 39) 6 Slide the knob to the left to decrease the volume and to... the right to hold the disc. It slides out from the drive unit when a disc needs to be loaded or unloaded. (P. 31) Manual Eject hole Only use this if no other method is used to increase...
...stereo headphones to this control to set a suitable volume level when listening to an audio CD using the headphone jack. Headphone volume control Adjust this stereo mini jack and listen to ... unloading a disc. (P. 32) Eject button Press this button when you need to audio CDs loaded in the drive. Front and Rear of the CRW2100S drive. (P. 39) 6 Slide the knob to the left to decrease the volume and to... the right to hold the disc. It slides out from the drive unit when a disc needs to be loaded or unloaded. (P. 31) Manual Eject hole Only use this if no other method is used to increase...
Owners Manual
Page 16
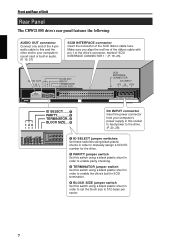
...from your computer's power supply in this socket to feed power to the drive. (P. 20, 28) 1 ID SELECT jumper switches Set these switches using black plastic shunts in order to manually assign a SCSI ID number for the drive. 2 PARITY jumper switch Set this switch using a black plastic shunt in... order to enable parity checking. 3 TERMINATOR jumper switch Set this switch using a black plastic shunt in order to enable the drive's built-in SCSI termination....
...from your computer's power supply in this socket to feed power to the drive. (P. 20, 28) 1 ID SELECT jumper switches Set these switches using black plastic shunts in order to manually assign a SCSI ID number for the drive. 2 PARITY jumper switch Set this switch using a black plastic shunt in... order to enable parity checking. 3 TERMINATOR jumper switch Set this switch using a black plastic shunt in order to enable the drive's built-in SCSI termination....
Owners Manual
Page 17
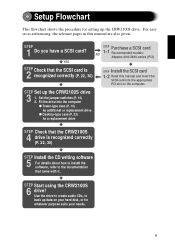
... SCSI card is recognized correctly (P. 22, 30) STEP Install the SCSI card 1-2 Read this manual are also given. Use the drive to create audio CDs, to the documentation that the CRW2100S 4 drive is recognized correctly (P. 22, 30) STEP Install the CD writing software 5 For details about how to install the software, refer to back up...
... SCSI card is recognized correctly (P. 22, 30) STEP Install the SCSI card 1-2 Read this manual are also given. Use the drive to create audio CDs, to the documentation that the CRW2100S 4 drive is recognized correctly (P. 22, 30) STEP Install the CD writing software 5 For details about how to install the software, refer to back up...

Owners Manual
Page 27
Setup Procedures 6 Connect one end of the card's SCSI connector. If your SCSI card requires that you manually disable internal termination, refer to the computer's SCSI card. With most cards, this is aligned with pin 1, marked "SCSI INTERFACE CONNECTOR 1." 50-pin SCSI flat ...-board internal SCSI termination must be switched ON. Next, connect a free 50-pin connector on the SCSI flat cable to the back of the CRW2100S drive such that came with Pin 1 of the 50-pin SCSI flat cable to the documentation that the red line on the cable is done automatically.
Setup Procedures 6 Connect one end of the card's SCSI connector. If your SCSI card requires that you manually disable internal termination, refer to the computer's SCSI card. With most cards, this is aligned with pin 1, marked "SCSI INTERFACE CONNECTOR 1." 50-pin SCSI flat ...-board internal SCSI termination must be switched ON. Next, connect a free 50-pin connector on the SCSI flat cable to the back of the CRW2100S drive such that came with Pin 1 of the 50-pin SCSI flat cable to the documentation that the red line on the cable is done automatically.

Owners Manual
Page 35
... the SCSI flat cable to the back of the CRW2100S drive such that the red line on -board internal SCSI termination must be switched ON. With most cards, this is aligned with it. 26 If your SCSI card requires that you manually disable internal termination, refer to the computer's SCSI card. SCSI...
... the SCSI flat cable to the back of the CRW2100S drive such that the red line on -board internal SCSI termination must be switched ON. With most cards, this is aligned with it. 26 If your SCSI card requires that you manually disable internal termination, refer to the computer's SCSI card. SCSI...

Owners Manual
Page 41
... a Disc in other situations, depending on the drive's front panel. Operation n It may occur if you can open for this too frequently. 1 Power down the computer. 2 Find a pin-like tool with a diameter of 2mm or less to fit through the Manual Eject hole on the SCSI command. Malfunctions may ... as a power outage, you do this purpose. 3 Push the tool gently into the Manual Eject hole until the springloaded mechanism ejects the tray and disc. 32 Otherwise, you risk damaging the drive or the disc. n A straightened large paper clip is being read or in an Emergency If the disc...
... a Disc in other situations, depending on the drive's front panel. Operation n It may occur if you can open for this too frequently. 1 Power down the computer. 2 Find a pin-like tool with a diameter of 2mm or less to fit through the Manual Eject hole on the SCSI command. Malfunctions may ... as a power outage, you do this purpose. 3 Push the tool gently into the Manual Eject hole until the springloaded mechanism ejects the tray and disc. 32 Otherwise, you risk damaging the drive or the disc. n A straightened large paper clip is being read or in an Emergency If the disc...
Owners Manual
Page 43
...161;P. 12) q Is the termination on the SCSI chain. Please read the manual that internal SCSI devices can still be set such that came with the software. q To write to ON only if it . q Is the CRW2100S drive powered up? Or if it does, contact the manufacturer of 11W (when reading...the disc tray correctly? If you use the eject command from within the software. Troubleshooting q Are the pins and holes on the CRW2100S drive set to CD-R/RW discs, your computer have a sufficient power supply? q Is the terminator on the SCSI connectors straight and not deformed?
...161;P. 12) q Is the termination on the SCSI chain. Please read the manual that internal SCSI devices can still be set such that came with the software. q To write to ON only if it . q Is the CRW2100S drive powered up? Or if it does, contact the manufacturer of 11W (when reading...the disc tray correctly? If you use the eject command from within the software. Troubleshooting q Are the pins and holes on the CRW2100S drive set to CD-R/RW discs, your computer have a sufficient power supply? q Is the terminator on the SCSI connectors straight and not deformed?

Owners Manual
Page 51
Index Symbols 4-pin power cable 20, 28 4-pin power connector 24 A additional drive 14 audio cable 19, 27 AUDIO OUT 7, 19, 27 B BIOS 33 block size 7, 13 Buffer Underrun 3, 35 C CD-DA 5 CD-R discs 4 CD-RW discs 4 D Data CD 5 DC INPUT 7, 20, 28 Device Manager 22, 30 disc tray 6 Disc-at... 1, 2 jumper switches 10 Appendix L lead-in 36 lead-out 36 LED 6, 39 Loading a disc 31 Long-Nosed Pliers 5 lug 19, 27 M Manual Eject hole 6, 32 Multisession 36 P Packet Writing 37 packet 37 paper clip 32 parity 7, 12 Partial CAV 2 Phillips Screwdriver 5 Pure-Phase Laser System 1,...
Index Symbols 4-pin power cable 20, 28 4-pin power connector 24 A additional drive 14 audio cable 19, 27 AUDIO OUT 7, 19, 27 B BIOS 33 block size 7, 13 Buffer Underrun 3, 35 C CD-DA 5 CD-R discs 4 CD-RW discs 4 D Data CD 5 DC INPUT 7, 20, 28 Device Manager 22, 30 disc tray 6 Disc-at... 1, 2 jumper switches 10 Appendix L lead-in 36 lead-out 36 LED 6, 39 Loading a disc 31 Long-Nosed Pliers 5 lug 19, 27 M Manual Eject hole 6, 32 Multisession 36 P Packet Writing 37 packet 37 paper clip 32 parity 7, 12 Partial CAV 2 Phillips Screwdriver 5 Pure-Phase Laser System 1,...