
User Guide
Page 10
...; x 14 in. (98 to 216 x 315/330 mm) 20 lb / 80 g/m² 14 - 34 lb 52 - 130 g/m² 20 lb / 80 g/m² XE86: 200 sheets XE88: 250 sheets Yes (1 at a time) COM-10 (4.1 x 9.5 in. / 216 x 279 mm) Monarch (3.87 x 7.5 in. / 98.5 x 191 mm) C5 (6.4 x 9.16 in. / 162 x 229 mm) DL (4.4 x 8.8 in... the paper feeding mechanism and will scratch the drum and damage other parts of the WorkCentre. Caution: Do not insert paper with metallic attachments such as staples or paper clips, nor place anything on top of the...
...; x 14 in. (98 to 216 x 315/330 mm) 20 lb / 80 g/m² 14 - 34 lb 52 - 130 g/m² 20 lb / 80 g/m² XE86: 200 sheets XE88: 250 sheets Yes (1 at a time) COM-10 (4.1 x 9.5 in. / 216 x 279 mm) Monarch (3.87 x 7.5 in. / 98.5 x 191 mm) C5 (6.4 x 9.16 in. / 162 x 229 mm) DL (4.4 x 8.8 in... the paper feeding mechanism and will scratch the drum and damage other parts of the WorkCentre. Caution: Do not insert paper with metallic attachments such as staples or paper clips, nor place anything on top of the...
User Guide
Page 23
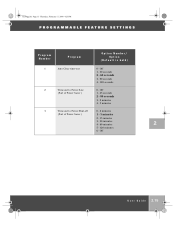
Off U s e r G u i d e 2.15 Off (Part of Power Saver ) 1 - 5 minutes 2 - 15 minutes 3 - 30 minutes 4 - 60 minutes 2 5 - 120 minutes 6 - Xe88qrg.bk Page 15 Thursday, February 17, 2000 4:25 PM PROGRAMMABLE FEATURE SETTINGS Program Number Program Option Number/ Option (Default is bold) 1 Auto Clear time-out 0 - Off 1 - 30 seconds 2 - 60 seconds 3 - 90 seconds 4 - 120 seconds 2 Time-out to Power Shut-off 0 - 2 minutes (Part of Power Saver ) 1 - 45 seconds 2 - 90 seconds 3 - 2 minutes 4 - 5 minutes 3 Time-out to Power Save 0 -
Off U s e r G u i d e 2.15 Off (Part of Power Saver ) 1 - 5 minutes 2 - 15 minutes 3 - 30 minutes 4 - 60 minutes 2 5 - 120 minutes 6 - Xe88qrg.bk Page 15 Thursday, February 17, 2000 4:25 PM PROGRAMMABLE FEATURE SETTINGS Program Number Program Option Number/ Option (Default is bold) 1 Auto Clear time-out 0 - Off 1 - 30 seconds 2 - 60 seconds 3 - 90 seconds 4 - 120 seconds 2 Time-out to Power Shut-off 0 - 2 minutes (Part of Power Saver ) 1 - 45 seconds 2 - 90 seconds 3 - 2 minutes 4 - 5 minutes 3 Time-out to Power Save 0 -

User Guide
Page 46
..., February 17, 2000 4:25 PM PROBLEMS AND SOLUTIONS Problem WorkCentre Suggested Solution All of the page is blank. - The WorkCentre does not print. - Test printer after removing any pass through devices. Uninstall, then reinstall the WorkCentre printing software. Reduce the resolution setting from side to side ...down on the document glass. Check power and cable connections to Enabling High Speen Printer Communications in the Windows Control Panel to the correct port. (For Example: LPT1.) - Part of the page is blank. For USB connections, check the USB/LPT devices...
..., February 17, 2000 4:25 PM PROBLEMS AND SOLUTIONS Problem WorkCentre Suggested Solution All of the page is blank. - The WorkCentre does not print. - Test printer after removing any pass through devices. Uninstall, then reinstall the WorkCentre printing software. Reduce the resolution setting from side to side ...down on the document glass. Check power and cable connections to Enabling High Speen Printer Communications in the Windows Control Panel to the correct port. (For Example: LPT1.) - Part of the page is blank. For USB connections, check the USB/LPT devices...

User Guide
Page 47
CLEANING AND MAINTENANCE Warning: Always unplug the power cord before cleaning any water drip onto the WorkCentre or inside it. Xe88qrg.bk Page 1 Thursday, February 17, 2000 4:25 PM C h a p t e r S6 i x Cleaning the Outside Clean the outside surfaces of the WorkCentre by wiping them with a soft, clean, lint-free cloth. • Keep the front cover closed when cleaning the outside of the WorkCentre. • You can dampen the cloth slightly with water, but be careful not to let any part of the WorkCentre. 6 U s e r G u i d e 6.1
CLEANING AND MAINTENANCE Warning: Always unplug the power cord before cleaning any water drip onto the WorkCentre or inside it. Xe88qrg.bk Page 1 Thursday, February 17, 2000 4:25 PM C h a p t e r S6 i x Cleaning the Outside Clean the outside surfaces of the WorkCentre by wiping them with a soft, clean, lint-free cloth. • Keep the front cover closed when cleaning the outside of the WorkCentre. • You can dampen the cloth slightly with water, but be careful not to let any part of the WorkCentre. 6 U s e r G u i d e 6.1
User Guide
Page 48
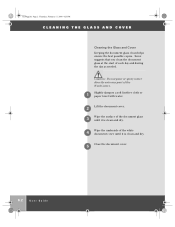
Xerox suggests that you clean the document glass at the start of the white document cover until it is clean and dry. 4 Wipe the underside of ... of the document glass until it is clean and dry. 5 Close the document cover. 6.2 U s e r G u i d e Caution: Do not pour or spray water directly onto any part of the WorkCentre. 1 Slightly dampen a soft lint-free cloth or paper towel with water. Xe88qrg.bk Page 2 Thursday, February 17, 2000 4:25 PM CLEANING THE GLASS AND...
Xerox suggests that you clean the document glass at the start of the white document cover until it is clean and dry. 4 Wipe the underside of ... of the document glass until it is clean and dry. 5 Close the document cover. 6.2 U s e r G u i d e Caution: Do not pour or spray water directly onto any part of the WorkCentre. 1 Slightly dampen a soft lint-free cloth or paper towel with water. Xe88qrg.bk Page 2 Thursday, February 17, 2000 4:25 PM CLEANING THE GLASS AND...

User Guide
Page 51
....bk Page 1 Thursday, February 17, 2000 4:25 PM C h a p t e r S7 e v e n The toner cartridge and the drum cartridge in your WorkCentre are as follows. The part numbers for these parts will need to be replaced. This means that after a certain period of drum cartridges, toner cartridges, and other supplies are customer maintenance responsibilities and are...
....bk Page 1 Thursday, February 17, 2000 4:25 PM C h a p t e r S7 e v e n The toner cartridge and the drum cartridge in your WorkCentre are as follows. The part numbers for these parts will need to be replaced. This means that after a certain period of drum cartridges, toner cartridges, and other supplies are customer maintenance responsibilities and are...