Service Manual
Page 9
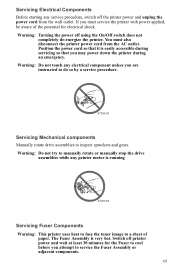
... If you attempt to a sheet of the potential for the Fuser to cool before you must also disconnect the printer power cord from the wall outlet. Switch off printer power and wait at least 30 minutes for electrical shock. Warning: Do not try to manually rotate or manually ...stop the drive assemblies while any printer motor is running S7300-03 Servicing Fuser Components Warning: This printer uses heat to fuse the toner image to service the Fuser Assembly or adjacent components. The Fuser Assembly is easily accessible during...
... If you attempt to a sheet of the potential for the Fuser to cool before you must also disconnect the printer power cord from the wall outlet. Switch off printer power and wait at least 30 minutes for electrical shock. Warning: Do not try to manually rotate or manually ...stop the drive assemblies while any printer motor is running S7300-03 Servicing Fuser Components Warning: This printer uses heat to fuse the toner image to service the Fuser Assembly or adjacent components. The Fuser Assembly is easily accessible during...
Service Manual
Page 15
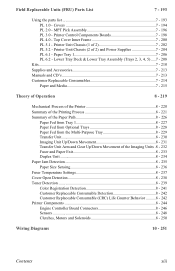
... Paper Jam Detection 8 - 235 Paper Size Sensing 8 - 236 Fuser Temperature Settings 8 - 237 Cover Open Detection 8 - 238 Toner Detection 8 - 239 Color Registration Detection 8 - 241 Customer Replaceable Consumable Detection 8 - 242 Customer Replaceable Consumable (CRC) Life Counter Behavior ..........8 - 242 Printer Components 8 - 244 Engine Controller Board Connectors 8 - 246 Sensors...8 - 248 Clutches, Motors and Solenoids 8 - 250 Wiring Diagrams...
... Paper Jam Detection 8 - 235 Paper Size Sensing 8 - 236 Fuser Temperature Settings 8 - 237 Cover Open Detection 8 - 238 Toner Detection 8 - 239 Color Registration Detection 8 - 241 Customer Replaceable Consumable Detection 8 - 242 Customer Replaceable Consumable (CRC) Life Counter Behavior ..........8 - 242 Printer Components 8 - 244 Engine Controller Board Connectors 8 - 246 Sensors...8 - 248 Clutches, Motors and Solenoids 8 - 250 Wiring Diagrams...
Service Manual
Page 30
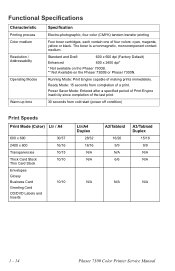
... Modes Warm-up time Specification Electro-photographic, four color (CMYK) tandem transfer printing Four toner cartridges, each contain one of making prints immediately. Ready Mode: 15 seconds from cold start (power off condition) Print Speeds Print Mode (Color) Ltr / A4 600 x 600 2400 x ... 28/32 16/16 N/A N/A N/A A3/Tabloid 16/20 9/9 N/A 6/6 A3/Tabloid Duplex 15/18 9/9 N/A N/A N/A N/A 1 - 14 Phaser 7300 Color Printer Service Manual Power Saver Mode: Entered after a specified period of Print Engine inactivity since completion of the last print. 30 seconds from completion of a ...
... Modes Warm-up time Specification Electro-photographic, four color (CMYK) tandem transfer printing Four toner cartridges, each contain one of making prints immediately. Ready Mode: 15 seconds from cold start (power off condition) Print Speeds Print Mode (Color) Ltr / A4 600 x 600 2400 x ... 28/32 16/16 N/A N/A N/A A3/Tabloid 16/20 9/9 N/A 6/6 A3/Tabloid Duplex 15/18 9/9 N/A N/A N/A N/A 1 - 14 Phaser 7300 Color Printer Service Manual Power Saver Mode: Entered after a specified period of Print Engine inactivity since completion of the last print. 30 seconds from completion of a ...

Service Manual
Page 31
... (CH) -1000 to -1400+50V Voltage to charge roller (DB) -50 to -300V/+300V Voltage to developing roller (SB) -300 to -450/0V Voltage to toner supply roller (TR) C: 0 to 7KV K,Y,M: 0 TO 6KV Voltage to transfer unit (variable) Environmental Specifications Characteristic Temperature Operating Storage Transport Humidity Operating Storage Transport Altitude Operating...
... (CH) -1000 to -1400+50V Voltage to charge roller (DB) -50 to -300V/+300V Voltage to developing roller (SB) -300 to -450/0V Voltage to toner supply roller (TR) C: 0 to 7KV K,Y,M: 0 TO 6KV Voltage to transfer unit (variable) Environmental Specifications Characteristic Temperature Operating Storage Transport Humidity Operating Storage Transport Altitude Operating...

Service Manual
Page 38
... 55 Adjust Tray [2] Size 56 Adjust Tray [3] Size 57 Adjust Tray [4] Size 58 Adjust Tray [5] Size 59 Replace Cyan Toner Cartridge 65 Replace Magenta Toner Cartridge 66 Replace Yellow Toner Cartridge 67 Replace Black Toner Cartridge 68 Replace Cyan Imaging Unit 69 Replace Magenta Imaging Unit 70 Replace Yellow Imaging Unit 71 Replace Black... 2 - 47 2 - 47 2 - 53 2 - 53 2 - 53 2 - 53 2 - 52 2 - 52 2 - 52 2 - 52 2 - 55 2 - 49 2 - 49 2 - 49 2 - 49 2 - 49 2 - 49 2 - 48 2 - 50 2 - 44 2 - 44 2 - 44 2 - 44 2 - 44 2-22 Phaser 7300 Color Printer Service Manual
... 55 Adjust Tray [2] Size 56 Adjust Tray [3] Size 57 Adjust Tray [4] Size 58 Adjust Tray [5] Size 59 Replace Cyan Toner Cartridge 65 Replace Magenta Toner Cartridge 66 Replace Yellow Toner Cartridge 67 Replace Black Toner Cartridge 68 Replace Cyan Imaging Unit 69 Replace Magenta Imaging Unit 70 Replace Yellow Imaging Unit 71 Replace Black... 2 - 47 2 - 47 2 - 53 2 - 53 2 - 53 2 - 53 2 - 52 2 - 52 2 - 52 2 - 52 2 - 55 2 - 49 2 - 49 2 - 49 2 - 49 2 - 49 2 - 49 2 - 48 2 - 50 2 - 44 2 - 44 2 - 44 2 - 44 2 - 44 2-22 Phaser 7300 Color Printer Service Manual

Service Manual
Page 39
... Tray [4] with [size*] [type*] Load Tray [5] with [size*] [type*] Load MPT with [size*] [type*] Install or Reseat Toner Cartridge Cyan Install or Reseat Toner Cartridge Magenta Install or Reseat Toner Cartridge Yellow Install or Reseat Toner Cartridge Black Install or Reseat Cyan Imaging Unit Install or Reseat Magenta Imaging Unit Install or Reseat Yellow...
... Tray [4] with [size*] [type*] Load Tray [5] with [size*] [type*] Load MPT with [size*] [type*] Install or Reseat Toner Cartridge Cyan Install or Reseat Toner Cartridge Magenta Install or Reseat Toner Cartridge Yellow Install or Reseat Toner Cartridge Black Install or Reseat Cyan Imaging Unit Install or Reseat Magenta Imaging Unit Install or Reseat Yellow...
Service Manual
Page 40
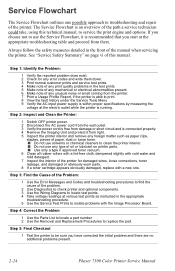
... Flowchart, it from light. 5 Inspect the printer interior and remove any foreign matter such as instructed in the front of the printer for damaged wires, loose connections, toner leakage, and damaged or obviously worn parts. 8 If a toner cartridge appears obviously damaged, replace with the Image...the Wiring Diagrams to replace the part. If you have corrected the initial problem and there are no additional problems present. 2-24 Phaser 7300 Color Printer Service Manual Step 4: Correct the Problem 1 Use the Parts List to locate a part number 2 Use the Removal and Replacement Procedures...
... Flowchart, it from light. 5 Inspect the printer interior and remove any foreign matter such as instructed in the front of the printer for damaged wires, loose connections, toner leakage, and damaged or obviously worn parts. 8 If a toner cartridge appears obviously damaged, replace with the Image...the Wiring Diagrams to replace the part. If you have corrected the initial problem and there are no additional problems present. 2-24 Phaser 7300 Color Printer Service Manual Step 4: Correct the Problem 1 Use the Parts List to locate a part number 2 Use the Removal and Replacement Procedures...
Service Manual
Page 43
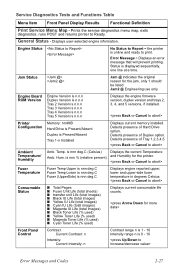
... Cyan IU Life (total images) ■ Magenta IU Life (total images) ■ Black Toner Life (% used) ■ Yellow Toner Life (% used) ■ Magenta Toner Life (% used) ■ Cyan Toner Life (% used) Displays engine reported upper, lower and upper-side fuser temperature in degrees Celsius ...is Present/Absent Tray 1-n Installed Displays current memory installed. Prints the service diagnostics menu map, exits diagnostics, runs POST and returns printer to print. Error Message = Displays an error message that will prevent printing. Temp. is displayed sequentially, one line at a ...
... Cyan IU Life (total images) ■ Magenta IU Life (total images) ■ Black Toner Life (% used) ■ Yellow Toner Life (% used) ■ Magenta Toner Life (% used) ■ Cyan Toner Life (% used) Displays engine reported upper, lower and upper-side fuser temperature in degrees Celsius ...is Present/Absent Tray 1-n Installed Displays current memory installed. Prints the service diagnostics menu map, exits diagnostics, runs POST and returns printer to print. Error Message = Displays an error message that will prevent printing. Temp. is displayed sequentially, one line at a ...
Service Manual
Page 48
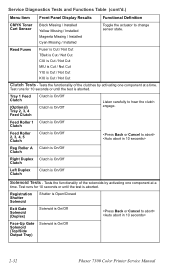
... Clutch is Cut / Not Cut Clutch Tests - Test runs for 10 seconds or until the test is On/Off 2-32 Phaser 7300 Color Printer Service Manual Registration Shutter Solenoid Shutter is Open/Closed Exit Gate Solenoid (Duplex) Solenoid is On/Off Face-Up Gate Solenoid (...to change sensor state. Service Diagnostics Tests and Functions Table (cont'd.) Menu Item Front Panel Display Results Functional Definition CMYK Toner Cart Sensor Black Missing / Installed Yellow Missing / Installed Magenta Missing / Installed Cyan Missing / Installed Toggle the actuator to hear the clutch...
... Clutch is Cut / Not Cut Clutch Tests - Test runs for 10 seconds or until the test is On/Off 2-32 Phaser 7300 Color Printer Service Manual Registration Shutter Solenoid Shutter is Open/Closed Exit Gate Solenoid (Duplex) Solenoid is On/Off Face-Up Gate Solenoid (...to change sensor state. Service Diagnostics Tests and Functions Table (cont'd.) Menu Item Front Panel Display Results Functional Definition CMYK Toner Cart Sensor Black Missing / Installed Yellow Missing / Installed Magenta Missing / Installed Cyan Missing / Installed Toggle the actuator to hear the clutch...
Service Manual
Page 52
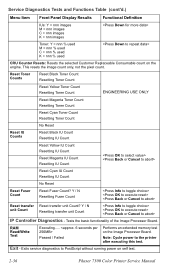
...Phaser 7300 Color Printer Service Manual Tests the basic functionality of the Image Processor Board. Reset Toner Counts Reset Black Toner Count Resetting Toner Count Reset Yellow Toner Count Resetting Toner Count ENGINEERING USE ONLY Reset Magenta Toner Count Resetting Toner Count Reset Cyan Toner Count Resetting Toner...Table (cont'd.) Menu Item Front Panel Display Results Functional Definition IUs: Y = nnn images M = nnn images C = nnn images K = nnn images Toner: Y = nnn % used M = nnn % used C = nnn % used K = nnn % used CRU Counter Resets: Resets the selected Customer ...
...Phaser 7300 Color Printer Service Manual Tests the basic functionality of the Image Processor Board. Reset Toner Counts Reset Black Toner Count Resetting Toner Count Reset Yellow Toner Count Resetting Toner Count ENGINEERING USE ONLY Reset Magenta Toner Count Resetting Toner Count Reset Cyan Toner Count Resetting Toner...Table (cont'd.) Menu Item Front Panel Display Results Functional Definition IUs: Y = nnn images M = nnn images C = nnn images K = nnn images Toner: Y = nnn % used M = nnn % used C = nnn % used K = nnn % used CRU Counter Resets: Resets the selected Customer ...
Service Manual
Page 53
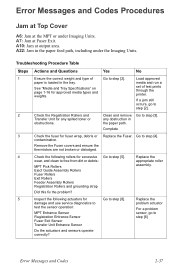
Troubleshooting Procedure Table Steps Actions and Questions Yes No 1 Ensure the correct weight and type of test prints through the printer. contamination. If a jam still occurs, go to Registration Entrance Sensor step [6] Fuser Exit Sensor Transfer Unit Entrance Sensor Do the ...media types and weights. Error Messages and Codes 2-37 media and run a See "Media and Tray Specifications" on page 1-16 for any spilled toner or any obstruction in the tray. Complete 3 Check the fuser for fuser wrap, debris or Replace the Fuser. set of Go to step [3]....
Troubleshooting Procedure Table Steps Actions and Questions Yes No 1 Ensure the correct weight and type of test prints through the printer. contamination. If a jam still occurs, go to Registration Entrance Sensor step [6] Fuser Exit Sensor Transfer Unit Entrance Sensor Do the ...media types and weights. Error Messages and Codes 2-37 media and run a See "Media and Tray Specifications" on page 1-16 for any spilled toner or any obstruction in the tray. Complete 3 Check the fuser for fuser wrap, debris or Replace the Fuser. set of Go to step [3]....
Service Manual
Page 55
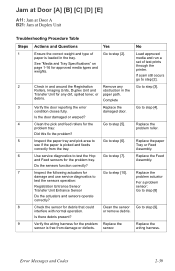
... and pick area to Go to step [2]. Replace the paper see if the paper is loaded in and around the Registration Remove any dirt, spilled toner, or paper path. Jam at Door [A] [B] [C] [D] [E] A11: Jam at Door A B21: Jam at Duplex Unit Troubleshooting Procedure Table Steps ...Actions and Questions Yes No 1 Ensure the correct weight and type of test prints through the printer. Load approved paper is picked and feeds Tray or Feed correctly from damage or defects. Replace the problem tray: problem roller. sensor.
... and pick area to Go to step [2]. Replace the paper see if the paper is loaded in and around the Registration Remove any dirt, spilled toner, or paper path. Jam at Door [A] [B] [C] [D] [E] A11: Jam at Door A B21: Jam at Duplex Unit Troubleshooting Procedure Table Steps ...Actions and Questions Yes No 1 Ensure the correct weight and type of test prints through the printer. Load approved paper is picked and feeds Tray or Feed correctly from damage or defects. Replace the problem tray: problem roller. sensor.

Service Manual
Page 59
Go to the Toner Sensor Board Pin 3 Full Sensor and for +5 volts at the Engine Replace the Go to correctly? Is the wiring free from the paper size Tray 1 - ... Replace the Tray. Tray 2, 3, 4, 5 Replace the LTA Controller Board. step [2}. 2 Check Pin 6 OPTN cable at Pin 6 OPTN cable to Replace the ribbon Replace the Toner the Toner Sensor Board. No Reseat the Paper Tray. 2 Inspect the tray for +5 volts. Controller Board for damage or defects. Error Messages and Codes 2-43 If the...
Go to the Toner Sensor Board Pin 3 Full Sensor and for +5 volts at the Engine Replace the Go to correctly? Is the wiring free from the paper size Tray 1 - ... Replace the Tray. Tray 2, 3, 4, 5 Replace the LTA Controller Board. step [2}. 2 Check Pin 6 OPTN cable at Pin 6 OPTN cable to Replace the ribbon Replace the Toner the Toner Sensor Board. No Reseat the Paper Tray. 2 Inspect the tray for +5 volts. Controller Board for damage or defects. Error Messages and Codes 2-43 If the...

Service Manual
Page 69
... material Go to break up any compacted toner in the toner cartridge. Reseat the toner cartridge or remove packing material. Reinstall the toner cartridge. Reinstall the toner cartridge. Remove the toner cartridge and visually check to break up any compacted toner in the toner cartridge. Are the magnets seated properly? Reseat the Toner Cartridge. Does the error still appear...
... material Go to break up any compacted toner in the toner cartridge. Reseat the toner cartridge or remove packing material. Reinstall the toner cartridge. Reinstall the toner cartridge. Remove the toner cartridge and visually check to break up any compacted toner in the toner cartridge. Are the magnets seated properly? Reseat the Toner Cartridge. Does the error still appear...

Service Manual
Page 77
...Is there continuity? Replace the Toner Sensor Board and/or Wiring Harness. Tray [2] [3] [4] [5] Interface Failure U14: Tray 2 U13: Tray 3 U16: Tray 4 U17: Tray 5 Troubleshooting Procedure Table Steps Actions and Questions Yes 1 Cycle power to the printer. Engine Controller Board No Complete ...Failure U18: Yellow U19: Magenta U20: Cyan U21: Black Troubleshooting Procedure Table Steps Actions and Questions Yes 1 Cycle power to the printer. Does the error still appear? Does the error still appear? LTA Controller Is there continuity between the LTA Controller Board(s) and ...
...Is there continuity? Replace the Toner Sensor Board and/or Wiring Harness. Tray [2] [3] [4] [5] Interface Failure U14: Tray 2 U13: Tray 3 U16: Tray 4 U17: Tray 5 Troubleshooting Procedure Table Steps Actions and Questions Yes 1 Cycle power to the printer. Engine Controller Board No Complete ...Failure U18: Yellow U19: Magenta U20: Cyan U21: Black Troubleshooting Procedure Table Steps Actions and Questions Yes 1 Cycle power to the printer. Does the error still appear? Does the error still appear? LTA Controller Is there continuity between the LTA Controller Board(s) and ...
Service Manual
Page 83
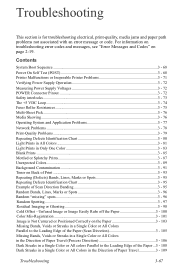
... the Paper ...3 - 108 Dark Streaks in a Single Color or All Colors in Only One Color 3 - 83 Blank Prints ...3 - 85 Mottled or Splotchy Prints...3 - 87 Unexpected Colors...3 - 89 Background Contamination 3 - 91 Toner on page 2-19. Contents System Boot Sequence ...3 - 68 Power On Self Test (POST 3 - 68 Printer Malfunctions or Inoperable Printer Problems 3 - 71 Verifying Power Supply Operation 3 - 72...
... the Paper ...3 - 108 Dark Streaks in a Single Color or All Colors in Only One Color 3 - 83 Blank Prints ...3 - 85 Mottled or Splotchy Prints...3 - 87 Unexpected Colors...3 - 89 Background Contamination 3 - 91 Toner on page 2-19. Contents System Boot Sequence ...3 - 68 Power On Self Test (POST 3 - 68 Printer Malfunctions or Inoperable Printer Problems 3 - 71 Verifying Power Supply Operation 3 - 72...
Service Manual
Page 90
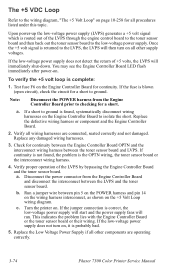
...5. To verify the +5 volt loop is returned to the low-voltage power supply. Verify all wiring harnesses are operating correctly. 3-74 Phaser 7300 Color Printer Service Manual Run a jumper wire between pin 5 on the POWER harness and pin 14 on the wiring harness interconnect, as shown on... for a short. Replace the defective wiring harness or component and the Engine Controller Board. 2. If continuity is the OPTN wiring, the toner sensor board or the interconnect wiring harness. 4. If a short to ground is found , the problem is not found , systematically disconnect wiring...
...5. To verify the +5 volt loop is returned to the low-voltage power supply. Verify all wiring harnesses are operating correctly. 3-74 Phaser 7300 Color Printer Service Manual Run a jumper wire between pin 5 on the POWER harness and pin 14 on the wiring harness interconnect, as shown on... for a short. Replace the defective wiring harness or component and the Engine Controller Board. 2. If continuity is the OPTN wiring, the toner sensor board or the interconnect wiring harness. 4. If a short to ground is found , the problem is not found , systematically disconnect wiring...

Service Manual
Page 95
... repeating or random. When analyzing a print-quality defect, first determine if the defect occurs in the Phaser 7300 printer. Print-Quality Problems Print-quality defects can adversely effect the Xerographic and fusing characteristics of paper, software applications, environmental conditions... approved media from the printers paper path. ■ Vacuum any obvious toner spills within the printer. This will initiate the Color Registration and Automatic Density Control (ADC) Calibrations. ■ Use the printer's internal test prints to verify the problem is with the printer and not with the ...
... repeating or random. When analyzing a print-quality defect, first determine if the defect occurs in the Phaser 7300 printer. Print-Quality Problems Print-quality defects can adversely effect the Xerographic and fusing characteristics of paper, software applications, environmental conditions... approved media from the printers paper path. ■ Vacuum any obvious toner spills within the printer. This will initiate the Color Registration and Automatic Density Control (ADC) Calibrations. ■ Use the printer's internal test prints to verify the problem is with the printer and not with the ...
Service Manual
Page 96
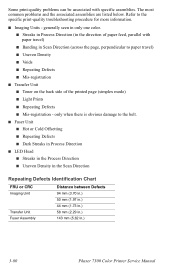
generally seen in only one color. ■ Streaks in Process Direction (in the direction of the printed page (simplex mode) ■ Light Prints ■ Repeating Defects ■ Mis-registration - only when ... paper travel ) ■ Uneven Density ■ Voids ■ Repeating Defects ■ Mis-registration ■ Transfer Unit ■ Toner on the back side of paper feed, parallel with specific assemblies. The most common problems and the associated assemblies are listed below. Refer to paper travel ) ■ Banding in .) 3-80 Phaser 7300 Color Printer Service Manual
generally seen in only one color. ■ Streaks in Process Direction (in the direction of the printed page (simplex mode) ■ Light Prints ■ Repeating Defects ■ Mis-registration - only when ... paper travel ) ■ Uneven Density ■ Voids ■ Repeating Defects ■ Mis-registration ■ Transfer Unit ■ Toner on the back side of paper feed, parallel with specific assemblies. The most common problems and the associated assemblies are listed below. Refer to paper travel ) ■ Banding in .) 3-80 Phaser 7300 Color Printer Service Manual
Service Manual
Page 97
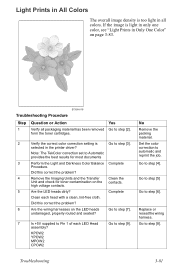
... each LED Head Go to step [8]. If the image is light in only one color, see "Light Prints in Only One Color" on the LED heads Go to Automatic provides the best results for toner contamination on the contacts. undamaged, properly routed and seated? 7 Is +5V supplied ... all packaging material has been removed form the toner cartridges. Did this correct the problem? 6 Are the wiring harnesses on page 3-83. Set the color correction to step [2]. 2 Verify the correct color correction setting is too light in the printer driver? assembly? Yes Go to automatic and reprint...
... each LED Head Go to step [8]. If the image is light in only one color, see "Light Prints in Only One Color" on the LED heads Go to Automatic provides the best results for toner contamination on the contacts. undamaged, properly routed and seated? 7 Is +5V supplied ... all packaging material has been removed form the toner cartridges. Did this correct the problem? 6 Are the wiring harnesses on page 3-83. Set the color correction to step [2]. 2 Verify the correct color correction setting is too light in the printer driver? assembly? Yes Go to automatic and reprint...


