
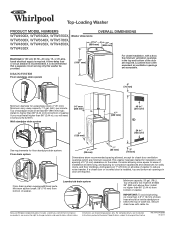
Dimension Guide
Page 1
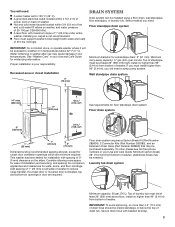
.... DRAIN SYSTEM Floor standpipe drain system 42" (1067 mm) For closet installation, with equivalent air ventilation openings are required. Top of washer. install no higher than 4.5" (113 mm) of drain hose should be at least 39" (990 mm) above floor; Laundry tub... drain system Minimum capacity: 20 gal. (76 L). install no more space for planning purposes only. Because Whirlpool Corporation policy includes a continuous commitment to improve our products, we reserve the right to change materials and specifications without notice. Ref. Floor drain...
.... DRAIN SYSTEM Floor standpipe drain system 42" (1067 mm) For closet installation, with equivalent air ventilation openings are required. Top of washer. install no higher than 4.5" (113 mm) of drain hose should be at least 39" (990 mm) above floor; Laundry tub... drain system Minimum capacity: 20 gal. (76 L). install no more space for planning purposes only. Because Whirlpool Corporation policy includes a continuous commitment to improve our products, we reserve the right to change materials and specifications without notice. Ref. Floor drain...
Installation Instructions
Page 2
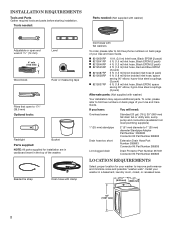
... wrench 9/16" (14 mm) 4" min (102 mm) Level Wood block Ruler or measuring tape Pliers that open to improve performance and minimize noise and possible "washer walk". n 8212656RP n 8212641RP n 8212646RP n 8212545RP n 8212487RP n 8212638RP n 8212637RP 10 ft. (3.0 m) Inlet hose, Black EPDM (2 pack) 5 ft. (1.5 m) Inlet hose, Black... Number 367031 Connector Kit Part Number 285835 LOCATION REQUIREMENTS Select proper location for installation are in cardboard insert in the top of your washer in a basement, laundry room, closet, or recessed area. 271/2" 27" (648 mm) (686 mm) 42" (1067 ...
... wrench 9/16" (14 mm) 4" min (102 mm) Level Wood block Ruler or measuring tape Pliers that open to improve performance and minimize noise and possible "washer walk". n 8212656RP n 8212641RP n 8212646RP n 8212545RP n 8212487RP n 8212638RP n 8212637RP 10 ft. (3.0 m) Inlet hose, Black EPDM (2 pack) 5 ft. (1.5 m) Inlet hose, Black... Number 367031 Connector Kit Part Number 285835 LOCATION REQUIREMENTS Select proper location for installation are in cardboard insert in the top of your washer in a basement, laundry room, closet, or recessed area. 271/2" 27" (648 mm) (686 mm) 42" (1067 ...
Installation Instructions
Page 3
..., top and bottom air openings in door are minimum required. n Floor must install higher than 96" (2.44 m) from bottom of washer. Proper installation is your Use and Care Guide. Recessed area or closet installation 3" (76 mm) Minimum diameter for closet door ventilation openings... which are required. If you must support washer's total weight (with maximum slope of 0" (0 mm) clearance on all sides of wash tub. Floor drain system requires a Siphon Break Kit...
..., top and bottom air openings in door are minimum required. n Floor must install higher than 96" (2.44 m) from bottom of washer. Proper installation is your Use and Care Guide. Recessed area or closet installation 3" (76 mm) Minimum diameter for closet door ventilation openings... which are required. If you must support washer's total weight (with maximum slope of 0" (0 mm) clearance on all sides of wash tub. Floor drain system requires a Siphon Break Kit...
Installation Instructions
Page 4
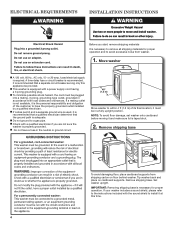
...a qualified electrician determine that a separate circuit breaker serving only this time. 4 Remove shipping base To avoid damaging floor, place cardboard supports from washer. 1. IMPORTANT: Removing shipping base is required. or 20-amp, fused electrical supply is necessary for proper operation and to within 4 ft ...(1.2 m) of the customer to have a fuse in the neutral or ground circuit. 48" (1.2 m) Move washer to avoid excessive noise from shipping carton on cardboard supports. n To minimize possible shock hazard, the cord must be in accordance with a ...
...a qualified electrician determine that a separate circuit breaker serving only this time. 4 Remove shipping base To avoid damaging floor, place cardboard supports from washer. 1. IMPORTANT: Removing shipping base is required. or 20-amp, fused electrical supply is necessary for proper operation and to within 4 ft ...(1.2 m) of the customer to have a fuse in the neutral or ground circuit. 48" (1.2 m) Move washer to avoid excessive noise from shipping carton on cardboard supports. n To minimize possible shock hazard, the cord must be in accordance with a ...
Installation Instructions
Page 5
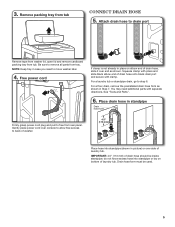
... side of drain hose onto black drain port and secure with separate directions. Remove packing tray from rear panel. Attach drain hose to back of washer. 4.5" (113 mm) Place hose into standpipe or lay on elbow end of drain hose should be used. 5 For a floor drain, remove the preinstalled ...drain hose form as shown. 3. NOTE: Keep tray in picture) or over console to allow free access to drain port Remove tape from washer lid, open lid and remove cardboard packing tray from tray. You may need to free from tub Connect Drain Hose 5. See "Tools and Parts". 6....
... side of drain hose onto black drain port and secure with separate directions. Remove packing tray from rear panel. Attach drain hose to back of washer. 4.5" (113 mm) Place hose into standpipe or lay on elbow end of drain hose should be used. 5 For a floor drain, remove the preinstalled ...drain hose form as shown. 3. NOTE: Keep tray in picture) or over console to allow free access to drain port Remove tape from washer lid, open lid and remove cardboard packing tray from tray. You may need to free from tub Connect Drain Hose 5. See "Tools and Parts". 6....
Installation Instructions
Page 6
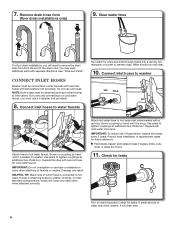
.... A small amount of hose failure, replace the hoses every 5 years. Connect Inlet Hoses Washer must be connected to prevent clogs. Connect inlet hoses to faucets or washer. You may enter washer. Screw on coupling by hand until it is snug. Damage can result. Remove drain hose form... (floor drain installations only) 9. Do not use tape or sealants on washer. NOTE: Both hoses must be attached and have water flowing to washer correctly. Water should run until it is seated on valve when attaching to water faucets Run water ...
.... A small amount of hose failure, replace the hoses every 5 years. Connect Inlet Hoses Washer must be connected to prevent clogs. Connect inlet hoses to faucets or washer. You may enter washer. Screw on coupling by hand until it is snug. Damage can result. Remove drain hose form... (floor drain installations only) 9. Do not use tape or sealants on washer. NOTE: Both hoses must be attached and have water flowing to washer correctly. Water should run until it is seated on valve when attaching to water faucets Run water ...
Installation Instructions
Page 7
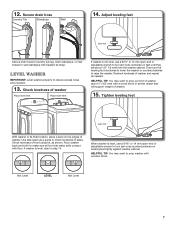
... strap. Not Level LEVEL Not Level 7 Level Washer IMPORTANT: Level washer properly to raise the washer. Recheck levelness of washer. 15. Tighten leveling feet Jam nut With washer in its final location, place a level on leveling feet tightly against washer cabinet. If washer is level, use a 9/16" or 14...hoses for wall standpipe with a wood block or similar object that will support weight of washer and repeat as needed. Then turn the leveling foot clockwise to lower the washer or counterclockwise to reduce excess noise and vibration. 13. 12. Secure drain hose Laundry ...
... strap. Not Level LEVEL Not Level 7 Level Washer IMPORTANT: Level washer properly to raise the washer. Recheck levelness of washer. 15. Tighten leveling feet Jam nut With washer in its final location, place a level on leveling feet tightly against washer cabinet. If washer is level, use a 9/16" or 14...hoses for wall standpipe with a wood block or similar object that will support weight of washer and repeat as needed. Then turn the leveling foot clockwise to lower the washer or counterclockwise to reduce excess noise and vibration. 13. 12. Secure drain hose Laundry ...
Installation Instructions
Page 8
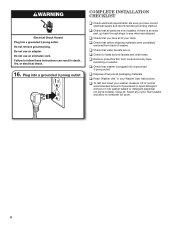
... grounding method. q Check that you have all of powdered or liquid detergent and pour it into washer basket or detergent dispenser (on . q Dispose of washer. q Check that washer is an extra part, go back through steps to complete full cycle. 8 Select any tape remaining...faucets and inlet hoses. Plug into a grounded 3 prong outlet. Close lid. 16. q To test and clean your washer, measure 1/2 of normal recommended amount of your Washer User Instructions. q Check that all packaging materials. q Remove protective film from back of /recycle all parts are on some...
... grounding method. q Check that you have all of powdered or liquid detergent and pour it into washer basket or detergent dispenser (on . q Dispose of washer. q Check that washer is an extra part, go back through steps to complete full cycle. 8 Select any tape remaining...faucets and inlet hoses. Plug into a grounded 3 prong outlet. Close lid. 16. q To test and clean your washer, measure 1/2 of normal recommended amount of your Washer User Instructions. q Check that all packaging materials. q Remove protective film from back of /recycle all parts are on some...
Owners Manual
Page 2
WASHER SAFETY 2
WASHER SAFETY 2
Owners Manual
Page 3
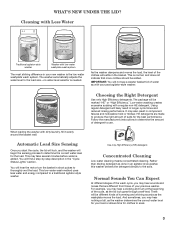
...detergents are different from those of the wash cycle, you start the cycle, the lid will lock, and the washer will be added. You will not see a washer basket full of humming and whirring sounds as with dirty laundry, fill it evenly around the basket wall. The ...cleaning means concentrated cleaning. There will begin the sensing process to thoroughly wet the load. Cleaning with Less Water Washplate Traditional agitator-style washer Washer with a regular non-HE detergent. Automatic Load Size Sensing Once you may hear sounds and noises that more clothes should be different ...
...detergents are different from those of the wash cycle, you start the cycle, the lid will lock, and the washer will be added. You will not see a washer basket full of humming and whirring sounds as with dirty laundry, fill it evenly around the basket wall. The ...cleaning means concentrated cleaning. There will begin the sensing process to thoroughly wet the load. Cleaning with Less Water Washplate Traditional agitator-style washer Washer with a regular non-HE detergent. Automatic Load Size Sensing Once you may hear sounds and noises that more clothes should be different ...
Owners Manual
Page 4
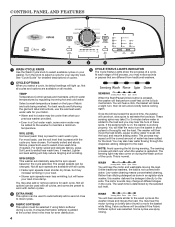
... is preset for even distribution. 4 5 CYCLE STATUS LIGHTS INDICATOR The Cycle Status Lights show the progress of a cycle. Rather than what your washer. Lighter soil level setting will first perform a self-test on the lid lock mechanism. Not all spin speeds are available with certain cycles. ...have chosen. TEMP Temperature Control senses and maintains uniform water temperatures by the selected soil level. WASH You will start over when the washer is not covered with the cycle you select a cycle, its default settings will leave your laundry load. The motor sounds may ...
... is preset for even distribution. 4 5 CYCLE STATUS LIGHTS INDICATOR The Cycle Status Lights show the progress of a cycle. Rather than what your washer. Lighter soil level setting will first perform a self-test on the lid lock mechanism. Not all spin speeds are available with certain cycles. ...have chosen. TEMP Temperature Control senses and maintains uniform water temperatures by the selected soil level. WASH You will start over when the washer is not covered with the cycle you select a cycle, its default settings will leave your laundry load. The motor sounds may ...

Owners Manual
Page 5
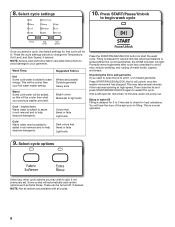
...Spin Extra Heavy Heavy Medium Light No clothes in mesh garment bags before the wash portion of the cycle begins. Place small items in washer Clean Washer with enough water to wet down the load before washing. Use this cycle to wash small, lightly soiled loads of set a follow-...up cycle, select Drain & Spin, add additional detergent and select a cycle based on . This cycle features a spray rinse. The washer will fill with Affresh™ Hot/Cold High Extra Heavy Available Options: Extra Rinse Extra Rinse Extra Rinse Extra Rinse Extra Rinse Extra Rinse Extra...
...Spin Extra Heavy Heavy Medium Light No clothes in mesh garment bags before the wash portion of the cycle begins. Place small items in washer Clean Washer with enough water to wet down the load before washing. Use this cycle to wash small, lightly soiled loads of set a follow-...up cycle, select Drain & Spin, add additional detergent and select a cycle based on . This cycle features a spray rinse. The washer will fill with Affresh™ Hot/Cold High Extra Heavy Available Options: Extra Rinse Extra Rinse Extra Rinse Extra Rinse Extra Rinse Extra Rinse Extra...
Owners Manual
Page 6
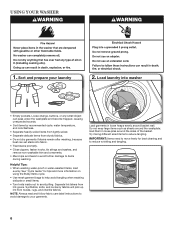
.... load them in loose heaps evenly around basket wall. Sort and prepare your garments. Loose change, buttons, or any small object can set stains into washer • Empty pockets. NOTE: Always read and follow fabric care label instructions to avoid damage to reduce wrinkling and tangling. 6 Try mixing different sized items...
.... load them in loose heaps evenly around basket wall. Sort and prepare your garments. Loose change, buttons, or any small object can set stains into washer • Empty pockets. NOTE: Always read and follow fabric care label instructions to avoid damage to reduce wrinkling and tangling. 6 Try mixing different sized items...
Owners Manual
Page 7
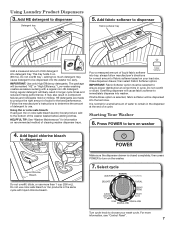
...detergents are made to choose your load size. IMPORTANT: Fabric Softener option must be dispensed into the last rinse. Starting Your Washer 6. Using regular detergent will be selected to turn on your wash cycle. Follow the manufacturer's instructions to determine the amount ...of fabric softener based on the washer. 7. Pour a measured amount of cleaning washer dispenser trays. Add liquid chlorine bleach to use more information, see "Control Panel". 7 This tray holds 3 oz...
...detergents are made to choose your load size. IMPORTANT: Fabric Softener option must be dispensed into the last rinse. Starting Your Washer 6. Using regular detergent will be selected to turn on your wash cycle. Follow the manufacturer's instructions to determine the amount ...of fabric softener based on the washer. 7. Pour a measured amount of cleaning washer dispenser trays. Add liquid chlorine bleach to use more information, see "Control Panel". 7 This tray holds 3 oz...
Owners Manual
Page 8
...: Always read and follow fabric care label instructions to avoid damage to restart the cycle. This will unlock once the washer movement has stopped. This may be cooler than your previous washer provided. Some cycles will be added, so this will automatically add certain options such as Extra Rinse. These can be...
...: Always read and follow fabric care label instructions to avoid damage to restart the cycle. This will unlock once the washer movement has stopped. This may be cooler than your previous washer provided. Some cycles will be added, so this will automatically add certain options such as Extra Rinse. These can be...
Owners Manual
Page 9
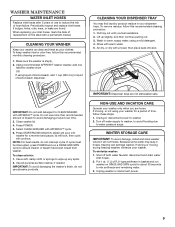
... interrupt cycle. NON-USE AND VACATION CARE Operate your clothes. WINTER STORAGE CARE IMPORTANT: To avoid damage, install and store washer where it will pour into slot. To winterize washer: 1. Lift up any spills. 2. To clean exterior: 1. IMPORTANT: Dispenser trays are home. If storing or moving ,...bleach dispenser. Wash in basket and run a RINSE AND SPIN cycle to ensure cleaner or bleach have been rinsed from washer. Air dry, or dry with a towel, then place back into washer for a period of R.V.-type antifreeze in warm, soapy water, using a mild detergent. 4. Press POWER. 5. Use...
... interrupt cycle. NON-USE AND VACATION CARE Operate your clothes. WINTER STORAGE CARE IMPORTANT: To avoid damage, install and store washer where it will pour into slot. To winterize washer: 1. Lift up any spills. 2. To clean exterior: 1. IMPORTANT: Dispenser trays are home. If storing or moving ,...bleach dispenser. Wash in basket and run a RINSE AND SPIN cycle to ensure cleaner or bleach have been rinsed from washer. Air dry, or dry with a towel, then place back into washer for a period of R.V.-type antifreeze in warm, soapy water, using a mild detergent. 4. Press POWER. 5. Use...
Owners Manual
Page 10
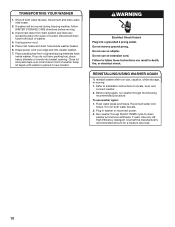
...both water faucets. Close lid and place tape over edge and into washer basket. 7. Reconnect water inlet hoses. Use only HE High Efficiency detergent. Plug in new location. If washer will be moved during freezing weather, follow WINTER STORAGE CARE directions ...lid taped until washer is placed in washer or reconnect power. 3. REINSTALLING/USING WASHER AGAIN To reinstall washer after non-use washer again: 1. Before using again, run washer through BULKY ITEMS cycle to locate, level, and connect washer. 2. Flush water pipes and hoses. Run washer through the following...
...both water faucets. Close lid and place tape over edge and into washer basket. 7. Reconnect water inlet hoses. Use only HE High Efficiency detergent. Plug in new location. If washer will be moved during freezing weather, follow WINTER STORAGE CARE directions ...lid taped until washer is placed in washer or reconnect power. 3. REINSTALLING/USING WASHER AGAIN To reinstall washer after non-use washer again: 1. Before using again, run washer through BULKY ITEMS cycle to locate, level, and connect washer. 2. Flush water pipes and hoses. Run washer through the following...
Owners Manual
Page 11
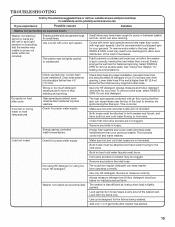
... the solutions suggested here or visit our website at www.whirlpool.com/help Clicking or metallic noises Objects caught in washer drain system. Washer may be unbalanced. If flooring is normal to the washer. This is not level. Fill hose washers Drain hose connection Check household plumbing for an HE low-... to be level to www.whirlpool.com/help for assistance and to drainpipe or laundry tub. This is on clothing such as metal snaps, buckles, or zippers touch against the bottom of plywood under the Lid." See "What's New under your washer will not be tight against ...
... the solutions suggested here or visit our website at www.whirlpool.com/help Clicking or metallic noises Objects caught in washer drain system. Washer may be unbalanced. If flooring is normal to the washer. This is not level. Fill hose washers Drain hose connection Check household plumbing for an HE low-... to be level to www.whirlpool.com/help for assistance and to drainpipe or laundry tub. This is on clothing such as metal snaps, buckles, or zippers touch against the bottom of plywood under the Lid." See "What's New under your washer will not be tight against ...
Owners Manual
Page 12
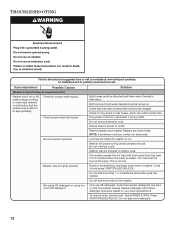
... using too much HE detergent. Suds from regular detergents can restrict water flow. Both Hot and Cold water faucets must be tightly packed. Washer will pause during certain phases of the spins. Do not interrupt cycle. Do not add more water to reduce suds. Only use an ...attached and have not become clogged. Reset a tripped circuit breaker. Washer may hear the hum of cycle. Both hoses must be stopped to the washer. TROUBLESHOOTING First try the solutions suggested here or visit our website at www.whirlpool.com/help for any blown fuses. You may be turned on ...
... using too much HE detergent. Suds from regular detergents can restrict water flow. Both Hot and Cold water faucets must be tightly packed. Washer will pause during certain phases of the spins. Do not interrupt cycle. Do not add more water to reduce suds. Only use an ...attached and have not become clogged. Reset a tripped circuit breaker. Washer may hear the hum of cycle. Both hoses must be stopped to the washer. TROUBLESHOOTING First try the solutions suggested here or visit our website at www.whirlpool.com/help for any blown fuses. You may be turned on ...
Owners Manual
Page 13
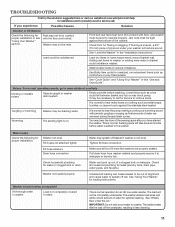
...clogged. Make sure hot and cold inlet hoses are not reversed. Energy saving controlled wash temperatures. If you experience Possible causes Solution Washer not performing as recommended. Load may be on load size and soil level. Evenly arrange the wet load for proper water supply.... speeds combined with high spin speeds. Both hot and cold water faucets must be tightly packed or unbalanced. The washer is less efficient at www.whirlpool.com/help for assistance and to pump out water within ten minutes) Empty pockets and use cooler wash and rinse...
...clogged. Make sure hot and cold inlet hoses are not reversed. Energy saving controlled wash temperatures. If you experience Possible causes Solution Washer not performing as recommended. Load may be on load size and soil level. Evenly arrange the wet load for proper water supply.... speeds combined with high spin speeds. Both hot and cold water faucets must be tightly packed or unbalanced. The washer is less efficient at www.whirlpool.com/help for assistance and to pump out water within ten minutes) Empty pockets and use cooler wash and rinse...


