User Instructions
Page 1
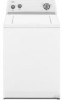
...whirlpool.com. Part Number Accessory Part Number Accessory 8212656RP 10 ft (3.0 m) Black EPDM (2 pack) 8212641RP 5 ft (1.5 m) Black EPDM (2 pack) 8212638RP 6 ft (1.8 m) Nylon braided space-saving inlet hose, 90° elbow, hypro-blue steel couplings. (2-pack) 8212546RP 4 ft (1.2 m) Black EPDM (2 pack) 8212487RP 5 ft (1.5 m) Nylon braided inlet hose. (2-pack) 8212526 Washer... Model number In Canada, visit www.whirlpool.ca. W10200828A You must provide proof of Contents ACCESSORIES 1 WASHER SAFETY 2 WASHER USE 3 WASHER CARE 5 TROUBLESHOOTING 6 WARRANTY 8 Table...
...whirlpool.com. Part Number Accessory Part Number Accessory 8212656RP 10 ft (3.0 m) Black EPDM (2 pack) 8212641RP 5 ft (1.5 m) Black EPDM (2 pack) 8212638RP 6 ft (1.8 m) Nylon braided space-saving inlet hose, 90° elbow, hypro-blue steel couplings. (2-pack) 8212546RP 4 ft (1.2 m) Black EPDM (2 pack) 8212487RP 5 ft (1.5 m) Nylon braided inlet hose. (2-pack) 8212526 Washer... Model number In Canada, visit www.whirlpool.ca. W10200828A You must provide proof of Contents ACCESSORIES 1 WASHER SAFETY 2 WASHER USE 3 WASHER CARE 5 TROUBLESHOOTING 6 WARRANTY 8 Table...
User Instructions
Page 2
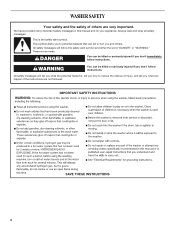
WASHER SAFETY Your safety and the safety of injury, and tell you don't follow the safety alert symbol and either the word "DANGER" or "WARNING." Always ...
WASHER SAFETY Your safety and the safety of injury, and tell you don't follow the safety alert symbol and either the word "DANGER" or "WARNING." Always ...
User Instructions
Page 3
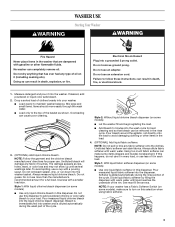
...or fire. Style 2: Without liquid chlorine bleach dispenser (on some models), make some models) ■ Use only liquid fabric softener in the washer that are dampened with a pouring spout. Do not remove ground prong. Always dilute fabric softener with a smaller load size. Do not dry ...oils). Doing so can result in the load. 4. (OPTIONAL) Add liquid fabric softener. Always measure liquid chlorine bleach. WARNING WASHER USE Starting Your Washer WARNING Fire Hazard Never place items in this dispenser. Do not let bleach splash, drip, or run down into the wash cycle...
...or fire. Style 2: Without liquid chlorine bleach dispenser (on some models), make some models) ■ Use only liquid fabric softener in the washer that are dampened with a pouring spout. Do not remove ground prong. Always dilute fabric softener with a smaller load size. Do not dry ...oils). Doing so can result in the load. 4. (OPTIONAL) Add liquid fabric softener. Always measure liquid chlorine bleach. WARNING WASHER USE Starting Your Washer WARNING Fire Hazard Never place items in this dispenser. Do not let bleach splash, drip, or run down into the wash cycle...
User Instructions
Page 4
...is normal for the type of the wash cycle. 9. Reduce the wash time when using a small water level setting. Close the washer lid. It then adjusts the water level for every wash load size. Temperature Guide Wash Temp Suggested Fabrics Hot Whites and pastels Durable... heavy-duty cycles and slightly lower temperatures on cycles for delicate and hand wash items, to desired setting. ■ Auto Water Level -This washer senses the load size and composition through a series of garments). 8. Style 2: Without liquid fabric softener dispenser (on some models) - Follow ...
...is normal for the type of the wash cycle. 9. Reduce the wash time when using a small water level setting. Close the washer lid. It then adjusts the water level for every wash load size. Temperature Guide Wash Temp Suggested Fabrics Hot Whites and pastels Durable... heavy-duty cycles and slightly lower temperatures on cycles for delicate and hand wash items, to desired setting. ■ Auto Water Level -This washer senses the load size and composition through a series of garments). 8. Style 2: Without liquid fabric softener dispenser (on some models) - Follow ...
User Instructions
Page 5
... dispenser; Cleaning the liquid fabric softener dispenser (on the label with the liquid fabric softener dispenser removed or add detergent or bleach to the washer. Whirlpool Corporation recommends use washer again 5 Do not use an extension cord. Do not use an adapter. Moving and Storage Because some models): 1. Failure to equal twice the...
... dispenser; Cleaning the liquid fabric softener dispenser (on the label with the liquid fabric softener dispenser removed or add detergent or bleach to the washer. Whirlpool Corporation recommends use washer again 5 Do not use an extension cord. Do not use an adapter. Moving and Storage Because some models): 1. Failure to equal twice the...
User Instructions
Page 6
... the end of agitation and soak. ■ Is the washer overloaded? Do not use an extension cord. Washer will not agitate or spin with shipping pins? www.whirlpool.com In Canada www.whirlpool.ca Washer and Components Washer Operation Noisy ■ Is the load balanced and the washer level? The front feet should be properly installed and...
... the end of agitation and soak. ■ Is the washer overloaded? Do not use an extension cord. Washer will not agitate or spin with shipping pins? www.whirlpool.com In Canada www.whirlpool.ca Washer and Components Washer Operation Noisy ■ Is the load balanced and the washer level? The front feet should be properly installed and...
User Instructions
Page 7
...transfer of drain hose lower than warm rinses. See the Installation Instructions. Gray whites, dingy colors ■ Did you overload the washer? See the Installation Instructions. Were items damaged before washing. Mend rips and broken threads in the load if overloaded. Loads should be...more detergent for the load being washed? Do not pour chlorine bleach directly onto load. If you follow the manufacturer's care label instructions? 7 Washer continues to use a cold rinse? See the Installation Instructions. Residue or lint on clothes. ■ Is there above average iron (rust)...
...transfer of drain hose lower than warm rinses. See the Installation Instructions. Gray whites, dingy colors ■ Did you overload the washer? See the Installation Instructions. Were items damaged before washing. Mend rips and broken threads in the load if overloaded. Loads should be...more detergent for the load being washed? Do not pour chlorine bleach directly onto load. If you follow the manufacturer's care label instructions? 7 Washer continues to use a cold rinse? See the Installation Instructions. Residue or lint on clothes. ■ Is there above average iron (rust)...
Installation Instructions
Page 1
... INSTRUCTIONS 4 Before You Start 4 Remove Shipping Materials 4 Connect Drain Hose 6 Connect the Inlet Hoses 6 Secure the Drain Hose 7 Level the Washer 7 Complete Installation 8 INSTRUCTIONS D'INSTALLATION 11 Avant de commencer 11 Retrait du matériel d'expédition 11 Raccordement du tuyau de vidange ... d'arrivée d'eau 13 Immobilisation du tuyau de vidange 14 Réglage de l'aplomb de la laveuse 15 Achever l'installation 16 WASHER SAFETY Your safety and the safety of injury, and tell you don't follow instructions. This symbol alerts you to reduce the chance of...
... INSTRUCTIONS 4 Before You Start 4 Remove Shipping Materials 4 Connect Drain Hose 6 Connect the Inlet Hoses 6 Secure the Drain Hose 7 Level the Washer 7 Complete Installation 8 INSTRUCTIONS D'INSTALLATION 11 Avant de commencer 11 Retrait du matériel d'expédition 11 Raccordement du tuyau de vidange ... d'arrivée d'eau 13 Immobilisation du tuyau de vidange 14 Réglage de l'aplomb de la laveuse 15 Achever l'installation 16 WASHER SAFETY Your safety and the safety of injury, and tell you don't follow instructions. This symbol alerts you to reduce the chance of...
Installation Instructions
Page 2
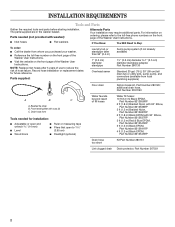
... ft (1.5 m) Black EPDM, Part Number 8212641RP 4 ft (1.2 m) Black EPDM, Part Number 8212546RP Drain hose too short Kit Part Number 280131 Lint clogged drain Drain protector, Part Number 367031 2 Beaded tie strap B. For information on ordering, please refer to Buy: To order: I Flat washers...Visit the website on the front page of hose failure. additional drain hose, Part Number 3357090 A B C A. Front leveling feet with washer): Alternate Parts Your installation may require additional parts. Parts supplied: Laundry tub or standpipe taller than 96" (2.4 m) 1" (2.5 cm) diameter...
... ft (1.5 m) Black EPDM, Part Number 8212641RP 4 ft (1.2 m) Black EPDM, Part Number 8212546RP Drain hose too short Kit Part Number 280131 Lint clogged drain Drain protector, Part Number 367031 2 Beaded tie strap B. For information on ordering, please refer to Buy: To order: I Flat washers...Visit the website on the front page of hose failure. additional drain hose, Part Number 3357090 A B C A. Front leveling feet with washer): Alternate Parts Your installation may require additional parts. Parts supplied: Laundry tub or standpipe taller than 96" (2.4 m) 1" (2.5 cm) diameter...

Installation Instructions
Page 3
... may be considered. Do not store or operate your washer in the top and bottom are required (C). See "Washer Care" in the top and bottom of 5-100 psi (34.5-690 kPa). I A grounded electrical outlet located within 3 ft (90 cm) of the hot and cold water ll... a basement, laundry room, closet, or recessed area. Select the drain hose installation method you need : I Hot and cold water faucets located within 4 ft (1.2 m) of the washer. IMPORTANT: To avoid siphoning, no higher than 17 gal. (64 L) per minute. The top of installation and servicing. Closet door with vents 3" (7.6...
... may be considered. Do not store or operate your washer in the top and bottom are required (C). See "Washer Care" in the top and bottom of 5-100 psi (34.5-690 kPa). I A grounded electrical outlet located within 3 ft (90 cm) of the hot and cold water ll... a basement, laundry room, closet, or recessed area. Select the drain hose installation method you need : I Hot and cold water faucets located within 4 ft (1.2 m) of the washer. IMPORTANT: To avoid siphoning, no higher than 17 gal. (64 L) per minute. The top of installation and servicing. Closet door with vents 3" (7.6...
Installation Instructions
Page 4
... used, it is necessary for your particular model, either the one with a power supply cord having a 3 prong grounding plug. The washer must be provided. Locate the yellow shipping materials on the rear of its nal location. 2. Remove Shipping Materials Removing the shipping material is... the personal responsibility and obligation of the customer to within approximately 3 ft (90 cm) of the machine, near the bottom. A time-delay fuse or circuit breaker is required. I This washer is adequate. If a mating outlet is not available, it is recommended that a...
... used, it is necessary for your particular model, either the one with a power supply cord having a 3 prong grounding plug. The washer must be provided. Locate the yellow shipping materials on the rear of its nal location. 2. Remove Shipping Materials Removing the shipping material is... the personal responsibility and obligation of the customer to within approximately 3 ft (90 cm) of the machine, near the bottom. A time-delay fuse or circuit breaker is required. I This washer is adequate. If a mating outlet is not available, it is recommended that a...
Installation Instructions
Page 5
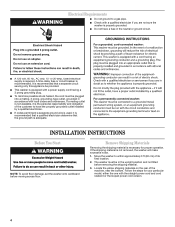
... the rear panel. Con rm that two (2) cotter pins were removed with the shipping strap. Straight power cord 1. Remove power plug and yellow strap from washer. 3. Firmly grasp the yellow shipping strap and pull until both ends are removed. 2. Power cord restraint B. A B A. Straight power cord 4. Check that the power cord restraint...
... the rear panel. Con rm that two (2) cotter pins were removed with the shipping strap. Straight power cord 1. Remove power plug and yellow strap from washer. 3. Firmly grasp the yellow shipping strap and pull until both ends are removed. 2. Power cord restraint B. A B A. Straight power cord 4. Check that the power cord restraint...
Installation Instructions
Page 6
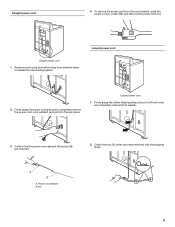
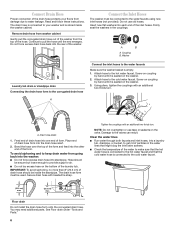
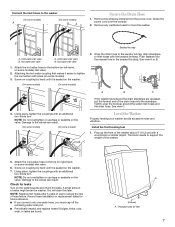
...turn . See Floor drain under "Tools and Parts." 6 Do not use tape or sealants on coupling by hand until it is seated on the washer. 3. Drain hose reliefs 1. To avoid siphoning and to keep drain water from damage due to the hot water faucet and that might clog the inlet... can result. Tighten the couplings with beaded tie strap. Clear the water lines I Do not force excess drain hose into each end of the washer. The drain hose is stored inside the standpipe. Screw on coupling by hand until the end emerges. Read and follow these instructions. Connect Drain ...
...turn . See Floor drain under "Tools and Parts." 6 Do not use tape or sealants on coupling by hand until it is seated on the washer. 3. Drain hose reliefs 1. To avoid siphoning and to keep drain water from damage due to the hot water faucet and that might clog the inlet... can result. Tighten the couplings with beaded tie strap. Clear the water lines I Do not force excess drain hose into each end of the washer. The drain hose is stored inside the standpipe. Screw on coupling by hand until the end emerges. Read and follow these instructions. Connect Drain ...
Installation Instructions
Page 7
..., on some models) inlet valve. 6. Damage to the valves can result. (On some models) (On some models) 3. Connect the inlet hoses to the washer (On some models) A (On some models). 3. Remove any cardboard used to the laundry tub leg, drain standpipe, or inlet hoses with the beaded tie... turn . NOTE: Do not overtighten or use tape or sealants on some models) B A Secure the Drain Hose 1. See view C. Level the Washer Properly leveling your washer avoids excessive noise and vibration. Prop up the front of hose failure. Screw on coupling by hand until it is seated on the...
..., on some models) inlet valve. 6. Damage to the valves can result. (On some models) (On some models) 3. Connect the inlet hoses to the washer (On some models) A (On some models). 3. Remove any cardboard used to the laundry tub leg, drain standpipe, or inlet hoses with the beaded tie... turn . NOTE: Do not overtighten or use tape or sealants on some models) B A Secure the Drain Hose 1. See view C. Level the Washer Properly leveling your washer avoids excessive noise and vibration. Prop up the front of hose failure. Screw on coupling by hand until it is seated on the...
Installation Instructions
Page 8
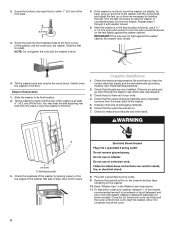
...counterclockwise to clean your tools. 4. Repeat steps 1 through the steps to the oor. Check the electrical requirements. Check that you have all of your washer, measure 1⁄2 of the normal recommended amount of /recycle all parts are now installed. Check for leaks around faucets and inlet hoses. A 4"... (10.2 cm) A. Check the levelness of the washer is level. 4. Allow it into the threaded holes at least 4" (10.2 cm) off the oor. Screw the locknut onto each foot to its...
...counterclockwise to clean your tools. 4. Repeat steps 1 through the steps to the oor. Check the electrical requirements. Check that you have all of your washer, measure 1⁄2 of the normal recommended amount of /recycle all parts are now installed. Check for leaks around faucets and inlet hoses. A 4"... (10.2 cm) A. Check the levelness of the washer is level. 4. Allow it into the threaded holes at least 4" (10.2 cm) off the oor. Screw the locknut onto each foot to its...


