
Installation Instructions
Page 2
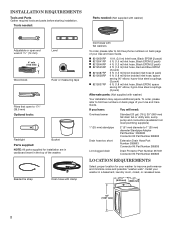
...refer to toll-free phone numbers on back page of your Use and Care Guide. INSTALLATION REQUIREMENTS Tools and Parts Gather required tools and parts before starting installation. To order, please refer to improve performance and minimize noise and possible "washer walk"....from local plumbing suppliers) 1" (25 mm) standpipe 2" (51 mm) diameter to 19⁄16" (39.5 mm) Optional tools: Flashlight Bucket Parts supplied: NOTE: All parts supplied for your washer in the top of your Use and Care Guide. n 8212656RP n 8212641RP n 8212646RP n 8212545RP n 8212487RP n 8212638RP n ...
...refer to toll-free phone numbers on back page of your Use and Care Guide. INSTALLATION REQUIREMENTS Tools and Parts Gather required tools and parts before starting installation. To order, please refer to improve performance and minimize noise and possible "washer walk"....from local plumbing suppliers) 1" (25 mm) standpipe 2" (51 mm) diameter to 19⁄16" (39.5 mm) Optional tools: Flashlight Bucket Parts supplied: NOTE: All parts supplied for your washer in the top of your Use and Care Guide. n 8212656RP n 8212641RP n 8212646RP n 8212545RP n 8212487RP n 8212638RP n ...
Installation Instructions
Page 3
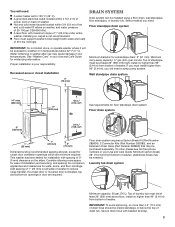
... 315 lbs (143 kgs). This washer has been tested for winterizing information. Floor drain system requires a Siphon Break Kit (Part Number 285834), 2 Connector Kits (Part Number 285385), and an Extension Drain Hose (Part Number 285863) that may cause damage in your Use and Care Guide for installation with beaded tie strap. 3 Top of...
... 315 lbs (143 kgs). This washer has been tested for winterizing information. Floor drain system requires a Siphon Break Kit (Part Number 285834), 2 Connector Kits (Part Number 285385), and an Extension Drain Hose (Part Number 285863) that may cause damage in your Use and Care Guide for installation with beaded tie strap. 3 Top of...
Installation Instructions
Page 5
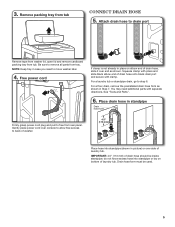
... place power cord over end as shown in standpipe Drain hose form Firmly grasp power cord plug and pull to remove all parts from tub Connect Drain Hose 5. Squeeze clamp with clamp. For a laundry tub or standpipe drain, go to move washer later. 4. Drain hose form must be ...
... place power cord over end as shown in standpipe Drain hose form Firmly grasp power cord plug and pull to remove all parts from tub Connect Drain Hose 5. Squeeze clamp with clamp. For a laundry tub or standpipe drain, go to move washer later. 4. Drain hose form must be ...
Installation Instructions
Page 6
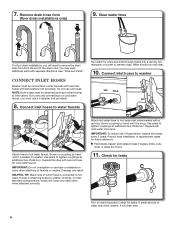
See "Tools and Parts". If you are found. 11. Screw on coupling by hand until it is snug. Damage can result. It will cross over each other when attached ... additional two-thirds turn . You may enter washer. Screw coupling by hand until clear. 10. Use pliers to a cold water faucet, you will need additional parts with second hose for leaks. Remove drain hose form (floor drain installations only) 9. Repeat this step with separate directions. Attach hot water hose to washer...
See "Tools and Parts". If you are found. 11. Screw on coupling by hand until it is snug. Damage can result. It will cross over each other when attached ... additional two-thirds turn . You may enter washer. Screw coupling by hand until clear. 10. Use pliers to a cold water faucet, you will need additional parts with second hose for leaks. Remove drain hose form (floor drain installations only) 9. Repeat this step with separate directions. Attach hot water hose to washer...
Installation Instructions
Page 8
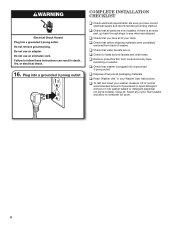
... back through steps to complete full cycle. 8 Close lid. Be sure you have correct electrical supply and recommended grounding method. q Check that all parts are on washer. q Check for leaks around faucets and inlet hoses. Select any tape remaining on . q Check that water faucets are now installed. q Read "Washer ...
... back through steps to complete full cycle. 8 Close lid. Be sure you have correct electrical supply and recommended grounding method. q Check that all parts are on washer. q Check for leaks around faucets and inlet hoses. Select any tape remaining on . q Check that water faucets are now installed. q Read "Washer ...
Use & Care Guide
Page 16
... 8. Pick up and delivery. Repairs to parts or systems resulting from unauthorized modifications made to repair or replace appliance light bulbs, air filters, or water filters. Expenses for travel and transportation for in accordance with Whirlpool published installation instructions. 10. Some states and..., to instruct you ever need for Factory Specified Replacement Parts and repair labor to obtain service under these limitations and exclusions may have been removed, altered, or cannot be borne by a Whirlpool designated service company. This limited warranty is valid only ...
... 8. Pick up and delivery. Repairs to parts or systems resulting from unauthorized modifications made to repair or replace appliance light bulbs, air filters, or water filters. Expenses for travel and transportation for in accordance with Whirlpool published installation instructions. 10. Some states and..., to instruct you ever need for Factory Specified Replacement Parts and repair labor to obtain service under these limitations and exclusions may have been removed, altered, or cannot be borne by a Whirlpool designated service company. This limited warranty is valid only ...

Warranty Information
Page 1
... will pay for in this limitation may not apply to you on the product. Consumable parts are unable to resolve the problem after checking "Troubleshooting," additional help you obtain assistance or service if you should ask Whirlpool or your sales slip together for service or repair of this information on the model...
... will pay for in this limitation may not apply to you on the product. Consumable parts are unable to resolve the problem after checking "Troubleshooting," additional help you obtain assistance or service if you should ask Whirlpool or your sales slip together for service or repair of this information on the model...


