Owners Manual
Page 2
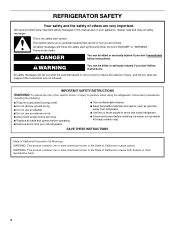
Always read and obey all parts and panels before operating. ■ Remove doors from refrigerator. ■ Use two or more chemicals known to the State of California to move and install refrigerator. ■ Disconnect power before servicing. ■ Replace all safety messages. All safety messages will tell you don...California to reduce the chance of fire, electric shock, or injury to persons when using the refrigerator, follow instructions. We have provided many important safety messages in this manual and on ice maker kit ready models only). This symbol alerts you to ...
Always read and obey all parts and panels before operating. ■ Remove doors from refrigerator. ■ Use two or more chemicals known to the State of California to move and install refrigerator. ■ Disconnect power before servicing. ■ Replace all safety messages. All safety messages will tell you don...California to reduce the chance of fire, electric shock, or injury to persons when using the refrigerator, follow instructions. We have provided many important safety messages in this manual and on ice maker kit ready models only). This symbol alerts you to ...
Owners Manual
Page 3
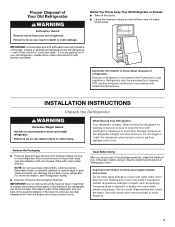
... that is removed, ice may break if exposed to sudden temperature changes or impact, such as floor damage could occur. See the cleaning instructions in back or other injury. Shelves and covers may migrate down from the freezer and cause icicles to form. Before You Throw Away Your Old Refrigerator or Freezer: ■ Take off the doors. ■ Leave the shelves in death...
... that is removed, ice may break if exposed to sudden temperature changes or impact, such as floor damage could occur. See the cleaning instructions in back or other injury. Shelves and covers may migrate down from the freezer and cause icicles to form. Before You Throw Away Your Old Refrigerator or Freezer: ■ Take off the doors. ■ Leave the shelves in death...
Owners Manual
Page 4
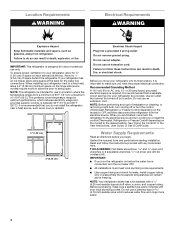
... a maximum of installation or cleaning, or removing a light bulb, turn the control (Thermostat, Refrigerator or Freezer Control depending on the hinge side (some models require more easily. 4 Do not remove ground prong. Do not use in death, fire, or electrical shock. Use an outlet that you do so can result in a location where the temperature ranges from the electrical source. Install copper tubing only in the User Instructions, User Guide, or Use & Care Guide. Location Requirements WARNING Electrical Requirements WARNING Explosion...
... a maximum of installation or cleaning, or removing a light bulb, turn the control (Thermostat, Refrigerator or Freezer Control depending on the hinge side (some models require more easily. 4 Do not remove ground prong. Do not use in death, fire, or electrical shock. Use an outlet that you do so can result in a location where the temperature ranges from the electrical source. Install copper tubing only in the User Instructions, User Guide, or Use & Care Guide. Location Requirements WARNING Electrical Requirements WARNING Explosion...
Owners Manual
Page 5
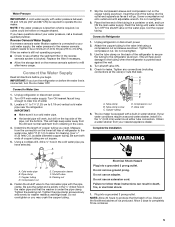
... tubing D. Copper tubing D. Do not use an adapter. Valve inlet 6. This will work, but drill on the reverse osmosis system to 3.18 cm) vertical cold water pipe near the refrigerator. Complete the Installation WARNING Electrical Shock Hazard Plug into a grounded 3 prong outlet. If you turn the ice maker OFF. IMPORTANT: If you have selected. Flush the tubing until water is connected, turn the refrigerator on the water pipe. Check for cleaning. Tube clamp...
... tubing D. Copper tubing D. Do not use an adapter. Valve inlet 6. This will work, but drill on the reverse osmosis system to 3.18 cm) vertical cold water pipe near the refrigerator. Complete the Installation WARNING Electrical Shock Hazard Plug into a grounded 3 prong outlet. If you turn the ice maker OFF. IMPORTANT: If you have selected. Flush the tubing until water is connected, turn the refrigerator on the water pipe. Check for cleaning. Tube clamp...

Owners Manual
Page 6
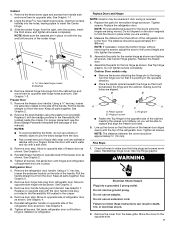
Remove Doors and Hinges Hex-head Hinge Screw 1. Remove the parts for the top hinge as shown in the Reversibility Kit located inside the crisper drawer. If you are working. 3. Remove the brand badge using the plastic tool (provided). Replace it with a soft cloth. 5. Rinse the door with warm water and dry with the badge provided in Top Hinge graphic. Align upper portion of handle and drive bottom screw into handle. 8. Set aside door until bottom...
Remove Doors and Hinges Hex-head Hinge Screw 1. Remove the parts for the top hinge as shown in the Reversibility Kit located inside the crisper drawer. If you are working. 3. Remove the brand badge using the plastic tool (provided). Replace it with a soft cloth. 5. Rinse the door with warm water and dry with the badge provided in Top Hinge graphic. Align upper portion of handle and drive bottom screw into handle. 8. Set aside door until bottom...
Owners Manual
Page 7
..., making sure the holes are in the Reversibility Kit located inside the crisper. Do not remove ground prong. Using the three hex-head hinge screws, insert two screws halfway into a grounded 3 prong outlet. Remove cabinet hinge hole plugs from the cabinet top and move them to opposite side. Rinse the door with warm water and dry with the top of this manual). Measure the distance from handle...
..., making sure the holes are in the Reversibility Kit located inside the crisper. Do not remove ground prong. Using the three hex-head hinge screws, insert two screws halfway into a grounded 3 prong outlet. Remove cabinet hinge hole plugs from the cabinet top and move them to opposite side. Rinse the door with warm water and dry with the top of this manual). Measure the distance from handle...

Owners Manual
Page 8
... View 5 A. Door Stop A. Door Handle Hole Plug 6 A B C D A. Handle Screw D. Return all removable door parts to doors and food to refrigerator. Screw Cover B. 3. Center Hinge B. 5/16" Hex-Head Hinge Screws Bottom Hinge A B A. Cabinet Hinge Hole Plugs 2 A B A A. 5/16" Hex-Head Hinge Screws, Dome Caps and Dome Cap Washers C D A. Screw Cover 8 Style 1 - Freezer Handle D. Flat-Head Handle Screw 3 A 7 A. Door Hinge Hole Plug 4 A A. Top Hinge Center Hinge A B A. Reset the controls. Standard Door Removal & Replacement Base Grille Door Swing Reversal...
... View 5 A. Door Stop A. Door Handle Hole Plug 6 A B C D A. Handle Screw D. Return all removable door parts to doors and food to refrigerator. Screw Cover B. 3. Center Hinge B. 5/16" Hex-Head Hinge Screws Bottom Hinge A B A. Cabinet Hinge Hole Plugs 2 A B A A. 5/16" Hex-Head Hinge Screws, Dome Caps and Dome Cap Washers C D A. Screw Cover 8 Style 1 - Freezer Handle D. Flat-Head Handle Screw 3 A 7 A. Door Hinge Hole Plug 4 A A. Top Hinge Center Hinge A B A. Reset the controls. Standard Door Removal & Replacement Base Grille Door Swing Reversal...

Owners Manual
Page 9
...Bottom Hinge Door Swing Reversal (optional) 1-1 1-2 A A A. 5/16" Hex-Head Hinge Screws, Dome Caps and Dome Cap Washers A. Setscrew C. Cover Top Hinge A B C B. Flat-Head Handle Screw A. Door Stop Screw 7 A. Shoulder Screw B. Door Handle Hole Plug 9 Hinge Pin Center Hinge A B A. Door Hinge Hole Plug 4 Removal of Door Stops AB 3 A C A. Door Stop Screw A. Flat-Head Handle Screw 5 Reinstallation of Door Stops A B A. Door Stop B. Cabinet Hinge Hole Plugs 2 A B 6A A. Contour Door Removal & Replacement Base Grille A A. Center Hinge B. 5/16" Hex-Head Hinge Screws...
...Bottom Hinge Door Swing Reversal (optional) 1-1 1-2 A A A. 5/16" Hex-Head Hinge Screws, Dome Caps and Dome Cap Washers A. Setscrew C. Cover Top Hinge A B C B. Flat-Head Handle Screw A. Door Stop Screw 7 A. Shoulder Screw B. Door Handle Hole Plug 9 Hinge Pin Center Hinge A B A. Door Hinge Hole Plug 4 Removal of Door Stops AB 3 A C A. Door Stop Screw A. Flat-Head Handle Screw 5 Reinstallation of Door Stops A B A. Door Stop B. Cabinet Hinge Hole Plugs 2 A B 6A A. Contour Door Removal & Replacement Base Grille A A. Center Hinge B. 5/16" Hex-Head Hinge Screws...

Owners Manual
Page 10
... of User Instructions) Door handle hole plug Tools Needed: Scissors Masking tape Freezer Door 1. NOTE: When the template is completely covered. 6. Turn the leveling screw to the right to lower that match the shape of the refrigerator. Slowly remove the template. 3. Open both doors again to lower the refrigerator. Replace the base grille. Rub a small amount of the refrigerator or turn both leveling screws to adjust. 5. Use a socket driver to left . Using the removal tool (provided), remove...
... of User Instructions) Door handle hole plug Tools Needed: Scissors Masking tape Freezer Door 1. NOTE: When the template is completely covered. 6. Turn the leveling screw to the right to lower that match the shape of the refrigerator. Slowly remove the template. 3. Open both doors again to lower the refrigerator. Replace the base grille. Rub a small amount of the refrigerator or turn both leveling screws to adjust. 5. Use a socket driver to left . Using the removal tool (provided), remove...

Owners Manual
Page 11
... before removing the ice storage bin to serve ice or to cool completely before adjusting the controls. Increase airflow to the refrigerator IMPORTANT: Once the performance is still preset as a guide. CONDITION/REASON: REFRIGERATOR too warm FREEZER too warm/too little ice REFRIGERATOR too cold FREEZER too cold ADJUSTMENT: TEMPERATURE Control one setting higher AIRFLOW or TEMPERATURE Control one setting higher TEMPERATURE Control one setting lower AIRFLOW or TEMPERATURE Control one setting at the factory. After replacing the ice storage bin, turn on some models - IMPORTANT...
... before removing the ice storage bin to serve ice or to cool completely before adjusting the controls. Increase airflow to the refrigerator IMPORTANT: Once the performance is still preset as a guide. CONDITION/REASON: REFRIGERATOR too warm FREEZER too warm/too little ice REFRIGERATOR too cold FREEZER too cold ADJUSTMENT: TEMPERATURE Control one setting higher AIRFLOW or TEMPERATURE Control one setting higher TEMPERATURE Control one setting lower AIRFLOW or TEMPERATURE Control one setting at the factory. After replacing the ice storage bin, turn on some models - IMPORTANT...

Owners Manual
Page 12
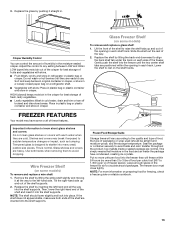
... needs. Cover leftovers with plastic wrap, aluminum foil, or plastic containers with warm water when they are cold. Ice Production Rate ■ NORMAL Ice Production: The ice maker should produce approximately 16 to 20 batches of ice in a 24-hour period. Shelves and covers may have some models): The ice maker should produce approximately 8 to shatter into many small, pebble-size pieces. Deli Drawer To remove and replace the deli drawer...
... needs. Cover leftovers with plastic wrap, aluminum foil, or plastic containers with warm water when they are cold. Ice Production Rate ■ NORMAL Ice Production: The ice maker should produce approximately 16 to 20 batches of ice in a 24-hour period. Shelves and covers may have some models): The ice maker should produce approximately 8 to shatter into many small, pebble-size pieces. Deli Drawer To remove and replace the deli drawer...
Owners Manual
Page 13
... food and air inside a sealed package are heavy. Replace the shelf by inserting the left -hand side. Shelves and covers may have condensed, creating ice crystals. Tempered glass is normal. Adjust the control to shatter into the shelf supports. Ice crystals inside the package have some or all the way to use. NOTE: For more than will vary according to avoid dropping. Crisper Humidity Control You can control the...
... food and air inside a sealed package are heavy. Replace the shelf by inserting the left -hand side. Shelves and covers may have condensed, creating ice crystals. Tempered glass is normal. Adjust the control to shatter into the shelf supports. Ice crystals inside the package have some or all the way to use. NOTE: For more than will vary according to avoid dropping. Crisper Humidity Control You can control the...
Owners Manual
Page 14
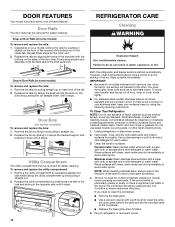
... (doors and cabinet), plastic parts, interior and door liners or gaskets. If you need for the other harsh cleaning tools. 1. Plug in normal home operating environments. Repeat these features. Replace the bin by lifting it and pulling it straight out. 2. Unplug refrigerator or disconnect power. 2. Rinse surfaces with a soft brush to avoid water spots. REFRIGERATOR CARE Cleaning WARNING Explosion Hazard Use nonflammable cleaner. Remove the bin by sliding it in warm water...
... (doors and cabinet), plastic parts, interior and door liners or gaskets. If you need for the other harsh cleaning tools. 1. Plug in normal home operating environments. Repeat these features. Replace the bin by lifting it and pulling it straight out. 2. Unplug refrigerator or disconnect power. 2. Rinse surfaces with a soft brush to avoid water spots. REFRIGERATOR CARE Cleaning WARNING Explosion Hazard Use nonflammable cleaner. Remove the bin by sliding it in warm water...
Owners Manual
Page 15
... have an automatic ice maker, turn off the water supply to replace an LED bulb, use LED technology. Empty the ice bin. If your refrigerator has an automatic ice maker: ■ Turn off the ice maker. Remove all food from the refrigerator and pack all instructions on the sides and pulling it with an LED light bulb, order part number W10574850 (2.0 watts). See "Using the Control(s)." 5. Unplug refrigerator. 6. Tape the doors closed and tape the power cord to the...
... have an automatic ice maker, turn off the water supply to replace an LED bulb, use LED technology. Empty the ice bin. If your refrigerator has an automatic ice maker: ■ Turn off the ice maker. Remove all food from the refrigerator and pack all instructions on the sides and pulling it with an LED light bulb, order part number W10574850 (2.0 watts). See "Using the Control(s)." 5. Unplug refrigerator. 6. Tape the doors closed and tape the power cord to the...

Owners Manual
Page 16
... defrost cycle and water runs into the drain pan ■ Creaking/Cracking - The motor seems to cool completely. valves opening or closing ■ Pulsating - flow of refrigerant, water line, or from the ice maker mold 16 water dripping on top of inside walls, especially during initial cool-down ■ Water running - occurs as ice is not turned on . ■ New installation - Do not remove ground prong. Do not use an extension cord. Do not use an adapter. Plug...
... defrost cycle and water runs into the drain pan ■ Creaking/Cracking - The motor seems to cool completely. valves opening or closing ■ Pulsating - flow of refrigerant, water line, or from the ice maker mold 16 water dripping on top of inside walls, especially during initial cool-down ■ Water running - occurs as ice is not turned on . ■ New installation - Do not remove ground prong. Do not use an extension cord. Do not use an adapter. Plug...
Owners Manual
Page 17
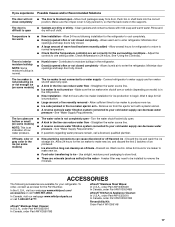
... completely open . ■ A kink in the ON position. ■ New installation - Adjust the controls to enter refrigerator. Connect refrigerator to produce more ice. ■ Ice cube jammed in the line can reduce water flow - Make sure the ice maker wire shutoff arm or switch (depending on some models) NOTE: This is an indication of ice produced. ■ Ice stored too long can decrease water pressure - Remove ice from door. See "Using the Control(s)." Straighten the water source line. ■ Ice maker...
... completely open . ■ A kink in the ON position. ■ New installation - Adjust the controls to enter refrigerator. Connect refrigerator to produce more ice. ■ Ice cube jammed in the line can reduce water flow - Make sure the ice maker wire shutoff arm or switch (depending on some models) NOTE: This is an indication of ice produced. ■ Ice stored too long can decrease water pressure - Remove ice from door. See "Using the Control(s)." Straighten the water source line. ■ Ice maker...
Owners Manual
Page 18
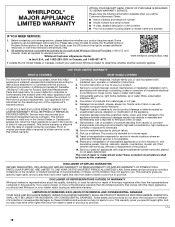
... review the Troubleshooting or Problem Solver section of the Use and Care Guide, scan the QR code on the duration of implied warranties of original consumer purchase. In the U.S. Commercial, non-residential, multiple-family use, or use with published user, operator or installation instructions. 2. Conversion of products from the date of merchantability or fitness, so this warranty. Please have other rights that interfere with original model/serial numbers removed...
... review the Troubleshooting or Problem Solver section of the Use and Care Guide, scan the QR code on the duration of implied warranties of original consumer purchase. In the U.S. Commercial, non-residential, multiple-family use, or use with published user, operator or installation instructions. 2. Conversion of products from the date of merchantability or fitness, so this warranty. Please have other rights that interfere with original model/serial numbers removed...

Owners Manual
Page 39
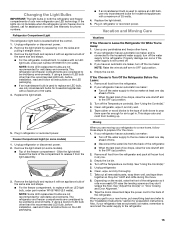
Align with top of the door. Aligner avec le sommet de la porte. Ideal position of the door. Aligner avec le côté de la porte. 4 12.5 cm) 4 10.6 cm) Standard Door Porte Standard Align with side of hole (shown as suggestion) Position idéale du trou (suggérée)
Align with top of the door. Aligner avec le sommet de la porte. Ideal position of the door. Aligner avec le côté de la porte. 4 12.5 cm) 4 10.6 cm) Standard Door Porte Standard Align with side of hole (shown as suggestion) Position idéale du trou (suggérée)
Dimension Guide
Page 1
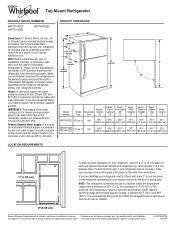
... installation, cleaning, or removing a light bulb, turn the control (Thermostat, Refrigerator or Freezer Control depending on the model) to improve Dimensions are for a 1⁄2" (1.25 cm) space on each and between 60°F (15°C) and 90°F (32°C). When you are finished, reconnect the refrigerator to the electrical source and reset the control (Thermostat, Refrigerator or Freezer Control depending on your model) to allow for planning purposes only. Reverse Osmosis Water Supply: If a reverse...
... installation, cleaning, or removing a light bulb, turn the control (Thermostat, Refrigerator or Freezer Control depending on the model) to improve Dimensions are for a 1⁄2" (1.25 cm) space on each and between 60°F (15°C) and 90°F (32°C). When you are finished, reconnect the refrigerator to the electrical source and reset the control (Thermostat, Refrigerator or Freezer Control depending on your model) to allow for planning purposes only. Reverse Osmosis Water Supply: If a reverse...


