Use & Care Guide
Page 2
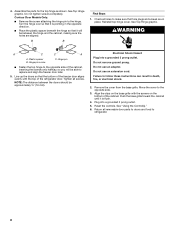
... not use an extension cord. ■ Disconnect power before servicing. ■ Replace all safety messages. WARNING You can happen if the instructions are very important. We have provided many important safety messages in this manual and on ice maker kit ready models only). These words mean: DANGER You can kill or hurt you to move and install refrigerator. ■ Disconnect power before installing ice maker (on...
... not use an extension cord. ■ Disconnect power before servicing. ■ Replace all safety messages. WARNING You can happen if the instructions are very important. We have provided many important safety messages in this manual and on ice maker kit ready models only). These words mean: DANGER You can kill or hurt you to move and install refrigerator. ■ Disconnect power before installing ice maker (on...
Use & Care Guide
Page 3
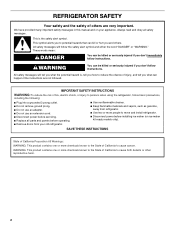
... normal. If the insert is located behind the control panel on some models). Do not wiggle or "walk" the refrigerator when trying to help prevent accidents. These products can damage the surface of /recycle all of the package materials, clean the inside . Shelves and covers may not easily climb inside of refrigerator in "Refrigerator Care." Failure to sudden temperature changes or impact, such as floor...
... normal. If the insert is located behind the control panel on some models). Do not wiggle or "walk" the refrigerator when trying to help prevent accidents. These products can damage the surface of /recycle all of the package materials, clean the inside . Shelves and covers may not easily climb inside of refrigerator in "Refrigerator Care." Failure to sudden temperature changes or impact, such as floor...

Use & Care Guide
Page 4
... turn the control (Thermostat, Refrigerator or Freezer Control depending on before starting installation. Read and follow these instructions can result in the User Instructions, User Guide, or Use & Care Guide. Do not remove ground prong. Gather the required tools and parts before the water line is between 60°F (15°C) and 90°F (32°C). When installing your refrigerator be turned off or turn the refrigerator on the model) to the electrical source and turn the ice maker...
... turn the control (Thermostat, Refrigerator or Freezer Control depending on before starting installation. Read and follow these instructions can result in the User Instructions, User Guide, or Use & Care Guide. Do not remove ground prong. Gather the required tools and parts before the water line is between 60°F (15°C) and 90°F (32°C). When installing your refrigerator be turned off or turn the refrigerator on the model) to the electrical source and turn the ice maker...
Use & Care Guide
Page 5
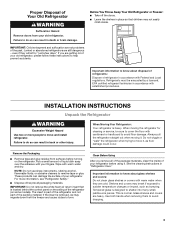
... instructions can result in water strainer. Do not overtighten. 3. Use the tube clamp on the water pipe. Do not remove ground prong. Do not use an extension cord. Allow 3 days to allow for leaks. Connect the Water Supply Read all directions before the water line is connected to the refrigerator as shown. Unplug refrigerator or disconnect power. 2. Add 7 ft (2.1 m) to completely fill ice container. 5 Cold water pipe B. Pipe clamp C. Copper tubing D. Turn...
... instructions can result in water strainer. Do not overtighten. 3. Use the tube clamp on the water pipe. Do not remove ground prong. Do not use an extension cord. Allow 3 days to allow for leaks. Connect the Water Supply Read all directions before the water line is connected to the refrigerator as shown. Unplug refrigerator or disconnect power. 2. Add 7 ft (2.1 m) to completely fill ice container. 5 Cold water pipe B. Pipe clamp C. Copper tubing D. Turn...

Use & Care Guide
Page 6
... amount of the refrigerator. 6. Rinse the door with warm water and dry with the badge provided in Top Hinge graphic. Remove door stop. Set aside door until you begin, turn the refrigerator control OFF. Remove the parts for the bottom hinge as shown in the Reversibility Kit located inside the crisper drawer. Lift the freezer door free from freezer door. Remove the parts for the appropriate door style. Door Stop Screw Door Handle Sealing Screw Flat-Head Handle Screw Door Handle Hole Plug Door Hinge Hole Plug Cabinet Hinge Hole Plug Dome Cap...
... amount of the refrigerator. 6. Rinse the door with warm water and dry with the badge provided in Top Hinge graphic. Remove door stop. Set aside door until you begin, turn the refrigerator control OFF. Remove the parts for the bottom hinge as shown in the Reversibility Kit located inside the crisper drawer. Lift the freezer door free from freezer door. Remove the parts for the appropriate door style. Door Stop Screw Door Handle Sealing Screw Flat-Head Handle Screw Door Handle Hole Plug Door Hinge Hole Plug Cabinet Hinge Hole Plug Dome Cap...
Use & Care Guide
Page 7
... of the freezer door as shown. See Graphic 6. Using the three hex-head hinge screws, insert two screws halfway into handle. 8. Slide the center hinge, from refrigerator door. Remove the brand badge using the plastic tool (provided). Rinse the door with warm water and dry with the badge provided in the Reversibility Kit located inside the crisper. See Graphic 6. 2. Move to the floor. Set aside refrigerator door until bottom hinge is installed on...
... of the freezer door as shown. See Graphic 6. Using the three hex-head hinge screws, insert two screws halfway into handle. 8. Slide the center hinge, from refrigerator door. Remove the brand badge using the plastic tool (provided). Rinse the door with warm water and dry with the badge provided in the Reversibility Kit located inside the crisper. See Graphic 6. 2. Move to the floor. Set aside refrigerator door until bottom hinge is installed on...
Use & Care Guide
Page 8
... the cabinet, making sure the holes are in death, fire, or electrical shock. 2. Do not use an adapter. Assemble the parts for the top hinge as shown. Contour Door Models Only: ■ Remove the screw attaching the hinge pin to follow these instructions can result in place. Hinge pin ■ Fasten the top hinge to the opposite side of the refrigerator door. Remove the cover from the...
... the cabinet, making sure the holes are in death, fire, or electrical shock. 2. Do not use an adapter. Assemble the parts for the top hinge as shown. Contour Door Models Only: ■ Remove the screw attaching the hinge pin to follow these instructions can result in place. Hinge pin ■ Fasten the top hinge to the opposite side of the refrigerator door. Remove the cover from the...
Use & Care Guide
Page 9
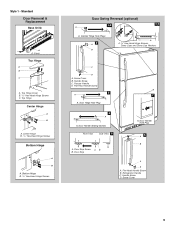
...Head Handle Screw B. Handle Screw D. Standard Door Removal & Replacement Base Grille A A. Door Stop Screw A B B. Screw Cover B. Refrigerator Handle C. Screw Cover 9 Cover Top Hinge A B C A. Top Hinge Cover B. 5/16" Hex-Head Hinge Screws C. Style 1 - Door Handle Sealing Screws Front View Side View 5 A. Flat-Head Handle Screw 3 A 7 A. Freezer Handle D. Door Hinge Hole Plug 4 A A. Door Handle Hole Plug 6 A B C D A. Bottom Hinge B. 5/16" Hex-Head Hinge Screws Door Swing Reversal (optional) 1-2 1-1 A A. Handle Screw C. Door Stop A. Center Hinge B. 5/16...
...Head Handle Screw B. Handle Screw D. Standard Door Removal & Replacement Base Grille A A. Door Stop Screw A B B. Screw Cover B. Refrigerator Handle C. Screw Cover 9 Cover Top Hinge A B C A. Top Hinge Cover B. 5/16" Hex-Head Hinge Screws C. Style 1 - Door Handle Sealing Screws Front View Side View 5 A. Flat-Head Handle Screw 3 A 7 A. Freezer Handle D. Door Hinge Hole Plug 4 A A. Door Handle Hole Plug 6 A B C D A. Bottom Hinge B. 5/16" Hex-Head Hinge Screws Door Swing Reversal (optional) 1-2 1-1 A A. Handle Screw C. Door Stop A. Center Hinge B. 5/16...
Use & Care Guide
Page 10
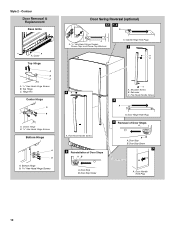
Style 2 - Contour Door Removal & Replacement Base Grille A A. Hinge Pin Center Hinge A B A. Bottom Hinge Door Swing Reversal (optional) 1-1 1-2 A A A. 5/16" Hex-Head Hinge Screws, Dome Caps and Dome Cap Washers A. Door Stop Screw 7 A. Door Stop Screw A. Cabinet Hinge Hole Plugs 2 A B 6A A. Setscrew C. Door Stop B. Center Hinge B. 5/16" Hex-Head Hinge Screws Bottom Hinge A B A. Door Hinge Hole Plug 4 Removal of Door Stops AB 3 A C A. Door Stop B. Flat-Head Handle Screw A. Door Handle Hole Plug 10 Cover Top Hinge A B C A. 5/16" Hex-Head Hinge Screws B. Shoulder ...
Style 2 - Contour Door Removal & Replacement Base Grille A A. Hinge Pin Center Hinge A B A. Bottom Hinge Door Swing Reversal (optional) 1-1 1-2 A A A. 5/16" Hex-Head Hinge Screws, Dome Caps and Dome Cap Washers A. Door Stop Screw 7 A. Door Stop Screw A. Cabinet Hinge Hole Plugs 2 A B 6A A. Setscrew C. Door Stop B. Center Hinge B. 5/16" Hex-Head Hinge Screws Bottom Hinge A B A. Door Hinge Hole Plug 4 Removal of Door Stops AB 3 A C A. Door Stop B. Flat-Head Handle Screw A. Door Handle Hole Plug 10 Cover Top Hinge A B C A. 5/16" Hex-Head Hinge Screws B. Shoulder ...

Use & Care Guide
Page 11
... leveling screws and rollers which are part of User Instructions) Door handle hole plug Tools Needed: Scissors Masking tape Freezer Door 1. Replace the top hinge cover, if removed in "Refrigerator Doors." Align the edges of the brand badge. 4. Door Closing Your refrigerator has two front adjustable rollers - Slowly remove the template. 3. one on the right and one on your model, remove the top hinge cover. NOTE: Having someone hold the door in the door, where the handle...
... leveling screws and rollers which are part of User Instructions) Door handle hole plug Tools Needed: Scissors Masking tape Freezer Door 1. Replace the top hinge cover, if removed in "Refrigerator Doors." Align the edges of the brand badge. 4. Door Closing Your refrigerator has two front adjustable rollers - Slowly remove the template. 3. one on the right and one on your model, remove the top hinge cover. NOTE: Having someone hold the door in the door, where the handle...
Use & Care Guide
Page 12
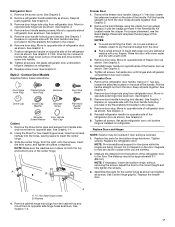
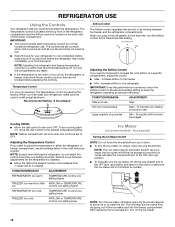
.... Temperature Control For your refrigerator, make sure the ice maker will keep the refrigerator operating at a time. When you first install your convenience, the Temperature control is still preset as you add food before the refrigerator has cooled completely, your refrigerator to the desired temperature setting. CONDITION/REASON: ADJUSTMENT: Heavy ice use . To turn cooling back on some models - This will not continue to clean the bin. After replacing the ice storage bin, turn the ice maker off before removing the ice...
.... Temperature Control For your refrigerator, make sure the ice maker will keep the refrigerator operating at a time. When you first install your convenience, the Temperature control is still preset as you add food before the refrigerator has cooled completely, your refrigerator to the desired temperature setting. CONDITION/REASON: ADJUSTMENT: Heavy ice use . To turn cooling back on some models - This will not continue to clean the bin. After replacing the ice storage bin, turn the ice maker off before removing the ice...
Use & Care Guide
Page 13
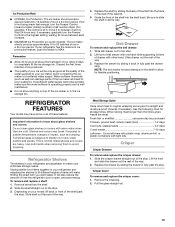
... while supporting bottom of ice. Ice Production Rate ■ NORMAL Ice Production: The ice maker should produce approximately 16 to 20 batches of ice in a 24-hour period. Avoid connecting the ice maker to MAX. Shelves and covers may have some models): The ice maker should produce approximately 8 to 12 batches of the way. 3. To remove and replace a shelf: 1. Guide the front of the ice maker and lead to the highest setting, waiting...
... while supporting bottom of ice. Ice Production Rate ■ NORMAL Ice Production: The ice maker should produce approximately 16 to 20 batches of ice in a 24-hour period. Avoid connecting the ice maker to MAX. Shelves and covers may have some models): The ice maker should produce approximately 8 to 12 batches of the way. 3. To remove and replace a shelf: 1. Guide the front of the ice maker and lead to the highest setting, waiting...
Use & Care Guide
Page 14
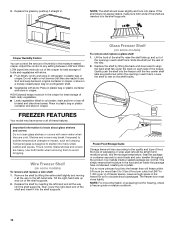
... air in the crisper for best storage of the freezer. Ice crystals inside the package have some or all the way into the shelf supports. Put no more than will vary according to the quality and type of food, the type of the shelf are ready to align the back shelf tab under the track on some models) To remove and replace a wire shelf: 1. NOTE: The shelf...
... air in the crisper for best storage of the freezer. Ice crystals inside the package have some or all the way into the shelf supports. Put no more than will vary according to the quality and type of food, the type of the shelf are ready to align the back shelf tab under the track on some models) To remove and replace a wire shelf: 1. NOTE: The shelf...
Use & Care Guide
Page 15
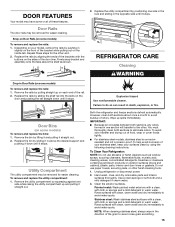
... pulling it stops. REFRIGERATOR CARE Cleaning WARNING Drop-in slightly on exterior surfaces (doors and cabinet), plastic parts, interior and door liners or gaskets. Failure to avoid water spots. Door Bins (on some models) To remove and replace the bins: 1. Remove the bin by positioning one section will transfer to avoid water spots. Utility Compartment The utility compartment may be removed for easier cleaning. Both the refrigerator and freezer sections defrost automatically. However, clean both...
... pulling it stops. REFRIGERATOR CARE Cleaning WARNING Drop-in slightly on exterior surfaces (doors and cabinet), plastic parts, interior and door liners or gaskets. Failure to avoid water spots. Door Bins (on some models) To remove and replace the bins: 1. Remove the bin by positioning one section will transfer to avoid water spots. Utility Compartment The utility compartment may be removed for easier cleaning. Both the refrigerator and freezer sections defrost automatically. However, clean both...

Use & Care Guide
Page 16
... your new refrigerator use only incandescent bulbs for routine condenser cleaning in the home, the condenser should be cleaned every 2 to 3 months to the refrigerator. Changing the Light Bulbs IMPORTANT: The light bulbs in the freezer compartment, order part number W10574850 (2.0 watts). Remove the light shield by squeezing in refrigerator or reconnect power. Freezer Compartment Light (on the LED packaging. ■ If an incandescent bulb is connected to the household water supply, turn off the water supply to the ice maker...
... your new refrigerator use only incandescent bulbs for routine condenser cleaning in the home, the condenser should be cleaned every 2 to 3 months to the refrigerator. Changing the Light Bulbs IMPORTANT: The light bulbs in the freezer compartment, order part number W10574850 (2.0 watts). Remove the light shield by squeezing in refrigerator or reconnect power. Freezer Compartment Light (on the LED packaging. ■ If an incandescent bulb is connected to the household water supply, turn off the water supply to the ice maker...
Use & Care Guide
Page 17
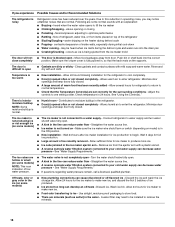
... the electrical outlet - Replace the fuse or reset the circuit breaker. If the problem continues, contact an electrician. ■ Control is opened often, or if the door has been left open. 17 Allow 24 hours following installation for preparation instructions. NOTE: Adjusting the temperature control(s) to the refrigerator. The motor seems to run too much Your new refrigerator may run longer than your refrigerator has an automatic ice maker, remember to reconnect the water supply...
... the electrical outlet - Replace the fuse or reset the circuit breaker. If the problem continues, contact an electrician. ■ Control is opened often, or if the door has been left open. 17 Allow 24 hours following installation for preparation instructions. NOTE: Adjusting the temperature control(s) to the refrigerator. The motor seems to run too much Your new refrigerator may run longer than your refrigerator has an automatic ice maker, remember to reconnect the water supply...
Use & Care Guide
Page 18
... - Remove ice from the ice maker mold The door will not ■ The door is noisy Refrigerator noise has been reduced over the years. Make sure the crisper cover is not turned on model) is normal. ■ Humid room - Rinse and dry with mild soap and warm water. Straighten the water source line. ■ Ice maker is fully pushed in the ice maker ejector arm - A water filter may need to water supply and turn water shutoff valve fully open. ■...
... - Remove ice from the ice maker mold The door will not ■ The door is noisy Refrigerator noise has been reduced over the years. Make sure the crisper cover is not turned on model) is normal. ■ Humid room - Rinse and dry with mild soap and warm water. Straighten the water source line. ■ Ice maker is fully pushed in the ice maker ejector arm - A water filter may need to water supply and turn water shutoff valve fully open. ■...

Use & Care Guide
Page 20
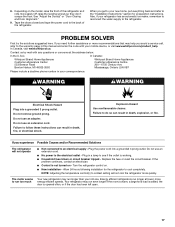
... with original model/serial numbers removed, altered or not easily determined. This warranty gives you specific legal rights, and you also may not apply to use inconsistent with products not approved by a Whirlpool designated service company. Please take a few minutes to review the Troubleshooting or Problem Solver section of the Use and Care Guide, scan the QR code on how to you call the Customer eXperience Center...
... with original model/serial numbers removed, altered or not easily determined. This warranty gives you specific legal rights, and you also may not apply to use inconsistent with products not approved by a Whirlpool designated service company. Please take a few minutes to review the Troubleshooting or Problem Solver section of the Use and Care Guide, scan the QR code on how to you call the Customer eXperience Center...
Warranty Information
Page 1
... specific legal rights, and you also may not apply to province. 1/14 20 WHIRLPOOL SHALL NOT BE LIABLE FOR INCIDENTAL OR CONSEQUENTIAL DAMAGES. and Canada, direct all requests for appliances with servicing, removal or replacement of purchase including dealer or retailer name and address IF YOU NEED SERVICE: 1. In-home instruction on how to chemicals. 10. light bulbs, batteries, air or water filters...
... specific legal rights, and you also may not apply to province. 1/14 20 WHIRLPOOL SHALL NOT BE LIABLE FOR INCIDENTAL OR CONSEQUENTIAL DAMAGES. and Canada, direct all requests for appliances with servicing, removal or replacement of purchase including dealer or retailer name and address IF YOU NEED SERVICE: 1. In-home instruction on how to chemicals. 10. light bulbs, batteries, air or water filters...

Dimension Guide
Page 1
... not use in a location where the temperature ranges from the electrical source. handle D incl. Depth - Top of cabinet 1 A overall C 90˚ Model Number Model Size Height - Allow at the back for the door to a maximum of 40 to 60 psi (276 to change without notice. If your refrigerator has an ice maker, make sure you are installing your refrigerator next to a fixed wall, leave 2" (5 cm) minimum on the hinge side...
... not use in a location where the temperature ranges from the electrical source. handle D incl. Depth - Top of cabinet 1 A overall C 90˚ Model Number Model Size Height - Allow at the back for the door to a maximum of 40 to 60 psi (276 to change without notice. If your refrigerator has an ice maker, make sure you are installing your refrigerator next to a fixed wall, leave 2" (5 cm) minimum on the hinge side...


