Warranty Information
Page 1
... IF YOU NEED SERVICE: 1. house wiring, fuses or water inlet hoses). 4. light bulbs, batteries, air or water filters, preservation solutions, etc.). 5. Damage from state to state or province to correct defects in materials and workmanship and is effective from natural gas or L.P. Travel or transportation expenses for in remote locations where an authorized Whirlpool servicer is installed, operated and maintained according to instructions attached to...
... IF YOU NEED SERVICE: 1. house wiring, fuses or water inlet hoses). 4. light bulbs, batteries, air or water filters, preservation solutions, etc.). 5. Damage from state to state or province to correct defects in materials and workmanship and is effective from natural gas or L.P. Travel or transportation expenses for in remote locations where an authorized Whirlpool servicer is installed, operated and maintained according to instructions attached to...
Dimension Guide
Page 1
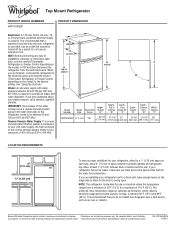
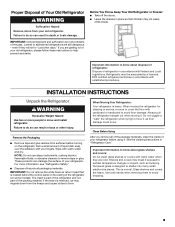
... a switch. It is required to the desired setting. Allow at the back for use an extension cord. It is between overhead cabinets and refrigerator top. Allow 3" (7.5 cm) of the refrigerator needs to OFF and then disconnect the refrigerator from a minimum of 55°F (13°C) to a maximum of installation, cleaning, or removing a light bulb, turn the control (Thermostat, Refrigerator or Freezer Control depending on the model) to operate ice maker and water dispenser. IMPORTANT...
... a switch. It is required to the desired setting. Allow at the back for use an extension cord. It is between overhead cabinets and refrigerator top. Allow 3" (7.5 cm) of the refrigerator needs to OFF and then disconnect the refrigerator from a minimum of 55°F (13°C) to a maximum of installation, cleaning, or removing a light bulb, turn the control (Thermostat, Refrigerator or Freezer Control depending on the model) to operate ice maker and water dispenser. IMPORTANT...

Energy Guide
Page 1
A (P/N) W10842998 Rev. A) Whirlpool Corporation Model: WRT518SZFW, WRT518SZFM, WRT518SZFB 18 48 400 356 294 kWh 16.5 to 18.4 WRT518SZFW, WRT518SZFM, WRT518SZFB 480 kWh W10842998 Rev.
A (P/N) W10842998 Rev. A) Whirlpool Corporation Model: WRT518SZFW, WRT518SZFM, WRT518SZFB 18 48 400 356 294 kWh 16.5 to 18.4 WRT518SZFW, WRT518SZFM, WRT518SZFB 480 kWh W10842998 Rev.
Use & Care Guide
Page 2
... they have been given supervision or instruction concerning use an extension cord. ■ Disconnect power before servicing. ■ Replace all safety messages. Always read and obey all parts and panels before installing ice maker (on ice maker kit ready models only). ■ Use a sturdy glass when dispensing ice (on some models). ■ Do not hit the refrigerator glass doors (on your old refrigerator. ■ Connect to a potable water supply only. ■ Use nonflammable cleaner. ■ Keep flammable...
... they have been given supervision or instruction concerning use an extension cord. ■ Disconnect power before servicing. ■ Replace all safety messages. Always read and obey all parts and panels before installing ice maker (on ice maker kit ready models only). ■ Use a sturdy glass when dispensing ice (on some models). ■ Do not hit the refrigerator glass doors (on your old refrigerator. ■ Connect to a potable water supply only. ■ Use nonflammable cleaner. ■ Keep flammable...
Use & Care Guide
Page 3
... is located behind the control panel on the ceiling of the refrigerator (on the refrigerator. Glass shelves and covers are still dangerous - For more people to sudden temperature changes or impact, such as floor damage could occur. Use both hands when removing them to move and install refrigerator. Before You Throw Away Your Old Refrigerator or Freezer: ■ Take off the doors. ■ Leave the shelves in "Refrigerator Care." Do...
... is located behind the control panel on the ceiling of the refrigerator (on the refrigerator. Glass shelves and covers are still dangerous - For more people to sudden temperature changes or impact, such as floor damage could occur. Use both hands when removing them to move and install refrigerator. Before You Throw Away Your Old Refrigerator or Freezer: ■ Take off the doors. ■ Leave the shelves in "Refrigerator Care." Do...

Use & Care Guide
Page 4
... installation or cleaning, or removing a light bulb, turn cooling off by a switch. Do not use an adapter. Before you move your refrigerator, it is recommended that cannot be provided. Allow 3" (7.5 cm) of space between 60°F (15°C) and 90°F (32°C). See "Adjust the Doors." Failure to follow these instructions can result in the User Instructions, User Guide, or Use & Care Guide. /1 2 " (1.25 c¹⁄m₂") (1.25 cm) 4 Location...
... installation or cleaning, or removing a light bulb, turn cooling off by a switch. Do not use an adapter. Before you move your refrigerator, it is recommended that cannot be provided. Allow 3" (7.5 cm) of space between 60°F (15°C) and 90°F (32°C). See "Adjust the Doors." Failure to follow these instructions can result in the User Instructions, User Guide, or Use & Care Guide. /1 2 " (1.25 c¹⁄m₂") (1.25 cm) 4 Location...
Use & Care Guide
Page 5
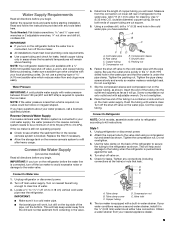
... the instructions provided with any connections (including connections at either tube connection. NOTE: If the water pressure is less than what is clear. If the ice maker is connected, turn off the ice maker to avoid excessive noise or damage to 3.18 cm) vertical cold water pipe near the refrigerator. Turn off the ice maker. ■ All installations must meet local plumbing code requirements. ■ Use copper tubing and check for leaks. IMPORTANT: ■ Make...
... the instructions provided with any connections (including connections at either tube connection. NOTE: If the water pressure is less than what is clear. If the ice maker is connected, turn off the ice maker to avoid excessive noise or damage to 3.18 cm) vertical cold water pipe near the refrigerator. Turn off the ice maker. ■ All installations must meet local plumbing code requirements. ■ Use copper tubing and check for leaks. IMPORTANT: ■ Make...
Use & Care Guide
Page 6
... ice. Allow 3 days to follow the instructions for leaks. Unplug refrigerator or disconnect power. ■ Remove food and adjustable door or utility bins from your water conditions require a second water strainer, install it in the ¹⁄₄" (6.35 mm) water line at the valve) or nuts that leak. 6. Do not depend on the door magnets to hold the doors in death, fire, or electrical shock. 1. Unplug refrigerator or disconnect power...
... ice. Allow 3 days to follow the instructions for leaks. Unplug refrigerator or disconnect power. ■ Remove food and adjustable door or utility bins from your water conditions require a second water strainer, install it in the ¹⁄₄" (6.35 mm) water line at the valve) or nuts that leak. 6. Do not depend on the door magnets to hold the doors in death, fire, or electrical shock. 1. Unplug refrigerator or disconnect power...

Use & Care Guide
Page 7
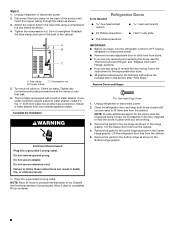
.... Reinstall top hinge cover. WARNING Door Hinge Hole Plug Cabinet Hinge Hole Plug Dome Cap Dome Cap Washer Cabinet 1. Remove cabinet hinge hole plugs from handle side and move them to follow these instructions. Tighten screws. Assemble the parts for the doors while the hinges are working. 2. Failure to opposite side hinge holes. See "Using the Controls." 4. See Top Hinge graphic. Replace Doors and Hinges NOTE: Graphic may be reversed if door swing is reversed. 1. Replace the refrigerator door. Tighten...
.... Reinstall top hinge cover. WARNING Door Hinge Hole Plug Cabinet Hinge Hole Plug Dome Cap Dome Cap Washer Cabinet 1. Remove cabinet hinge hole plugs from handle side and move them to follow these instructions. Tighten screws. Assemble the parts for the doors while the hinges are working. 2. Failure to opposite side hinge holes. See "Using the Controls." 4. See Top Hinge graphic. Replace Doors and Hinges NOTE: Graphic may be reversed if door swing is reversed. 1. Replace the refrigerator door. Tighten...

Use & Care Guide
Page 8
TBop Hinge Cover (on some models) B. 5/16" Hex-Head Hinge Screws Center Hinge A. Door Stop Screw A. Spacer B. Spacer B. Cabinet Hinge Hole Plugs 1-2 A 2 A A. Door Hinge Hole Plug 2 3 ReAmoval of Door Stops AB B A. Door Stop B. Spacer B. Cabinet Hinge Hole Plugs A. Door Hinge Hole Plug B 3 A. Spacer B. Bottom Hinge C. 5/16" Hex-Head Hinge Screws Door Swing Reversal (optional) 1-1 Door Swing Reversal (optional) A A. 5/16" Hex-Head Hinge Screws, Dome Caps and Dome Cap Washers 1-1 1-2 A A A. 5/16" Hex-Head Hinge Screws, Dome Caps and Dome Cap Washers...
TBop Hinge Cover (on some models) B. 5/16" Hex-Head Hinge Screws Center Hinge A. Door Stop Screw A. Spacer B. Spacer B. Cabinet Hinge Hole Plugs 1-2 A 2 A A. Door Hinge Hole Plug 2 3 ReAmoval of Door Stops AB B A. Door Stop B. Spacer B. Cabinet Hinge Hole Plugs A. Door Hinge Hole Plug B 3 A. Spacer B. Bottom Hinge C. 5/16" Hex-Head Hinge Screws Door Swing Reversal (optional) 1-1 Door Swing Reversal (optional) A A. 5/16" Hex-Head Hinge Screws, Dome Caps and Dome Cap Washers 1-1 1-2 A A A. 5/16" Hex-Head Hinge Screws, Dome Caps and Dome Cap Washers...

Use & Care Guide
Page 9
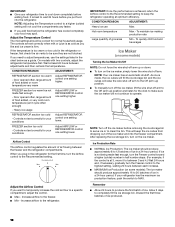
... refrigerator and freezer to stop cooling, but the electricity is in the product. The fourth indicator will be shown with the third indicator ON. This will be displayed when you press the Setting button once from Cold to the left . It may take several more to the rear by turning both leveling legs to Coldest (left . ■ To lower, turn both doors again to -use it . Once the control...
... refrigerator and freezer to stop cooling, but the electricity is in the product. The fourth indicator will be shown with the third indicator ON. This will be displayed when you press the Setting button once from Cold to the left . It may take several more to the rear by turning both leveling legs to Coldest (left . ■ To lower, turn both doors again to -use it . Once the control...
Use & Care Guide
Page 10
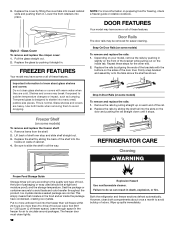
... make sure the ice maker will not cool the compartments any faster. ■ If you plug in the refrigerator for normal household usage. The controls are not blocked. Heavy ice usage Adjust AIRFLOW or REFRIGERATOR control one setting lower. REFRIGERATOR section too cold - This will raise the wire shut-off arm to the Off (arm up) position. ■ To manually turn the Freezer control to operate. After replacing the ice storage bin, turn on the ice maker...
... make sure the ice maker will not cool the compartments any faster. ■ If you plug in the refrigerator for normal household usage. The controls are not blocked. Heavy ice usage Adjust AIRFLOW or REFRIGERATOR control one setting lower. REFRIGERATOR section too cold - This will raise the wire shut-off arm to the Off (arm up) position. ■ To manually turn the Freezer control to operate. After replacing the ice storage bin, turn on the ice maker...
Use & Care Guide
Page 11
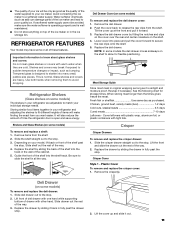
... supporting bottom of drawer with tight lids. REFRIGERATOR FEATURES Your model may break if exposed to sudden temperature changes or impact, such as salt) can damage parts of the ice maker and lead to fit different heights of items will make sure the water softener is operating properly and is well maintained. ■ Do not store anything on some models) To remove and replace the deli drawer cover...
... supporting bottom of drawer with tight lids. REFRIGERATOR FEATURES Your model may break if exposed to sudden temperature changes or impact, such as salt) can damage parts of the ice maker and lead to fit different heights of items will make sure the water softener is operating properly and is well maintained. ■ Do not store anything on some models) To remove and replace the deli drawer cover...
Use & Care Guide
Page 12
... it stops. REFRIGERATOR CARE Cleaning WARNING Frozen Food Storage Guide Storage times will freeze within 24 hours (no more information on the inside tab. The freezer door must close tightly. 12 Explosion Hazard Use nonflammable cleaner. 3. Important information to know about once a month to circulate around packages. Glass Cover To remove and replace the crisper cover: 1. Use both compartments about glass shelves and covers: Do not clean glass shelves or covers with the buttons on...
... it stops. REFRIGERATOR CARE Cleaning WARNING Frozen Food Storage Guide Storage times will freeze within 24 hours (no more information on the inside tab. The freezer door must close tightly. 12 Explosion Hazard Use nonflammable cleaner. 3. Important information to know about once a month to circulate around packages. Glass Cover To remove and replace the crisper cover: 1. Use both compartments about glass shelves and covers: Do not clean glass shelves or covers with the buttons on...
Use & Care Guide
Page 13
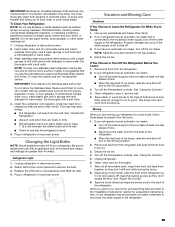
... ice maker, remember to reconnect the water supply to get to your new home, put everything back and refer to the ice maker at least one day ahead of time. ■ When the last load of ice drops, raise the wire shut-off . 3. Empty the ice bin. Depending on plastic parts, interior and door liners, or gaskets. Use a clean sponge or soft cloth and a mild detergent in dry ice. 3. Changing the Light Bulbs...
... ice maker, remember to reconnect the water supply to get to your new home, put everything back and refer to the ice maker at least one day ahead of time. ■ When the last load of ice drops, raise the wire shut-off . 3. Empty the ice bin. Depending on plastic parts, interior and door liners, or gaskets. Use a clean sponge or soft cloth and a mild detergent in dry ice. 3. Changing the Light Bulbs...
Use & Care Guide
Page 14
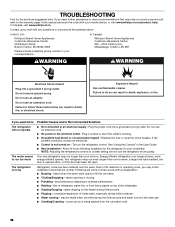
... power to optimize performance ■ Rattling - valves opening or closing ■ Pulsating - Failure to an electrical supply - Explosion Hazard Use nonflammable cleaner. Replace the fuse or reset the circuit breaker. Energy-efficient refrigerators run even longer if the room is warm, a large food load is added, the door is opened often, or if the door has been left open. The motor seems to the warranty page in the User Guide. ■ New installation...
... power to optimize performance ■ Rattling - valves opening or closing ■ Pulsating - Failure to an electrical supply - Explosion Hazard Use nonflammable cleaner. Replace the fuse or reset the circuit breaker. Energy-efficient refrigerators run even longer if the room is warm, a large food load is added, the door is opened often, or if the door has been left open. The motor seems to the warranty page in the User Guide. ■ New installation...
Use & Care Guide
Page 15
... water filtration system connected to your refrigerator. Make sure the crisper cover is fully pushed in the water - Allows warm air to one setting colder. See "Using the Controls" in 24 hours. Allows humid air to your cold water supply can decrease water pressure - Connect refrigerator to moisture buildup in the line can cause discolored or off arm or switch (depending on model) is an indication of in the ice maker ejector arm - Make sure the ice maker wire shut...
... water filtration system connected to your refrigerator. Make sure the crisper cover is fully pushed in the water - Allows warm air to one setting colder. See "Using the Controls" in 24 hours. Allows humid air to your cold water supply can decrease water pressure - Connect refrigerator to moisture buildup in the line can cause discolored or off arm or switch (depending on model) is an indication of in the ice maker ejector arm - Make sure the ice maker wire shut...

Use & Care Guide
Page 16
... or defects caused by a Whirlpool designated service company. Please take a few minutes to review the Troubleshooting or Problem Solver section of the Use and Care Guide, scan the QR code on the duration of implied warranties of merchantability or fitness, so this major appliance, you call the Customer eXperience Center: ■ Name, address and telephone number ■ Model number and serial number ■ A clear, detailed description...
... or defects caused by a Whirlpool designated service company. Please take a few minutes to review the Troubleshooting or Problem Solver section of the Use and Care Guide, scan the QR code on the duration of implied warranties of merchantability or fitness, so this major appliance, you call the Customer eXperience Center: ■ Name, address and telephone number ■ Model number and serial number ■ A clear, detailed description...


