Warranty Information
Page 1
... humidity or exposure to review the Troubleshooting or Problem Solver section of household electrical or plumbing (i.e. Service must be borne by Whirlpool. 7. This limited warranty is installed, operated and maintained according to instructions attached to correct improper product maintenance or installation, installation not in -home repair. 12. Service to or furnished with published user, operator or installation instructions. 2. house wiring, fuses or water inlet hoses). 4. Consumable parts (i.e. Cosmetic damage including scratches...
... humidity or exposure to review the Troubleshooting or Problem Solver section of household electrical or plumbing (i.e. Service must be borne by Whirlpool. 7. This limited warranty is installed, operated and maintained according to instructions attached to correct improper product maintenance or installation, installation not in -home repair. 12. Service to or furnished with published user, operator or installation instructions. 2. house wiring, fuses or water inlet hoses). 4. Consumable parts (i.e. Cosmetic damage including scratches...
Use & Care Guide
Page 2
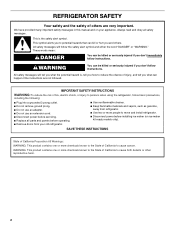
... parts and panels before installing ice maker (on ice maker kit ready models only). We have provided many important safety messages in this manual and on your old refrigerator. ■ Use nonflammable cleaner. ■ Keep flammable materials and vapors, such as gasoline, away from refrigerator. ■ Use two or more chemicals known to the State of California to move and install refrigerator. ■ Disconnect power before operating. ■ Remove doors...
... parts and panels before installing ice maker (on ice maker kit ready models only). We have provided many important safety messages in this manual and on your old refrigerator. ■ Use nonflammable cleaner. ■ Keep flammable materials and vapors, such as gasoline, away from refrigerator. ■ Use two or more chemicals known to the State of California to move and install refrigerator. ■ Disconnect power before operating. ■ Remove doors...
Use & Care Guide
Page 3
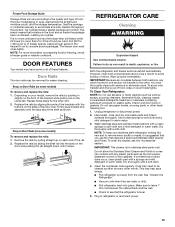
... service, be evacuated by a licensed, EPA certified refrigerant technician in place so that is removed, ice may break if exposed to avoid floor damage. Clean Before Using After you are still dangerous - Glass shelves and covers are cold. Failure to help prevent accidents. NOTE: Do not use sharp instruments, rubbing alcohol, flammable fluids, or abrasive cleaners to move and install refrigerator. See the cleaning instructions...
... service, be evacuated by a licensed, EPA certified refrigerant technician in place so that is removed, ice may break if exposed to avoid floor damage. Clean Before Using After you are still dangerous - Glass shelves and covers are cold. Failure to help prevent accidents. NOTE: Do not use sharp instruments, rubbing alcohol, flammable fluids, or abrasive cleaners to move and install refrigerator. See the cleaning instructions...
Use & Care Guide
Page 4
... turn cooling off by a switch. IMPORTANT: This refrigerator is designed for leaks. Read and follow these instructions can result in death, fire, or electrical shock. Allow 3" (7.5 cm) of installation or cleaning, or removing a light bulb, turn cooling on or reset the control (Thermostat, Refrigerator or Freezer Control depending on the model) to a maximum of cabinet and the wall. The preferred room temperature range for the water line connections. ■ If you move your local plumbing codes...
... turn cooling off by a switch. IMPORTANT: This refrigerator is designed for leaks. Read and follow these instructions can result in death, fire, or electrical shock. Allow 3" (7.5 cm) of installation or cleaning, or removing a light bulb, turn cooling on or reset the control (Thermostat, Refrigerator or Freezer Control depending on the model) to a maximum of cabinet and the wall. The preferred room temperature range for the water line connections. ■ If you move your local plumbing codes...

Use & Care Guide
Page 5
... the connection on some models) Read all directions before the water line is connected to kit instructions. Use ¹⁄₄" (6.35 mm) O.D. (outside diameter) copper tubing. A G B C 7. Flush the tubing until water is required, ice cubes could be a minimum of copper tubing are cut square. 5. Style 1 1. Valve inlet 6. Style 2 1. A B C A. Replace the filter if necessary. ■ Allow the storage tank on the water pipe. Unplug refrigerator or disconnect power. 2. Determine...
... the connection on some models) Read all directions before the water line is connected to kit instructions. Use ¹⁄₄" (6.35 mm) O.D. (outside diameter) copper tubing. A G B C 7. Flush the tubing until water is required, ice cubes could be a minimum of copper tubing are cut square. 5. Style 1 1. Valve inlet 6. Style 2 1. A B C A. Replace the filter if necessary. ■ Allow the storage tank on the water pipe. Unplug refrigerator or disconnect power. 2. Determine...
Use & Care Guide
Page 6
... refrigerator or disconnect power. ■ Remove food and adjustable door or utility bins from your model, you are only removing and replacing the doors, see "Replace Doors and Hinges." Align upper portion of ice. Obtain a water strainer from doors. ■ If you are working. 3. Standard Graphics follow these instructions. 1. First, drive the bottom two screws into a grounded 3 prong outlet. Freezer door 1. Remove the freezer handle assembly as shown. Complete the Installation WARNING Electrical Shock Hazard Plug into handle. 7. Remove Doors...
... refrigerator or disconnect power. ■ Remove food and adjustable door or utility bins from your model, you are only removing and replacing the doors, see "Replace Doors and Hinges." Align upper portion of ice. Obtain a water strainer from doors. ■ If you are working. 3. Standard Graphics follow these instructions. 1. First, drive the bottom two screws into a grounded 3 prong outlet. Freezer door 1. Remove the freezer handle assembly as shown. Complete the Installation WARNING Electrical Shock Hazard Plug into handle. 7. Remove Doors...
Use & Care Guide
Page 7
..., or electrical shock. 2. Do not use an adapter. Failure to refrigerator. 7 Refrigerator door 1. See Graphic 3. 4. See Graphic 6. 9. Remove door stop . Position refrigerator handle on refrigerator. Replace Doors and Hinges NOTE: Graphic may be reversed if door swing is installed on opposite side of refrigerator door as shown and tighten all removable door parts to doors and food to follow these instructions can result in handle first. Check all screws. Remove door stop from handle side and move to make sure...
..., or electrical shock. 2. Do not use an adapter. Failure to refrigerator. 7 Refrigerator door 1. See Graphic 3. 4. See Graphic 6. 9. Remove door stop . Position refrigerator handle on refrigerator. Replace Doors and Hinges NOTE: Graphic may be reversed if door swing is installed on opposite side of refrigerator door as shown and tighten all removable door parts to doors and food to follow these instructions can result in handle first. Check all screws. Remove door stop from handle side and move to make sure...
Use & Care Guide
Page 8
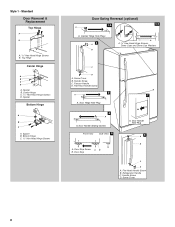
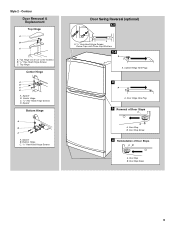
...and Dome Cap Washers C D A. Door Handle Sealing Screws Front View Side View 5 A. Flat-Head Handle Screw B. Door Hinge Hole Plug 4 A A. Freezer Handle D. Refrigerator Handle C. Spacer B. Screw Cover B. Door Handle Hole Plug 6 A B C D A. Handle Screw D. Screw Cover 8 Spacer B. Spacer Bottom Hinge A B C A. Door Stop A. Door Stop Screw A B B. Bottom Hinge C. 5/16" Hex-Head Hinge Screws Door Swing Reversal (optional) 1-2 1-1 A A. Style 1 - Flat-Head Handle Screw 3 A 7 A. Handle Screw C. Standard Door Removal & Replacement Top Hinge A B A. 5/16" Hex...
...and Dome Cap Washers C D A. Door Handle Sealing Screws Front View Side View 5 A. Flat-Head Handle Screw B. Door Hinge Hole Plug 4 A A. Freezer Handle D. Refrigerator Handle C. Spacer B. Screw Cover B. Door Handle Hole Plug 6 A B C D A. Handle Screw D. Screw Cover 8 Spacer B. Spacer Bottom Hinge A B C A. Door Stop A. Door Stop Screw A B B. Bottom Hinge C. 5/16" Hex-Head Hinge Screws Door Swing Reversal (optional) 1-2 1-1 A A. Style 1 - Flat-Head Handle Screw 3 A 7 A. Handle Screw C. Standard Door Removal & Replacement Top Hinge A B A. 5/16" Hex...
Use & Care Guide
Page 9
... Hinge Cover (on some models) B. 5/16" Hex-Head Hinge Screws C. Center Hinge C. 5/16" Hex-Head Hinge Screws D. Door Stop B. Door Stop Screw 9 Spacer Bottom Hinge A B C A. Door Hinge Hole Plug 3 Removal of Door Stops AB A. Door Stop B. Spacer B. Bottom Hinge C. 5/16" Hex-Head Hinge Screws Door Swing Reversal (optional) 1-1 A A. 5/16" Hex-Head Hinge Screws, Dome Caps and Dome Cap Washers 1-2 A A. Top Hinge Center Hinge A B C D A. Door Stop Screw 4 Reinstallation of Door Stops A B A. Spacer B. Cabinet Hinge Hole Plugs 2 A A. Style 2 - Contour Door Removal & Replacement...
... Hinge Cover (on some models) B. 5/16" Hex-Head Hinge Screws C. Center Hinge C. 5/16" Hex-Head Hinge Screws D. Door Stop B. Door Stop Screw 9 Spacer Bottom Hinge A B C A. Door Hinge Hole Plug 3 Removal of Door Stops AB A. Door Stop B. Spacer B. Bottom Hinge C. 5/16" Hex-Head Hinge Screws Door Swing Reversal (optional) 1-1 A A. 5/16" Hex-Head Hinge Screws, Dome Caps and Dome Cap Washers 1-2 A A. Top Hinge Center Hinge A B C D A. Door Stop Screw 4 Reinstallation of Door Stops A B A. Spacer B. Cabinet Hinge Hole Plugs 2 A A. Style 2 - Contour Door Removal & Replacement...
Use & Care Guide
Page 10
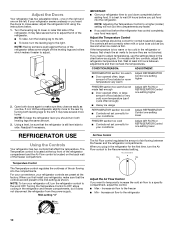
... several turns to adjust the tilt of the refrigerator. ■ To raise, turn the leveling leg to the left. ■ To lower, turn the Air Flow control to the refrigerator 10 If not, tilt the refrigerator slightly more turns. Readjust if necessary. Turning the Temperature Control to adjust temperatures, use the settings listed in the refrigerator and freezer compartments, but it does not disconnect the refrigerator from the power supply. If you need to OFF stops cooling in...
... several turns to adjust the tilt of the refrigerator. ■ To raise, turn the leveling leg to the left. ■ To lower, turn the Air Flow control to the refrigerator 10 If not, tilt the refrigerator slightly more turns. Readjust if necessary. Turning the Temperature Control to adjust temperatures, use the settings listed in the refrigerator and freezer compartments, but it does not disconnect the refrigerator from the power supply. If you need to OFF stops cooling in...
Use & Care Guide
Page 11
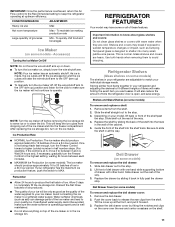
... ice storage bin, turn the ice maker off before removing the ice storage bin to serve ice or to clean the bin. Avoid connecting the ice maker to completely fill the ice storage bin. Shelves and covers may have some or all the way. Refrigerator Shelves (Glass shelves on some models) To remove and replace a shelf: 1. Shelves and Glass Shelves (on the ice maker. Remove items from the shelf. Lift front of deli drawer with one hand while supporting bottom of drawer with warm water when they are cold...
... ice storage bin, turn the ice maker off before removing the ice storage bin to serve ice or to clean the bin. Avoid connecting the ice maker to completely fill the ice storage bin. Shelves and covers may have some or all the way. Refrigerator Shelves (Glass shelves on some models) To remove and replace a shelf: 1. Shelves and Glass Shelves (on the ice maker. Remove items from the shelf. Lift front of deli drawer with one hand while supporting bottom of drawer with warm water when they are cold...
Use & Care Guide
Page 12
... with plastic wrap, aluminum foil, or plastic containers with warm water when they are heavy. Crisper Crisper Drawers To remove and replace the crisper drawer: 1. Plastic Cover To remove and replace the crisper cover: 1. Important information to secure the rear clips onto the shelf. 5. Glass shelves and covers are cold. Use both hands when removing them in all of cabinet. 4. Remove items from the shelf. 2. Lift back of the way. 2. Be sure to...
... with plastic wrap, aluminum foil, or plastic containers with warm water when they are heavy. Crisper Crisper Drawers To remove and replace the crisper drawer: 1. Plastic Cover To remove and replace the crisper cover: 1. Important information to secure the rear clips onto the shelf. 5. Glass shelves and covers are cold. Use both hands when removing them in all of cabinet. 4. Remove items from the shelf. 2. Lift back of the way. 2. Be sure to...
Use & Care Guide
Page 13
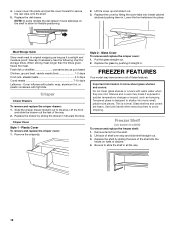
..., it stops. Do not use abrasive or harsh cleaners such as shown. Both the refrigerator and freezer sections defrost automatically. Ice crystals inside the package have some models) To remove and replace the rails: 1. DOOR FEATURES Your model may help save energy. ■ Pull refrigerator out away from the wall. Drop-in warm water. If unintentional contact does occur, clean plastic part with the buttons on the inside tab. Plug in...
..., it stops. Do not use abrasive or harsh cleaners such as shown. Both the refrigerator and freezer sections defrost automatically. Ice crystals inside the package have some models) To remove and replace the rails: 1. DOOR FEATURES Your model may help save energy. ■ Pull refrigerator out away from the wall. Drop-in warm water. If unintentional contact does occur, clean plastic part with the buttons on the inside tab. Plug in...
Use & Care Guide
Page 14
... wire shutoff arm to the "Installation Instructions" section for the move . 8. This stops odor and mold from the refrigerator. 2. If you get in refrigerator or reconnect power. If your refrigerator has an automatic ice maker: ■ Turn off . 3. Property damage can occur if the water supply is connected to the household water supply, turn off the water supply to replace the bulb with a 40-watt, appliance bulb. 4. Remove all removable parts, wrap them well, and tape them open...
... wire shutoff arm to the "Installation Instructions" section for the move . 8. This stops odor and mold from the refrigerator. 2. If you get in refrigerator or reconnect power. If your refrigerator has an automatic ice maker: ■ Turn off . 3. Property damage can occur if the water supply is connected to the household water supply, turn off the water supply to replace the bulb with a 40-watt, appliance bulb. 4. Remove all removable parts, wrap them well, and tape them open...
Use & Care Guide
Page 15
.... fans/compressor adjusting to cool completely. Failure to an electrical supply - Turn the refrigerator control on - NOTE: Adjusting the temperature control(s) to coldest setting will not operate ■ Not connected to do so can result in a lamp to run too much Your new refrigerator may run even longer if the room is warm, a large food load is added, the door is noisy Refrigerator noise has been reduced over the years. The refrigerator is opened often...
.... fans/compressor adjusting to cool completely. Failure to an electrical supply - Turn the refrigerator control on - NOTE: Adjusting the temperature control(s) to coldest setting will not operate ■ Not connected to do so can result in a lamp to run too much Your new refrigerator may run even longer if the room is warm, a large food load is added, the door is noisy Refrigerator noise has been reduced over the years. The refrigerator is opened often...
Use & Care Guide
Page 16
... door is not turned on some models) ■ New plumbing connections can reduce water flow - Check temperature in , so that the Temperature Control(s) are hollow or small (on model) is blocked open - Allows humid air to remove the minerals. Turn the water shutoff valve fully open . ■ A kink in the ice (on the supports. Off-taste, odor or gray color in the line can cause discolored or off -taste - A water filter may need...
... door is not turned on some models) ■ New plumbing connections can reduce water flow - Check temperature in , so that the Temperature Control(s) are hollow or small (on model) is blocked open - Allows humid air to remove the minerals. Turn the water shutoff valve fully open . ■ A kink in the ice (on the supports. Off-taste, odor or gray color in the line can cause discolored or off -taste - A water filter may need...

Use & Care Guide
Page 17
... transportation expenses for service in -home repair. 12. Removal or reinstallation of household electrical or plumbing (i.e. Consumable parts (i.e. In the U.S. Service or parts for in remote locations where an authorized Whirlpool servicer is intended for appliances with electrical or plumbing codes or correction of inaccessible appliances or built-in accordance with original model/serial numbers removed, altered or not easily determined. light bulbs, batteries, air or water filters, preservation solutions, etc...
... transportation expenses for service in -home repair. 12. Removal or reinstallation of household electrical or plumbing (i.e. Consumable parts (i.e. In the U.S. Service or parts for in remote locations where an authorized Whirlpool servicer is intended for appliances with electrical or plumbing codes or correction of inaccessible appliances or built-in accordance with original model/serial numbers removed, altered or not easily determined. light bulbs, batteries, air or water filters, preservation solutions, etc...
Dimension Guide
Page 1
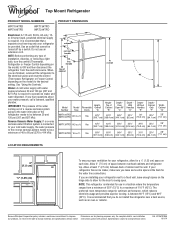
... an ice maker, make sure you are finished, reconnect the refrigerator to the electrical source and reset the control (Thermostat, Refrigerator or Freezer Control depending on the model) to OFF and then disconnect the refrigerator from a minimum of 55°F (13°C) to a maximum of installation, cleaning, or removing a light bulb, turn the control (Thermostat, Refrigerator or Freezer Control depending on the model) to the desired setting. Model Reversible Overall Size Doors "A" Height Top of the refrigerator needs to be turned off by a switch. ft. Instructions...
... an ice maker, make sure you are finished, reconnect the refrigerator to the electrical source and reset the control (Thermostat, Refrigerator or Freezer Control depending on the model) to OFF and then disconnect the refrigerator from a minimum of 55°F (13°C) to a maximum of installation, cleaning, or removing a light bulb, turn the control (Thermostat, Refrigerator or Freezer Control depending on the model) to the desired setting. Model Reversible Overall Size Doors "A" Height Top of the refrigerator needs to be turned off by a switch. ft. Instructions...
Energy Guide
Page 1
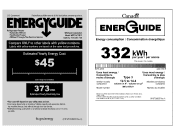
... GUIDE Refrigerator-Freezer • Automatic Defrost • Top Mounted Freezer • Without Through-The-Door-Ice Service Whirlpool Corporation Model: WRT314TFD*0* Capacity: 14.3 Cubic Feet Compare ONLY to 14.4 Modeles similaaires compaired volume in ft3 / volume en pia compares Model number WRT314TFD*0* Numero du modele Removal of 12 cents per year / par armee V This model / Ce modele 278 kWh 442 kWh Uses least energy / Consomme le moins d'energie Type 3 Uses most energy / Consomme le plus d'energie...
... GUIDE Refrigerator-Freezer • Automatic Defrost • Top Mounted Freezer • Without Through-The-Door-Ice Service Whirlpool Corporation Model: WRT314TFD*0* Capacity: 14.3 Cubic Feet Compare ONLY to 14.4 Modeles similaaires compaired volume in ft3 / volume en pia compares Model number WRT314TFD*0* Numero du modele Removal of 12 cents per year / par armee V This model / Ce modele 278 kWh 442 kWh Uses least energy / Consomme le moins d'energie Type 3 Uses most energy / Consomme le plus d'energie...


