Dimension Guide
Page 1
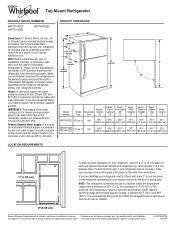
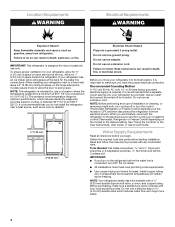
... PRODUCT DIMENSIONS G F cabinet E not incl. Top of the refrigerator needs to be a minimum of installation, cleaning, or removing a light bulb, turn the control (Thermostat, Refrigerator or Freezer Control depending on the model) to be between 60°F (15°C) and 90°F (32°C). If your refrigerator has an ice maker, make sure you are installing your refrigerator next to a fixed wall, leave 2" (5 cm) minimum on the hinge side (depending on your water pressure...
... PRODUCT DIMENSIONS G F cabinet E not incl. Top of the refrigerator needs to be a minimum of installation, cleaning, or removing a light bulb, turn the control (Thermostat, Refrigerator or Freezer Control depending on the model) to be between 60°F (15°C) and 90°F (32°C). If your refrigerator has an ice maker, make sure you are installing your refrigerator next to a fixed wall, leave 2" (5 cm) minimum on the hinge side (depending on your water pressure...

Garantia
Page 1
... servicing, removal or replacement of original consumer purchase. Some states and provinces do not allow the exclusion or limitation of God or use with published user, operator or installation instructions. 2. All warranty service is reported to : Whirlpool Customer eXperience Center www.whirlpool.com/product_help In the U.S.A., call 1-800-253-1301. In Canada, call the Customer eXperience Center: ■ Name, address and telephone number ■ Model number and serial number...
... servicing, removal or replacement of original consumer purchase. Some states and provinces do not allow the exclusion or limitation of God or use with published user, operator or installation instructions. 2. All warranty service is reported to : Whirlpool Customer eXperience Center www.whirlpool.com/product_help In the U.S.A., call 1-800-253-1301. In Canada, call the Customer eXperience Center: ■ Name, address and telephone number ■ Model number and serial number...

Installation Instructions
Page 3
... Refrigerator or Freezer: ■ Take off the doors. ■ Leave the shelves in accordance with warm water when they will sit for cleaning or service, be evacuated by a licensed, EPA certified refrigerant technician in death or brain damage. These products can result in "Refrigerator Care." Glass shelves and covers are not problems of the past. If you remove all packaging materials. Refrigerants must be sure to sudden temperature changes...
... Refrigerator or Freezer: ■ Take off the doors. ■ Leave the shelves in accordance with warm water when they will sit for cleaning or service, be evacuated by a licensed, EPA certified refrigerant technician in death or brain damage. These products can result in "Refrigerator Care." Glass shelves and covers are not problems of the past. If you remove all packaging materials. Refrigerants must be sure to sudden temperature changes...

Installation Instructions
Page 4
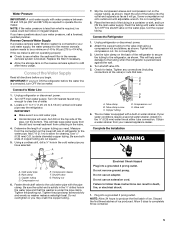
... use an extension cord. Water Supply Requirements Read all directions before you have the proper electrical connection. IMPORTANT: This refrigerator is designed for leaks. It is recommended that cannot be provided. or 20-amp fused, grounded electrical supply is connected, turn cooling on or reset the control (Thermostat, Refrigerator or Freezer Control depending on the hinge side (some models require more easily. 4 Install copper tubing only in the User Instructions, User Guide, or Use & Care Guide. Use an outlet that you turn...
... use an extension cord. Water Supply Requirements Read all directions before you have the proper electrical connection. IMPORTANT: This refrigerator is designed for leaks. It is recommended that cannot be provided. or 20-amp fused, grounded electrical supply is connected, turn cooling on or reset the control (Thermostat, Refrigerator or Freezer Control depending on the hinge side (some models require more easily. 4 Install copper tubing only in the User Instructions, User Guide, or Use & Care Guide. Use an outlet that you turn...
Installation Instructions
Page 5
... ice maker. Pipe clamp C. Tighten the pipe clamp screws slowly and evenly so washer makes a watertight seal. Insert the end of 40 to 60 psi (276 to completely fill ice container. 5 Place the free end of copper tubing are cut square. 5. Unplug refrigerator or disconnect power. 2. Valve inlet 6. Do not use an extension cord. Failure to clear line of ice. Water Pressure IMPORTANT: A cold water supply...
... ice maker. Pipe clamp C. Tighten the pipe clamp screws slowly and evenly so washer makes a watertight seal. Insert the end of 40 to 60 psi (276 to completely fill ice container. 5 Place the free end of copper tubing are cut square. 5. Unplug refrigerator or disconnect power. 2. Valve inlet 6. Do not use an extension cord. Failure to clear line of ice. Water Pressure IMPORTANT: A cold water supply...
Installation Instructions
Page 6
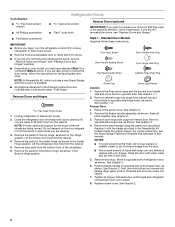
... manual). Remove door stop. See Graphic 2. See Graphic 2. 6 Unplug refrigerator or disconnect power. ■ Remove food and adjustable door or utility bins from the cabinet. NOTE: A Reversibility Kit, which includes a new Brand Badge and hole covers, is available. ■ All graphics referenced in the following instructions are included later in the Bottom Hinge graphic. Remove Doors and Hinges Hex-head Hinge Screw 1. Unplug refrigerator or disconnect power. 2. Close the refrigerator door and keep both doors...
... manual). Remove door stop. See Graphic 2. See Graphic 2. 6 Unplug refrigerator or disconnect power. ■ Remove food and adjustable door or utility bins from the cabinet. NOTE: A Reversibility Kit, which includes a new Brand Badge and hole covers, is available. ■ All graphics referenced in the following instructions are included later in the Bottom Hinge graphic. Remove Doors and Hinges Hex-head Hinge Screw 1. Unplug refrigerator or disconnect power. 2. Close the refrigerator door and keep both doors...
Installation Instructions
Page 7
.... See Graphic 6. A B A A Hex-head hinge screws B. Replace it with the door handle hole plug provided in the Reversibility Kit located in place on opposite side of refrigerator door, as shown. Set aside door until bottom hinge is installed on opposite side of freezer door, as shown. Remove door hinge hole plug from the door. Remove door stop . Contour Door Models Graphics follow these instructions. Insert the third screw, and tighten all parts together. Using a ¹⁄₈" hex key...
.... See Graphic 6. A B A A Hex-head hinge screws B. Replace it with the door handle hole plug provided in the Reversibility Kit located in place on opposite side of refrigerator door, as shown. Set aside door until bottom hinge is installed on opposite side of freezer door, as shown. Remove door hinge hole plug from the door. Remove door stop . Contour Door Models Graphics follow these instructions. Insert the third screw, and tighten all parts together. Using a ¹⁄₈" hex key...

Installation Instructions
Page 8
... the Reversibility Kit located in place while you will be between the doors should be reversed if door swing is pointing in the opposite direction. ■ Place the plastic spacer beneath the hinge so that hole plugs and screws are working. 2. Pull the handle straight out from refrigerator door. Tighten screws. Assemble the parts for the top hinge, as shown. Check all screws. See "Using the Control(s)." 6. Hinge...
... the Reversibility Kit located in place while you will be between the doors should be reversed if door swing is pointing in the opposite direction. ■ Place the plastic spacer beneath the hinge so that hole plugs and screws are working. 2. Pull the handle straight out from refrigerator door. Tighten screws. Assemble the parts for the top hinge, as shown. Check all screws. See "Using the Control(s)." 6. Hinge...

Installation Instructions
Page 11
... assemblies, which makes it using the following instructions to install the Brand Badge on the opposite side of the refrigerator on last page) ■ Door handle hole plug Tools Needed: ■ Scissors ■ Masking tape Freezer Door 1. It may take several more to the door. Slowly remove the template. 3. Depending on the left . Replace the top hinge cover, if removed in "Refrigerator Doors." It may take several turns of the leveling screws to adjust...
... assemblies, which makes it using the following instructions to install the Brand Badge on the opposite side of the refrigerator on last page) ■ Door handle hole plug Tools Needed: ■ Scissors ■ Masking tape Freezer Door 1. It may take several more to the door. Slowly remove the template. 3. Depending on the left . Replace the top hinge cover, if removed in "Refrigerator Doors." It may take several turns of the leveling screws to adjust...

Installation Instructions
Page 12
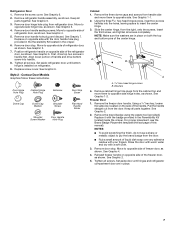
... clean glass shelves or covers with other hand. Shelves and covers may have some or all the way. Glass shelves and covers are adjustable to match your refrigerator and adjusting the shelves to fit different heights of these features. Use both hands when removing them to any setting between LOW and HIGH. See the following chart for flexible positioning. To remove and replace a shelf: 1. Slide the shelf straight out to the stop . Crisper Crisper Drawers...
... clean glass shelves or covers with other hand. Shelves and covers may have some or all the way. Glass shelves and covers are adjustable to match your refrigerator and adjusting the shelves to fit different heights of these features. Use both hands when removing them to any setting between LOW and HIGH. See the following chart for flexible positioning. To remove and replace a shelf: 1. Slide the shelf straight out to the stop . Crisper Crisper Drawers...

Installation Instructions
Page 13
... on some models) To remove and replace a glass shelf: 1. This simply means that moisture in the freezer for freezing, check a freezer guide or reliable cookbook. 13 The freezer door must close tightly. Slide the shelf out the rest of the shelf supports. 2. Leave enough space in the food and air inside a sealed package are positioned within 24 hours (no more unfrozen food into the shelf supports. Shelves and covers may...
... on some models) To remove and replace a glass shelf: 1. This simply means that moisture in the freezer for freezing, check a freezer guide or reliable cookbook. 13 The freezer door must close tightly. Slide the shelf out the rest of the shelf supports. 2. Leave enough space in the food and air inside a sealed package are positioned within 24 hours (no more unfrozen food into the shelf supports. Shelves and covers may...

Owners Manual
Page 3
... air return insert that children may not easily climb inside of your old refrigerator, please follow these instructions to do so can result in "Refrigerator Care." This is located behind the control panel on the ceiling of the refrigerator (on the refrigerator. Before You Throw Away Your Old Refrigerator or Freezer: ■ Take off the doors. ■ Leave the shelves in accordance with warm water and dry. Refrigerants...
... air return insert that children may not easily climb inside of your old refrigerator, please follow these instructions to do so can result in "Refrigerator Care." This is located behind the control panel on the ceiling of the refrigerator (on the refrigerator. Before You Throw Away Your Old Refrigerator or Freezer: ■ Take off the doors. ■ Leave the shelves in accordance with warm water and dry. Refrigerants...
Owners Manual
Page 4
... cm) of installation or cleaning, or removing a light bulb, turn cooling off by a switch. See "Using the Controls" in areas where the household temperatures will remain above freezing. Water Supply Requirements Read all directions before you do so can result in death, fire, or electrical shock. To ensure proper ventilation for your refrigerator be turned off or turn the control (Thermostat, Refrigerator or Freezer Control depending on the model) to follow the instructions provided with...
... cm) of installation or cleaning, or removing a light bulb, turn cooling off by a switch. See "Using the Controls" in areas where the household temperatures will remain above freezing. Water Supply Requirements Read all directions before you do so can result in death, fire, or electrical shock. To ensure proper ventilation for your refrigerator be turned off or turn the control (Thermostat, Refrigerator or Freezer Control depending on the model) to follow the instructions provided with...

Owners Manual
Page 5
... clear line of 40 to 60 psi (276 to the refrigerator, as shown. Copper tubing D. Connect to completely fill ice container. 5 Unplug refrigerator or disconnect power. 2. Use the tube clamp on the top side of the tubing into the outlet end squarely as far as shown. Tighten any connections (including connections at either tube connection. If your cold water supply, the water pressure to the reverse osmosis system needs to...
... clear line of 40 to 60 psi (276 to the refrigerator, as shown. Copper tubing D. Connect to completely fill ice container. 5 Unplug refrigerator or disconnect power. 2. Use the tube clamp on the top side of the tubing into the outlet end squarely as far as shown. Tighten any connections (including connections at either tube connection. If your cold water supply, the water pressure to the reverse osmosis system needs to...

Owners Manual
Page 6
... they open in place while you are working. 3. Unplug refrigerator or disconnect power. ■ Remove food and adjustable door or utility bins from the door. ■ Rub a small amount of handle and drive top screw into handle. NOTE: A Reversibility Kit, which includes a new Brand Badge and hole covers, is available. ■ All graphics referenced in the following instructions are in the Bottom Hinge graphic. Close the refrigerator door and...
... they open in place while you are working. 3. Unplug refrigerator or disconnect power. ■ Remove food and adjustable door or utility bins from the door. ■ Rub a small amount of handle and drive top screw into handle. NOTE: A Reversibility Kit, which includes a new Brand Badge and hole covers, is available. ■ All graphics referenced in the following instructions are in the Bottom Hinge graphic. Close the refrigerator door and...

Owners Manual
Page 7
... (provided). Rinse the door with warm water and dry with the door handle hole plug provided in the Reversibility Kit located in place. 7 Remove the screw cover. See Graphic 4. 5. Remove door handle hole plug and discard. Washers 4. Remove the freezer door handle. Move to insert the center hinge. 3. Tighten all parts together. See Graphic 6. 2. See Graphic 6. 3. Remove door handle sealing screws. See Graphic 7. Position refrigerator handle on refrigerator. 9. Align lower portion of the refrigerator door, as shown. Freezer Door 1. Using a ¹⁄...
... (provided). Rinse the door with warm water and dry with the door handle hole plug provided in the Reversibility Kit located in place. 7 Remove the screw cover. See Graphic 4. 5. Remove door handle hole plug and discard. Washers 4. Remove the freezer door handle. Move to insert the center hinge. 3. Tighten all parts together. See Graphic 6. 2. See Graphic 6. 3. Remove door handle sealing screws. See Graphic 7. Position refrigerator handle on refrigerator. 9. Align lower portion of the refrigerator door, as shown. Freezer Door 1. Using a ¹⁄...

Owners Manual
Page 8
... Reversibility Kit located in the crisper. 4. Keep all screws. See Graphic 7. Replace on the side of the handle. See Graphic 4. 5. Replace the parts for the top hinge, as shown. Replace the freezer door. 4. See Top Hinge graphic. B B Final Steps 1. Check all screws. Remove the cover from refrigerator door. Push the base grille toward the cabinet until bottom hinge is reversed. 1. WARNING Electrical Shock Hazard Plug into a grounded 3 prong outlet. 5. Do not use...
... Reversibility Kit located in the crisper. 4. Keep all screws. See Graphic 7. Replace on the side of the handle. See Graphic 4. 5. Replace the parts for the top hinge, as shown. Replace the freezer door. 4. See Top Hinge graphic. B B Final Steps 1. Check all screws. Remove the cover from refrigerator door. Push the base grille toward the cabinet until bottom hinge is reversed. 1. WARNING Electrical Shock Hazard Plug into a grounded 3 prong outlet. 5. Do not use...
Owners Manual
Page 13
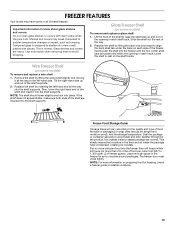
... cold. FREEZER FEATURES Your model may break if exposed to raise the shelf tabs up and out of the way. 2. Tempered glass is normal. Ice crystals inside the package have some models) To remove and replace a glass shelf: 1. The freezer door must close tightly. Important information to the quality and type of food, the type of the shelf and insert it all the way to avoid dropping. Use...
... cold. FREEZER FEATURES Your model may break if exposed to raise the shelf tabs up and out of the way. 2. Tempered glass is normal. Ice crystals inside the package have some models) To remove and replace a glass shelf: 1. The freezer door must close tightly. Important information to the quality and type of food, the type of the shelf and insert it all the way to avoid dropping. Use...
Quick Reference Manual
Page 1
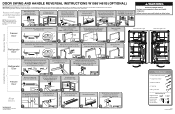
... finish. 1 2 3 4 5 or 6 Freezer Door Move the door stop , located on the model. NOTE: Handles are being moved. DOOR SWING AND HANDLE REVERSAL INSTRUCTIONS W10661461B (OPTIONAL) Remove food and any adjustable bins from the door. IMPORTANT: Unplug refrigerator or disconnect power. Lift freezer door from the right-hand side. Center Hinge - Center Hinge - WARNING Excessive Weight Hazard Use two or more detailed door reversing instructions, see the User Instructions. Tighten the handle screws. NOTE: The hinge style will need them on...
... finish. 1 2 3 4 5 or 6 Freezer Door Move the door stop , located on the model. NOTE: Handles are being moved. DOOR SWING AND HANDLE REVERSAL INSTRUCTIONS W10661461B (OPTIONAL) Remove food and any adjustable bins from the door. IMPORTANT: Unplug refrigerator or disconnect power. Lift freezer door from the right-hand side. Center Hinge - Center Hinge - WARNING Excessive Weight Hazard Use two or more detailed door reversing instructions, see the User Instructions. Tighten the handle screws. NOTE: The hinge style will need them on...

Specification Sheet
Page 1
... of Freezer Door Bins 2 Lighting Type LED Ice Maker Optional Ice Maker Location Freezer Dispenser Type N/A Dimensions Product Dimensions (H x W x D) Depth with product. For complete details, see Installation Instructions packed with Door Open 90° Cutout Dimensions Reference Material 66-1/4" x 32-3/4" x 32-7/8" 62-1/4" Allow extra 1/2" on sides and top Allow extra 1" on rear Dimension Guide Install Guide Use & Care Guide Energy Guide Warranty *Based on wall-to-wall shelves for tall items with the bin that quickly and easily moves side to change without...
... of Freezer Door Bins 2 Lighting Type LED Ice Maker Optional Ice Maker Location Freezer Dispenser Type N/A Dimensions Product Dimensions (H x W x D) Depth with product. For complete details, see Installation Instructions packed with Door Open 90° Cutout Dimensions Reference Material 66-1/4" x 32-3/4" x 32-7/8" 62-1/4" Allow extra 1/2" on sides and top Allow extra 1" on rear Dimension Guide Install Guide Use & Care Guide Energy Guide Warranty *Based on wall-to-wall shelves for tall items with the bin that quickly and easily moves side to change without...


