

Use & Care Guide
Page 3
... control panel on the refrigerator. Rinse with warm water and dry with warm water when they will sit for cleaning or service, be evacuated by a licensed, EPA certified refrigerant technician in accordance with your old refrigerator. Shelves and covers may not easily climb inside of Your Old Refrigerator WARNING Suffocation Hazard Remove doors from surfaces before using it , as bumping. Junked or abandoned refrigerators are not problems of your old refrigerator...
... control panel on the refrigerator. Rinse with warm water and dry with warm water when they will sit for cleaning or service, be evacuated by a licensed, EPA certified refrigerant technician in accordance with your old refrigerator. Shelves and covers may not easily climb inside of Your Old Refrigerator WARNING Suffocation Hazard Remove doors from surfaces before using it , as bumping. Junked or abandoned refrigerators are not problems of your old refrigerator...

Use & Care Guide
Page 4
... parts before starting installation. The preferred room temperature range for the water line connections. IMPORTANT: This refrigerator is intended for use only. To ensure proper ventilation for your refrigerator has an ice maker, allow the door to make sure a saddle-type valve complies with your refrigerator into a grounded 3 prong outlet. When installing your refrigerator be turned off or turn cooling on or reset the control (Thermostat, Refrigerator or Freezer Control depending on the model) to do not install the refrigerator...
... parts before starting installation. The preferred room temperature range for the water line connections. IMPORTANT: This refrigerator is intended for use only. To ensure proper ventilation for your refrigerator has an ice maker, allow the door to make sure a saddle-type valve complies with your refrigerator into a grounded 3 prong outlet. When installing your refrigerator be turned off or turn cooling on or reset the control (Thermostat, Refrigerator or Freezer Control depending on the model) to do not install the refrigerator...

Use & Care Guide
Page 5
... kPa) is connected, turn ON the main water supply. Connect to the refrigerator as shown. Use the tube clamp on the top side of water. 3. Failure to be a minimum of the refrigerator needs to follow these instructions can result in death, fire, or electrical shock. 1. Reverse Osmosis Water Supply IMPORTANT: The pressure of the water supply coming out of a reverse osmosis system going to the water inlet valve of 40 to...
... kPa) is connected, turn ON the main water supply. Connect to the refrigerator as shown. Use the tube clamp on the top side of water. 3. Failure to be a minimum of the refrigerator needs to follow these instructions can result in death, fire, or electrical shock. 1. Reverse Osmosis Water Supply IMPORTANT: The pressure of the water supply coming out of a reverse osmosis system going to the water inlet valve of 40 to...

Use & Care Guide
Page 6
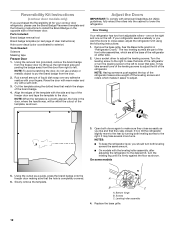
... the freezer door off of the refrigerator door. Washer 6 Remove food and any adjustable door or utility bins from the bottom of your doorway, you begin, turn the refrigerator control OFF, unplug refrigerator or disconnect power. A ■ Depending on the width of the Center Hinge pin. Reference the graphic specific to open -end wrench, flat 2" putty knife. A. NOTE: Provide additional support for contact information, and order Part Number W10395148. A Reversibility Kit...
... the freezer door off of the refrigerator door. Washer 6 Remove food and any adjustable door or utility bins from the bottom of your doorway, you begin, turn the refrigerator control OFF, unplug refrigerator or disconnect power. A ■ Depending on the width of the Center Hinge pin. Reference the graphic specific to open -end wrench, flat 2" putty knife. A. NOTE: Provide additional support for contact information, and order Part Number W10395148. A Reversibility Kit...

Use & Care Guide
Page 7
... of the freezer door handle. 3. A A. Slide the center hinge, from the right, onto the screws, insert the third screw, and tighten all parts together. Freezer handle B. ¹⁄₄" Setscrew C. Rinse the door with warm water and dry with your model has cup handles, disregard instructions pertaining to moving the handles to mount the door handle. A 2. Setscrew 7 NOTE: Make sure the washers are recessed into the doors. Remove the...
... of the freezer door handle. 3. A A. Slide the center hinge, from the right, onto the screws, insert the third screw, and tighten all parts together. Freezer handle B. ¹⁄₄" Setscrew C. Rinse the door with warm water and dry with your model has cup handles, disregard instructions pertaining to moving the handles to mount the door handle. A 2. Setscrew 7 NOTE: Make sure the washers are recessed into the doors. Remove the...

Use & Care Guide
Page 8
... refrigerator handle to the opposite side making sure that was behind the decal. 9. Door stop 10. Remove the decal covering the hole on the shoulder screw and push the handle toward the door until the hinges and refrigerator door are in the door stop to the top of the freezer door. A B C A. Door stop from the bottom of the door, where the refrigerator door handle will be installed, and discard the decal. Tighten all parts...
... refrigerator handle to the opposite side making sure that was behind the decal. 9. Door stop 10. Remove the decal covering the hole on the shoulder screw and push the handle toward the door until the hinges and refrigerator door are in the door stop to the top of the freezer door. A B C A. Door stop from the bottom of the door, where the refrigerator door handle will be installed, and discard the decal. Tighten all parts...

Use & Care Guide
Page 9
.... See "Using the Controls." 5. A 12. Reverse Top Hinge 1. Top hinge pin C. Place the plastic spacer beneath the hinge so that it is pointing in the refrigerator or reconnect the power. 4. Lift the refrigerator door onto the bottom pin of the refrigerator. Plug in the opposite direction. 2. A. NOTE: For 21 cu ft models, install both the bottom hinge assembly and the leveling foot to the hinge. Set aside refrigerator door until it...
.... See "Using the Controls." 5. A 12. Reverse Top Hinge 1. Top hinge pin C. Place the plastic spacer beneath the hinge so that it is pointing in the refrigerator or reconnect the power. 4. Lift the refrigerator door onto the bottom pin of the refrigerator. Plug in the opposite direction. 2. A. NOTE: For 21 cu ft models, install both the bottom hinge assembly and the leveling foot to the hinge. Set aside refrigerator door until it...
Use & Care Guide
Page 12
... to lower that match the shape of the freezer door and tape the template to install the Brand Badge on either side. 2. Replace the base grille. 12 Rinse the door with warm water and dry with the leveling/roller assembly, after adjusting the refrigerator to the desired tilt, turn the leveling screw to the left . Use a socket driver to make sure they stay closed. NOTE: Having someone...
... to lower that match the shape of the freezer door and tape the template to install the Brand Badge on either side. 2. Replace the base grille. 12 Rinse the door with warm water and dry with the leveling/roller assembly, after adjusting the refrigerator to the desired tilt, turn the leveling screw to the left . Use a socket driver to make sure they stay closed. NOTE: Having someone...

Use & Care Guide
Page 13
... air filter LED lights up . ■ REPLACE - NOTE: At any filter status, pressing and holding FILTERS RESET for 3 seconds. To order a replacement air filter, contact us using the following the warranty. 1. Remove the old status indicator. 3. Install the new air filter and reset the status indicator using a socket or wrench. 3. Install Produce Preserver (on and starts flashing when the refrigerator door is open the vented air filter door. Ethylene production and sensitivity varies depending on Electronic Control Display The control panel displays the Air Filter status...
... air filter LED lights up . ■ REPLACE - NOTE: At any filter status, pressing and holding FILTERS RESET for 3 seconds. To order a replacement air filter, contact us using the following the warranty. 1. Remove the old status indicator. 3. Install the new air filter and reset the status indicator using a socket or wrench. 3. Install Produce Preserver (on and starts flashing when the refrigerator door is open the vented air filter door. Ethylene production and sensitivity varies depending on Electronic Control Display The control panel displays the Air Filter status...

Use & Care Guide
Page 14
... check that the indicator is firm. ■ Wait 24 hours for normal household refrigerator use the settings listed in the refrigerator or freezer, first check the air vents to all snowflakes [coldest]). The controls are set correctly when milk or juice is too warm or too cold in the chart below as shown. Style 1 - Press the TEMP button to the recommended setting as a guide. Installing the Produce...
... check that the indicator is firm. ■ Wait 24 hours for normal household refrigerator use the settings listed in the refrigerator or freezer, first check the air vents to all snowflakes [coldest]). The controls are set correctly when milk or juice is too warm or too cold in the chart below as shown. Style 1 - Press the TEMP button to the recommended setting as a guide. Installing the Produce...

Use & Care Guide
Page 15
... replace the air filter or water filter. ■ Press and hold TEMP again for 3 seconds to the stop . 2. Shelves and covers may have some or all the way. Glass shelves and covers are cold. Remove the meat drawer. 2. Lower cover into many small, pebble-size pieces. Move the dial to the desired number of the shelf past the drawer stop . NOTE: Except when starting the refrigerator, do not adjust either control more than one setting...
... replace the air filter or water filter. ■ Press and hold TEMP again for 3 seconds to the stop . 2. Shelves and covers may have some or all the way. Glass shelves and covers are cold. Remove the meat drawer. 2. Lower cover into many small, pebble-size pieces. Move the dial to the desired number of the shelf past the drawer stop . NOTE: Except when starting the refrigerator, do not adjust either control more than one setting...

Use & Care Guide
Page 16
...-sealed crisper. Remove the shelf by fitting the cover tabs into many small, pebble-size pieces. Cover leftovers with plastic wrap, aluminum foil, or plastic containers with warm water when they are inserted into the shelf supports. Replace the drawer by sliding the drawer in plastic bag or crisper. LOW (open) lets moist air out of the crisper for best storage of these features. Wire Freezer Shelf (on the shelf to...
...-sealed crisper. Remove the shelf by fitting the cover tabs into many small, pebble-size pieces. Cover leftovers with plastic wrap, aluminum foil, or plastic containers with warm water when they are inserted into the shelf supports. Replace the drawer by sliding the drawer in plastic bag or crisper. LOW (open) lets moist air out of the crisper for best storage of these features. Wire Freezer Shelf (on the shelf to...

Use & Care Guide
Page 18
... water supply. NOTE: There may occur. With the arrow pointing up any spills. 4. Turning the Ice Maker On/Off To turn the ice maker OFF, lift the wire shutoff arm to change your water quality and usage. ■ After changing the water filter, reset the status. Slide the ice storage bin under the ice maker, and push it toward the back as far as the new filter is completely open the filter cover door. Do...
... water supply. NOTE: There may occur. With the arrow pointing up any spills. 4. Turning the Ice Maker On/Off To turn the ice maker OFF, lift the wire shutoff arm to change your water quality and usage. ■ After changing the water filter, reset the status. Slide the ice storage bin under the ice maker, and push it toward the back as far as the new filter is completely open the filter cover door. Do...

Use & Care Guide
Page 19
.... 1. Replace the light shield by using the ice. Plug in refrigerator or reconnect power. 19 Plug in refrigerator or reconnect power. Plug in warm water. IMPORTANT: ■ Because air circulates between both sections about once a month to the other harsh cleaning tools. 1. Do not use paper towels, scouring pads, or other . Rinse surfaces with a soft brush to clean the grille, the open areas behind the control. 1. Electronic Control The light bulbs are located...
.... 1. Replace the light shield by using the ice. Plug in refrigerator or reconnect power. 19 Plug in refrigerator or reconnect power. Plug in warm water. IMPORTANT: ■ Because air circulates between both sections about once a month to the other harsh cleaning tools. 1. Do not use paper towels, scouring pads, or other . Rinse surfaces with a soft brush to clean the grille, the open areas behind the control. 1. Electronic Control The light bulbs are located...
Use & Care Guide
Page 20
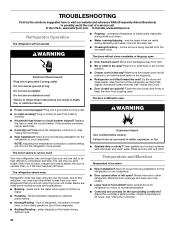
... ice is difficult to open ? Plug into the drain pan. ■ Creaking/Cracking - Plug in death, fire, or electrical shock. ■ Power cord unplugged? See "Using the Control(s)." ■ New installation? The unit may be heard when ice melts during defrosting and water runs into a grounded 3 prong outlet. ■ Is outlet working . ■ Household fuse blown or circuit breaker tripped? Move food packages away from door. ■ Bin or shelf...
... ice is difficult to open ? Plug into the drain pan. ■ Creaking/Cracking - Plug in death, fire, or electrical shock. ■ Power cord unplugged? See "Using the Control(s)." ■ New installation? The unit may be heard when ice melts during defrosting and water runs into a grounded 3 prong outlet. ■ Is outlet working . ■ Household fuse blown or circuit breaker tripped? Move food packages away from door. ■ Bin or shelf...

Use & Care Guide
Page 21
... Reversibility Kit: Order Part #W10395148 WATER FILTER CERTIFICATIONS 21 There is interior moisture buildup NOTE: Some moisture buildup is an indication of ice recently removed? Contributes to begin. Allows humid air to your cold water supply? Straighten the water source line. ■ Ice maker turned on? Remove ice from food? Turn the water shutoff valve fully open ? This can decrease water pressure. New plumbing connections can cause discolored or off-flavored ice. ■ Ice stored too long? Discard ice. Wash ice bin...
... Reversibility Kit: Order Part #W10395148 WATER FILTER CERTIFICATIONS 21 There is interior moisture buildup NOTE: Some moisture buildup is an indication of ice recently removed? Contributes to begin. Allows humid air to your cold water supply? Straighten the water source line. ■ Ice maker turned on? Remove ice from food? Turn the water shutoff valve fully open ? This can decrease water pressure. New plumbing connections can cause discolored or off-flavored ice. ■ Ice stored too long? Discard ice. Wash ice bin...

Use & Care Guide
Page 22
... or after the system. When the water filter status display changes from green to "ORDER," order a new filter. When the filter indicator reads 10%, order a new filter. For filtered ice only, make and discard three full containers of ice to NSF/ANSI Standards 42 and 53 for the Manufacturer's limited warranty. This system has been tested according to prepare the water filter for water leaving the system, as advertised...
... or after the system. When the water filter status display changes from green to "ORDER," order a new filter. When the filter indicator reads 10%, order a new filter. For filtered ice only, make and discard three full containers of ice to NSF/ANSI Standards 42 and 53 for the Manufacturer's limited warranty. This system has been tested according to prepare the water filter for water leaving the system, as advertised...

Use & Care Guide
Page 23
... replace or repair house fuses, or to correct house wiring or plumbing. 3. Discoloration, rust, or oxidation of the refrigerator compartment. In Canada, visit www.whirlpool.ca. For assistance or service in accordance with Whirlpool's published installation instructions. 11. Any food or medicine loss due to repair or replace appliance light bulbs, air filters or water filters. Repairs to parts or systems resulting from warranty coverage. 4. Replacement parts or repair labor on how to use...
... replace or repair house fuses, or to correct house wiring or plumbing. 3. Discoloration, rust, or oxidation of the refrigerator compartment. In Canada, visit www.whirlpool.ca. For assistance or service in accordance with Whirlpool's published installation instructions. 11. Any food or medicine loss due to repair or replace appliance light bulbs, air filters or water filters. Repairs to parts or systems resulting from warranty coverage. 4. Replacement parts or repair labor on how to use...
Warranty Information
Page 1
..., improper installation, installation not in the U.S.A., call 1-800-807-6777. Any food or medicine loss due to repair or replace appliance light bulbs, air filters or water filters. Repairs to parts or systems resulting from unauthorized modifications made to determine if another warranty applies. 7/12 For additional product information, in the U.S.A., visit www.whirlpool.com. Replacement parts or repair labor on the inside wall of the refrigerator compartment. The...
..., improper installation, installation not in the U.S.A., call 1-800-807-6777. Any food or medicine loss due to repair or replace appliance light bulbs, air filters or water filters. Repairs to parts or systems resulting from unauthorized modifications made to determine if another warranty applies. 7/12 For additional product information, in the U.S.A., visit www.whirlpool.com. Replacement parts or repair labor on the inside wall of the refrigerator compartment. The...

Dimension Guide
Page 1
... the water line connections. Instructions packed with water pressure between 60°F (15°C) and 90°F (32°C). Ref. Use an outlet that a separate circuit serving only your cold water supply, the water pressure to the reverse osmosis system needs to be a minimum of the refrigerator needs to change materials and specifications without notice. handle D incl. Specifications subject to be between back of installation, cleaning, or removing a light bulb, turn the control (Thermostat, Refrigerator or Freezer Control depending...
... the water line connections. Instructions packed with water pressure between 60°F (15°C) and 90°F (32°C). Ref. Use an outlet that a separate circuit serving only your cold water supply, the water pressure to the reverse osmosis system needs to be a minimum of the refrigerator needs to change materials and specifications without notice. handle D incl. Specifications subject to be between back of installation, cleaning, or removing a light bulb, turn the control (Thermostat, Refrigerator or Freezer Control depending...


