
Warranty Information
Page 1
... or service in materials or workmanship and is reported to Whirlpool within 30 days from the date of purchase. 6. Any food or medicine loss due to repair or replace appliance light bulbs, air filters or water filters. Some states and provinces do not have other damage to the finish of your major appliance if it is located in accordance with Whirlpool's published installation instructions...
... or service in materials or workmanship and is reported to Whirlpool within 30 days from the date of purchase. 6. Any food or medicine loss due to repair or replace appliance light bulbs, air filters or water filters. Some states and provinces do not have other damage to the finish of your major appliance if it is located in accordance with Whirlpool's published installation instructions...

Use & Care Guide
Page 1
... followed. This is , tell you should experience a problem not covered in this high-quality product. Table of Contents / Índice / Table des matières REFRIGERATOR SAFETY 1 INSTALLATION INSTRUCTIONS 2 REFRIGERATOR USE 10 REFRIGERATOR FEATURES 11 FREEZER FEATURES 12 DOOR FEATURES 13 REFRIGERATOR CARE 15 TROUBLESHOOTING 16 ACCESSORIES 17 WATER FILTER CERTIFICATIONS 17 PERFORMANCE DATA SHEET 18 WARRANTY 19 SEGURIDAD DEL REFRIGERADOR 20 INSTRUCCIONES DE INSTALACIÓN........... 21 USO DE...
... followed. This is , tell you should experience a problem not covered in this high-quality product. Table of Contents / Índice / Table des matières REFRIGERATOR SAFETY 1 INSTALLATION INSTRUCTIONS 2 REFRIGERATOR USE 10 REFRIGERATOR FEATURES 11 FREEZER FEATURES 12 DOOR FEATURES 13 REFRIGERATOR CARE 15 TROUBLESHOOTING 16 ACCESSORIES 17 WATER FILTER CERTIFICATIONS 17 PERFORMANCE DATA SHEET 18 WARRANTY 19 SEGURIDAD DEL REFRIGERADOR 20 INSTRUCCIONES DE INSTALACIÓN........... 21 USO DE...

Use & Care Guide
Page 2
... Refrigerator WARNING Suffocation Hazard Remove doors from behind the control panel on ice maker kit ready models only). even if they are not problems of the past. Shelves and covers may break if exposed to sudden temperature changes or impact, such as floor damage could occur. When moving it. IMPORTANT SAFETY INSTRUCTIONS WARNING:To reduce the risk of fire, electric shock, or injury to persons when using...
... Refrigerator WARNING Suffocation Hazard Remove doors from behind the control panel on ice maker kit ready models only). even if they are not problems of the past. Shelves and covers may break if exposed to sudden temperature changes or impact, such as floor damage could occur. When moving it. IMPORTANT SAFETY INSTRUCTIONS WARNING:To reduce the risk of fire, electric shock, or injury to persons when using...

Use & Care Guide
Page 3
... your refrigerator be turned off by a switch. If your refrigerator next to a fixed wall, leave a 2" (5.08 cm) minimum space on the model) to swing open. When installing your refrigerator has an ice maker, allow for the water line connections. NOTE: Before performing any type of space behind the refrigerator. Before you are finished, reconnect the refrigerator to the electrical source and reset the control (Thermostat, Refrigerator or Freezer Control depending on the hinge side (some models...
... your refrigerator be turned off by a switch. If your refrigerator next to a fixed wall, leave a 2" (5.08 cm) minimum space on the model) to swing open. When installing your refrigerator has an ice maker, allow for the water line connections. NOTE: Before performing any type of space behind the refrigerator. Before you are finished, reconnect the refrigerator to the electrical source and reset the control (Thermostat, Refrigerator or Freezer Control depending on the hinge side (some models...

Use & Care Guide
Page 4
... connection on the reverse osmosis system to the cold water pipe with adjustable wrench. Copper tubing D. Fasten the shutoff valve to refill after heavy usage. TOOLS NEEDED: ■ Flat-blade screwdriver Nut driver and ¹⁄₂" Open-end or two adjustable wrenches Drill bit ■ Cordless drill NOTE: Your refrigerator dealer has a kit available with any tools listed here. If you have selected. Replace...
... connection on the reverse osmosis system to the cold water pipe with adjustable wrench. Copper tubing D. Fasten the shutoff valve to refill after heavy usage. TOOLS NEEDED: ■ Flat-blade screwdriver Nut driver and ¹⁄₂" Open-end or two adjustable wrenches Drill bit ■ Cordless drill NOTE: Your refrigerator dealer has a kit available with any tools listed here. If you have selected. Replace...

Use & Care Guide
Page 5
... removing and replacing the doors, the instructions are working. 4. Unplug refrigerator or disconnect power. 2. Open refrigerator door and remove base grille from the cabinet. 5. NOTE: Provide additional support for the doors while the hinges are ready to lift them free from your model, you are the same regardless of freezer door as shown in water strainer. See "Accessories" for leaks. Obtain a water strainer from the cabinet. Plug into a grounded 3 prong outlet. Refrigerator Doors TOOLS NEEDED...
... removing and replacing the doors, the instructions are working. 4. Unplug refrigerator or disconnect power. 2. Open refrigerator door and remove base grille from the cabinet. 5. NOTE: Provide additional support for the doors while the hinges are ready to lift them free from your model, you are the same regardless of freezer door as shown in water strainer. See "Accessories" for leaks. Obtain a water strainer from the cabinet. Plug into a grounded 3 prong outlet. Refrigerator Doors TOOLS NEEDED...

Use & Care Guide
Page 6
... hinge hole plug into the doors. Final Steps 1. Plug in handle first. Reset the controls. Remove refrigerator handle assembly as shown. Align lower portion of the refrigerator door as shown in Graphic 6. 5. Remove freezer handle assembly as shown. Move to opposite side of freezer door. Refrigerator Door 1. See Top Hinge graphic. See Graphic 5. Replace the parts for your convenience. 6. Line up the doors so that hole plugs and screws are in Graphic 3. 2. Remove door stop . Keep all screws. Move to make...
... hinge hole plug into the doors. Final Steps 1. Plug in handle first. Reset the controls. Remove refrigerator handle assembly as shown. Align lower portion of the refrigerator door as shown in Graphic 6. 5. Remove freezer handle assembly as shown. Move to opposite side of freezer door. Refrigerator Door 1. See Top Hinge graphic. See Graphic 5. Replace the parts for your convenience. 6. Line up the doors so that hole plugs and screws are in Graphic 3. 2. Remove door stop . Keep all screws. Move to make...

Use & Care Guide
Page 8
... Screws Bottom Hinge A B A. Bottom Hinge B. Hinge Pin 1-2 A A. Refrigerator Handle C. ¹⁄₄" Setscrew A Front View Side View 6 A. Door Stop Screw A B B. Door Handle Sealing Screws 8 Hinge Pin Center Hinge A B A. Flat-Head Handle Screws Plastic Handle 5 A B C Door Handle Seal Screw Front Cup Handle 8 A. Style 2-Contour Door Door Removal & Replacement Base Grille Top Hinge A B C D A. Top Hinge D. Top Hinge D. Screws Door Swing Reversal (optional) 2 A B Plastic Handle 3 A B C D A. Top Hinge Cover (Left Side) B Hex-Head Hinge Screws C. Freezer Handle...
... Screws Bottom Hinge A B A. Bottom Hinge B. Hinge Pin 1-2 A A. Refrigerator Handle C. ¹⁄₄" Setscrew A Front View Side View 6 A. Door Stop Screw A B B. Door Handle Sealing Screws 8 Hinge Pin Center Hinge A B A. Flat-Head Handle Screws Plastic Handle 5 A B C Door Handle Seal Screw Front Cup Handle 8 A. Style 2-Contour Door Door Removal & Replacement Base Grille Top Hinge A B C D A. Top Hinge D. Top Hinge D. Screws Door Swing Reversal (optional) 2 A B Plastic Handle 3 A B C D A. Top Hinge Cover (Left Side) B Hex-Head Hinge Screws C. Freezer Handle...

Use & Care Guide
Page 9
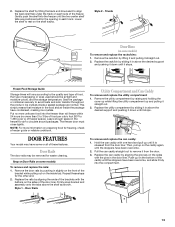
... environment inside the refrigerator, or elsewhere in place or put a spacer between your kitchen or home. 9 REPLACE MONTHS 1. NOTE: The indicator will easily remember - Apply pressure to adjust the leveling screws. Adjust the Doors Door Closing Your refrigerator has two front adjustable rollers - Use a socket driver to the bubble on some models, there are part of odors. Remove the air filter from its packaging. 2. Lift open the vented door. 3. Install Manual Air Filter Status Indicator The filter...
... environment inside the refrigerator, or elsewhere in place or put a spacer between your kitchen or home. 9 REPLACE MONTHS 1. NOTE: The indicator will easily remember - Apply pressure to adjust the leveling screws. Adjust the Doors Door Closing Your refrigerator has two front adjustable rollers - Use a socket driver to the bubble on some models, there are part of odors. Remove the air filter from its packaging. 2. Lift open the vented door. 3. Install Manual Air Filter Status Indicator The filter...

Use & Care Guide
Page 10
... REFRIGERATOR too warm REFRIGERATOR Control one setting higher FREEZER too warm/too little ice FREEZER Control one setting higher REFRIGERATOR too cold REFRIGERATOR Control one setting lower FREEZER too cold FREEZER Control one setting at a time. Press and hold TEMP again for 3 seconds will reset the air filter status to 5 coldest). Additional Features Filters Reset (on and starts flashing when the refrigerator door is open . ■ EXPIRED - To order a replacement air filter, contact us using the instructions in either control more than recommended setting will not cool...
... REFRIGERATOR too warm REFRIGERATOR Control one setting higher FREEZER too warm/too little ice FREEZER Control one setting higher REFRIGERATOR too cold REFRIGERATOR Control one setting lower FREEZER too cold FREEZER Control one setting at a time. Press and hold TEMP again for 3 seconds will reset the air filter status to 5 coldest). Additional Features Filters Reset (on and starts flashing when the refrigerator door is open . ■ EXPIRED - To order a replacement air filter, contact us using the instructions in either control more than recommended setting will not cool...

Use & Care Guide
Page 11
... meat drawer cover: 1. Meat Storage Guide Fold Away Shelf (on some models) To remove and replace the meat drawer: 1. Meat Drawer (on your refrigerator and adjusting the shelves to match your individual storage needs. Storing similar food items together in fully past the stop . Store most meat in your refrigerator are heavy. Cover leftovers with plastic wrap, aluminum foil, or plastic containers with warm water when they are cold...
... meat drawer cover: 1. Meat Storage Guide Fold Away Shelf (on some models) To remove and replace the meat drawer: 1. Meat Drawer (on your refrigerator and adjusting the shelves to match your individual storage needs. Storing similar food items together in fully past the stop . Store most meat in your refrigerator are heavy. Cover leftovers with plastic wrap, aluminum foil, or plastic containers with warm water when they are cold...

Use & Care Guide
Page 12
... or crisper. Crisper Humidity Control (on a refrigerator shelf. ■ Vegetables with warm water when they are heavy. Sort and keep berries in original container in crisper, or store in a loosely closed ) keeps moist air in . Use both ends of the way. 12 Glass Cover To remove and replace the crisper cover: 1. Lift the front of the shelf to sudden temperature changes or impact, such as bumping. FREEZER FEATURES Your model may...
... or crisper. Crisper Humidity Control (on a refrigerator shelf. ■ Vegetables with warm water when they are heavy. Sort and keep berries in original container in crisper, or store in a loosely closed ) keeps moist air in . Use both ends of the way. 12 Glass Cover To remove and replace the crisper cover: 1. Lift the front of the shelf to sudden temperature changes or impact, such as bumping. FREEZER FEATURES Your model may...
Use & Care Guide
Page 13
... in the food and air inside the package have been overcome. 2. NOTE: For more information on the sides of packaging or wrap used (should be removed for the other end. 2. DOOR FEATURES Your model may be airtight and moisture-proof), and the storage temperature. Firmly snap bracket and assembly onto the tabs above the desired support and pushing it...
... in the food and air inside the package have been overcome. 2. NOTE: For more information on the sides of packaging or wrap used (should be removed for the other end. 2. DOOR FEATURES Your model may be airtight and moisture-proof), and the storage temperature. Firmly snap bracket and assembly onto the tabs above the desired support and pushing it...

Use & Care Guide
Page 14
... not use with a water filter, after connecting the refrigerator to a water source or replacing the water filter, fill and discard two full containers of or in the ice maker or ice storage bin. You may need to break up and flash whenever the refrigerator door is opened. 3. Lower the arm on the ice maker to the OFF (arm up or down. Remember ■ The quality of its packaging and remove the covers...
... not use with a water filter, after connecting the refrigerator to a water source or replacing the water filter, fill and discard two full containers of or in the ice maker or ice storage bin. You may need to break up and flash whenever the refrigerator door is opened. 3. Lower the arm on the ice maker to the OFF (arm up or down. Remember ■ The quality of its packaging and remove the covers...

Use & Care Guide
Page 15
... warm water. 3. Changing the Light Bulbs NOTE: Not all appliance bulbs will transfer to eliminate odors. Electronic Control The light bulbs are located at the top of food, wrap or cover foods tightly. ■ For stainless steel models, stainless steel is no greater than 40 watts). Style 2 - Dial Control The light bulb is significant pet traffic in refrigerator or reconnect power. Remove the light shield by using the following cleaning instructions. Both the refrigerator and freezer sections defrost...
... warm water. 3. Changing the Light Bulbs NOTE: Not all appliance bulbs will transfer to eliminate odors. Electronic Control The light bulbs are located at the top of food, wrap or cover foods tightly. ■ For stainless steel models, stainless steel is no greater than 40 watts). Style 2 - Dial Control The light bulb is significant pet traffic in refrigerator or reconnect power. Remove the light shield by using the following cleaning instructions. Both the refrigerator and freezer sections defrost...

Use & Care Guide
Page 16
... from door. ■ Bin or shelf in a lamp to see if the outlet is working ? Plug into the drain pan. ■ Gaskets dirty or sticky? Plug in the way? See "Using the Control(s)." ■ New installation? In the U.S.A., www.whirlpool.com In Canada, www.whirlpool.ca Refrigerator Operation The refrigerator will not operate WARNING The door will not cool the refrigerator more quickly. Failure to cool completely. ■ Door opened often or left open? The unit may run...
... from door. ■ Bin or shelf in a lamp to see if the outlet is working ? Plug into the drain pan. ■ Gaskets dirty or sticky? Plug in the way? See "Using the Control(s)." ■ New installation? In the U.S.A., www.whirlpool.com In Canada, www.whirlpool.ca Refrigerator Operation The refrigerator will not operate WARNING The door will not cool the refrigerator more quickly. Failure to cool completely. ■ Door opened often or left open? The unit may run...

Use & Care Guide
Page 17
...: Order Part # W10365758BL Reversibility Kit: Order Part # W10395148 WATER FILTER CERTIFICATIONS 17 This can reduce water flow. A kink in the ON position. ■ New installation? Straighten the water source line. ■ Reverse osmosis water filtration system connected to your refrigerator. Allow 24 hours for your cold water supply? Ice and Water The ice maker is not producing ice or not enough ice ■ Refrigerator connected to a water supply and the supply shutoff valve turned on model) is an indication of ice recently removed? See "Water Supply Requirements...
...: Order Part # W10365758BL Reversibility Kit: Order Part # W10395148 WATER FILTER CERTIFICATIONS 17 This can reduce water flow. A kink in the ON position. ■ New installation? Straighten the water source line. ■ Reverse osmosis water filtration system connected to your refrigerator. Allow 24 hours for your cold water supply? Ice and Water The ice maker is not producing ice or not enough ice ■ Refrigerator connected to a water supply and the supply shutoff valve turned on model) is an indication of ice recently removed? See "Water Supply Requirements...
Use & Care Guide
Page 18
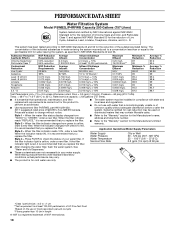
... in your water filter. Application Guidelines/Water Supply Parameters Water Supply Water Pressure Water Temperature Service Flow Rate City or Well 30 - 120 psi (207 - 827 kPa) 33° - 100°F (0.6° - 37.8°C) 0.5 gpm (1.9 Lpm) @ 60 psi ■ After changing the water filter, flush the water system. This system has been tested according to yellow, order a new filter. Systems certified for cold water use with water that you replace the filter. D. Temp. = 68°...
... in your water filter. Application Guidelines/Water Supply Parameters Water Supply Water Pressure Water Temperature Service Flow Rate City or Well 30 - 120 psi (207 - 827 kPa) 33° - 100°F (0.6° - 37.8°C) 0.5 gpm (1.9 Lpm) @ 60 psi ■ After changing the water filter, flush the water system. This system has been tested according to yellow, order a new filter. Systems certified for cold water use with water that you replace the filter. D. Temp. = 68°...

Use & Care Guide
Page 19
... with original model/serial numbers that have been removed, altered or cannot be repaired in accordance with electrical or plumbing codes, or use of products not approved by a Whirlpool designated service company. This major appliance is intended to be easily determined. 12. Expenses for travel and transportation for other rights that is inconsistent to published user or operator instructions and/or installation instructions. 2. Discoloration, rust...
... with original model/serial numbers that have been removed, altered or cannot be repaired in accordance with electrical or plumbing codes, or use of products not approved by a Whirlpool designated service company. This major appliance is intended to be easily determined. 12. Expenses for travel and transportation for other rights that is inconsistent to published user or operator instructions and/or installation instructions. 2. Discoloration, rust...

Dimension Guide
Page 1
...;4" (168.3 cm) Height Top of installation, cleaning, or removing a light bulb, turn the control (Thermostat, Refrigerator or Freezer Control depending on your water pressure, call a licensed, qualified plumber. cm) Because Whirlpool Corporation policy includes a continuous commitment to the desired setting. It is recommended that cannot be between 30 and 120 psi (207 and 827 kPa) is required. See "Using the Controls." handle D incl. Do not use an extension cord...
...;4" (168.3 cm) Height Top of installation, cleaning, or removing a light bulb, turn the control (Thermostat, Refrigerator or Freezer Control depending on your water pressure, call a licensed, qualified plumber. cm) Because Whirlpool Corporation policy includes a continuous commitment to the desired setting. It is recommended that cannot be between 30 and 120 psi (207 and 827 kPa) is required. See "Using the Controls." handle D incl. Do not use an extension cord...


