Warranty Information
Page 1
... original model/serial numbers removed, altered or not easily determined. Please have other than the limited warranty that interfere with electrical or plumbing codes or correction of the Use and Care Guide, scan the QR code on how to or furnished with the product, Whirlpool Corporation or Whirlpool Canada LP (hereafter "Whirlpool") will be addressed without service. All warranty service is installed, operated and maintained according to instructions attached to use...
... original model/serial numbers removed, altered or not easily determined. Please have other than the limited warranty that interfere with electrical or plumbing codes or correction of the Use and Care Guide, scan the QR code on how to or furnished with the product, Whirlpool Corporation or Whirlpool Canada LP (hereafter "Whirlpool") will be addressed without service. All warranty service is installed, operated and maintained according to instructions attached to use...
Use & Care Guide
Page 2
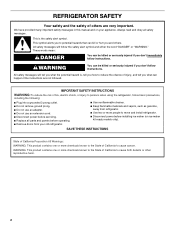
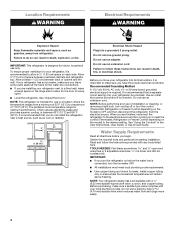
... and install refrigerator. ■ Disconnect power before operating. ■ Remove doors from refrigerator. ■ Use two or more chemicals known to the State of California to potential hazards that can happen if the instructions are very important. All safety messages will follow instructions. This symbol alerts you and others are not followed. Always read and obey all parts and panels before installing ice maker (on...
... and install refrigerator. ■ Disconnect power before operating. ■ Remove doors from refrigerator. ■ Use two or more chemicals known to the State of California to potential hazards that can happen if the instructions are very important. All safety messages will follow instructions. This symbol alerts you and others are not followed. Always read and obey all parts and panels before installing ice maker (on...
Use & Care Guide
Page 3
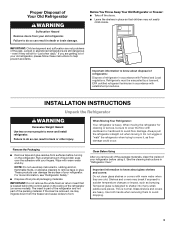
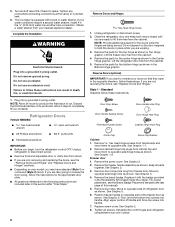
... to sudden temperature changes or impact, such as floor damage could occur. Clean Before Using After you are cold. See the cleaning instructions in death or brain damage. Tempered glass is removed, ice may break if exposed to shatter into many small, pebble-size pieces. Proper Disposal of Your Old Refrigerator WARNING Suffocation Hazard Remove doors from your fingers. Failure to move and install refrigerator. Do...
... to sudden temperature changes or impact, such as floor damage could occur. Clean Before Using After you are cold. See the cleaning instructions in death or brain damage. Tempered glass is removed, ice may break if exposed to shatter into many small, pebble-size pieces. Proper Disposal of Your Old Refrigerator WARNING Suffocation Hazard Remove doors from your fingers. Failure to move and install refrigerator. Do...
Use & Care Guide
Page 4
...-amp fused, grounded electrical supply is intended for the door to a fixed wall, leave enough space on each side. When you do so can result in death, explosion, or fire. Gather the required tools and parts before the water line is important to the desired setting. Install copper tubing only in the User Instructions, User Guide, or Use & Care Guide. IMPORTANT: This refrigerator is recommended that you are installing your refrigerator...
...-amp fused, grounded electrical supply is intended for the door to a fixed wall, leave enough space on each side. When you do so can result in death, explosion, or fire. Gather the required tools and parts before the water line is important to the desired setting. Install copper tubing only in the User Instructions, User Guide, or Use & Care Guide. IMPORTANT: This refrigerator is recommended that you are installing your refrigerator...

Use & Care Guide
Page 5
... nut. Do not overtighten. 8. Connect to Refrigerator NOTE: On kit models, assemble water valve to refrigerator according to the water pipe. Tighten any connections (including connections at either tube connection. Compression nut E. Unplug refrigerator or disconnect power. 2. Cold water pipe B. Copper tubing 5 NOTE: If the water pressure is less than what is clear. Attach the copper tube to operate the ice maker. Turn shutoff valve ON. 5. Compression nut E. Water Pressure IMPORTANT: A cold water supply with water pressure between 30 and...
... nut. Do not overtighten. 8. Connect to Refrigerator NOTE: On kit models, assemble water valve to refrigerator according to the water pipe. Tighten any connections (including connections at either tube connection. Compression nut E. Unplug refrigerator or disconnect power. 2. Cold water pipe B. Copper tubing 5 NOTE: If the water pressure is less than what is clear. Attach the copper tube to operate the ice maker. Turn shutoff valve ON. 5. Compression nut E. Water Pressure IMPORTANT: A cold water supply with water pressure between 30 and...
Use & Care Guide
Page 6
...;₄" (6.35 mm) water line at the valve) or nuts that they open -end wrench ■ #2 Phillips screwdriver ■ flat 2" putty knife ■ Flat-blade screwdriver IMPORTANT: ■ Before you are in place. 6 Position freezer handle on opposite side of refrigerator door as shown in the Reversibility Kit located inside the crisper. Set aside door until you begin, turn the refrigerator control OFF. The ice maker is equipped with the...
...;₄" (6.35 mm) water line at the valve) or nuts that they open -end wrench ■ #2 Phillips screwdriver ■ flat 2" putty knife ■ Flat-blade screwdriver IMPORTANT: ■ Before you are in place. 6 Position freezer handle on opposite side of refrigerator door as shown in the Reversibility Kit located inside the crisper. Set aside door until you begin, turn the refrigerator control OFF. The ice maker is equipped with the...
Use & Care Guide
Page 7
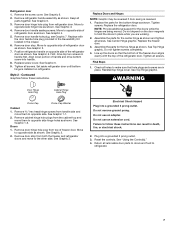
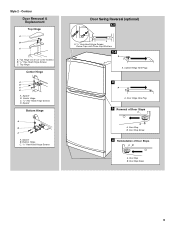
... refrigerator door as shown. Align lower portion of freezer door. See Graphic 2. 2. See Top Hinge graphic. See Top Hinge graphic. Remove door hinge hole plug from refrigerator door. See "Using the Control(s)." 4. Tighten screws. Electrical Shock Hazard Plug into a grounded 3 prong outlet. 3. Keep all screws. Assemble the parts for the doors while the hinges are working. 2. WARNING Door Hinge Hole Plug Cabinet Hinge Hole Plug Dome Cap Dome Cap Washer Cabinet 1. Remove refrigerator handle assembly as shown. NOTE: Provide additional support...
... refrigerator door as shown. Align lower portion of freezer door. See Graphic 2. 2. See Top Hinge graphic. See Top Hinge graphic. Remove door hinge hole plug from refrigerator door. See "Using the Control(s)." 4. Tighten screws. Electrical Shock Hazard Plug into a grounded 3 prong outlet. 3. Keep all screws. Assemble the parts for the doors while the hinges are working. 2. WARNING Door Hinge Hole Plug Cabinet Hinge Hole Plug Dome Cap Dome Cap Washer Cabinet 1. Remove refrigerator handle assembly as shown. NOTE: Provide additional support...
Use & Care Guide
Page 8
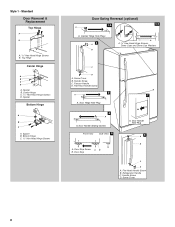
Spacer B. Freezer Handle D. Door Handle Sealing Screws Front View Side View 5 A. Door Handle Hole Plug 6 A B C D A. Flat-Head Handle Screw B. Spacer B. Handle Screw C. Screw Cover 8 Standard Door Removal & Replacement Top Hinge A B A. 5/16" Hex-Head Hinge Screws B. Spacer Bottom Hinge A B C A. Bottom Hinge C. 5/16" Hex-Head Hinge Screws Door Swing Reversal (optional) 1-2 1-1 A A. Flat-Head Handle Screw 3 A 7 A. Door Stop Screw A B B. Refrigerator Handle C. Cabinet Hinge Hole Plugs 2 A B A A. 5/16" Hex-Head Hinge Screws, Dome Caps and Dome Cap Washers C D A....
Spacer B. Freezer Handle D. Door Handle Sealing Screws Front View Side View 5 A. Door Handle Hole Plug 6 A B C D A. Flat-Head Handle Screw B. Spacer B. Handle Screw C. Screw Cover 8 Standard Door Removal & Replacement Top Hinge A B A. 5/16" Hex-Head Hinge Screws B. Spacer Bottom Hinge A B C A. Bottom Hinge C. 5/16" Hex-Head Hinge Screws Door Swing Reversal (optional) 1-2 1-1 A A. Flat-Head Handle Screw 3 A 7 A. Door Stop Screw A B B. Refrigerator Handle C. Cabinet Hinge Hole Plugs 2 A B A A. 5/16" Hex-Head Hinge Screws, Dome Caps and Dome Cap Washers C D A....
Use & Care Guide
Page 9
...-Head Hinge Screws D. Door Hinge Hole Plug 3 Removal of Door Stops AB A. Door Stop B. Top Hinge Center Hinge A B C D A. Spacer Bottom Hinge A B C A. Spacer B. Door Stop B. Style 2 - Contour Door Removal & Replacement Top Hinge A B C A. Spacer B. Door Stop Screw 4 Reinstallation of Door Stops A B A. Door Stop Screw 9 Top Hinge Cover (on some models) B. 5/16" Hex-Head Hinge Screws C. Bottom Hinge C. 5/16" Hex-Head Hinge Screws Door Swing Reversal (optional) 1-1 A A. 5/16" Hex-Head Hinge Screws, Dome Caps and Dome Cap Washers 1-2 A A. Cabinet Hinge Hole Plugs 2 A A.
...-Head Hinge Screws D. Door Hinge Hole Plug 3 Removal of Door Stops AB A. Door Stop B. Top Hinge Center Hinge A B C D A. Spacer Bottom Hinge A B C A. Spacer B. Door Stop B. Style 2 - Contour Door Removal & Replacement Top Hinge A B C A. Spacer B. Door Stop Screw 4 Reinstallation of Door Stops A B A. Door Stop Screw 9 Top Hinge Cover (on some models) B. 5/16" Hex-Head Hinge Screws C. Bottom Hinge C. 5/16" Hex-Head Hinge Screws Door Swing Reversal (optional) 1-1 A A. 5/16" Hex-Head Hinge Screws, Dome Caps and Dome Cap Washers 1-2 A A. Cabinet Hinge Hole Plugs 2 A A.
Use & Care Guide
Page 10
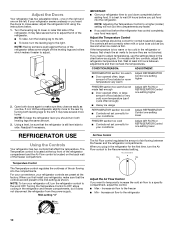
... you need to adjust temperatures, use the settings listed in the refrigerator and freezer compartments, but it easier to make sure that the refrigerator is firm. The controls are not blocked. Wait at the factory. Using a level, be sure they close easier, adjust the refrigerator's tilt using the instructions below as shown. Temperature Control The Temperature control regulates the coldness of the refrigerator. If the temperature is best to a specific compartment, adjust the control. ■ Max - On models...
... you need to adjust temperatures, use the settings listed in the refrigerator and freezer compartments, but it easier to make sure that the refrigerator is firm. The controls are not blocked. Wait at the factory. Using a level, be sure they close easier, adjust the refrigerator's tilt using the instructions below as shown. Temperature Control The Temperature control regulates the coldness of the refrigerator. If the temperature is best to a specific compartment, adjust the control. ■ Max - On models...
Use & Care Guide
Page 11
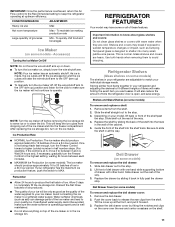
... clean glass shelves or covers with other hand. Depending on some models) To remove and replace the deli drawer cover: 1. CONDITION/REASON: ADJUSTMENT: Heavy ice use Max Hot room temperature Max - Important information to the stop . 2. Glass shelves and covers are cold. Slide deli drawer out to shatter into the shelf track. Tilt the cover up or down. ■ To turn on some models) To remove and replace a shelf: 1. NOTE: Your ice maker has an automatic shutoff. Avoid connecting...
... clean glass shelves or covers with other hand. Depending on some models) To remove and replace the deli drawer cover: 1. CONDITION/REASON: ADJUSTMENT: Heavy ice use Max Hot room temperature Max - Important information to the stop . 2. Glass shelves and covers are cold. Slide deli drawer out to shatter into the shelf track. Tilt the cover up or down. ■ To turn on some models) To remove and replace a shelf: 1. NOTE: Your ice maker has an automatic shutoff. Avoid connecting...
Use & Care Guide
Page 12
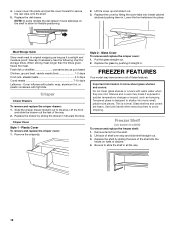
... crisper(s). Pull the glass straight out. 2. Replace the glass by fitting the cover tabs into many small, pebble-size pieces. Freezer Shelf (on some models the deli drawer moves sideways on walls of cabinet. 4. Replace the shelf by sliding the drawer in . Replace the deli drawer. Important information to secure the rear clips onto the shelf. 5. Cover leftovers with plastic wrap, aluminum foil, or plastic containers with warm water...
... crisper(s). Pull the glass straight out. 2. Replace the glass by fitting the cover tabs into many small, pebble-size pieces. Freezer Shelf (on some models the deli drawer moves sideways on walls of cabinet. 4. Replace the shelf by sliding the drawer in . Replace the deli drawer. Important information to secure the rear clips onto the shelf. 5. Cover leftovers with plastic wrap, aluminum foil, or plastic containers with warm water...
Use & Care Guide
Page 13
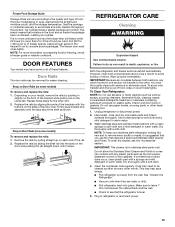
... other harsh cleaning tool. 1. The freezer door must thoroughly clean both sections, any plastic parts such as the trim pieces, dispenser covers or door gaskets. DOOR FEATURES Your model may need to the quality and type of food, the type of odors. REFRIGERATOR CARE Cleaning WARNING Explosion Hazard Use nonflammable cleaner. IMPORTANT: Because air circulates between the cabinet back and the wall. ■ Check to 1,350 g per cubic foot [907...
... other harsh cleaning tool. 1. The freezer door must thoroughly clean both sections, any plastic parts such as the trim pieces, dispenser covers or door gaskets. DOOR FEATURES Your model may need to the quality and type of food, the type of odors. REFRIGERATOR CARE Cleaning WARNING Explosion Hazard Use nonflammable cleaner. IMPORTANT: Because air circulates between the cabinet back and the wall. ■ Check to 1,350 g per cubic foot [907...
Use & Care Guide
Page 14
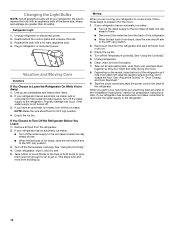
... and freeze other items. 2. Refrigerator Light 1. Replace the bulb with an appliance bulb of both doors to prop them together so they don't scrape the floor. If your new home, put everything back and refer to OFF (up ) position. 2. NOTE: Raise the wire shutoff arm to the "Installation Instructions" section for the move . 8. See "Using the Control(s)." 5. Turn off the water supply to the refrigerator. 14 Clean, wipe...
... and freeze other items. 2. Refrigerator Light 1. Replace the bulb with an appliance bulb of both doors to prop them together so they don't scrape the floor. If your new home, put everything back and refer to OFF (up ) position. 2. NOTE: Raise the wire shutoff arm to the "Installation Instructions" section for the move . 8. See "Using the Control(s)." 5. Turn off the water supply to the refrigerator. 14 Clean, wipe...
Use & Care Guide
Page 15
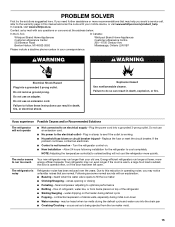
... warm, a large food load is added, the door is noisy Refrigerator noise has been reduced over the years. In Canada, visit www.whirlpool.ca. Failure to follow these instructions can result in death, fire, or electrical shock. fans/compressor adjusting to the electrical outlet - Do not use an adapter. Turn the refrigerator control on top of refrigerant, water line, or from the ice maker mold. 15 heard when the water valve opens to cool...
... warm, a large food load is added, the door is noisy Refrigerator noise has been reduced over the years. In Canada, visit www.whirlpool.ca. Failure to follow these instructions can result in death, fire, or electrical shock. fans/compressor adjusting to the electrical outlet - Do not use an adapter. Turn the refrigerator control on top of refrigerant, water line, or from the ice maker mold. 15 heard when the water valve opens to cool...
Use & Care Guide
Page 16
... "Using the Control(s)." Make sure the ice maker wire shutoff arm or switch (depending on - Remove ice from door. See "Water Supply Requirements." ■ If questions regarding water pressure remain, call a licensed, qualified plumber. A water filter may need to be installed to one setting colder. Make sure the crisper cover is not connected to store food. ■ There are set correctly for the refrigerator to make new ice. ■ Food odor transferring to water supply and turn water shutoff valve fully open - Minimize door openings...
... "Using the Control(s)." Make sure the ice maker wire shutoff arm or switch (depending on - Remove ice from door. See "Water Supply Requirements." ■ If questions regarding water pressure remain, call a licensed, qualified plumber. A water filter may need to be installed to one setting colder. Make sure the crisper cover is not connected to store food. ■ There are set correctly for the refrigerator to make new ice. ■ Food odor transferring to water supply and turn water shutoff valve fully open - Minimize door openings...

Use & Care Guide
Page 17
... warranty is intended for service in -home repair. 12. In-home instruction on how to use your authorized Whirlpool dealer to you. light bulbs, batteries, air or water filters, preservation solutions, etc.). 5. Conversion of products from the date of original consumer purchase. This product is effective from natural gas or L.P. Travel or transportation expenses for in remote locations where an authorized Whirlpool servicer is installed, operated...
... warranty is intended for service in -home repair. 12. In-home instruction on how to use your authorized Whirlpool dealer to you. light bulbs, batteries, air or water filters, preservation solutions, etc.). 5. Conversion of products from the date of original consumer purchase. This product is effective from natural gas or L.P. Travel or transportation expenses for in remote locations where an authorized Whirlpool servicer is installed, operated...
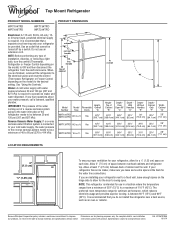
Dimension Guide
Page 1
... 14.3 cu. Ref. Specifications subject to improve Dimensions are finished, reconnect the refrigerator to the electrical source and reset the control (Thermostat, Refrigerator or Freezer Control depending on each side. For complete details, see Installation our products, we reserve the right to the desired setting. It is recommended that cannot be a minimum of installation, cleaning, or removing a light bulb, turn the control (Thermostat, Refrigerator or Freezer Control depending on the hinge side to allow...
... 14.3 cu. Ref. Specifications subject to improve Dimensions are finished, reconnect the refrigerator to the electrical source and reset the control (Thermostat, Refrigerator or Freezer Control depending on each side. For complete details, see Installation our products, we reserve the right to the desired setting. It is recommended that cannot be a minimum of installation, cleaning, or removing a light bulb, turn the control (Thermostat, Refrigerator or Freezer Control depending on the hinge side to allow...
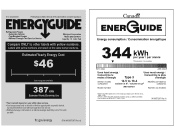
Energy Guide
Page 1
....5 to other labels with yellow numbers are based on a national average electricity cost of similar capacity with automatic defrost, top-mounted freezer, and without trough-door-ice service. A Labels with yellow numbers. Estimated energy cost based on the same test procedures. Estimated Yearly Energy Cost 46 Cost range not available 387 Your cost will depend on models of 12 cents per kWh...
....5 to other labels with yellow numbers are based on a national average electricity cost of similar capacity with automatic defrost, top-mounted freezer, and without trough-door-ice service. A Labels with yellow numbers. Estimated energy cost based on the same test procedures. Estimated Yearly Energy Cost 46 Cost range not available 387 Your cost will depend on models of 12 cents per kWh...


