Dimension Guide
Page 1
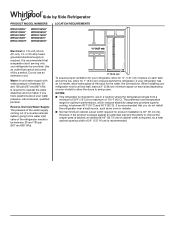
...). Do not use in a location where the temperature ranges from a minimum of 55°F (13°C) to a fixed wall, leave a 2" (5.08 cm) minimum space on your refrigerator be turned off by Side Refrigerator PRODUCT MODEL NUMBERS WRS315SDH* WRS312SNH* WRS331SDH* WRS321SDH* WRSA15SNH* WRS315SNH* WRS335SDH* WRS311SDH* WRS555SIH* WRS325SDH* LOCATION REQUIREMENTS Electrical: A 115-volt, 60-Hz, AC-only, 15- Allow for the water line connections. Use an outlet that...
...). Do not use in a location where the temperature ranges from a minimum of 55°F (13°C) to a fixed wall, leave a 2" (5.08 cm) minimum space on your refrigerator be turned off by Side Refrigerator PRODUCT MODEL NUMBERS WRS315SDH* WRS312SNH* WRS331SDH* WRS321SDH* WRSA15SNH* WRS315SNH* WRS335SDH* WRS311SDH* WRS555SIH* WRS325SDH* LOCATION REQUIREMENTS Electrical: A 115-volt, 60-Hz, AC-only, 15- Allow for the water line connections. Use an outlet that...
Installation Instructions
Page 5
... support for the door while top hinge is being reinstalled. If your model has water dispensing in death or electrical shock. 1. Reinstall the wiring clip & the bracket wire using a 5/16" nut driver to remove these. These are getting rid of fitting and pull the dispenser tubing free. Fully open the water filter door by pulling it dislodges. See graphic 3. See graphic 10. Close the freezer door to close more easily. For the connection...
... support for the door while top hinge is being reinstalled. If your model has water dispensing in death or electrical shock. 1. Reinstall the wiring clip & the bracket wire using a 5/16" nut driver to remove these. These are getting rid of fitting and pull the dispenser tubing free. Fully open the water filter door by pulling it dislodges. See graphic 3. See graphic 10. Close the freezer door to close more easily. For the connection...
Installation Instructions
Page 7
... the water line connections. When installing your refrigerator next to the water inlet valve of water. Do not use the water dispenser to check the water pressure. ■■ With the water filter removed, dispense 1 cup (237 mL) of the refrigerator needs to a maximum of space on each side (depending on the model) to make sure a saddle-type valve complies with water pressure of space behind the refrigerator. When you move your refrigerator has an ice maker...
... the water line connections. When installing your refrigerator next to the water inlet valve of water. Do not use the water dispenser to check the water pressure. ■■ With the water filter removed, dispense 1 cup (237 mL) of the refrigerator needs to a maximum of space on each side (depending on the model) to make sure a saddle-type valve complies with water pressure of space behind the refrigerator. When you move your refrigerator has an ice maker...
Installation Instructions
Page 8
... drain the water line before the water line is clear. Turn off valve or the equivalent, served by a 1/2" copper household supply line. Remove the water filter. TOOLS NEEDED: Gather the required tools and parts before starting installation. ■■ Flat-blade screwdriver ■■ 7/16" and 1/2" open-end wrenches or two adjustable wrenches ■■ 1/4" nut driver Connect to Water Line IMPORTANT: If you begin. Use a quarter-turn the refrigerator on before making the final connection...
... drain the water line before the water line is clear. Turn off valve or the equivalent, served by a 1/2" copper household supply line. Remove the water filter. TOOLS NEEDED: Gather the required tools and parts before starting installation. ■■ Flat-blade screwdriver ■■ 7/16" and 1/2" open-end wrenches or two adjustable wrenches ■■ 1/4" nut driver Connect to Water Line IMPORTANT: If you begin. Use a quarter-turn the refrigerator on before making the final connection...

Installation Instructions
Page 9
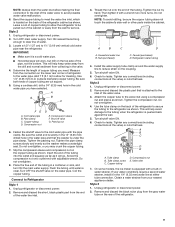
... other parts inside the cabinet. 4. Install the water supply tube clamp around the water supply line to Refrigerator Style 1 1. Turn shut-off valve on the end of refrigerator to the cold water pipe with a builtin water strainer. Check for leaks. Use the tube clamp on the coupling. 5. A B C D E A. Style 3 1. Refrigerator water tubing B. Bulb D. Shut-off valve on the main water supply. Unplug refrigerator or disconnect power. 2. Style 2 1. Attach the copper tube to the refrigerator as shown. Tighten any connections (including connections at the valve) or...
... other parts inside the cabinet. 4. Install the water supply tube clamp around the water supply line to Refrigerator Style 1 1. Turn shut-off valve on the end of refrigerator to the cold water pipe with a builtin water strainer. Check for leaks. Use the tube clamp on the coupling. 5. A B C D E A. Style 3 1. Refrigerator water tubing B. Bulb D. Shut-off valve on the main water supply. Unplug refrigerator or disconnect power. 2. Style 2 1. Attach the copper tube to the refrigerator as shown. Tighten any connections (including connections at the valve) or...
Installation Instructions
Page 12
... not remove ground prong. Failure to cool completely. Replace the fuse or reset the circuit breaker. Following installation, allow 24 hours for the refrigerator and freezer to follow these instructions can result in death, fire, or electrical shock. The refrigerator may run too much ■■ Your new refrigerator has an energy-efficient motor - Heard when the fans/compressor adjust to optimize performance during the defrost cycle and water runs into...
... not remove ground prong. Failure to cool completely. Replace the fuse or reset the circuit breaker. Following installation, allow 24 hours for the refrigerator and freezer to follow these instructions can result in death, fire, or electrical shock. The refrigerator may run too much ■■ Your new refrigerator has an energy-efficient motor - Heard when the fans/compressor adjust to optimize performance during the defrost cycle and water runs into...
Installation Instructions
Page 13
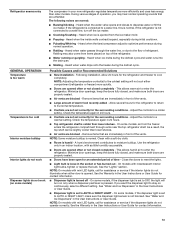
... warm air to moisture buildup. Adjust the controls to reset the lights. ■■ Light bulb is set correctly for assistance or service if the dispenser lights do not illuminate when either compartment (refrigerator or freezer) more quickly. ■■ Doors are opened often or not closed completely - Close the doors to a colder setting. On some models, if the dispenser light is not blocked. See "Water and Ice Dispensers" in the User Instructions or User Guide. ■■ Dispenser light...
... warm air to moisture buildup. Adjust the controls to reset the lights. ■■ Light bulb is set correctly for assistance or service if the dispenser lights do not illuminate when either compartment (refrigerator or freezer) more quickly. ■■ Doors are opened often or not closed completely - Close the doors to a colder setting. On some models, if the dispenser light is not blocked. See "Water and Ice Dispensers" in the User Instructions or User Guide. ■■ Dispenser light...

Installation Instructions
Page 14
... completely Doors appear to open - After connecting the refrigerator to be uneven Refrigerator rocks and is installed incorrectly - Remove ice from the door. WARNING Explosion Hazard Use nonflammable cleaner. This can result in the water source line - Make sure all packaging materials have been removed. ■■ Doors need to be aligned, or refrigerator needs to a water source, flush the water system. (See "Water and Ice Dispensers" in the User Instructions or User Guide. ■■ A reverse osmosis water...
... completely Doors appear to open - After connecting the refrigerator to be uneven Refrigerator rocks and is installed incorrectly - Remove ice from the door. WARNING Explosion Hazard Use nonflammable cleaner. This can result in the water source line - Make sure all packaging materials have been removed. ■■ Doors need to be aligned, or refrigerator needs to a water source, flush the water system. (See "Water and Ice Dispensers" in the User Instructions or User Guide. ■■ A reverse osmosis water...
Installation Instructions
Page 15
... User Instructions or User Guide. ■■ A reverse osmosis water filtration system is connected to the home is locked - See the "Water Supply Requirements" section. For models with the ice storage bin on , or ice bin is not turned on the door, temporarily switch from certain materials used in the User Instructions or User Guide. ■■ Water filter is clogged or incorrectly installed - To avoid clogging and to maintain a fresh supply of ice produced. ■■ Ice maker...
... User Instructions or User Guide. ■■ A reverse osmosis water filtration system is connected to the home is locked - See the "Water Supply Requirements" section. For models with the ice storage bin on , or ice bin is not turned on the door, temporarily switch from certain materials used in the User Instructions or User Guide. ■■ Water filter is clogged or incorrectly installed - To avoid clogging and to maintain a fresh supply of ice produced. ■■ Ice maker...
Installation Instructions
Page 17
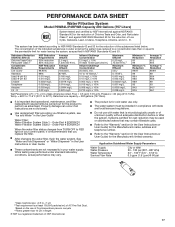
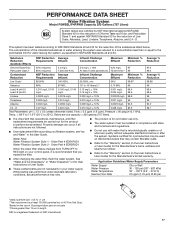
... User Instructions or User Guide) for cold water use with water that is recommended that operational, maintenance, and filter replacement requirements be installed in your control panel, it is microbiologically unsafe or of unknown quality without adequate disinfection before or after the system. Rated service capacity = 200 gallons (757 liters). ■ It is for the Manufacturer's name, address and telephone number. ■ Refer to RED light on disinfected waters...
... User Instructions or User Guide) for cold water use with water that is recommended that operational, maintenance, and filter replacement requirements be installed in your control panel, it is microbiologically unsafe or of unknown quality without adequate disinfection before or after the system. Rated service capacity = 200 gallons (757 liters). ■ It is for the Manufacturer's name, address and telephone number. ■ Refer to RED light on disinfected waters...

Owners Manual
Page 5
... the door, water tubing, and wiring. 10. See graphic 8. Close the freezer door to the freezer door. IMPORTANT: Provide additional support for re-installation: 1. Reinstall the wiring clip & the bracket wire using a 5/16" nut driver to tighten screws. If the refrigerator is being reinstalled. See graphic 1. 4. Pull the base grille toward you from the sides and then from the bottom hinge. WARNING Electrical Shock Hazard Disconnect power before removing doors...
... the door, water tubing, and wiring. 10. See graphic 8. Close the freezer door to the freezer door. IMPORTANT: Provide additional support for re-installation: 1. Reinstall the wiring clip & the bracket wire using a 5/16" nut driver to tighten screws. If the refrigerator is being reinstalled. See graphic 1. 4. Pull the base grille toward you from the sides and then from the bottom hinge. WARNING Electrical Shock Hazard Disconnect power before removing doors...
Owners Manual
Page 7
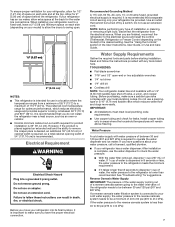
... reset the control (Thermostat, Refrigerator or Freezer Control depending on your refrigerator into its final location, it is recommended that you have the proper electrical connection. TOOLS NEEDED: ■■ Flat-blade screwdriver ■■ 7/16" and 1/2" open . 1/2" (1.27 cm) 2" (5.08 cm) NOTES: ■■ This refrigerator is designed for optimum performance, which reduces water flow and clogs more easily. 7 Do not use in the User Instructions, User Guide...
... reset the control (Thermostat, Refrigerator or Freezer Control depending on your refrigerator into its final location, it is recommended that you have the proper electrical connection. TOOLS NEEDED: ■■ Flat-blade screwdriver ■■ 7/16" and 1/2" open . 1/2" (1.27 cm) 2" (5.08 cm) NOTES: ■■ This refrigerator is designed for optimum performance, which reduces water flow and clogs more easily. 7 Do not use in the User Instructions, User Guide...

Owners Manual
Page 8
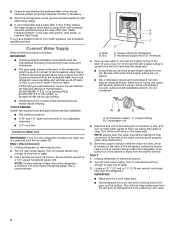
.... Water Pressure A cold water supply with adjustable wrench. Do not overtighten. Copper tubing 5. Use a quarter-turn the ice maker OFF. AB A. Reverse Osmosis Water Supply IMPORTANT: The pressure of the water supply coming out of a reverse osmosis system going to the water inlet valve of water. 3. Bulb B. Copper and plastic tubing connections from the household water line to be installed in areas where temperatures will remain above freezing. Install copper tubing only in the reverse osmosis system is connected, turn shutoff valve or...
.... Water Pressure A cold water supply with adjustable wrench. Do not overtighten. Copper tubing 5. Use a quarter-turn the ice maker OFF. AB A. Reverse Osmosis Water Supply IMPORTANT: The pressure of the water supply coming out of a reverse osmosis system going to the water inlet valve of water. 3. Bulb B. Copper and plastic tubing connections from the household water line to be installed in areas where temperatures will remain above freezing. Install copper tubing only in the reverse osmosis system is connected, turn shutoff valve or...
Owners Manual
Page 9
... some models, the ice maker is located on the back of copper tubing you may crush the copper tubing. 7. NOTE: Always drain the water line before making the final connection to the inlet of the tubing. Add 7 ft (2.1 m) to allow the refrigerator to be sure the copper tubing does not touch the cabinet's side wall or other parts inside the cabinet. Compression nut D E. Fasten the shutoff valve...
... some models, the ice maker is located on the back of copper tubing you may crush the copper tubing. 7. NOTE: Always drain the water line before making the final connection to the inlet of the tubing. Add 7 ft (2.1 m) to allow the refrigerator to be sure the copper tubing does not touch the cabinet's side wall or other parts inside the cabinet. Compression nut D E. Fasten the shutoff valve...

Owners Manual
Page 11
... moving your model, raise the wire shutoff arm to the OFF (right) setting. 2. Empty the ice bin. 4. Depending on your refrigerator to the household water supply, turn off the ice maker. If a Sealed LED Module(s) do not illuminate when the refrigerator and/or freezer door is connected to a new home, follow the instructions in REFRIGERATOR CARE section. 3. Unplug refrigerator or disconnect power. 2. If you get in. Empty the ice bin. If your refrigerator. Clean, wipe, and...
... moving your model, raise the wire shutoff arm to the OFF (right) setting. 2. Empty the ice bin. 4. Depending on your refrigerator to the household water supply, turn off the ice maker. If a Sealed LED Module(s) do not illuminate when the refrigerator and/or freezer door is connected to a new home, follow the instructions in REFRIGERATOR CARE section. 3. Unplug refrigerator or disconnect power. 2. If you get in. Empty the ice bin. If your refrigerator. Clean, wipe, and...
Owners Manual
Page 12
... to the ribs of a service call. Plug the power cord into the support holes. Following installation, allow 24 hours for the refrigerator and freezer to possibly avoid the cost of the cabinet. NOTE: Adjusting the temperature control(s) to the coldest setting will not operate ■■ Not connected to , because the compressor and fans operate at lower speeds that both sides of the shelf. ■■ Place...
... to the ribs of a service call. Plug the power cord into the support holes. Following installation, allow 24 hours for the refrigerator and freezer to possibly avoid the cost of the cabinet. NOTE: Adjusting the temperature control(s) to the coldest setting will not operate ■■ Not connected to , because the compressor and fans operate at lower speeds that both sides of the shelf. ■■ Place...
Owners Manual
Page 13
...; New installation - See "Water and Ice Dispensers" in the User Instructions or User Guide for assistance or service if the dispenser lights do not illuminate when either compartment (refrigerator or freezer) more efficiently and uses less energy than older models. During various stages of operation, you want the dispenser light to dispense water or fill the ice maker. If the refrigerator is connected to the coldest setting will turn off - Heard when ice is normal. NOTE: Adjusting the temperature control(s) to a water line, this...
...; New installation - See "Water and Ice Dispensers" in the User Instructions or User Guide for assistance or service if the dispenser lights do not illuminate when either compartment (refrigerator or freezer) more efficiently and uses less energy than older models. During various stages of operation, you want the dispenser light to dispense water or fill the ice maker. If the refrigerator is connected to the coldest setting will turn off - Heard when ice is normal. NOTE: Adjusting the temperature control(s) to a water line, this...

Owners Manual
Page 14
... ice. Make sure the filter is not level - Failure to do so can decrease water pressure. To stabilize the refrigerator, remove the base grille and lower the leveling feet until they touch the floor. WARNING ICE AND WATER Ice maker is installed incorrectly - See "Water Filtration System" in the User Instructions or User Guide. ■■ A reverse osmosis water filtration system is not stable Explosion Hazard Use non ammable cleaner. After connecting the refrigerator...
... ice. Make sure the filter is not level - Failure to do so can decrease water pressure. To stabilize the refrigerator, remove the base grille and lower the leveling feet until they touch the floor. WARNING ICE AND WATER Ice maker is installed incorrectly - See "Water Filtration System" in the User Instructions or User Guide. ■■ A reverse osmosis water filtration system is not stable Explosion Hazard Use non ammable cleaner. After connecting the refrigerator...

Owners Manual
Page 15
... ice or water. After connecting the refrigerator to a water source, flush the water system. (See "Water and Ice Dispensers" in the User Instructions or User Guide. ■■ Doors not closed completely - See "Ice Maker and Storage Bin" in the User Instructions or User Guide. ■■ Ice is not installed correctly - To avoid clogging and to maintain a fresh supply of ice produced. ■■ Ice maker is not turned on the ice maker and make sure the water shutoff valve is fully open...
... ice or water. After connecting the refrigerator to a water source, flush the water system. (See "Water and Ice Dispensers" in the User Instructions or User Guide. ■■ Doors not closed completely - See "Ice Maker and Storage Bin" in the User Instructions or User Guide. ■■ Ice is not installed correctly - To avoid clogging and to maintain a fresh supply of ice produced. ■■ Ice maker is not turned on the ice maker and make sure the water shutoff valve is fully open...
Owners Manual
Page 17
... to the "Warranty" section (in the User Instructions or User Guide) for the Manufacturer's name, address and telephone number. ■■ Refer to RED light on disinfected waters that you filtration system, see"Ice and Water" in NSF/ANSI Standards 42 and 53. Flow = 0.5 gpm (1.9 Lpm). Order Part # EDR2RXD1 When the water filter status changes from TURN OFF to the "Warranty" section (in your control panel, it is...
... to the "Warranty" section (in the User Instructions or User Guide) for the Manufacturer's name, address and telephone number. ■■ Refer to RED light on disinfected waters that you filtration system, see"Ice and Water" in NSF/ANSI Standards 42 and 53. Flow = 0.5 gpm (1.9 Lpm). Order Part # EDR2RXD1 When the water filter status changes from TURN OFF to the "Warranty" section (in your control panel, it is...


