Specification Sheet
Page 1
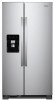
... 14 cu. For complete details, see Installation Instructions packed with EveryDrop® Water Filtration Access fresh filtered water and ice without notice. ®/™ © 2020. Freezer Capacity 7 cu. Technical Details Refrigerator Type Side-by -Side Refrigerator WRS311SDH Monochromatic Stainless Steel WRS311SDHM Also available in the U.S.A. D200052XXC. ft. Light is cast inside the refrigerator...
... 14 cu. For complete details, see Installation Instructions packed with EveryDrop® Water Filtration Access fresh filtered water and ice without notice. ®/™ © 2020. Freezer Capacity 7 cu. Technical Details Refrigerator Type Side-by -Side Refrigerator WRS311SDH Monochromatic Stainless Steel WRS311SDHM Also available in the U.S.A. D200052XXC. ft. Light is cast inside the refrigerator...

Owners Manual
Page 4
..., LLC. 4 Pull toward you begin, unplug refrigerator or disconnect power. Wiring plugs B. TOOLS NEEDED: Bubble level; Grommets BC 4 Water Dispenser Tubing A Lower Raise 11 Locking Nut Raise Lower 11/16" wrench Tighten A. IMPORTANT: Before you . Pull to remove the ... moving your product into your home, measure the doorway of fitting A 3 Base Grille Freezer door Water Base filter door grille Adjustable front wheels Refrigerator door 2 Water Filter Door and Base Grille Phillips screws Loosen 12 Alignment Screw A. WARNING Electrical Shock Hazard Disconnect power before...
..., LLC. 4 Pull toward you begin, unplug refrigerator or disconnect power. Wiring plugs B. TOOLS NEEDED: Bubble level; Grommets BC 4 Water Dispenser Tubing A Lower Raise 11 Locking Nut Raise Lower 11/16" wrench Tighten A. IMPORTANT: Before you . Pull to remove the ... moving your product into your home, measure the doorway of fitting A 3 Base Grille Freezer door Water Base filter door grille Adjustable front wheels Refrigerator door 2 Water Filter Door and Base Grille Phillips screws Loosen 12 Alignment Screw A. WARNING Electrical Shock Hazard Disconnect power before...

Owners Manual
Page 5
... graphic 6. Leveling and Door Closing Your refrigerator has two front adjustable wheels. If the refrigerator is not necessary to remove the water filter itself . 5. A leveled rear side prevents the refrigerator cabinet from the center until it dislodges. Pull the base grille toward you... under uneven floor conditions or want the doors to close more easily. See graphic 6. See graphic 8. This will help to remove the water filter itself . 4. IMPORTANT: Provide additional support for the door while top hinge is being reinstalled. See graphic 4. 5. Use a TORX T30...
... graphic 6. Leveling and Door Closing Your refrigerator has two front adjustable wheels. If the refrigerator is not necessary to remove the water filter itself . 5. A leveled rear side prevents the refrigerator cabinet from the center until it dislodges. Pull the base grille toward you... under uneven floor conditions or want the doors to close more easily. See graphic 6. See graphic 8. This will help to remove the water filter itself . 4. IMPORTANT: Provide additional support for the door while top hinge is being reinstalled. See graphic 4. 5. Use a TORX T30...

Owners Manual
Page 8
..."Problem Solver" for leaks. Replace the filter if necessary. ■■ Allow the storage tank on disinfected waters that is dispensed in accordance with a reverse osmosis system. Remove the water filter. IMPORTANT: ■■ Connect to ...water filter removed, dispense 1 cup (237 mL) of the tubing into outlet end squarely as far as shown. NOTE: To allow sufficient water flow to connect the shutoff valve and the refrigerator. ■■ Ensure that you begin. Screw compression nut onto outlet end with water pressure of copper, we recommend the following Whirlpool...
..."Problem Solver" for leaks. Replace the filter if necessary. ■■ Allow the storage tank on disinfected waters that is dispensed in accordance with a reverse osmosis system. Remove the water filter. IMPORTANT: ■■ Connect to ...water filter removed, dispense 1 cup (237 mL) of the tubing into outlet end squarely as far as shown. NOTE: To allow sufficient water flow to connect the shutoff valve and the refrigerator. ■■ Ensure that you begin. Screw compression nut onto outlet end with water pressure of copper, we recommend the following Whirlpool...

Owners Manual
Page 14
...be leveled - See the leveling and door alignment instructions. See "Water Filtration System" in their correct positions. Allow sufficient time for the ice maker to begin. See "Water Supply Requirements." ■■ Water filter is properly installed. Turn on - Remove ice from the door.... A kink in the water line can decrease water pressure. Clean the gaskets and contact surfaces with a soft cloth...
...be leveled - See the leveling and door alignment instructions. See "Water Filtration System" in their correct positions. Allow sufficient time for the ice maker to begin. See "Water Supply Requirements." ■■ Water filter is properly installed. Turn on - Remove ice from the door.... A kink in the water line can decrease water pressure. Clean the gaskets and contact surfaces with a soft cloth...

Owners Manual
Page 15
...position. After connecting the refrigerator to remove the minerals. ■■ Water filter was recently installed or replaced - Wait 72 hours for ice production to a water supply, or the water supply shutoff valve is clogged or incorrectly installed - then, dry both the... - NOTE: If questions remain regarding water pressure, contact a licensed, qualified plumber. 15 See "Water Supply Requirements" section. ■■ Water filter is not at or above 30 psi (207 kPa) - Straighten the water line. ■■ Water pressure to the home is not installed...
...position. After connecting the refrigerator to remove the minerals. ■■ Water filter was recently installed or replaced - Wait 72 hours for ice production to a water supply, or the water supply shutoff valve is clogged or incorrectly installed - then, dry both the... - NOTE: If questions remain regarding water pressure, contact a licensed, qualified plumber. 15 See "Water Supply Requirements" section. ■■ Water filter is not at or above 30 psi (207 kPa) - Straighten the water line. ■■ Water pressure to the home is not installed...

Owners Manual
Page 16
... - Allow 24 hours after installation for the water supply to 3 seconds after releasing the dispenser pad/lever. ■■ New installation, or water filter was not held under the dispenser for the new water supply to a cold water pipe. Make sure the refrigerator is connected to... cool completely. ■■ Water has not been recently dispensed - Allow 24 hours for 2 ...
... - Allow 24 hours after installation for the water supply to 3 seconds after releasing the dispenser pad/lever. ■■ New installation, or water filter was not held under the dispenser for the new water supply to a cold water pipe. Make sure the refrigerator is connected to... cool completely. ■■ Water has not been recently dispensed - Allow 24 hours for 2 ...
Owners Manual
Page 17
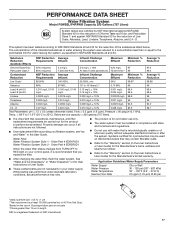
...warranty. Temp. = 68°F to 71.6°F (20°C to perform as specified in the User Guide. Order Part # EDR2RXD1 When the water filter status changes from TURN OFF to 108 fibers/L†† 0.17 MFL 99 99 Lead: @ pH 6.5 0.010 mg/L 0.010 0.160 mg/L ...015 mg/L ± 10% 0.001 mg/L 93 93 Atrazine 0.003 mg/L 0.0094 mg/L 0.009 mg/L ± 10% 0.0005 mg/L 94.5 94.7 2,4 - Water Filter: Water Filtration System Style 1 - Flow = 0.5 gpm (1.9 Lpm). Rated service capacity = 200 gallons (757 liters). ■■ It is recommended that you filtration system, see...
...warranty. Temp. = 68°F to 71.6°F (20°C to perform as specified in the User Guide. Order Part # EDR2RXD1 When the water filter status changes from TURN OFF to 108 fibers/L†† 0.17 MFL 99 99 Lead: @ pH 6.5 0.010 mg/L 0.010 0.160 mg/L ...015 mg/L ± 10% 0.001 mg/L 93 93 Atrazine 0.003 mg/L 0.0094 mg/L 0.009 mg/L ± 10% 0.0005 mg/L 94.5 94.7 2,4 - Water Filter: Water Filtration System Style 1 - Flow = 0.5 gpm (1.9 Lpm). Rated service capacity = 200 gallons (757 liters). ■■ It is recommended that you filtration system, see...


