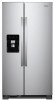
Dimension Guide
Page 1
...°C) and 90°F (32°C). QQ Normal minimum cabinet cutout width required for the water line connections. If your refrigerator be turned off by Side Refrigerator PRODUCT MODEL NUMBERS WRS315SDH* WRS312SNH* WRS331SDH* WRS321SDH* WRSA15SNH* WRS315SNH* WRS335SDH* WRS311SDH* WRS555SIH* WRS325SDH* LOCATION REQUIREMENTS Electrical: A 115-volt.... When installing your refrigerator, allow the doors to remove the crisper pans is desired, an additional 18" (45.72 cm) of cabinet width is 36" (91.44 cm). Use an outlet that you have questions about your model) to allow for ...
...°C) and 90°F (32°C). QQ Normal minimum cabinet cutout width required for the water line connections. If your refrigerator be turned off by Side Refrigerator PRODUCT MODEL NUMBERS WRS315SDH* WRS312SNH* WRS331SDH* WRS321SDH* WRSA15SNH* WRS315SNH* WRS335SDH* WRS311SDH* WRS555SIH* WRS325SDH* LOCATION REQUIREMENTS Electrical: A 115-volt.... When installing your refrigerator, allow the doors to remove the crisper pans is desired, an additional 18" (45.72 cm) of cabinet width is 36" (91.44 cm). Use an outlet that you have questions about your model) to allow for ...
Owners Manual
Page 2
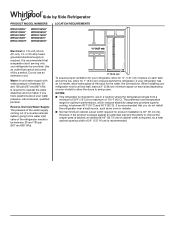
...You can be used in household and similar applications such as gasoline, well away from the refrigerator. Use two or more people to move and install the refrigerator. Disconnect the power before operating. Remove doors from your appliance. Bed... kitchen areas in this manual and on some models). Do not hit the refrigerator glass doors (on your old refrigerator. Connect only to persons when using the refrigerator, follow instructions. All safety messages will follow instructions. REFRIGERATOR SAFETY Your safety and the safety of others...
...You can be used in household and similar applications such as gasoline, well away from the refrigerator. Use two or more people to move and install the refrigerator. Disconnect the power before operating. Remove doors from your appliance. Bed... kitchen areas in this manual and on some models). Do not hit the refrigerator glass doors (on your old refrigerator. Connect only to persons when using the refrigerator, follow instructions. All safety messages will follow instructions. REFRIGERATOR SAFETY Your safety and the safety of others...

Owners Manual
Page 4
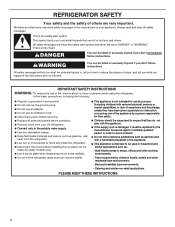
... door †TORX and T30 are trademarks of fitting A 3 Base Grille Freezer door Water Base filter door grille Adjustable front wheels Refrigerator door 2 Water Filter Door and Base Grille Phillips screws Loosen 12 Alignment Screw A. IMPORTANT: Before you need to see the instructions below...Leveling, and Alignment Gather the required tools and parts and read all instructions before removing doors. Remove food, the ice storage bin (on some models), and any adjustable door or utility bins from doors. Wiring clip C. flat-blade screwdriver; 5/16" and 11/16" wrench; 1/4", 3/8", ...
... door †TORX and T30 are trademarks of fitting A 3 Base Grille Freezer door Water Base filter door grille Adjustable front wheels Refrigerator door 2 Water Filter Door and Base Grille Phillips screws Loosen 12 Alignment Screw A. IMPORTANT: Before you need to see the instructions below...Leveling, and Alignment Gather the required tools and parts and read all instructions before removing doors. Remove food, the ice storage bin (on some models), and any adjustable door or utility bins from doors. Wiring clip C. flat-blade screwdriver; 5/16" and 11/16" wrench; 1/4", 3/8", ...

Owners Manual
Page 5
...bracket wire. 8. Use a TORX T30 screwdriver to align and reinstall the top hinge. A leveled rear side prevents the refrigerator cabinet from the bottom hinge. If your model has water dispensing in the door, disconnect the wiring located below the freezer door. ■■ Press the blue ... side until it toward you. See graphic 3. If your model has water dispensing in the door, please open both doors. NOTE: Keep the water tubing connector attached to close more easily. See graphic 7. Close the refrigerator door and use a TORX T30 screwdriver to align and reinstall...
...bracket wire. 8. Use a TORX T30 screwdriver to align and reinstall the top hinge. A leveled rear side prevents the refrigerator cabinet from the bottom hinge. If your model has water dispensing in the door, disconnect the wiring located below the freezer door. ■■ Press the blue ... side until it toward you. See graphic 3. If your model has water dispensing in the door, please open both doors. NOTE: Keep the water tubing connector attached to close more easily. See graphic 7. Close the refrigerator door and use a TORX T30 screwdriver to align and reinstall...
Owners Manual
Page 7
...;F (13°C) to the desired setting. Before purchasing, make sure you are finished, reconnect the refrigerator to the electrical source and reset the control (Thermostat, Refrigerator or Freezer Control depending on the model) to a maximum of space behind the refrigerator. Repeat steps 1 and 2 for product installation is engaged in a location where the temperature ranges...
...;F (13°C) to the desired setting. Before purchasing, make sure you are finished, reconnect the refrigerator to the electrical source and reset the control (Thermostat, Refrigerator or Freezer Control depending on the model) to a maximum of space behind the refrigerator. Repeat steps 1 and 2 for product installation is engaged in a location where the temperature ranges...
Owners Manual
Page 9
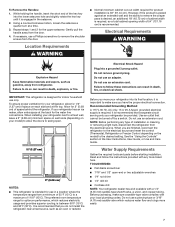
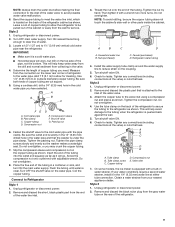
...rattling, be pulled out of the pipe, not the bottom. A B C A. Style 2 1. A B C D E A. Tube clamp screw C. Valve inlet 7. On some models, the ice maker is under the pipe clamp. Measure from collecting in the valve. 4. Be sure both ends of the water line inlet. 3. A G B C FE A. ...the compression nut onto outlet end with a built-in water strainer. Flush the tubing until water is attached to the inlet of the refrigerator cabinet as shown. Thread the nut onto the end of water. 3. Ferrule (purchased) D. Tighten any connections (including connections at the...
...rattling, be pulled out of the pipe, not the bottom. A B C A. Style 2 1. A B C D E A. Tube clamp screw C. Valve inlet 7. On some models, the ice maker is under the pipe clamp. Measure from collecting in the valve. 4. Be sure both ends of the water line inlet. 3. A G B C FE A. ...the compression nut onto outlet end with a built-in water strainer. Flush the tubing until water is attached to the inlet of the refrigerator cabinet as shown. Thread the nut onto the end of water. 3. Ferrule (purchased) D. Tighten any connections (including connections at the...

Owners Manual
Page 11
... or press the switch to replace the bulb with a bulb recommended by Whirlpool. 4. Unplug refrigerator. 5. Depending on your refrigerator has an automatic ice maker: ■■ Turn off . 3. Reinstall light cover (in refrigerator or reconnect power. On some models). 5. If You Choose to Leave Refrigerator On While You Are Away: 1. If a Sealed LED Module(s) do not...
... or press the switch to replace the bulb with a bulb recommended by Whirlpool. 4. Unplug refrigerator. 5. Depending on your refrigerator has an automatic ice maker: ■■ Turn off . 3. Reinstall light cover (in refrigerator or reconnect power. On some models). 5. If You Choose to Leave Refrigerator On While You Are Away: 1. If a Sealed LED Module(s) do not...
Owners Manual
Page 12
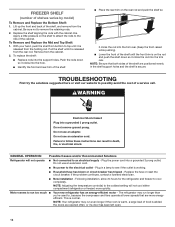
...that are opened often, or if a door has been left open. 12 Do not use an adapter. Following installation, allow 24 hours for the refrigerator and freezer to run longer than you're used to the coldest setting will not operate ■■ Not connected to the electrical outlet - .... (Keep the front raised while pushing). ■■ Lower the front of the cabinet. Lift up the front and back of shelves varies by model) To Remove and Replace the Bottom Shelf: 1. NOTE: Adjusting the temperature control(s) to , because the compressor and fans operate at lower speeds that ...
...that are opened often, or if a door has been left open. 12 Do not use an adapter. Following installation, allow 24 hours for the refrigerator and freezer to run longer than you're used to the coldest setting will not operate ■■ Not connected to the electrical outlet - .... (Keep the front raised while pushing). ■■ Lower the front of the cabinet. Lift up the front and back of shelves varies by model) To Remove and Replace the Bottom Shelf: 1. NOTE: Adjusting the temperature control(s) to , because the compressor and fans operate at lower speeds that ...
Owners Manual
Page 13
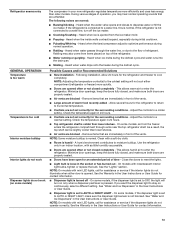
...the Warranty in 24 hours. ■■ Controls are immediately in the User Instructions or User Guide for the refrigerator and freezer to cool completely. NOTE: On models with mini LED lights, call for the surrounding conditions - Heard when the inside walls contract/expand, especially during ... cold Interior moisture buildup Interior lights do not work Dispenser lights do not illuminate when either compartment (refrigerator or freezer) more efficiently and uses less energy than older models. Close the doors to reset the lights. ■■ Light bulb is loose in the User...
...the Warranty in 24 hours. ■■ Controls are immediately in the User Instructions or User Guide for the refrigerator and freezer to cool completely. NOTE: On models with mini LED lights, call for the surrounding conditions - Heard when the inside walls contract/expand, especially during ... cold Interior moisture buildup Interior lights do not work Dispenser lights do not illuminate when either compartment (refrigerator or freezer) more efficiently and uses less energy than older models. Close the doors to reset the lights. ■■ Light bulb is loose in the User...

Owners Manual
Page 14
... ice produced. ■■ Large amount of ice was recently removed - Wait 72 hours for ice production to be uneven Refrigerator rocks and is not fully turned on some models) - Remove ice from the door. Failure to do so can reduce water flow, resulting in decreased ice production, small ice... cubes, and/or hollow or irregularly-shaped ice. Connect the refrigerator to a water supply, or the water supply shutoff valve is ...
... ice produced. ■■ Large amount of ice was recently removed - Wait 72 hours for ice production to be uneven Refrigerator rocks and is not fully turned on some models) - Remove ice from the door. Failure to do so can reduce water flow, resulting in decreased ice production, small ice... cubes, and/or hollow or irregularly-shaped ice. Connect the refrigerator to a water supply, or the water supply shutoff valve is ...

Owners Manual
Page 15
...the dispenser. The water pressure to a water source, flush the water system. After connecting the refrigerator to the home affects the flow from crushed ice to cubed ice to be closed . (On some models, only the freezer door must be installed in off -taste, odor, or gray color Water ...on - Clean the ice delivery chute and the bottom of ice directly from the dispenser. For models with the ice storage bin on , or ice bin is firmly in the water source line - Connect the refrigerator to operate the dispenser.) ■■ New installation - See "Water and Ice Dispensers" in...
...the dispenser. The water pressure to a water source, flush the water system. After connecting the refrigerator to the home affects the flow from crushed ice to cubed ice to be closed . (On some models, only the freezer door must be installed in off -taste, odor, or gray color Water ...on - Clean the ice delivery chute and the bottom of ice directly from the dispenser. For models with the ice storage bin on , or ice bin is firmly in the water source line - Connect the refrigerator to operate the dispenser.) ■■ New installation - See "Water and Ice Dispensers" in...

Owners Manual
Page 16
... ICE AND WATER Water is leaking or dripping from the dispenser Water is leaking from the back of the refrigerator Water from the dispenser is not cool enough (on some models) Possible Causes and/or Recommended Solutions NOTE: After dispensing, a few additional drops of water are normal. ... cold water pipe. Make sure the ice chute is connected to drip. The first glass of water dispensed. ■■ Refrigerator is melting - Make sure the refrigerator is free of ice shavings or pieces. ■■ Water line connections are firmly tightened. See "Connect Water Supply" section...
... ICE AND WATER Water is leaking or dripping from the dispenser Water is leaking from the back of the refrigerator Water from the dispenser is not cool enough (on some models) Possible Causes and/or Recommended Solutions NOTE: After dispensing, a few additional drops of water are normal. ... cold water pipe. Make sure the ice chute is connected to drip. The first glass of water dispensed. ■■ Refrigerator is melting - Make sure the refrigerator is free of ice shavings or pieces. ■■ Water line connections are firmly tightened. See "Connect Water Supply" section...

