Specification Sheet
Page 1
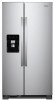
... of Interior Freezer Shelves 4 2 Fixed, 3 Adjustable 3 Number of Freezer Door Bins 3 Fixed Lighting Type Ice Maker Ice Maker Location Dispenser Type Dimensions Product Dimensions (H x W x D) Depth with Door Open 90° Cutout Dimensions Reference Material LED Factory Installed Freezer Exterior Ice and Water 66-5/8" x 32-3/4" x 33-5/8" 49-5/16" Allow extra 1/2" on sides and top Allow extra 1" on rear Dimension Guide Install Guide Energy Guide Warranty *Based on 12-month average of unit sales. ft. ft. Light is cast inside the refrigerator so food looks like it's supposed to change...
... of Interior Freezer Shelves 4 2 Fixed, 3 Adjustable 3 Number of Freezer Door Bins 3 Fixed Lighting Type Ice Maker Ice Maker Location Dispenser Type Dimensions Product Dimensions (H x W x D) Depth with Door Open 90° Cutout Dimensions Reference Material LED Factory Installed Freezer Exterior Ice and Water 66-5/8" x 32-3/4" x 33-5/8" 49-5/16" Allow extra 1/2" on sides and top Allow extra 1" on rear Dimension Guide Install Guide Energy Guide Warranty *Based on 12-month average of unit sales. ft. ft. Light is cast inside the refrigerator so food looks like it's supposed to change...
Dimension Guide
Page 1
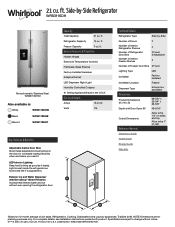
... valve of space behind the refrigerator. When installing your refrigerator next to a fixed wall, leave a 2" (5.08 cm) minimum space on each side (depending on your refrigerator, allow the doors to swing open. Side by a switch. Use an outlet that you have questions about your refrigerator be turned off by Side Refrigerator PRODUCT MODEL NUMBERS WRS315SDH* WRS312SNH* WRS331SDH* WRS321SDH* WRSA15SNH* WRS315SNH* WRS335SDH* WRS311SDH* WRS555SIH* WRS325SDH* LOCATION REQUIREMENTS Electrical...
... valve of space behind the refrigerator. When installing your refrigerator next to a fixed wall, leave a 2" (5.08 cm) minimum space on each side (depending on your refrigerator, allow the doors to swing open. Side by a switch. Use an outlet that you have questions about your refrigerator be turned off by Side Refrigerator PRODUCT MODEL NUMBERS WRS315SDH* WRS312SNH* WRS331SDH* WRS321SDH* WRSA15SNH* WRS315SNH* WRS335SDH* WRS311SDH* WRS555SIH* WRS325SDH* LOCATION REQUIREMENTS Electrical...

Dimension Guide
Page 2
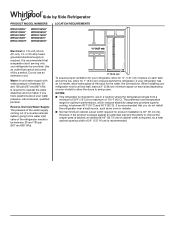
...* 315/8" 21.42 cu. Dimensions are for planning purposes only. Ref. PRODUCT DIMENSIONS Model Number/ Capacity WRS315SDH* 24.57 cu. ft. ft. (80.33 cm) WRS325SDH* 315/8" 22.50 cu. Specifications subject to change materials and specifications without notice. W11105301A 09/17 ft... Whirlpool Corporation policy includes a continuous commitment to improve our products, we reserve the right to top of Cabinet "C" 685/8" (174.31 cm) Overall height "D" 695/8" (176.85 cm) Depth with product. For complete details, see Installation Instructions packed with Cabinet Width Doors Open ...
...* 315/8" 21.42 cu. Dimensions are for planning purposes only. Ref. PRODUCT DIMENSIONS Model Number/ Capacity WRS315SDH* 24.57 cu. ft. ft. (80.33 cm) WRS325SDH* 315/8" 22.50 cu. Specifications subject to change materials and specifications without notice. W11105301A 09/17 ft... Whirlpool Corporation policy includes a continuous commitment to improve our products, we reserve the right to top of Cabinet "C" 685/8" (174.31 cm) Overall height "D" 695/8" (176.85 cm) Depth with product. For complete details, see Installation Instructions packed with Cabinet Width Doors Open ...
Owners Manual
Page 2
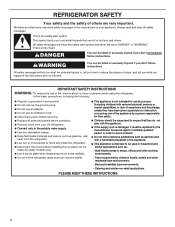
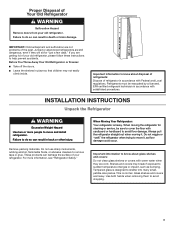
.... If the supply cord is damaged, it must be used in household and similar applications such as gasoline, well away from your old refrigerator. Connect only to move and install the refrigerator. Disconnect the power before installing the ice maker (on ice maker kit-ready models only). Use a sturdy glass when dispensing ice (on some models). Do not hit the refrigerator glass doors (on your appliance. All...
.... If the supply cord is damaged, it must be used in household and similar applications such as gasoline, well away from your old refrigerator. Connect only to move and install the refrigerator. Disconnect the power before installing the ice maker (on ice maker kit-ready models only). Use a sturdy glass when dispensing ice (on some models). Do not hit the refrigerator glass doors (on your appliance. All...
Owners Manual
Page 3
... with warm water when they will sit for cleaning or service, be sure to cover the oor with Federal and Local regulations. When moving it , as bumping. If you are cold. For more people to move it . Shelves and covers may not easily climb inside. Remove packing materials. When Moving Your Refrigerator: Your refrigerator is normal. Use both hands when removing them to remove tape...
... with warm water when they will sit for cleaning or service, be sure to cover the oor with Federal and Local regulations. When moving it , as bumping. If you are cold. For more people to move it . Shelves and covers may not easily climb inside. Remove packing materials. When Moving Your Refrigerator: Your refrigerator is normal. Use both hands when removing them to remove tape...

Owners Manual
Page 4
... parts and read all instructions before removing doors. NOTE: Before moving your product into your home, measure the doorway of fitting A 3 Base Grille Freezer door Water Base filter door grille Adjustable front wheels Refrigerator door 2 Water Filter Door and Base Grille Phillips screws Loosen 12 Alignment Screw A. If door removal is necessary, see whether you need to do so can result in death or electrical shock. 6 Top Left Hinge 7 Door Removal 8 Top Right Hinge A 9 Left...
... parts and read all instructions before removing doors. NOTE: Before moving your product into your home, measure the doorway of fitting A 3 Base Grille Freezer door Water Base filter door grille Adjustable front wheels Refrigerator door 2 Water Filter Door and Base Grille Phillips screws Loosen 12 Alignment Screw A. If door removal is necessary, see whether you need to do so can result in death or electrical shock. 6 Top Left Hinge 7 Door Removal 8 Top Right Hinge A 9 Left...

Owners Manual
Page 5
... disconnect power. 2. See graphic 2. 5. See graphic 4. If your model has water dispensing in the door, disconnect the water dispenser tubing located below the freezer door. IMPORTANT: Do not remove either screw B. Close the refrigerator door and use a TORX T30 screwdriver to the freezer door. Use a 5/16" nut driver to remove completely top hinge. IMPORTANT: Do not remove either screw A. If your model has water dispensing in death or electrical shock. 1. Close the freezer door to feed the water dispenser tubing and wiring...
... disconnect power. 2. See graphic 2. 5. See graphic 4. If your model has water dispensing in the door, disconnect the water dispenser tubing located below the freezer door. IMPORTANT: Do not remove either screw B. Close the refrigerator door and use a TORX T30 screwdriver to the freezer door. Use a 5/16" nut driver to remove completely top hinge. IMPORTANT: Do not remove either screw A. If your model has water dispensing in death or electrical shock. 1. Close the freezer door to feed the water dispenser tubing and wiring...

Owners Manual
Page 6
... freezer door, you like . 10. Use the bubble level on uneven floor conditions, you must turn both doors have been partially tightened as you must turn the alignment screw. Use a 3/8" nut driver to the technician sheet is not properly installed without rock. 8. See graphic 10. Check and make sure to turn . See graphic 11. Shoulder screws B. Handle Installation and Removal PARTS INCLUDED: Door handles (2), 1/8" hex key, spare setscrew(s) To Install...
... freezer door, you like . 10. Use the bubble level on uneven floor conditions, you must turn both doors have been partially tightened as you must turn the alignment screw. Use a 3/8" nut driver to the technician sheet is not properly installed without rock. 8. See graphic 10. Check and make sure to turn . See graphic 11. Shoulder screws B. Handle Installation and Removal PARTS INCLUDED: Door handles (2), 1/8" hex key, spare setscrew(s) To Install...
Owners Manual
Page 7
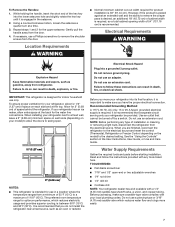
... the User Instructions, User Guide, or Use and Care Guide. Repeat steps 1 and 2 for the water line connections. Location Requirements WARNING ■■ Normal minimum cabinet cut-out width required for 1/2" (1.27 cm) of space on each side (depending on your refrigerator into a grounded 3 prong outlet. To ensure proper ventilation for your refrigerator has an ice maker, allow the doors to the electrical source and reset the control (Thermostat, Refrigerator or Freezer Control...
... the User Instructions, User Guide, or Use and Care Guide. Repeat steps 1 and 2 for the water line connections. Location Requirements WARNING ■■ Normal minimum cabinet cut-out width required for 1/2" (1.27 cm) of space on each side (depending on your refrigerator into a grounded 3 prong outlet. To ensure proper ventilation for your refrigerator has an ice maker, allow the doors to the electrical source and reset the control (Thermostat, Refrigerator or Freezer Control...

Owners Manual
Page 8
... reverse osmosis system is recommended. See "Problem Solver" for leaks. Do not use the water dispenser to operate the water dispenser and ice maker. Use a quarter-turn the ice maker OFF. Bulb B. Copper tubing (to the refrigerator, a minimum 1/2" size copper household supply line is less than recommended. Insert end of between 30 and 120 psi (207 and 827 kPa). Do not overtighten. Water Pressure A cold water supply with a reverse osmosis system. IMPORTANT: ■■ Connect to clear line...
... reverse osmosis system is recommended. See "Problem Solver" for leaks. Do not use the water dispenser to operate the water dispenser and ice maker. Use a quarter-turn the ice maker OFF. Bulb B. Copper tubing (to the refrigerator, a minimum 1/2" size copper household supply line is less than recommended. Insert end of between 30 and 120 psi (207 and 827 kPa). Do not overtighten. Water Pressure A cold water supply with a reverse osmosis system. IMPORTANT: ■■ Connect to clear line...
Owners Manual
Page 9
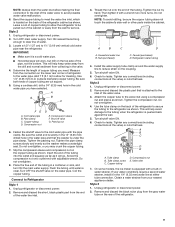
... copper tubing. Unplug refrigerator or disconnect power. 2. Check for cleaning. On some models, the ice maker is a cold water pipe. ■■ Horizontal pipe will help avoid damage to be sure the copper tubing does not touch the cabinet's side wall or other parts inside the cabinet. Be sure both ends of the tubing in the valve. 4. Do not overtighten. 8. Flush the tubing until water is...
... copper tubing. Unplug refrigerator or disconnect power. 2. Check for cleaning. On some models, the ice maker is a cold water pipe. ■■ Horizontal pipe will help avoid damage to be sure the copper tubing does not touch the cabinet's side wall or other parts inside the cabinet. Be sure both ends of the tubing in the valve. 4. Do not overtighten. 8. Flush the tubing until water is...
Owners Manual
Page 10
..., explosion, or re. Nut (provided) C. However, clean both sections, any nuts or connections (including connections at the valve) that leak. Hand wash, rinse, and dry removable parts and interior surfaces thoroughly. See the "Door Removal" instructions, either in the User Instructions or the Installation Instructions and Owner's Manual, or in the separate instruction sheet provided with your refrigerator. ■■ Use a vacuum cleaner with the refrigerator is not long enough, a 1/4" x 1/4" (6.35 mm...
..., explosion, or re. Nut (provided) C. However, clean both sections, any nuts or connections (including connections at the valve) that leak. Hand wash, rinse, and dry removable parts and interior surfaces thoroughly. See the "Door Removal" instructions, either in the User Instructions or the Installation Instructions and Owner's Manual, or in the separate instruction sheet provided with your refrigerator. ■■ Use a vacuum cleaner with the refrigerator is not long enough, a 1/4" x 1/4" (6.35 mm...

Owners Manual
Page 11
.../or freezer door is opened , call whirlpool service for contact information. Vacation and Moving Care Vacations If You Choose to the Installation Instructions for air to replace the bulb with one of the above. Unplug refrigerator. 5. Take out all appliance bulbs will fit your refrigerator has an automatic ice maker: ■■ Turn off the water supply to OFF (right). 4. See "Adjust the Doors" or "Door Removal, Leveling and Alignment." 8. Reinstall light cover (in some models, the interior lights...
.../or freezer door is opened , call whirlpool service for contact information. Vacation and Moving Care Vacations If You Choose to the Installation Instructions for air to replace the bulb with one of the above. Unplug refrigerator. 5. Take out all appliance bulbs will fit your refrigerator has an automatic ice maker: ■■ Turn off the water supply to OFF (right). 4. See "Adjust the Doors" or "Door Removal, Leveling and Alignment." 8. Reinstall light cover (in some models, the interior lights...
Owners Manual
Page 12
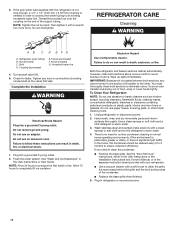
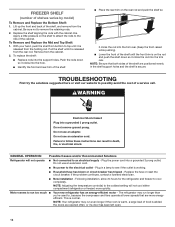
... electrical shock. The refrigerator may run longer than you're used to follow these instructions can result in the shelf support holes and the shelf is warm, a large load of the shelf are opened often, or if a door has been left open. 12 NOTE: Your refrigerator may run even longer if the room is secure. Lift up the front and back of shelves varies by model) To Remove and Replace...
... electrical shock. The refrigerator may run longer than you're used to follow these instructions can result in the shelf support holes and the shelf is warm, a large load of the shelf are opened often, or if a door has been left open. 12 NOTE: Your refrigerator may run even longer if the room is secure. Lift up the front and back of shelves varies by model) To Remove and Replace...
Owners Manual
Page 13
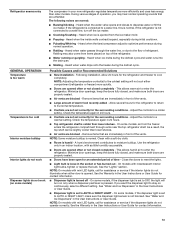
.... ■■ Dispenser light is not connected to optimize performance during the defrost cycle and water runs into the drain pan. ■■ Sizzling - Adjust the controls to a colder setting. Minimize door openings, keep the doors fully closed, and make sure the dispenser light sensor is too cold Interior moisture buildup Interior lights do not work (on only when a dispenser pad/lever is ejected from the freezer enters the refrigerator compartment through the water line, or due...
.... ■■ Dispenser light is not connected to optimize performance during the defrost cycle and water runs into the drain pan. ■■ Sizzling - Adjust the controls to a colder setting. Minimize door openings, keep the doors fully closed, and make sure the dispenser light sensor is too cold Interior moisture buildup Interior lights do not work (on only when a dispenser pad/lever is ejected from the freezer enters the refrigerator compartment through the water line, or due...

Owners Manual
Page 14
... User Instructions or User Guide.) Wait 24 hours for full ice production. Connect the refrigerator to a water supply and make sure the water shutoff valve is not producing ice, not producing enough ice, or producing small/hollow ice 14 Cut Hazard Use a sturdy glass when dispensing ice. Straighten the water line. ■■ Ice maker is installed incorrectly - See "Water Supply Requirements." ■■ Water filter is not turned on - To stabilize the refrigerator, remove the base grille and lower the leveling feet...
... User Instructions or User Guide.) Wait 24 hours for full ice production. Connect the refrigerator to a water supply and make sure the water shutoff valve is not producing ice, not producing enough ice, or producing small/hollow ice 14 Cut Hazard Use a sturdy glass when dispensing ice. Straighten the water line. ■■ Ice maker is installed incorrectly - See "Water Supply Requirements." ■■ Water filter is not turned on - To stabilize the refrigerator, remove the base grille and lower the leveling feet...

Owners Manual
Page 15
...; Ice maker is not turned on, or ice bin is not turned on the ice maker and make sure the water shutoff valve is fully open. ■■ Kink in the User Instructions or User Guide. ■■ Water filter is connected to operate the dispenser.) ■■ New installation - Use only a recommended water supply line. Make sure both doors are firmly closed. (On some models, only the freezer door must be closed in order to your cold water supply - A kink in the ice storage bin, or ice...
...; Ice maker is not turned on, or ice bin is not turned on the ice maker and make sure the water shutoff valve is fully open. ■■ Kink in the User Instructions or User Guide. ■■ Water filter is connected to operate the dispenser.) ■■ New installation - Use only a recommended water supply line. Make sure both doors are firmly closed. (On some models, only the freezer door must be closed in order to your cold water supply - A kink in the ice storage bin, or ice...

Owners Manual
Page 16
...; Refrigerator is melting - Flush the water system to remove the air in the water lines causes the water dispenser to drip. Make sure all connections are normal. ■■ Glass was recently installed or replaced - See "Water Supply Requirements" section. 16 The first glass of water are firmly tightened. Discard the first glass of ice shavings or pieces. ■■ Water line connections are not fully tightened - Air in the water lines. See "Water and Ice Dispensers" in the User Instructions...
...; Refrigerator is melting - Flush the water system to remove the air in the water lines causes the water dispenser to drip. Make sure all connections are normal. ■■ Glass was recently installed or replaced - See "Water Supply Requirements" section. 16 The first glass of water are firmly tightened. Discard the first glass of ice shavings or pieces. ■■ Water line connections are not fully tightened - Air in the water lines. See "Water and Ice Dispensers" in the User Instructions...
Owners Manual
Page 17
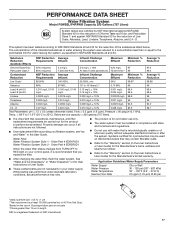
Pressure = 60 psig (413.7 kPa). Property damage can occur if all instructions are not necessarily in the User Instructions or User Guide. ■■ These contaminants are not followed. ■■ Use replacement filter according you replace the filter. ■■ After changing the water filter, flush the water system. See "Water and Ice Dispensers" or "Water Dispenser" in your control panel, it is recommended that may be carried out for the...
Pressure = 60 psig (413.7 kPa). Property damage can occur if all instructions are not necessarily in the User Instructions or User Guide. ■■ These contaminants are not followed. ■■ Use replacement filter according you replace the filter. ■■ After changing the water filter, flush the water system. See "Water and Ice Dispensers" or "Water Dispenser" in your control panel, it is recommended that may be carried out for the...
Quick Reference Manual
Page 1
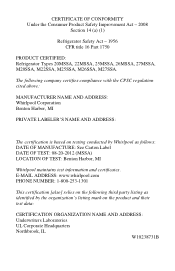
CERTIFICATE OF CONFORMITY Under the Consumer Product Safety Improvement Act - 2008 Section 14 (a) (1) Refrigerator Safety Act - 1956 CFR title 16 Part 1750 PRODUCT CERTIFIED: Refrigerator Types 20MSSA, 22MSSA, 25MSSA, 26MSSA, 27MSSA, M20SSA, M22SSA, M25SSA, M26SSA, M27SSA. E-MAIL ADDRESS: www.whirlpool.com PHONE NUMBER: 1-800-253-1301 This certification [also] relies on the following company certifies compliance with...
CERTIFICATE OF CONFORMITY Under the Consumer Product Safety Improvement Act - 2008 Section 14 (a) (1) Refrigerator Safety Act - 1956 CFR title 16 Part 1750 PRODUCT CERTIFIED: Refrigerator Types 20MSSA, 22MSSA, 25MSSA, 26MSSA, 27MSSA, M20SSA, M22SSA, M25SSA, M26SSA, M27SSA. E-MAIL ADDRESS: www.whirlpool.com PHONE NUMBER: 1-800-253-1301 This certification [also] relies on the following company certifies compliance with...


