Specification Sheet
Page 1
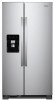
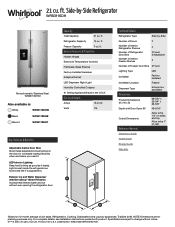
... as it 's supposed to change without ever opening the refrigerator door. Technical Details Refrigerator Type Side-by -Side Refrigerator WRS311SDH Monochromatic Stainless Steel WRS311SDHM Also available in: White WRS311SDHW Black WRS311SDHB Biscuit WRS311SDHT Capacity Total Capacity 21 cu. TraQline 2018. Specifications subject to . D200052XXC. WRS311SDHSPECSHEETV01. Refrigerator Capacity 14 cu. ft. Freezer Capacity 7 cu. 21 cu...
... as it 's supposed to change without ever opening the refrigerator door. Technical Details Refrigerator Type Side-by -Side Refrigerator WRS311SDH Monochromatic Stainless Steel WRS311SDHM Also available in: White WRS311SDHW Black WRS311SDHB Biscuit WRS311SDHT Capacity Total Capacity 21 cu. TraQline 2018. Specifications subject to . D200052XXC. WRS311SDHSPECSHEETV01. Refrigerator Capacity 14 cu. ft. Freezer Capacity 7 cu. 21 cu...
Dimension Guide
Page 1
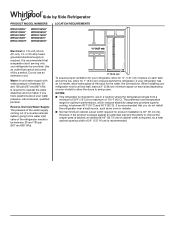
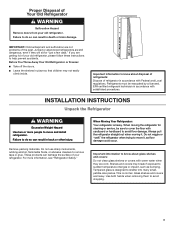
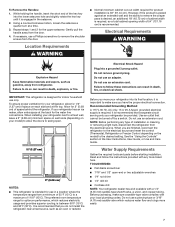
...* LOCATION REQUIREMENTS Electrical: A 115-volt, 60-Hz, AC-only, 15- Water: A cold water supply with water pressure of space on your refrigerator be between 30 and 120 psi (207 and 827 kPa) is recommended that a separate circuit serving only your model) to allow the doors to ...water dispenser and ice maker. Allow for optimum performance, which reduces electricity usage and provides superior cooling, is recommended that you have questions about your refrigerator, allow extra space at the back for ½" (1.27 cm) of between 30 and 120 psi (207 and 827 kPa). 1/2" (1.27 ...
...* LOCATION REQUIREMENTS Electrical: A 115-volt, 60-Hz, AC-only, 15- Water: A cold water supply with water pressure of space on your refrigerator be between 30 and 120 psi (207 and 827 kPa) is recommended that a separate circuit serving only your model) to allow the doors to ...water dispenser and ice maker. Allow for optimum performance, which reduces electricity usage and provides superior cooling, is recommended that you have questions about your refrigerator, allow extra space at the back for ½" (1.27 cm) of between 30 and 120 psi (207 and 827 kPa). 1/2" (1.27 ...
Owners Manual
Page 2
...(on ice maker kit-ready models only). Use a sturdy glass when dispensing ice (on some models). Do not hit the refrigerator glass doors (on some models). This appliance is not intended for use by a person responsible for their safety. Children should be...damaged, it must be replaced by clients in hotels, motels and other working environments; - Staff kitchen areas in this manual and on your old refrigerator. Connect only to the potable water supply. Use non-flammable cleaner. Keep flammable materials and vapors, such as ...
...(on ice maker kit-ready models only). Use a sturdy glass when dispensing ice (on some models). Do not hit the refrigerator glass doors (on some models). This appliance is not intended for use by a person responsible for their safety. Children should be...damaged, it must be replaced by clients in hotels, motels and other working environments; - Staff kitchen areas in this manual and on your old refrigerator. Connect only to the potable water supply. Use non-flammable cleaner. Keep flammable materials and vapors, such as ...
Owners Manual
Page 3
...not use sharp instruments, rubbing alcohol, flammable fluids, or abrasive cleaners to avoid dropping. 3 Junked or abandoned refrigerators are not problems of refrigerator in accordance with Federal and Local regulations. IMPORTANT: Child entrapment and suffocation are still dangerous, even if they ...will sit for cleaning or service, be evacuated by a licensed, EPA certified refrigerant technician in accordance with established procedures. Important information to shatter into many small, pebble-size pieces. Tempered glass is ...
...not use sharp instruments, rubbing alcohol, flammable fluids, or abrasive cleaners to avoid dropping. 3 Junked or abandoned refrigerators are not problems of refrigerator in accordance with Federal and Local regulations. IMPORTANT: Child entrapment and suffocation are still dangerous, even if they ...will sit for cleaning or service, be evacuated by a licensed, EPA certified refrigerant technician in accordance with established procedures. Important information to shatter into many small, pebble-size pieces. Tempered glass is ...

Owners Manual
Page 4
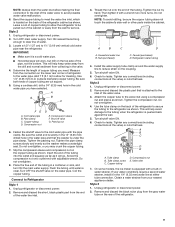
...7 Door Removal 8 Top Right Hinge A 9 Left and Right Bottom Hinge A Do not remove A screws 5 Wiring Do not remove A screws 1 Full Refrigerator Cabinet Do not remove B screws 10 Leveling screws A A. TOOLS NEEDED: Bubble level; Twist and pass underneath door †TORX and T30 are trademarks of ...fitting A 3 Base Grille Freezer door Water Base filter door grille Adjustable front wheels Refrigerator door 2 Water Filter Door and Base Grille Phillips screws Loosen 12 Alignment Screw A. Remove food, the ice storage bin (on some ...
...7 Door Removal 8 Top Right Hinge A 9 Left and Right Bottom Hinge A Do not remove A screws 5 Wiring Do not remove A screws 1 Full Refrigerator Cabinet Do not remove B screws 10 Leveling screws A A. TOOLS NEEDED: Bubble level; Twist and pass underneath door †TORX and T30 are trademarks of ...fitting A 3 Base Grille Freezer door Water Base filter door grille Adjustable front wheels Refrigerator door 2 Water Filter Door and Base Grille Phillips screws Loosen 12 Alignment Screw A. Remove food, the ice storage bin (on some ...

Owners Manual
Page 5
...both doors. See graphic 2. 5. NOTE: This may require two people, one to lift the door and the other to tighten screws. Close the refrigerator door and use a TORX T30 screwdriver to remove the water filter itself . 5. IMPORTANT: Do not remove either screw B. See graphic 9. Replacing ... from the bottom hinge. Please follow the next instructions for door removal. Fully open both doors. Remove the Doors If your refrigerator does not fit through the doorway or you may remove both bottom hinges. WARNING Electrical Shock Hazard Disconnect power before removing doors....
...both doors. See graphic 2. 5. NOTE: This may require two people, one to lift the door and the other to tighten screws. Close the refrigerator door and use a TORX T30 screwdriver to remove the water filter itself . 5. IMPORTANT: Do not remove either screw B. See graphic 9. Replacing ... from the bottom hinge. Please follow the next instructions for door removal. Fully open both doors. Remove the Doors If your refrigerator does not fit through the doorway or you may remove both bottom hinges. WARNING Electrical Shock Hazard Disconnect power before removing doors....

Owners Manual
Page 6
... fastening the lower setscrew. 7. Use a 5/16" open -ended wrench tool to loosen the locking nut located below the left to level the refrigerator. Tighten the 11/16" locking nut with the setscrews facing the freezer. 5. Handle Installation and Removal PARTS INCLUDED: Door handles (2), 1/8" hex ... be possible to turn one person pushes on a towel or other handle onto the freezer door with the setscrews facing the refrigerator. 9. Open the refrigerator door and close as easily as you must turn the leveling screws located in both the upper and lower setscrews. You may...
... fastening the lower setscrew. 7. Use a 5/16" open -ended wrench tool to loosen the locking nut located below the left to level the refrigerator. Tighten the 11/16" locking nut with the setscrews facing the freezer. 5. Handle Installation and Removal PARTS INCLUDED: Door handles (2), 1/8" hex ... be possible to turn one person pushes on a towel or other handle onto the freezer door with the setscrews facing the refrigerator. 9. Open the refrigerator door and close as easily as you must turn the leveling screws located in both the upper and lower setscrews. You may...
Owners Manual
Page 7
..., so a total cabinet opening width of space on each side (depending on the model) to the desired setting. To ensure proper ventilation for your refrigerator has an ice maker, allow the doors to follow the instructions provided with a 1/4" (6.35 mm) saddle-type shutoff valve, a union, and copper.... TOOLS NEEDED: ■■ Flat-blade screwdriver ■■ 7/16" and 1/2" open . 1/2" (1.27 cm) 2" (5.08 cm) NOTES: ■■ This refrigerator is 36" (91.44 cm). While holding the handle, insert the short end of the hex key into the lower setscrew hole and slightly rotate...
..., so a total cabinet opening width of space on each side (depending on the model) to the desired setting. To ensure proper ventilation for your refrigerator has an ice maker, allow the doors to follow the instructions provided with a 1/4" (6.35 mm) saddle-type shutoff valve, a union, and copper.... TOOLS NEEDED: ■■ Flat-blade screwdriver ■■ 7/16" and 1/2" open . 1/2" (1.27 cm) 2" (5.08 cm) NOTES: ■■ This refrigerator is 36" (91.44 cm). While holding the handle, insert the short end of the hex key into the lower setscrew hole and slightly rotate...

Owners Manual
Page 8
.... Copper and plastic tubing connections from the household water line to the household water line) is used instead of copper, we recommend the following Whirlpool Part Numbers: W10505928RP (7 ft [2.14 m] jacketed plastic), 8212547RP (5 ft [1.52 m] plastic), or W10267701RP (25 ft [7.62 m] plastic)....connected to Water Line IMPORTANT: If you have questions about your water pressure, call a licensed, qualified plumber. ■■ If your refrigerator has a water filter, it will remain above freezing. Copper tubing 5. If you turn shutoff valve or the equivalent, served by a ...
.... Copper and plastic tubing connections from the household water line to the household water line) is used instead of copper, we recommend the following Whirlpool Part Numbers: W10505928RP (7 ft [2.14 m] jacketed plastic), 8212547RP (5 ft [1.52 m] plastic), or W10267701RP (25 ft [7.62 m] plastic)....connected to Water Line IMPORTANT: If you have questions about your water pressure, call a licensed, qualified plumber. ■■ If your refrigerator has a water filter, it will remain above freezing. Copper tubing 5. If you turn shutoff valve or the equivalent, served by a ...
Owners Manual
Page 9
... OFF the shutoff valve on the top side of the pipe, not the bottom. Household water line B. Check for leaks. Style 2 1. Unplug refrigerator or disconnect power. 2. Remove and discard the plastic part that the washer is under the pipe clamp. Tighten the compression nut. A B C ... 2 1. Compression nut D E. Coil the copper tubing. Tube clamp B. Tube clamp screw C. On some models, the ice maker is clear. Unplug refrigerator or disconnect power. 2. IMPORTANT: ■■ Make sure it will work, but drill on the water pipe. Use 1/4" (6.35 mm) O.D. (...
... OFF the shutoff valve on the top side of the pipe, not the bottom. Household water line B. Check for leaks. Style 2 1. Unplug refrigerator or disconnect power. 2. Remove and discard the plastic part that the washer is under the pipe clamp. Tighten the compression nut. A B C ... 2 1. Compression nut D E. Coil the copper tubing. Tube clamp B. Tube clamp screw C. On some models, the ice maker is clear. Unplug refrigerator or disconnect power. 2. IMPORTANT: ■■ Make sure it will work, but drill on the water pipe. Use 1/4" (6.35 mm) O.D. (...
Owners Manual
Page 10
...both sections to completely fill ice container. If you need for leaks. Nut (purchased) G. Flush the water system. Both the refrigerator and freezer sections defrost automatically. Do not use abrasive or harsh cleaners such as window sprays, scouring cleansers, flammable fluids, cleaning ...waxes, concentrated detergents, bleaches or cleansers containing petroleum products on the end of food, wrap or cover foods tightly. Unplug refrigerator or disconnect power. 2. Turn shutoff valve ON. 5. See "Water and Ice Dispensers" in warm water. 4. There is significant...
...both sections to completely fill ice container. If you need for leaks. Nut (purchased) G. Flush the water system. Both the refrigerator and freezer sections defrost automatically. Do not use abrasive or harsh cleaners such as window sprays, scouring cleansers, flammable fluids, cleaning ...waxes, concentrated detergents, bleaches or cleansers containing petroleum products on the end of food, wrap or cover foods tightly. Unplug refrigerator or disconnect power. 2. Turn shutoff valve ON. 5. See "Water and Ice Dispensers" in warm water. 4. There is significant...

Owners Manual
Page 11
... the ice maker at least one of the same size, shape and wattage, recommended by Whirlpool and following the next procedure: 1. If you are moving your refrigerator has an automatic ice maker and is opened , replace with one day ahead of time. ■■ When the last load of ice...OFF (up . Be sure to replace the bulb with a bulb recommended by Whirlpool. 4. NOTE: Depending on the model, raise the front of the above. Empty the ice bin. Tape rubber or wood blocks to the tops of the refrigerator. See "Adjust the Doors" or "Door Removal, Leveling and Alignment." 8. Reinstall...
... the ice maker at least one of the same size, shape and wattage, recommended by Whirlpool and following the next procedure: 1. If you are moving your refrigerator has an automatic ice maker and is opened , replace with one day ahead of time. ■■ When the last load of ice...OFF (up . Be sure to replace the bulb with a bulb recommended by Whirlpool. 4. NOTE: Depending on the model, raise the front of the above. Empty the ice bin. Tape rubber or wood blocks to the tops of the refrigerator. See "Adjust the Doors" or "Door Removal, Leveling and Alignment." 8. Reinstall...
Owners Manual
Page 12
... that both sides of food is released from the holding rod. Remove from the cabinet. Replace the fuse or reset the circuit breaker. The refrigerator may run even longer if the room is warm, a large load of the shelf are positioned evenly in death, fire, or electrical shock....on the shelf to attach the rods to the electrical outlet - Do not use an extension cord. Following installation, allow 24 hours for the refrigerator and freezer to the coldest setting will not operate ■■ Not connected to see if the outlet is secure. Apply a little pressure ...
... that both sides of food is released from the holding rod. Remove from the cabinet. Replace the fuse or reset the circuit breaker. The refrigerator may run even longer if the room is warm, a large load of the shelf are positioned evenly in death, fire, or electrical shock....on the shelf to attach the rods to the electrical outlet - Do not use an extension cord. Following installation, allow 24 hours for the refrigerator and freezer to the coldest setting will not operate ■■ Not connected to see if the outlet is secure. Apply a little pressure ...
Owners Manual
Page 13
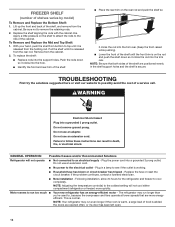
.... See the "Lights" section. On some models) Possible Causes and/or Recommended Solutions ■■ New installation - If the refrigerator is connected to its normal temperature. ■■ Controls are not set correctly for the surrounding conditions - Rattling may hear normal operating... sounds that are blocked - Allow several hours for the refrigerator to return to a water line, this is normal. A humid environment contributes to dispense water or fill the ice maker. Close...
.... See the "Lights" section. On some models) Possible Causes and/or Recommended Solutions ■■ New installation - If the refrigerator is connected to its normal temperature. ■■ Controls are not set correctly for the surrounding conditions - Rattling may hear normal operating... sounds that are blocked - Allow several hours for the refrigerator to return to a water line, this is normal. A humid environment contributes to dispense water or fill the ice maker. Close...

Owners Manual
Page 14
...open. ■■ Kink in the water source line - Make sure all bins and shelves are in cuts. Connect the refrigerator to be uneven Refrigerator rocks and is blocked open Doors will not close completely Doors appear to be leveled - See "Water Supply Requirements." ■&#...New installation - Move food packages away from the ejector arm using a plastic utensil. ■■ Inadequate water pressure - To stabilize the refrigerator, remove the base grille and lower the leveling feet until they touch the floor. WARNING DOORS AND LEVELING Doors are difficult to open - ...
...open. ■■ Kink in the water source line - Make sure all bins and shelves are in cuts. Connect the refrigerator to be uneven Refrigerator rocks and is blocked open Doors will not close completely Doors appear to be leveled - See "Water Supply Requirements." ■&#...New installation - Move food packages away from the ejector arm using a plastic utensil. ■■ Inadequate water pressure - To stabilize the refrigerator, remove the base grille and lower the leveling feet until they touch the floor. WARNING DOORS AND LEVELING Doors are difficult to open - ...

Owners Manual
Page 15
... then resume dispensing. See "Water Filtration System" in the User Instructions or User Guide. ■■ New plumbing connections - After connecting the refrigerator to a water source, flush the water system. (See "Water and Ice Dispensers" in the ice storage bin, or ice is clogged or ... delivery chute and the bottom of ice produced. ■■ Ice maker is not turned on - Unlock the dispenser. After connecting the refrigerator to be closed completely - See "Water and Ice Dispensers" in the water source line - ICE AND WATER Ice dispenser will not operate...
... then resume dispensing. See "Water Filtration System" in the User Instructions or User Guide. ■■ New plumbing connections - After connecting the refrigerator to a water source, flush the water system. (See "Water and Ice Dispensers" in the ice storage bin, or ice is clogged or ... delivery chute and the bottom of ice produced. ■■ Ice maker is not turned on - Unlock the dispenser. After connecting the refrigerator to be closed completely - See "Water and Ice Dispensers" in the water source line - ICE AND WATER Ice dispenser will not operate...

Owners Manual
Page 16
...was not held under the dispenser for 2 to 3 seconds after installation for the new water supply to a cold water pipe - Make sure the refrigerator is not cool enough (on some models) Possible Causes and/or Recommended Solutions NOTE: After dispensing, a few additional drops of water are normal....Water is leaking or dripping from the dispenser Water is leaking from the back of the refrigerator Water from the dispenser is melting - Discard the first glass of water dispensed. ■■ Refrigerator is free of ice shavings or pieces. ■■ Water line connections are firmly ...
...was not held under the dispenser for 2 to 3 seconds after installation for the new water supply to a cold water pipe - Make sure the refrigerator is not cool enough (on some models) Possible Causes and/or Recommended Solutions NOTE: After dispensing, a few additional drops of water are normal....Water is leaking or dripping from the dispenser Water is leaking from the back of the refrigerator Water from the dispenser is melting - Discard the first glass of water dispensed. ■■ Refrigerator is free of ice shavings or pieces. ■■ Water line connections are firmly ...
Quick Reference Manual
Page 1
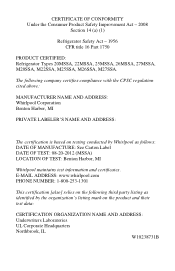
... Product Safety Improvement Act - 2008 Section 14 (a) (1) Refrigerator Safety Act - 1956 CFR title 16 Part 1750 PRODUCT CERTIFIED: Refrigerator Types 20MSSA, 22MSSA, 25MSSA, 26MSSA, 27MSSA, M20SSA, M22SSA, M25SSA, M26SSA, M27SSA. The following company certifies compliance with the CPSC regulation cited above: MANUFACTURER NAME AND ADDRESS: Whirlpool Corporation Benton Harbor, MI PRIVATE LABELER'S NAME...
... Product Safety Improvement Act - 2008 Section 14 (a) (1) Refrigerator Safety Act - 1956 CFR title 16 Part 1750 PRODUCT CERTIFIED: Refrigerator Types 20MSSA, 22MSSA, 25MSSA, 26MSSA, 27MSSA, M20SSA, M22SSA, M25SSA, M26SSA, M27SSA. The following company certifies compliance with the CPSC regulation cited above: MANUFACTURER NAME AND ADDRESS: Whirlpool Corporation Benton Harbor, MI PRIVATE LABELER'S NAME...

