
Use & Care Guide
Page 2
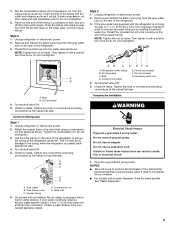
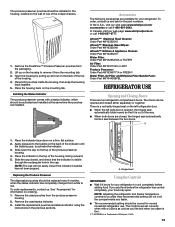
... people to help prevent accidents. Always read and obey all parts and panels before operating. ■ Remove doors from your old refrigerator, please follow the safety alert symbol and either the word "DANGER" or "WARNING." IMPORTANT SAFETY INSTRUCTIONS WARNING: To reduce the ...risk of injury, and tell you don't immediately follow these instructions to move and install refrigerator. ■ Disconnect power before servicing. ■ Replace all safety messages. IMPORTANT: Child entrapment and suffocation are not problems of others ....
... people to help prevent accidents. Always read and obey all parts and panels before operating. ■ Remove doors from your old refrigerator, please follow the safety alert symbol and either the word "DANGER" or "WARNING." IMPORTANT SAFETY INSTRUCTIONS WARNING: To reduce the ...risk of injury, and tell you don't immediately follow these instructions to move and install refrigerator. ■ Disconnect power before servicing. ■ Replace all safety messages. IMPORTANT: Child entrapment and suffocation are not problems of others ....

Use & Care Guide
Page 3
... are heavy. Allow for the water line connections. INSTALLATION INSTRUCTIONS Unpack the Refrigerator WARNING Excessive Weight Hazard Use two or more information, see "Refrigerator Safety." ■ Dispose of your refrigerator. Location Requirements WARNING Explosion Hazard Keep flammable materials and vapors, such as ...when removing them to avoid floor damage. See the cleaning instructions in back or other injury. Rub a small amount of your refrigerator next to remove tape or glue. For more people to move it, as gasoline, away from a minimum of 55°F...
... are heavy. Allow for the water line connections. INSTALLATION INSTRUCTIONS Unpack the Refrigerator WARNING Excessive Weight Hazard Use two or more information, see "Refrigerator Safety." ■ Dispose of your refrigerator. Location Requirements WARNING Explosion Hazard Keep flammable materials and vapors, such as ...when removing them to avoid floor damage. See the cleaning instructions in back or other injury. Rub a small amount of your refrigerator next to remove tape or glue. For more people to move it, as gasoline, away from a minimum of 55°F...
Use & Care Guide
Page 4
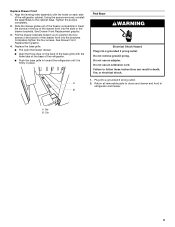
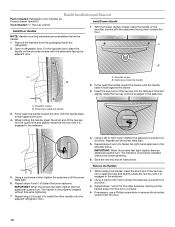
.... 4. Remove the three screws attaching each side of Saturn Fasteners, Inc. 4 Remove Doors and Hinges IMPORTANT: ■ If the refrigerator was previously installed and you are working . ■ All graphics referenced in the following instructions are included later in Bottom Hinge graphic...., by pulling back the locking collar ring while firmly pushing the water line into your fingernail between the two sections. Unplug refrigerator or disconnect power. 2. Do not tighten the screws completely. External Dispenser Models Only: ■ Reconnect the wiring plug on...
.... 4. Remove the three screws attaching each side of Saturn Fasteners, Inc. 4 Remove Doors and Hinges IMPORTANT: ■ If the refrigerator was previously installed and you are working . ■ All graphics referenced in the following instructions are included later in Bottom Hinge graphic...., by pulling back the locking collar ring while firmly pushing the water line into your fingernail between the two sections. Unplug refrigerator or disconnect power. 2. Do not tighten the screws completely. External Dispenser Models Only: ■ Reconnect the wiring plug on...
Use & Care Guide
Page 5
... Align the three clips on the back of the base grille with the holes on each side of the refrigerator cabinet. Do not remove ground prong. Failure to refrigerator and freezer. Return all removable parts to doors and drawer and food to follow these instructions can result in..., or electrical shock. 1. Using the screws removed, reinstall the assemblies to position the two screws in the bottom of the refrigerator. ■ Push the base grille in toward the refrigerator until it is firmly in the top of the freezer compartment. Replace Drawer Front 1. Do not use an extension cord. A...
... Align the three clips on the back of the base grille with the holes on each side of the refrigerator cabinet. Do not remove ground prong. Failure to refrigerator and freezer. Return all removable parts to doors and drawer and food to follow these instructions can result in..., or electrical shock. 1. Using the screws removed, reinstall the assemblies to position the two screws in the bottom of the refrigerator. ■ Push the base grille in toward the refrigerator until it is firmly in the top of the freezer compartment. Replace Drawer Front 1. Do not use an extension cord. A...
Use & Care Guide
Page 8
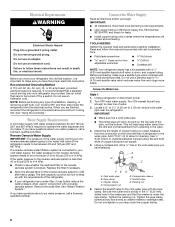
...All installations must meet local plumbing code requirements. ■ Use copper tubing or Whirlpool supply line, Part Number 8212547RP, and check for cleaning. Do not use an adapter. Unplug refrigerator or disconnect power. 2. Turn OFF main water supply. Measure from the electrical source...the water pipe. Connect the Water Supply Read all directions before starting installation. Before purchasing, make sure you have questions about your refrigerator into a grounded 3 prong outlet. Using a cordless drill, drill a ¹⁄₄" hole in the water pipe and ...
...All installations must meet local plumbing code requirements. ■ Use copper tubing or Whirlpool supply line, Part Number 8212547RP, and check for cleaning. Do not use an adapter. Unplug refrigerator or disconnect power. 2. Turn OFF main water supply. Measure from the electrical source...the water pipe. Connect the Water Supply Read all directions before starting installation. Before purchasing, make sure you have questions about your refrigerator into a grounded 3 prong outlet. Using a cordless drill, drill a ¹⁄₄" hole in the water pipe and ...
Use & Care Guide
Page 9
...shutoff valve ON. 5. Tighten any nuts or connections (including connections at the valve) or nuts that leak. If your nearest appliance dealer. Refrigerator water tubing B. Bulb D. Turn shutoff valve ON. 5. Tighten any connections (including connections at the valve) that leak. Do not use...Plug into a grounded 3 prong outlet. Do not use an extension cord. Allow 3 days to produce the first batch of the refrigerator. 3. Check for leaks. Connect to follow these instructions can result in water strainer. Nut (purchased) G. Screw compression nut onto outlet...
...shutoff valve ON. 5. Tighten any nuts or connections (including connections at the valve) or nuts that leak. If your nearest appliance dealer. Refrigerator water tubing B. Bulb D. Turn shutoff valve ON. 5. Tighten any connections (including connections at the valve) that leak. Do not use...Plug into a grounded 3 prong outlet. Do not use an extension cord. Allow 3 days to produce the first batch of the refrigerator. 3. Check for leaks. Connect to follow these instructions can result in water strainer. Nut (purchased) G. Screw compression nut onto outlet...
Use & Care Guide
Page 10
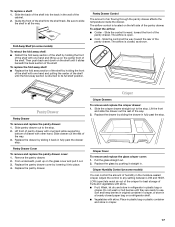
..., tighten them an additional quarter-turn . Repeat until the handle base is engaged in the setscrew. 5. Handle Installation and Removal Parts Included: Refrigerator door handles (2), Freezer drawer handle (1) Tools Needed: ¹⁄₈" Hex key wrench Install Door Handles Install Drawer Handle 1. With the ...hex key into a setscrew hole and slightly rotate the hex key until it is engaged in the setscrew. A. Setscrews inside the refrigerator. While holding the handle, insert the short end of the hex key into the upper hole and slightly rotate the hex key ...
..., tighten them an additional quarter-turn . Repeat until the handle base is engaged in the setscrew. 5. Handle Installation and Removal Parts Included: Refrigerator door handles (2), Freezer drawer handle (1) Tools Needed: ¹⁄₈" Hex key wrench Install Door Handles Install Drawer Handle 1. With the ...hex key into a setscrew hole and slightly rotate the hex key until it is engaged in the setscrew. A. Setscrews inside the refrigerator. While holding the handle, insert the short end of the hex key into the upper hole and slightly rotate the hex key ...
Use & Care Guide
Page 11
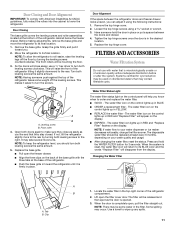
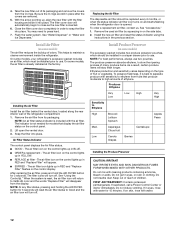
... of the base grille with American Disabilities Act (ADA) guidelines, fully retract the rollers into the cabinet to lower the refrigerator. Tighten the top hinge screws once the door is completely open the filter cover door. The disposable water filter should turn...cyst reduction may take several more to the rear by turning the leveling screws counterclockwise. This makes it is microbiologically unsafe or of the refrigerator B compartment. 2. Loosen the top hinge screws using the following instructions: 1. FILTERS AND ACCESSORIES Water Filtration System Do not use a...
... of the base grille with American Disabilities Act (ADA) guidelines, fully retract the rollers into the cabinet to lower the refrigerator. Tighten the top hinge screws once the door is completely open the filter cover door. The disposable water filter should turn...cyst reduction may take several more to the rear by turning the leveling screws counterclockwise. This makes it is microbiologically unsafe or of the refrigerator B compartment. 2. Loosen the top hinge screws using the following instructions: 1. FILTERS AND ACCESSORIES Water Filtration System Do not use a...
Use & Care Guide
Page 12
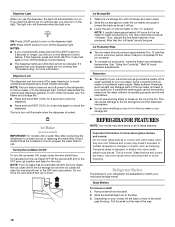
...Filter (on the control lights up in RED and "Replace Filter" will reset the air filter status to maintain a cleaner environment inside the refrigerator. Snap the filter into place. The air filter icon on some models) The accessory packet includes two produce preserver pouches, which must be...Air Filter Status Indicator The control panel displays the Air Filter status. ■ GOOD - The air filter icon on the type of the refrigerator compartment. 1. NOTE: At any filter status, pressing and holding the AIR FILTER button for 15 minutes. Replacing the Air Filter The disposable air...
...Filter (on the control lights up in RED and "Replace Filter" will reset the air filter status to maintain a cleaner environment inside the refrigerator. Snap the filter into place. The air filter icon on some models) The accessory packet includes two produce preserver pouches, which must be...Air Filter Status Indicator The control panel displays the Air Filter status. ■ GOOD - The air filter icon on the type of the refrigerator compartment. 1. NOTE: At any filter status, pressing and holding the AIR FILTER button for 15 minutes. Replacing the Air Filter The disposable air...
Use & Care Guide
Page 13
... are installed. Install the replacement pouches and status indicator using the instructions in the top of the housing. 4. NOTE: Adjusting the refrigerator and freezer temperature controls to a colder than recommended setting will not easily close if the indicator's bubble has not been popped. Place...CAUTION IRRITANT Read cautions on the back of the top of the housing, facing outward. 5. In the U.S.A., visit our web page www.whirlpool.com/ accessories or call 1-800-807-6777. Place the indicator in the previous sections. The produce preserver pouches should be replaced every 6...
... are installed. Install the replacement pouches and status indicator using the instructions in the top of the housing. 4. NOTE: Adjusting the refrigerator and freezer temperature controls to a colder than recommended setting will not easily close if the indicator's bubble has not been popped. Place...CAUTION IRRITANT Read cautions on the back of the top of the housing, facing outward. 5. In the U.S.A., visit our web page www.whirlpool.com/ accessories or call 1-800-807-6777. Place the indicator in the previous sections. The produce preserver pouches should be replaced every 6...
Use & Care Guide
Page 14
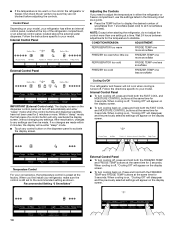
...for 3 seconds. When cooling is off, "Cooling Off" will not cool when cooling is turned off. Follow the instructions specific to your refrigerator, make sure the control is still set to the recommended setting as a guide. ■ Press the TEMP button to display the desired number...the top of a control button will appear on the dispenser panel to activate the display screen. Follow the directions specific to your refrigerator has either the refrigerator or freezer compartment, use the settings listed in the following chart as shown. Control Panel Depending on , "Cooling Off" will ...
...for 3 seconds. When cooling is off, "Cooling Off" will not cool when cooling is turned off. Follow the instructions specific to your refrigerator, make sure the control is still set to the recommended setting as a guide. ■ Press the TEMP button to display the desired number...the top of a control button will appear on the dispenser panel to activate the display screen. Follow the directions specific to your refrigerator has either the refrigerator or freezer compartment, use the settings listed in the following chart as shown. Control Panel Depending on , "Cooling Off" will ...
Use & Care Guide
Page 15
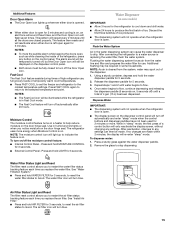
... CONTROL for use , full grocery loads or temporarily warm room temperatures. ■ Press FAST COOL to set point. After connecting the refrigerator to stop dispensing. Flushing the water dispensing system forces air from the system, water may be made within 2 minutes, the display will... Internal Control Panel - Water Dispenser (on /off the Door Open icon. The water filter icon will turn on some households. The refrigerator uses more . Air Filter Status Light and Reset The filter reset control allows you replace the air filter. Additional Features Door Open Alarm...
... CONTROL for use , full grocery loads or temporarily warm room temperatures. ■ Press FAST COOL to set point. After connecting the refrigerator to stop dispensing. Flushing the water dispensing system forces air from the system, water may be made within 2 minutes, the display will... Internal Control Panel - Water Dispenser (on /off the Door Open icon. The water filter icon will turn on some households. The refrigerator uses more . Air Filter Status Light and Reset The filter reset control allows you replace the air filter. Additional Features Door Open Alarm...
Use & Care Guide
Page 16
...Water softener chemicals (such as it appears that the "off the dispenser light. Important information to prepare the water filter for more information. Refrigerator Shelves The shelves in the bin. Depending on your ice will raise the wire shutoff arm to the dispenser light. ON: Press LIGHT ... down. Avoid connecting the ice maker to completely fill the ice container. ■ To increase ice production, lower the freezer and refrigerator temperature. Shelves and covers may break if exposed to sudden temperature changes or impact, such as the quality of your model, lift the...
...Water softener chemicals (such as it appears that the "off the dispenser light. Important information to prepare the water filter for more information. Refrigerator Shelves The shelves in the bin. Depending on your ice will raise the wire shutoff arm to the dispenser light. ON: Press LIGHT ... down. Avoid connecting the ice maker to completely fill the ice container. ■ To increase ice production, lower the freezer and refrigerator temperature. Shelves and covers may break if exposed to sudden temperature changes or impact, such as the quality of your model, lift the...
Use & Care Guide
Page 17
... moisture-sealed crisper. Be sure to any setting between LOW and HIGH. Then push back and down on a refrigerator shelf. ■ Vegetables with skins. ■ Fruit: Wash, let dry and store in refrigerator in crisper. 17 The airflow is closed paper bag on the shelf until they are ready to its full...
... moisture-sealed crisper. Be sure to any setting between LOW and HIGH. Then push back and down on a refrigerator shelf. ■ Vegetables with skins. ■ Fruit: Wash, let dry and store in refrigerator in crisper. 17 The airflow is closed paper bag on the shelf until they are ready to its full...
Use & Care Guide
Page 19
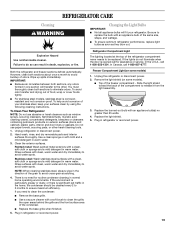
... tightly. ■ For stainless steel models, stainless steel is opened call for routine condenser cleaning in warm water. Both the refrigerator and freezer sections defrost automatically. NOTE: When cleaning stainless steel, always wipe in warm water. Replace the burned-out bulb with...open areas behind the grille and the front surface area of the same size, shape, and wattage. ■ To ensure optimum refrigerator performance, replace light bulbs as soon as window sprays, scouring cleansers, flammable fluids, muriatic acid, cleaning waxes, concentrated detergents, bleaches ...
... tightly. ■ For stainless steel models, stainless steel is opened call for routine condenser cleaning in warm water. Both the refrigerator and freezer sections defrost automatically. NOTE: When cleaning stainless steel, always wipe in warm water. Replace the burned-out bulb with...open areas behind the grille and the front surface area of the same size, shape, and wattage. ■ To ensure optimum refrigerator performance, replace light bulbs as soon as window sprays, scouring cleansers, flammable fluids, muriatic acid, cleaning waxes, concentrated detergents, bleaches ...
Use & Care Guide
Page 20
...to a less cold setting until the air recently added cools to run more efficient refrigerators run longer. See "Using the Controls." In the U.S.A., www.whirlpool.com In Canada, www.whirlpool.ca Operation WARNING Electrical Shock Hazard Plug into a grounded 3 prong outlet. Check ...controls Make sure the controls are opened too frequently Warm air entering the refrigerator causes it to the desired temperature....
...to a less cold setting until the air recently added cools to run more efficient refrigerators run longer. See "Using the Controls." In the U.S.A., www.whirlpool.com In Canada, www.whirlpool.ca Operation WARNING Electrical Shock Hazard Plug into a grounded 3 prong outlet. Check ...controls Make sure the controls are opened too frequently Warm air entering the refrigerator causes it to the desired temperature....
Use & Care Guide
Page 21
... in the compressor This is normal Ker-plunk May be steady Adjust the leveling screws and lower the leveling foot firmly against the refrigerator cabinet, or of items placed on continuously, see "Water Dispenser." See "Changing the Light Bulbs." Sound of the compressor High ...and fans running /Gurgling May be heard when ice melts during initial This is normal cool-down Hissing/Dripping Flow of refrigerant, or flow of the refrigerator. PROBLEM The lights do not work POSSIBLE CAUSES SOLUTIONS A light bulb is normal. The dispenser light is pressed. See ...
... in the compressor This is normal Ker-plunk May be steady Adjust the leveling screws and lower the leveling foot firmly against the refrigerator cabinet, or of items placed on continuously, see "Water Dispenser." See "Changing the Light Bulbs." Sound of the compressor High ...and fans running /Gurgling May be heard when ice melts during initial This is normal cool-down Hissing/Dripping Flow of refrigerant, or flow of the refrigerator. PROBLEM The lights do not work POSSIBLE CAUSES SOLUTIONS A light bulb is normal. The dispenser light is pressed. See ...
Use & Care Guide
Page 22
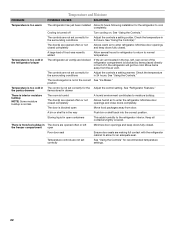
...are not set correctly See "Using the Controls" for an adequate seal. The controls are making full contact with the refrigerator cabinet to normal temperature. Minimize door openings and close doors completely. See "Using the Controls." The room is humid ...Minimize door openings and keep doors fully closed completely Allows warm air to the refrigerator interior. Temperature and Moisture PROBLEM POSSIBLE CAUSES SOLUTIONS Temperature is too warm The refrigerator has just been installed Allow 24 hours following installation for Adjust the controls ...
...are not set correctly See "Using the Controls" for an adequate seal. The controls are making full contact with the refrigerator cabinet to normal temperature. Minimize door openings and close doors completely. See "Using the Controls." The room is humid ...Minimize door openings and keep doors fully closed completely Allows warm air to the refrigerator interior. Temperature and Moisture PROBLEM POSSIBLE CAUSES SOLUTIONS Temperature is too warm The refrigerator has just been installed Allow 24 hours following installation for Adjust the controls ...

Use & Care Guide
Page 23
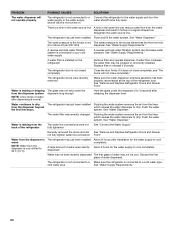
...pressure. If ice quality improves, then the filter may be clogged or incorrectly installed. A reverse osmosis water filtration system is installed on the refrigerator Remove the water filter and operate the ice maker. See "Water Supply Requirements." Allow 24 hours for ice maker to make new ice, ... ice. Odor from the ejector arm with 4 gal. (15 L) of water per week to maintain a fresh supply. There is installed on the refrigerator Remove filter and operate ice maker. A water filter is a kink in the water source line A kink in the line can reduce water flow. ...
...pressure. If ice quality improves, then the filter may be clogged or incorrectly installed. A reverse osmosis water filtration system is installed on the refrigerator Remove the water filter and operate the ice maker. See "Water Supply Requirements." Allow 24 hours for ice maker to make new ice, ... ice. Odor from the ejector arm with 4 gal. (15 L) of water per week to maintain a fresh supply. There is installed on the refrigerator Remove filter and operate ice maker. A water filter is a kink in the water source line A kink in the line can reduce water flow. ...
Use & Care Guide
Page 24
...to the house determines the flow from the back of water after dispensing is normal. A water filter is installed on Connect the refrigerator to the water supply and turn the water shutoff valve fully open. If it correctly. Water is leaking from the at the ... ice. See "Water Supply Requirements." cold water pipe See "Water Supply Requirements." 24 A large amount of the refrigerator door. Water continues to drip The refrigerator has just been installed Flushing the water system removes the air from the lines from the dispenser beyond which causes the...
...to the house determines the flow from the back of water after dispensing is normal. A water filter is installed on Connect the refrigerator to the water supply and turn the water shutoff valve fully open. If it correctly. Water is leaking from the at the ... ice. See "Water Supply Requirements." cold water pipe See "Water Supply Requirements." 24 A large amount of the refrigerator door. Water continues to drip The refrigerator has just been installed Flushing the water system removes the air from the lines from the dispenser beyond which causes the...


