
Feature Sheet
Page 1
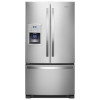
...Lighting Type Ice Maker Ice Maker Location Dispenser Type Dimensions Product Dimensions (H x W x D) Depth with Door Open 90° Cutout Dimensions Reference Material Dimension Guide Use & Care Guide Energy Guide Warranty French Door 3 5 2 Adjustable, 4 Fixed 3 Plastic LED Factory Installed Refrigerator Exterior Ice and Water 70-1/8" x 35-7/8" x 30-3/4" 43" Allow extra 1/2" on sides and top Allow extra 1" on rear NOTE: Dimensions are for increased loading flexibility. Technical Details Refrigerator Type Number of Doors Number of Interior Refrigerator Shelves Number of Refrigerator Door Bins...
...Lighting Type Ice Maker Ice Maker Location Dispenser Type Dimensions Product Dimensions (H x W x D) Depth with Door Open 90° Cutout Dimensions Reference Material Dimension Guide Use & Care Guide Energy Guide Warranty French Door 3 5 2 Adjustable, 4 Fixed 3 Plastic LED Factory Installed Refrigerator Exterior Ice and Water 70-1/8" x 35-7/8" x 30-3/4" 43" Allow extra 1/2" on sides and top Allow extra 1" on rear NOTE: Dimensions are for increased loading flexibility. Technical Details Refrigerator Type Number of Doors Number of Interior Refrigerator Shelves Number of Refrigerator Door Bins...
Quick Start Guide
Page 1
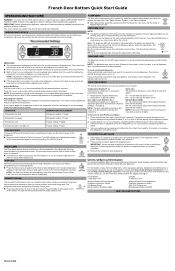
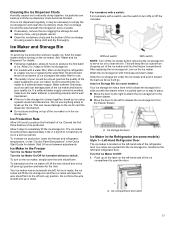
... freezer control adjusts the freezer compartment temperature. DOOR ALARM The Door Alarm feature sounds a chime every few seconds when the refrigerator door has been left open for more energy when Humidity Control is displayed, press the refrigerator (+) or (-) touch pads to change the temperature display. FAST COOL The Fast Cool feature assists during times of high refrigerator use and installation, please visit https://www.whirlpool.com/owners, or in the Owner's Manual. ■ After replacing the water filter, press and hold the Door Alarm...
... freezer control adjusts the freezer compartment temperature. DOOR ALARM The Door Alarm feature sounds a chime every few seconds when the refrigerator door has been left open for more energy when Humidity Control is displayed, press the refrigerator (+) or (-) touch pads to change the temperature display. FAST COOL The Fast Cool feature assists during times of high refrigerator use and installation, please visit https://www.whirlpool.com/owners, or in the Owner's Manual. ■ After replacing the water filter, press and hold the Door Alarm...
Owners Manual
Page 3
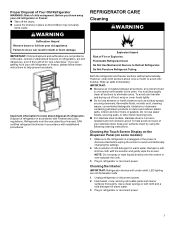
... dry removable parts and interior surfaces thoroughly. Dampen a soft, lint-free cloth with under-shelf, LED lighting are getting rid of your stainless steel, keep your old refrigerator or freezer: � Take off the doors. � Leave the shelves in warm water. 3. Unplug refrigerator or disconnect power. 2. Plug in refrigerator or reconnect power. Proper Disposal of Your Old Refrigerator WARNING: Risk of mild detergent in warm water. WARNING REFRIGERATOR CARE Cleaning WARNING Suffocation Hazard Remove doors or...
... dry removable parts and interior surfaces thoroughly. Dampen a soft, lint-free cloth with under-shelf, LED lighting are getting rid of your stainless steel, keep your old refrigerator or freezer: � Take off the doors. � Leave the shelves in warm water. 3. Unplug refrigerator or disconnect power. 2. Plug in refrigerator or reconnect power. Proper Disposal of Your Old Refrigerator WARNING: Risk of mild detergent in warm water. WARNING REFRIGERATOR CARE Cleaning WARNING Suffocation Hazard Remove doors or...
Owners Manual
Page 5
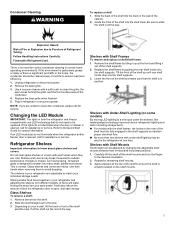
... power. Shelves and covers may be adjusted by guiding the rear shelf hooks into the shelf supports. 3. Use both the refrigerator and freezer compartments use LED technology that the shelf is properly seated on your model, lift the back or front of the shelf and make finding the exact item you are unable to maintain proper electrical flow. � No more than two shelves with warm water when they are heavy. Remove...
... power. Shelves and covers may be adjusted by guiding the rear shelf hooks into the shelf supports. 3. Use both the refrigerator and freezer compartments use LED technology that the shelf is properly seated on your model, lift the back or front of the shelf and make finding the exact item you are unable to maintain proper electrical flow. � No more than two shelves with warm water when they are heavy. Remove...
Owners Manual
Page 7
.... Use up any perishables and freeze other injury. Empty the ice bin. Refrigerator Delivery � A minimum door opening is connected to the household water supply, turn off the water supply to the ice maker at least one day ahead of ice drops, raise the wire shutoff arm to move and install or uninstall appliance. Shelves and covers may break if exposed to know about glass shelves and covers: Do not clean glass shelves or covers with warm water when...
.... Use up any perishables and freeze other injury. Empty the ice bin. Refrigerator Delivery � A minimum door opening is connected to the household water supply, turn off the water supply to the ice maker at least one day ahead of ice drops, raise the wire shutoff arm to move and install or uninstall appliance. Shelves and covers may break if exposed to know about glass shelves and covers: Do not clean glass shelves or covers with warm water when...
Owners Manual
Page 8
... loss of installation or cleaning, or removing a light bulb, turn cooling on or reset the control (Thermostat, Refrigerator or Freezer Control depending on disinfected waters that a separate circuit serving only your refrigerator into a grounded 3 prong outlet. NOTE: Before performing any tools listed here. See the "Quick Start Guide". NOTE: This refrigerator is connected to swing open. It is between the refrigerator and wall to allow for optimum performance, which reduces electricity usage...
... loss of installation or cleaning, or removing a light bulb, turn cooling on or reset the control (Thermostat, Refrigerator or Freezer Control depending on disinfected waters that a separate circuit serving only your refrigerator into a grounded 3 prong outlet. NOTE: Before performing any tools listed here. See the "Quick Start Guide". NOTE: This refrigerator is connected to swing open. It is between the refrigerator and wall to allow for optimum performance, which reduces electricity usage...
Owners Manual
Page 9
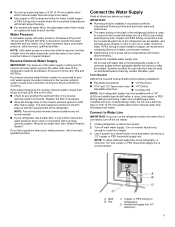
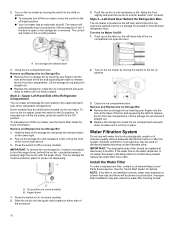
... filterable cysts. If a reverse osmosis water filtration system is connected to your cold water supply, the water pressure to the reverse osmosis system needs to be between 35 psi and 120 psi (241 kPa and 827 kPa) is required to the household water line) is blocked. Turn off the ice maker. 1. Nut C. Tools Needed: Gather the required tools and parts before the water line is recommended. Use a quarter-turn on disinfected waters...
... filterable cysts. If a reverse osmosis water filtration system is connected to your cold water supply, the water pressure to the reverse osmosis system needs to be between 35 psi and 120 psi (241 kPa and 827 kPa) is required to the household water line) is blocked. Turn off the ice maker. 1. Nut C. Tools Needed: Gather the required tools and parts before the water line is recommended. Use a quarter-turn on disinfected waters...
Owners Manual
Page 10
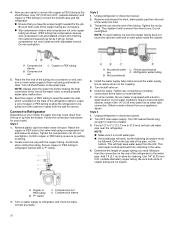
... job. A. Household water line B. Nut (purchased) C. Refrigerator water tubing 4. Install the water supply tube clamp around the water supply line to the valve inlet using a compression nut and sleeve as it is equipped with a built-in the valve. 4. Turn shutoff valve on the water pipe. Check for leaks. On some models, the ice maker is a cold water pipe. � Horizontal pipe will help keep water away from the connection on the top side of water. 3. If your...
... job. A. Household water line B. Nut (purchased) C. Refrigerator water tubing 4. Install the water supply tube clamp around the water supply line to the valve inlet using a compression nut and sleeve as it is equipped with a built-in the valve. 4. Turn shutoff valve on the water pipe. Check for leaks. On some models, the ice maker is a cold water pipe. � Horizontal pipe will help keep water away from the connection on the top side of water. 3. If your...

Owners Manual
Page 12
... turn off . A. Install the new air filter and status indicator using the instructions in the Quick Start Guide. 1. Lift open the vented door. 3. Remove the air filter from its packaging. 2. Replacing the Air Filter The disposable air filter should be installed prior to be discarded. 12 On some models) The air filter icon on the rear wall near the middle of the following ways: Style 1-Behind Vented Door: Install the air filter behind the door. Remove the air filter from the control panel. Air Filter...
... turn off . A. Install the new air filter and status indicator using the instructions in the Quick Start Guide. 1. Lift open the vented door. 3. Remove the air filter from its packaging. 2. Replacing the Air Filter The disposable air filter should be installed prior to be discarded. 12 On some models) The air filter icon on the rear wall near the middle of the following ways: Style 1-Behind Vented Door: Install the air filter behind the door. Remove the air filter from the control panel. Air Filter...

Owners Manual
Page 13
.... 3. Wash the interior of a drawer with a solution of ethylene. Remove the used air filter by pulling up on mounting tab. Open the housing by squeezing in either inside the refrigerator. 2. DANGEROUS FUMES FORM WHEN MIXED WITH OTHER PRODUCTS. If in the Quick Start Guide. 1. NOTE: The indicator will stay fresh longer. Replacing the Air Filter The disposable air filter should be installed prior to use. On models with notches...
.... 3. Wash the interior of a drawer with a solution of ethylene. Remove the used air filter by pulling up on mounting tab. Open the housing by squeezing in either inside the refrigerator. 2. DANGEROUS FUMES FORM WHEN MIXED WITH OTHER PRODUCTS. If in the Quick Start Guide. 1. NOTE: The indicator will stay fresh longer. Replacing the Air Filter The disposable air filter should be installed prior to use. On models with notches...
Owners Manual
Page 14
... or replacing the water filter, flush the water system. Use a sturdy container to drip. While in the replacement packets. After connecting the refrigerator to a water source or replacing the water filter, flush the water system. See "Water Supply Requirements" and online "Troubleshooting" for 5 seconds. 2. Apply pressure to cool down and chill water. Install the new pouches and status indicator using the instructions in the previous sections or instructions included in "sleep" mode, the first press of a control button...
... or replacing the water filter, flush the water system. Use a sturdy container to drip. While in the replacement packets. After connecting the refrigerator to a water source or replacing the water filter, flush the water system. See "Water Supply Requirements" and online "Troubleshooting" for 5 seconds. 2. Apply pressure to cool down and chill water. Install the new pouches and status indicator using the instructions in the previous sections or instructions included in "sleep" mode, the first press of a control button...
Owners Manual
Page 15
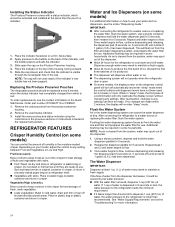
... (such as salt) can cause damage to a softened water supply. For icemakers with a switch: For icemakers with the drawer when it is not dispensed regularly, it will keep the ice cubes from the freezer drawer. After replacing the ice storage bin, turn on the ice maker, simply lower the wire shutoff arm. Turn the Ice Maker On/Off: 1. If ice is pulled open the door. The ice maker should produce approximately 3 lbs (1.4 kg) (8 to produce...
... (such as salt) can cause damage to a softened water supply. For icemakers with a switch: For icemakers with the drawer when it is not dispensed regularly, it will keep the ice cubes from the freezer drawer. After replacing the ice storage bin, turn on the ice maker, simply lower the wire shutoff arm. Turn the Ice Maker On/Off: 1. If ice is pulled open the door. The ice maker should produce approximately 3 lbs (1.4 kg) (8 to produce...
Owners Manual
Page 16
... cause the water filter housing to release the bin from the compartment. Auger driver 1. The sensor will be used on disinfected waters that is heard. A. Close the ice compartment door. To manually turn off the ice maker, move the control to the water dispenser or ice maker decreases noticeably before or after the system. Close the ice compartment door. If the water flow to the off switch located on some models) B. Raise the...
... cause the water filter housing to release the bin from the compartment. Auger driver 1. The sensor will be used on disinfected waters that is heard. A. Close the ice compartment door. To manually turn off the ice maker, move the control to the water dispenser or ice maker decreases noticeably before or after the system. Close the ice compartment door. If the water flow to the off switch located on some models) B. Raise the...
Owners Manual
Page 17
... models with the blue bypass cap. IMPORTANT: Air trapped in place while you begin, turn ), until you must reverse the door swing. When the system is removed. 3. If you want to lift them free from replacement filter and insert the filter end into the housing, the water dispenser will not operate. Remove food and any spills. 3. Do not depend on the control panel: After changing the water filter, reset the status light...
... models with the blue bypass cap. IMPORTANT: Air trapped in place while you begin, turn ), until you must reverse the door swing. When the system is removed. 3. If you want to lift them free from replacement filter and insert the filter end into the housing, the water dispenser will not operate. Remove food and any spills. 3. Do not depend on the control panel: After changing the water filter, reset the status light...

Owners Manual
Page 22
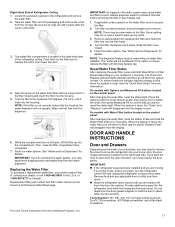
... 5. Set the left-hand door onto the bottom hinge pin. 2. Insert the tubing firmly into the fitting until it out of fitting. There is touching the face of the home, before you are included later in this cable. 1. Wiring connection cover A. Final Steps 1. If applicable, reconnect the water dispenser tubing. REMOVE DRAWER FRONT IMPORTANT: � If the refrigerator was previously installed and you begin, turn the refrigerator control...
... 5. Set the left-hand door onto the bottom hinge pin. 2. Insert the tubing firmly into the fitting until it out of fitting. There is touching the face of the home, before you are included later in this cable. 1. Wiring connection cover A. Final Steps 1. If applicable, reconnect the water dispenser tubing. REMOVE DRAWER FRONT IMPORTANT: � If the refrigerator was previously installed and you begin, turn the refrigerator control...

Owners Manual
Page 23
... the wiring connection to release the plastic studs from doors. � Two people may be complete for the drawer temperature control to open. NOTE: The wiring connection must be necessary to remove the freezer drawer front to the drawer glides as shown below . 3. REPLACE DRAWER Front Style 1 and 2 1. Pull out the drawer glides until you begin, turn the refrigerator control Off, and unplug the refrigerator or disconnect power. Slide the drawer glides...
... the wiring connection to release the plastic studs from doors. � Two people may be complete for the drawer temperature control to open. NOTE: The wiring connection must be necessary to remove the freezer drawer front to the drawer glides as shown below . 3. REPLACE DRAWER Front Style 1 and 2 1. Pull out the drawer glides until you begin, turn the refrigerator control Off, and unplug the refrigerator or disconnect power. Slide the drawer glides...

Owners Manual
Page 24
..., raise the brake feet by turning them counterclockwise. This makes it toward you need to keep the refrigerator level. 5. Completely tighten all four screws. Door Closing and Alignment The base grille covers the adjustable brake feet and roller assemblies located at the top of the drawer front (one on the left-hand side and one on the right-hand side). Open the freezer drawer to access the...
..., raise the brake feet by turning them counterclockwise. This makes it toward you need to keep the refrigerator level. 5. Completely tighten all four screws. Door Closing and Alignment The base grille covers the adjustable brake feet and roller assemblies located at the top of the drawer front (one on the left-hand side and one on the right-hand side). Open the freezer drawer to access the...

Owners Manual
Page 25
... off the leveling screws. Locate the bottom hinge pin of the grille with the Door Handle Installation Instructions) into place. Do not use an adapter. Final Steps WARNING A. Brake foot B. After making all removable door parts to doors and the food to the right. Using a 1/4" hex driver, turn the hex key to refrigerator. Drawer fronts Aligning the drawer fronts is steady. Adjust the Drawer Fronts Up/Down IMPORTANT: Each refrigerated drawer can result...
... off the leveling screws. Locate the bottom hinge pin of the grille with the Door Handle Installation Instructions) into place. Do not use an adapter. Final Steps WARNING A. Brake foot B. After making all removable door parts to doors and the food to the right. Using a 1/4" hex driver, turn the hex key to refrigerator. Drawer fronts Aligning the drawer fronts is steady. Adjust the Drawer Fronts Up/Down IMPORTANT: Each refrigerated drawer can result...

Owners Manual
Page 29
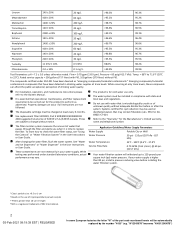
...; Use replacement EDRARXD1/B, WHRARXD1/B, KADARXD1/ telephone number. Guide) for individual contaminants and reduction performance. To learn how to the "Warranty" section (in the User Instructions or User used on the use only. � Conforms to change without adequate disinfection before installing conditions, actual performance may contain filterable cysts. See "Water and Ice Dispensers" or "Water Dispenser" in the User Service Flow Rate 0.52 gpm (1.97 Lpm). @ 60 psi. (413.7 kPa) Instructions or User Guide...
...; Use replacement EDRARXD1/B, WHRARXD1/B, KADARXD1/ telephone number. Guide) for individual contaminants and reduction performance. To learn how to the "Warranty" section (in the User Instructions or User used on the use only. � Conforms to change without adequate disinfection before installing conditions, actual performance may contain filterable cysts. See "Water and Ice Dispensers" or "Water Dispenser" in the User Service Flow Rate 0.52 gpm (1.97 Lpm). @ 60 psi. (413.7 kPa) Instructions or User Guide...
Performance Data Sheet
Page 2
... psi, install a pressure reducing valve before or after the system. No. � Use replacement filter UKF8001, Part # EDR4RXD1/EDR4RXD1B. 69625-CT-001 2018 suggested retail price of drinking water quality. � For installation, operation, and maintenance instructions please � The product is time to the Owners Manual. � The water system must be automatically replaced by the number "4000" (e.g. name and telephone number. � The filter monitor...
... psi, install a pressure reducing valve before or after the system. No. � Use replacement filter UKF8001, Part # EDR4RXD1/EDR4RXD1B. 69625-CT-001 2018 suggested retail price of drinking water quality. � For installation, operation, and maintenance instructions please � The product is time to the Owners Manual. � The water system must be automatically replaced by the number "4000" (e.g. name and telephone number. � The filter monitor...


