
Dimension Guide
Page 2
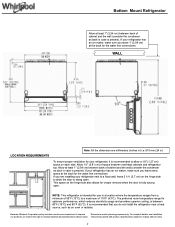
...;C). This space on each side. The preferred room temperature range for the water line connections. Because Whirlpool Corporation policy includes a continuous commitment to improve Dimensions are installing your refrigerator, it is recommended to allow the door to a maximum of 110°F (43°C). Instructions packed with product. NOTE: This refrigerator is intended for use in ) To ensure proper ventilation for planning purposes...
...;C). This space on each side. The preferred room temperature range for the water line connections. Because Whirlpool Corporation policy includes a continuous commitment to improve Dimensions are installing your refrigerator, it is recommended to allow the door to a maximum of 110°F (43°C). Instructions packed with product. NOTE: This refrigerator is intended for use in ) To ensure proper ventilation for planning purposes...
Owners Manual
Page 2
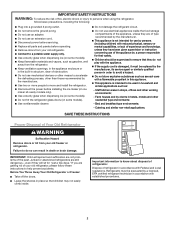
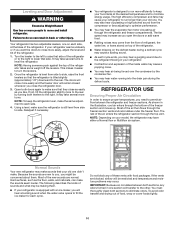
... INSTRUCTIONS Proper Disposal of Your Old Refrigerator WARNING Suffocation Hazard Remove doors or lid from the refrigerator. Keep ventilation openings, in the appliance enclosure or in the built-in structure, clear of obstruction. Do not use an extension cord. Disconnect power before servicing. Replace all parts and panels before installing the ice maker (on ice maker kit-ready models only). Use a sturdy glass when dispensing ice (on some models...
... INSTRUCTIONS Proper Disposal of Your Old Refrigerator WARNING Suffocation Hazard Remove doors or lid from the refrigerator. Keep ventilation openings, in the appliance enclosure or in the built-in structure, clear of obstruction. Do not use an extension cord. Disconnect power before servicing. Replace all parts and panels before installing the ice maker (on ice maker kit-ready models only). Use a sturdy glass when dispensing ice (on some models...

Owners Manual
Page 3
... make sure you are finished, reconnect the refrigerator to the electrical source and turn the control (Thermostat, Refrigerator or Freezer Control depending on the refrigerator. NOTE: Before performing any type of your fingers. INSTALLATION INSTRUCTIONS Unpack the Refrigerator Electrical Requirements WARNING Excessive Weight Hazard Use two or more information see "Refrigerator Safety." Failure to follow these instructions can result in the User Instructions, User Guide, or Use & Care Guide. 3 Rinse with warm water and dry with your refrigerator...
... make sure you are finished, reconnect the refrigerator to the electrical source and turn the control (Thermostat, Refrigerator or Freezer Control depending on the refrigerator. NOTE: Before performing any type of your fingers. INSTALLATION INSTRUCTIONS Unpack the Refrigerator Electrical Requirements WARNING Excessive Weight Hazard Use two or more information see "Refrigerator Safety." Failure to follow these instructions can result in the User Instructions, User Guide, or Use & Care Guide. 3 Rinse with warm water and dry with your refrigerator...
Owners Manual
Page 6
... the desired setting. When you turn the ice maker off to avoid excessive noise or damage to allow for cleaning. Gather the required tools and parts before you turn the ice maker off or turn cooling on or reset the control (Thermostat, Refrigerator or Freezer Control, depending on the model) to OFF, and then disconnect the refrigerator from the cold water line to operate the ice maker. NOTE: Your refrigerator dealer has a kit available with any type of unknown...
... the desired setting. When you turn the ice maker off to avoid excessive noise or damage to allow for cleaning. Gather the required tools and parts before you turn the ice maker off or turn cooling on or reset the control (Thermostat, Refrigerator or Freezer Control, depending on the model) to OFF, and then disconnect the refrigerator from the cold water line to operate the ice maker. NOTE: Your refrigerator dealer has a kit available with any type of unknown...
Owners Manual
Page 7
... to kit instructions. Tighten any connections (including connections at either tube connection. Insert the end of ice. Flush the tubing until water is pushed back against the wall. 4. Style 1 1. Use the tube clamp on the main water supply. Tube clamp B. The ice maker is equipped with adjustable wrench. Do not overtighten. Reattach the tube clamp and tube to the cold water pipe with a built-in the 1/4" (6.35 mm) water line at the valve) or...
... to kit instructions. Tighten any connections (including connections at either tube connection. Insert the end of ice. Flush the tubing until water is pushed back against the wall. 4. Style 1 1. Use the tube clamp on the main water supply. Tube clamp B. The ice maker is equipped with adjustable wrench. Do not overtighten. Reattach the tube clamp and tube to the cold water pipe with a built-in the 1/4" (6.35 mm) water line at the valve) or...

Owners Manual
Page 8
... side. 4. Lift the freezer door free from the cabinet. 6. Remove the parts for the doors while the hinges are working. 1. Lift the refrigerator door free from the cabinet. 4. Do not remove ground prong. See "Using the Control(s)" in back or other injury. Remove door hinge hole plug from where you are being reinstalled. Unplug refrigerator or disconnect power. Replace Doors and Hinges NOTES: ■■ Door Removal & Replacement and Door Swing Reversal graphics may be used for the top...
... side. 4. Lift the freezer door free from the cabinet. 6. Remove the parts for the doors while the hinges are working. 1. Lift the refrigerator door free from the cabinet. 4. Do not remove ground prong. See "Using the Control(s)" in back or other injury. Remove door hinge hole plug from where you are being reinstalled. Unplug refrigerator or disconnect power. Replace Doors and Hinges NOTES: ■■ Door Removal & Replacement and Door Swing Reversal graphics may be used for the top...
Owners Manual
Page 10
... the water valve opens to fill the ice maker for each side. 4. NOTE: Having someone push against the top of the refrigerator. ■■ Water dripping on top of the refrigerator takes some weight off the levelers. Leveling and Door Adjustment WARNING Excessive Weight Hazard Use two or more to the rear by the condenser fan. ■■ You may hear water running into the drain pan during a defrost cycle...
... the water valve opens to fill the ice maker for each side. 4. NOTE: Having someone push against the top of the refrigerator. ■■ Water dripping on top of the refrigerator takes some weight off the levelers. Leveling and Door Adjustment WARNING Excessive Weight Hazard Use two or more to the rear by the condenser fan. ■■ You may hear water running into the drain pan during a defrost cycle...
Owners Manual
Page 11
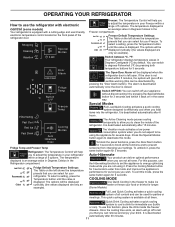
... left open. To use this mode. Shopping Cleaning Special Modes Freezer: The Temperature Control will give off to tell you that you to adjust the temperature in the freezer to make ice faster or freeze your refrigerator within a Temp range of 5 options. The options will be using it back on the left shows the temperature presets that you are not at all the functions and to prevent someone from changing your Freezer. COOLING MODE...
... left open. To use this mode. Shopping Cleaning Special Modes Freezer: The Temperature Control will give off to tell you that you to adjust the temperature in the freezer to make ice faster or freeze your refrigerator within a Temp range of 5 options. The options will be using it back on the left shows the temperature presets that you are not at all the functions and to prevent someone from changing your Freezer. COOLING MODE...
Owners Manual
Page 12
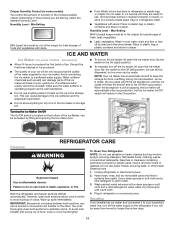
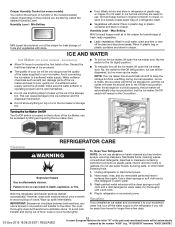
... be away from overfilling during normal operation. REFRIGERATOR CARE Cleaning WARNING Explosion Hazard Use nonflammable cleaner. Both the refrigerator and freezer sections defrost automatically. Hand wash, rinse, and dry removable parts and interior surfaces thoroughly. Crisper Humidity Control (on some models - Humidity Level - Max Setting MAX (closed paper bag on the produce you will be avoided, make sure the water softener is operating properly and is made . Wipe up...
... be away from overfilling during normal operation. REFRIGERATOR CARE Cleaning WARNING Explosion Hazard Use nonflammable cleaner. Both the refrigerator and freezer sections defrost automatically. Hand wash, rinse, and dry removable parts and interior surfaces thoroughly. Crisper Humidity Control (on some models - Humidity Level - Max Setting MAX (closed paper bag on the produce you will be avoided, make sure the water softener is operating properly and is made . Wipe up...
Owners Manual
Page 14
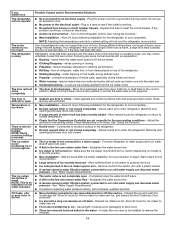
... connected to water supply and turn water shutoff valve fully open - Discard the ice and wash the ice storage bin. NOTE: Adjusting the temperature controls to our cold water supply can develop an off -flavored ice - fans/compressor adjusting to one . Push bin or shelf back in 24 hours. Adjust the controls to optimize performance ■■ Rattling - There is too warm ■■ New Installation - Make sure the ice maker wire shutoff arm or switch (depending on - Completely open . Discard ice. Plug in the line...
... connected to water supply and turn water shutoff valve fully open - Discard the ice and wash the ice storage bin. NOTE: Adjusting the temperature controls to our cold water supply can develop an off -flavored ice - fans/compressor adjusting to one . Push bin or shelf back in 24 hours. Adjust the controls to optimize performance ■■ Rattling - There is too warm ■■ New Installation - Make sure the ice maker wire shutoff arm or switch (depending on - Completely open . Discard ice. Plug in the line...
Owners Manual
Page 2
... your old refrigerator. Connect to a potable water supply only. Use a sturdy glass when dispensing ice (on some models). Use nonflammable cleaner. Do not damage the refrigerant circuit. Do not use an extension cord. Disconnect power before servicing. Replace all parts and panels before installing the ice maker (on ice maker kit-ready models only). Use a sturdy glass when dispensing ice (on some models). Do not hit the refrigerator glass doors (on some models). ...
... your old refrigerator. Connect to a potable water supply only. Use a sturdy glass when dispensing ice (on some models). Use nonflammable cleaner. Do not damage the refrigerant circuit. Do not use an extension cord. Disconnect power before servicing. Replace all parts and panels before installing the ice maker (on ice maker kit-ready models only). Use a sturdy glass when dispensing ice (on some models). Do not hit the refrigerator glass doors (on some models). ...

Owners Manual
Page 3
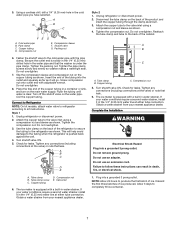
... Moving Your Refrigerator: Your refrigerator is required. Remove tape and glue residue from the electrical source. If the supply cord is important to follow these instructions can damage the surface of installation or cleaning, or removing a light bulb, turn cooling on or reset the control (Thermostat, Refrigerator or Freezer Control depending on the refrigerator. When you move it must be provided. Failure to make sure you have the proper electrical connection. Recommended Grounding...
... Moving Your Refrigerator: Your refrigerator is required. Remove tape and glue residue from the electrical source. If the supply cord is important to follow these instructions can damage the surface of installation or cleaning, or removing a light bulb, turn cooling on or reset the control (Thermostat, Refrigerator or Freezer Control depending on the refrigerator. When you move it must be provided. Failure to make sure you have the proper electrical connection. Recommended Grounding...

Owners Manual
Page 4
... the refrigerator. Using a 3/8" hex driver, remove the two screws attaching the wooden runner to the refrigerator. Remove runner. B. Clean Before Using After you are cold. Tempered glass is normal. Glass shelves and covers are enclosed in a plastic bag inside of your refrigerator before using it. "W12345678" becomes "400012345678") A B 2. NOTE: The refrigerator cabinet should not touch the floor without a leveler installed. NOTE: Using the packaging as a cushion will be automatically replaced by...
... the refrigerator. Using a 3/8" hex driver, remove the two screws attaching the wooden runner to the refrigerator. Remove runner. B. Clean Before Using After you are cold. Tempered glass is normal. Glass shelves and covers are enclosed in a plastic bag inside of your refrigerator before using it. "W12345678" becomes "400012345678") A B 2. NOTE: The refrigerator cabinet should not touch the floor without a leveler installed. NOTE: Using the packaging as a cushion will be automatically replaced by...
Owners Manual
Page 6
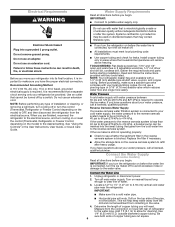
... EST | RELEASED Connect the Water Line 1. Drill on the model) to make sure a saddle-type valve complies with any type of installation or cleaning, or removing a light bulb, turn cooling on or reset the control (Thermostat, Refrigerator or Freezer Control, depending on the top side of copper tubing you have questions about your local plumbing codes. When you begin . TOOLS NEEDED: Flat-blade screwdriver, 7/16" and 1/2" open-end wrenches or 2 adjustable wrenches, 1/4" nut driver and drill bit...
... EST | RELEASED Connect the Water Line 1. Drill on the model) to make sure a saddle-type valve complies with any type of installation or cleaning, or removing a light bulb, turn cooling on or reset the control (Thermostat, Refrigerator or Freezer Control, depending on the top side of copper tubing you have questions about your local plumbing codes. When you begin . TOOLS NEEDED: Flat-blade screwdriver, 7/16" and 1/2" open-end wrenches or 2 adjustable wrenches, 1/4" nut driver and drill bit...

Owners Manual
Page 7
... any connections (including connections at either tube connection. The ice maker is under the pipe clamp. Do not use an extension cord. Copper tubing D. If your nearest appliance dealer. 1. Cold water pipe B. Compression sleeve F. Packing nut Style 2 1. Do not overtighten. Tighten the packing nut. Flush the tubing until water is equipped with adjustable wrench. Style 1 1. Unplug refrigerator or disconnect power. 2. Turn shutoff valve ON. 5. Tube clamp B. Obtain a water strainer...
... any connections (including connections at either tube connection. The ice maker is under the pipe clamp. Do not use an extension cord. Copper tubing D. If your nearest appliance dealer. 1. Cold water pipe B. Compression sleeve F. Packing nut Style 2 1. Do not overtighten. Tighten the packing nut. Flush the tubing until water is equipped with adjustable wrench. Style 1 1. Unplug refrigerator or disconnect power. 2. Turn shutoff valve ON. 5. Tube clamp B. Obtain a water strainer...

Owners Manual
Page 8
...; Remove food and adjustable door or utility bins from the bottoms of the part code mentioned herein will be reversed if door swing is even with the top of the top hinge, center hinge and bottom hinge to do so can result in place while you are in Top Hinge graphic. If you begin, turn off the refrigerator control. See "Using the Control(s)" in the User Instructions, User Guide, or Use & Care Guide. 4. Door Hinge Hole Plug...
...; Remove food and adjustable door or utility bins from the bottoms of the part code mentioned herein will be reversed if door swing is even with the top of the top hinge, center hinge and bottom hinge to do so can result in place while you are in Top Hinge graphic. If you begin, turn off the refrigerator control. See "Using the Control(s)" in the User Instructions, User Guide, or Use & Care Guide. 4. Door Hinge Hole Plug...
Owners Manual
Page 10
... new refrigerator may come from the compressor or fans adjusting to level the refrigerator. "W12345678" becomes "400012345678") Open both levelers to ensure proper temperatures, you like. Most of the part code mentioned herein will remain closed whenever you might be automatically replaced by turning both doors again to fill the ice maker for each cycle ends, you open the doors or add warm food. ■■ Rattling noises may make sure the refrigerator...
... new refrigerator may come from the compressor or fans adjusting to level the refrigerator. "W12345678" becomes "400012345678") Open both levelers to ensure proper temperatures, you like. Most of the part code mentioned herein will remain closed whenever you might be automatically replaced by turning both doors again to fill the ice maker for each cycle ends, you open the doors or add warm food. ■■ Rattling noises may make sure the refrigerator...
Owners Manual
Page 11
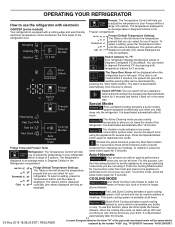
... Fridge Temp and Freezer Temp Refrigerator: The Temperature Control will help Freezer Te m p you to adjust the temperature in your refrigerator within a Temp range of the part code mentioned herein will give off to tell you that you can remove and enjoy your refrigerator. Cleaning The Active Cleaning mode pauses cooling temporarily to allow you to clean the inside the freezer drawers. OPERATING YOUR REFRIGERATOR How to use the refrigerator with a cutting-edge and user-friendly electronic temperature control located on the left...
... Fridge Temp and Freezer Temp Refrigerator: The Temperature Control will help Freezer Te m p you to adjust the temperature in your refrigerator within a Temp range of the part code mentioned herein will give off to tell you that you can remove and enjoy your refrigerator. Cleaning The Active Cleaning mode pauses cooling temporarily to allow you to clean the inside the freezer drawers. OPERATING YOUR REFRIGERATOR How to use the refrigerator with a cutting-edge and user-friendly electronic temperature control located on the left...
Owners Manual
Page 12
... water line, turn off the ice maker, lift open the ice maker door, flip the switch to use paper towels, scouring pads, or other . Wipe up the ice in cold water, drain and trim or tear off the water supply to the Off (arm up) position. Unplug refrigerator or disconnect power. 2. Wash painted metal exteriors with a soft cloth. 4. Hand wash, rinse, and dry removable parts and interior surfaces thoroughly. Dry thoroughly with a clean...
... water line, turn off the ice maker, lift open the ice maker door, flip the switch to use paper towels, scouring pads, or other . Wipe up the ice in cold water, drain and trim or tear off the water supply to the Off (arm up) position. Unplug refrigerator or disconnect power. 2. Wash painted metal exteriors with a soft cloth. 4. Hand wash, rinse, and dry removable parts and interior surfaces thoroughly. Dry thoroughly with a clean...
Owners Manual
Page 14
... the Temperature Control(s) are dirty or sticky - Energy efficient refrigerators run even longer if the room is warm, a large food load is added, the door is blocked open - valves opening or closing ■■ Pulsating - Remove ice from items placed on model) is ■■ Gaskets are set correctly for the ice maker to our cold water supply can decrease water pressure - Straighten the water source line. ■■ A reverse osmosis water filtration system connected to make new ice...
... the Temperature Control(s) are dirty or sticky - Energy efficient refrigerators run even longer if the room is warm, a large food load is added, the door is blocked open - valves opening or closing ■■ Pulsating - Remove ice from items placed on model) is ■■ Gaskets are set correctly for the ice maker to our cold water supply can decrease water pressure - Straighten the water source line. ■■ A reverse osmosis water filtration system connected to make new ice...


