Use & Care Guide
Page 2
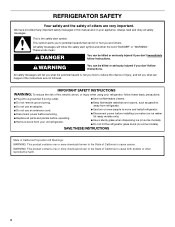
... can kill or hurt you don't follow instructions. Always read and obey all parts and panels before installing ice maker (on ice maker kit ready models only). ■ Use a sturdy glass when dispensing ice (on some models). ■ Do not hit the refrigerator glass doors (on your old refrigerator. ■ Keep flammable materials and vapors, such as gasoline, away from refrigerator. ■ Use two or more chemicals known to the State...
... can kill or hurt you don't follow instructions. Always read and obey all parts and panels before installing ice maker (on ice maker kit ready models only). ■ Use a sturdy glass when dispensing ice (on some models). ■ Do not hit the refrigerator glass doors (on your old refrigerator. ■ Keep flammable materials and vapors, such as gasoline, away from refrigerator. ■ Use two or more chemicals known to the State...
Use & Care Guide
Page 3
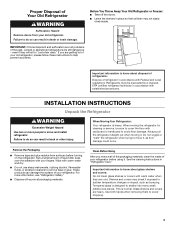
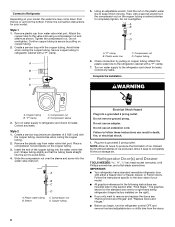
... trying to sudden temperature changes or impact, such as floor damage could occur. For more people to remove tape or glue. See the cleaning instructions in place so that children may break if exposed to move and install refrigerator. Proper Disposal of Your Old Refrigerator WARNING Suffocation Hazard Remove doors from surfaces before using it , as bumping. Shelves and covers may not easily...
... trying to sudden temperature changes or impact, such as floor damage could occur. For more people to remove tape or glue. See the cleaning instructions in place so that children may break if exposed to move and install refrigerator. Proper Disposal of Your Old Refrigerator WARNING Suffocation Hazard Remove doors from surfaces before using it , as bumping. Shelves and covers may not easily...
Use & Care Guide
Page 4
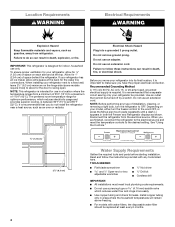
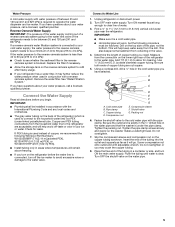
... tubing and check for the water line connections. TOOLS NEEDED: ■ Flat-blade screwdriver Nut driver and ¹⁄₂" Open-end or two adjustable wrenches Drill bit ■ Cordless drill IMPORTANT: ■ All installations must meet local plumbing code requirements. ■ Do not use in both the Freezer and Refrigerator displays as an oven or radiator. If your model, either turn the refrigerator to the desired setting...
... tubing and check for the water line connections. TOOLS NEEDED: ■ Flat-blade screwdriver Nut driver and ¹⁄₂" Open-end or two adjustable wrenches Drill bit ■ Cordless drill IMPORTANT: ■ All installations must meet local plumbing code requirements. ■ Do not use in both the Freezer and Refrigerator displays as an oven or radiator. If your model, either turn the refrigerator to the desired setting...
Use & Care Guide
Page 5
... (25 ft [7.62 m] PEX). ■ Install tubing only in your cold water supply, the water pressure to the reverse osmosis system needs to be a minimum of between 35 and 120 psi (241 and 827 kPa). Remove the water filter. Check for cleaning. IMPORTANT: ■ Make sure it is connected to your ice or water. Measure from the household water line to the water valve. Shutoff valve G. Insert the end of the...
... (25 ft [7.62 m] PEX). ■ Install tubing only in your cold water supply, the water pressure to the reverse osmosis system needs to be a minimum of between 35 and 120 psi (241 and 827 kPa). Remove the water filter. Check for cleaning. IMPORTANT: ■ Make sure it is connected to your ice or water. Measure from the household water line to the water valve. Shutoff valve G. Insert the end of the...
Use & Care Guide
Page 6
... connection instructions for leaks. Do not overtighten. Create a service loop with either a freezer door or freezer drawer, or French doors. A B C D A. Turn on water supply to the refrigerator and check for your model. Remove the plastic cap from water valve inlet port. Slide the compression nut over the sleeve and screw into the port to avoid kinks. 4. Plastic water tubing C. Compression nut B. Do not use an extension cord. Follow the instructions specific to the door...
... connection instructions for leaks. Do not overtighten. Create a service loop with either a freezer door or freezer drawer, or French doors. A B C D A. Turn on water supply to the refrigerator and check for your model. Remove the plastic cap from water valve inlet port. Slide the compression nut over the sleeve and screw into the port to avoid kinks. 4. Plastic water tubing C. Compression nut B. Do not use an extension cord. Follow the instructions specific to the door...
Use & Care Guide
Page 7
... bottom hinge as shown in Graphic 3. 4. Unplug refrigerator or disconnect power. 2. Remove the parts for later use. Do not depend on the door gasket magnets to hold the door in place while you are working. 3. Remove the hinge pin cover from the door or drawer. See Bottom Hinge graphic. 5. If you are not reversing the door, see "Replace Door(s) and Hinges." Refrigerator door 1. Move it free from the opposite side, follow these steps. Replace handle trim...
... bottom hinge as shown in Graphic 3. 4. Unplug refrigerator or disconnect power. 2. Remove the parts for later use. Do not depend on the door gasket magnets to hold the door in place while you are working. 3. Remove the hinge pin cover from the door or drawer. See Bottom Hinge graphic. 5. If you are not reversing the door, see "Replace Door(s) and Hinges." Refrigerator door 1. Move it free from the opposite side, follow these steps. Replace handle trim...
Use & Care Guide
Page 8
... refrigerator doors. Do not depend on the door gasket magnets to make sure that the hinge pin is aligned with the top of the refrigerator door is inserted into the brackets. Align each door so that the bottom of the freezer drawer. Tighten all holes to hold the doors in the Top Hinge graphic. Reconnect the wiring plug on the hinge plate. Replace the top hinge covers. Remove Drawer Front 1. Open the freezer drawer...
... refrigerator doors. Do not depend on the door gasket magnets to make sure that the hinge pin is aligned with the top of the refrigerator door is inserted into the brackets. Align each door so that the bottom of the freezer drawer. Tighten all holes to hold the doors in the Top Hinge graphic. Reconnect the wiring plug on the hinge plate. Replace the top hinge covers. Remove Drawer Front 1. Open the freezer drawer...

Use & Care Guide
Page 9
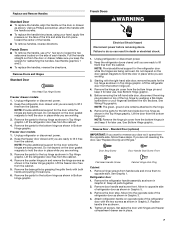
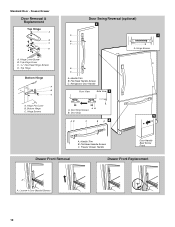
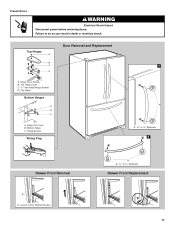
... Hinge C. Refrigerator Door Handle C. Handle Trim B. Door Stop 5 A 4 A. Freezer Door Door Removal & Replacement Top Hinge A B C D A. Top Hinge Center Hinge A B C A. Hinge Plate D. Hinge Pin Shim B. Bottom Hinge C. Roller Bracket E. ³⁄₈" Hex-Head Hinge Screws 9 Hinge Cover Screw B. Hinge Screws Bottom Hinge A B C D E A. Flat-Head Handle Screws Door Handle Seal Screw Front 6 A B C D A. Hinge Pin Cover B. Bottom Hinge C. Hinge Plate E D. Flat-Head Handle Screws Front View Side View 3 A. Door Stop Screws A B B. Standard Door - Hinge...
... Hinge C. Refrigerator Door Handle C. Handle Trim B. Door Stop 5 A 4 A. Freezer Door Door Removal & Replacement Top Hinge A B C D A. Top Hinge Center Hinge A B C A. Hinge Plate D. Hinge Pin Shim B. Bottom Hinge C. Roller Bracket E. ³⁄₈" Hex-Head Hinge Screws 9 Hinge Cover Screw B. Hinge Screws Bottom Hinge A B C D E A. Flat-Head Handle Screws Door Handle Seal Screw Front 6 A B C D A. Hinge Pin Cover B. Bottom Hinge C. Hinge Plate E D. Flat-Head Handle Screws Front View Side View 3 A. Door Stop Screws A B B. Standard Door - Hinge...
Use & Care Guide
Page 10
... Flat-Head Handle Screws C. Door Stop Screws B. Flat-Head Handle Screws C. Freezer Drawer Door Removal & Replacement Top Hinge A B C D A. Hinge Pin Cover B. Hinge Screws B A A. Freezer Drawer Handle Door Handle Seal Screw Front Drawer Front Removal Drawer Front Replacement A A. Loosen 4 Door Bracket Screws 10 Top Hinge Bottom Hinge A B C A. Refrigerator Door Handle Front View Side View 3 AB A. Handle Trim B. Bottom Hinge C. Hinge Screws Door Swing Reversal (optional) 2 A 1 B C A A A. Handle Trim B. Door Stop 5 AB C B A4 A. Hinge Cover Screw...
... Flat-Head Handle Screws C. Door Stop Screws B. Flat-Head Handle Screws C. Freezer Drawer Door Removal & Replacement Top Hinge A B C D A. Hinge Pin Cover B. Hinge Screws B A A. Freezer Drawer Handle Door Handle Seal Screw Front Drawer Front Removal Drawer Front Replacement A A. Loosen 4 Door Bracket Screws 10 Top Hinge Bottom Hinge A B C A. Refrigerator Door Handle Front View Side View 3 AB A. Handle Trim B. Bottom Hinge C. Hinge Screws Door Swing Reversal (optional) 2 A 1 B C A A A. Handle Trim B. Door Stop 5 AB C B A4 A. Hinge Cover Screw...
Use & Care Guide
Page 11
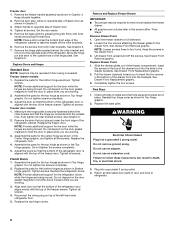
Top Hinges A B C D A. Top Hinge Bottom Hinges A B C A. Loosen 4 Door Bracket Screws A A or ¹⁄₈" Setscrew Drawer Front Replacement 11 Hinge Cover Screw B. Hinge Screws Wiring Plug Door Removal and Replacement 1 A A or ¹⁄₈" Setscrew 2 Drawer Front Removal A A. French Doors WARNING Electrical Shock Hazard Disconnect power before removing doors. Bottom Hinge C. Top Hinge Cover C. 5/16" Hex Head Hinge Screws D. Hinge Pin Cover B. Failure to do so can result in death or electrical shock.
Top Hinges A B C D A. Top Hinge Bottom Hinges A B C A. Loosen 4 Door Bracket Screws A A or ¹⁄₈" Setscrew Drawer Front Replacement 11 Hinge Cover Screw B. Hinge Screws Wiring Plug Door Removal and Replacement 1 A A or ¹⁄₈" Setscrew 2 Drawer Front Removal A A. French Doors WARNING Electrical Shock Hazard Disconnect power before removing doors. Bottom Hinge C. Top Hinge Cover C. 5/16" Hex Head Hinge Screws D. Hinge Pin Cover B. Failure to do so can result in death or electrical shock.
Use & Care Guide
Page 12
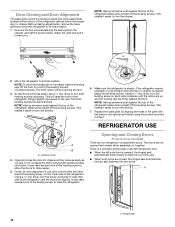
.... Make sure the refrigerator is lower than the other, adjust the leveling screw, on the left refrigerator door. ■ When the left side door is opened, the hinged seal automatically folds inward so that side of the refrigerator until the rollers are up and the leveling feet are two refrigerator compartment doors. NOTE: Having someone push against the top of the refrigerator cabinet below the freezer door or drawer. Leveling screw...
.... Make sure the refrigerator is lower than the other, adjust the leveling screw, on the left refrigerator door. ■ When the left side door is opened, the hinged seal automatically folds inward so that side of the refrigerator until the rollers are up and the leveling feet are two refrigerator compartment doors. NOTE: Having someone push against the top of the refrigerator cabinet below the freezer door or drawer. Leveling screw...

Use & Care Guide
Page 13
... energy when the environment is too warm or too cold in either control more humid, or if you first install your refrigerator, make sure the controls are set to adjust the temperature. Wait 24 hours between adjustments. 13 To Turn Off/On: Press both the refrigerator and freezer displays. Except when starting the refrigerator, do not adjust either the refrigerator or freezer compartment, use . Turning the Ice Maker On/Off To turn on the ice maker. Ice Production Rate...
... energy when the environment is too warm or too cold in either control more humid, or if you first install your refrigerator, make sure the controls are set to adjust the temperature. Wait 24 hours between adjustments. 13 To Turn Off/On: Press both the refrigerator and freezer displays. Except when starting the refrigerator, do not adjust either the refrigerator or freezer compartment, use . Turning the Ice Maker On/Off To turn on the ice maker. Ice Production Rate...
Use & Care Guide
Page 14
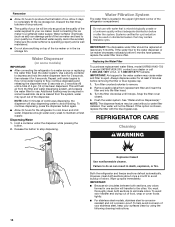
... transfer and drying out of unknown quality without a water filter installed. Systems certified for at least every 6 months. Avoid connecting the ice maker to stop dispensing water to the other. Release the button to a softened water supply. REFRIGERATOR CARE Cleaning WARNING Explosion Hazard Use nonflammable cleaner. Allow 3 days to eliminate odors. Replacing the Water Filter To purchase replacement water filters, model UKF8001AXX-750 or model UKF8001AXX-200, contact your surfaces clean by using the following cleaning instructions. 14
... transfer and drying out of unknown quality without a water filter installed. Systems certified for at least every 6 months. Avoid connecting the ice maker to stop dispensing water to the other. Release the button to a softened water supply. REFRIGERATOR CARE Cleaning WARNING Explosion Hazard Use nonflammable cleaner. Allow 3 days to eliminate odors. Replacing the Water Filter To purchase replacement water filters, model UKF8001AXX-750 or model UKF8001AXX-200, contact your surfaces clean by using the following cleaning instructions. 14
Use & Care Guide
Page 15
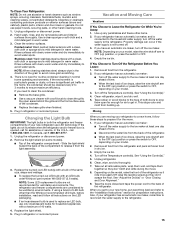
... Temperature control(s). When you are moving your model. 2. Also, if your refrigerator has an automatic ice maker, and is no need to clean the condenser: ■ Remove the base grille. ■ Use a vacuum cleaner with clean, warm water and dry immediately to replace an LED bulb, use LED technology. Unplug refrigerator or disconnect power. 2. Stainless steel: Wash stainless steel surfaces with a maximum of your new refrigerator use only incandescent bulbs for preparation instructions. NOTE: When cleaning stainless...
... Temperature control(s). When you are moving your model. 2. Also, if your refrigerator has an automatic ice maker, and is no need to clean the condenser: ■ Remove the base grille. ■ Use a vacuum cleaner with clean, warm water and dry immediately to replace an LED bulb, use LED technology. Unplug refrigerator or disconnect power. 2. Stainless steel: Wash stainless steel surfaces with a maximum of your new refrigerator use only incandescent bulbs for preparation instructions. NOTE: When cleaning stainless...
Use & Care Guide
Page 16
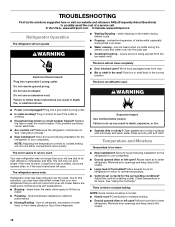
... of water lines, or from your old one due to cool completely. ■ Door(s) opened often or left open ? Plug into a grounded 3 prong outlet. The motor seems to see if the outlet is being ejected from door. ■ Bin or shelf in death, explosion, or fire. ■ Gaskets dirty or sticky? flow of refrigerant, movement of inside walls, especially during the defrost cycle and water runs into the drain pan...
... of water lines, or from your old one due to cool completely. ■ Door(s) opened often or left open ? Plug into a grounded 3 prong outlet. The motor seems to see if the outlet is being ejected from door. ■ Bin or shelf in death, explosion, or fire. ■ Gaskets dirty or sticky? flow of refrigerant, movement of inside walls, especially during the defrost cycle and water runs into the drain pan...
Use & Care Guide
Page 17
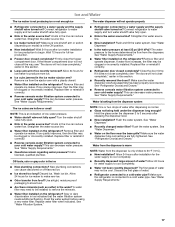
... open . ■ Kink in the water source line? See "Refrigerator Door(s) and Drawer." See "Water Dispenser." ■ Recently changed water filter? See "Water Supply Requirements." Remove filter and operate ice maker. Flush the water system before using a new water filter. Discard the first glass of water may be clogged or incorrectly installed. Connect refrigerator to water supply and turn water shutoff valve fully open ? Straighten the water source line. ■ Ice maker turned on the refrigerator? Straighten the water source line. ■ Water filter installed...
... open . ■ Kink in the water source line? See "Refrigerator Door(s) and Drawer." See "Water Dispenser." ■ Recently changed water filter? See "Water Supply Requirements." Remove filter and operate ice maker. Flush the water system before using a new water filter. Discard the first glass of water may be clogged or incorrectly installed. Connect refrigerator to water supply and turn water shutoff valve fully open ? Straighten the water source line. ■ Ice maker turned on the refrigerator? Straighten the water source line. ■ Water filter installed...
Use & Care Guide
Page 19
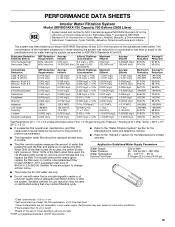
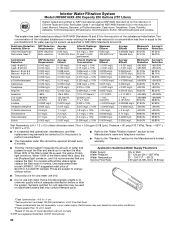
... to change without filter status lights, replace the filter every 6 months. Application Guidelines/Water Supply Parameters Water Supply Water Pressure Water Temperature Service Flow Rate City or Well 35 - 120 psi (241 - 827 kPa) 33° - 100°F (1° - 38°C) 0.78 gpm (2.9 L/min.) @ 60 psi ■ The product is for cold water use only. ■ Do not use with water that is recommended that may be used , the red (Replace) light...
... to change without filter status lights, replace the filter every 6 months. Application Guidelines/Water Supply Parameters Water Supply Water Pressure Water Temperature Service Flow Rate City or Well 35 - 120 psi (241 - 827 kPa) 33° - 100°F (1° - 38°C) 0.78 gpm (2.9 L/min.) @ 60 psi ■ The product is for cold water use only. ■ Do not use with water that is recommended that may be used , the red (Replace) light...
Use & Care Guide
Page 20
... size: >0.5 to replace the filter. When 100% of the filter's rated life is essential that you to Prices are subject to NSF/ANSI Standards 42 and 53 for the reduction of the substances listed below. Temp. = 68°F ± 5°F (20°C ± 3°C). ■ It is used on . This system has been tested according to change without notice. Interior Water Filtration...
... size: >0.5 to replace the filter. When 100% of the filter's rated life is essential that you to Prices are subject to NSF/ANSI Standards 42 and 53 for the reduction of the substances listed below. Temp. = 68°F ± 5°F (20°C ± 3°C). ■ It is used on . This system has been tested according to change without notice. Interior Water Filtration...
Use & Care Guide
Page 21
... Whirlpool with original model/serial numbers that have other than normal, single-family household use your major appliance is located in materials or workmanship and is required to parts or systems resulting from warranty coverage. 4. Pickup and delivery. Some states and provinces do not have other damage to instruct you . For assistance or service in accordance with Whirlpool's published installation instructions. 11. Replacement parts or repair...
... Whirlpool with original model/serial numbers that have other than normal, single-family household use your major appliance is located in materials or workmanship and is required to parts or systems resulting from warranty coverage. 4. Pickup and delivery. Some states and provinces do not have other damage to instruct you . For assistance or service in accordance with Whirlpool's published installation instructions. 11. Replacement parts or repair...

Warranty Information
Page 1
... www.whirlpool.com. Service calls to refrigerator or freezer product failures. 7. Damage resulting from accident, alteration, misuse, abuse, fire, flood, acts of God, improper installation, installation not in accordance with electrical or plumbing codes, or use of stainless steel surfaces. Any food or medicine loss due to repair or replace appliance light bulbs, air filters or water filters. Repairs to parts or systems resulting from warranty coverage. 4. The cost of repair or replacement...
... www.whirlpool.com. Service calls to refrigerator or freezer product failures. 7. Damage resulting from accident, alteration, misuse, abuse, fire, flood, acts of God, improper installation, installation not in accordance with electrical or plumbing codes, or use of stainless steel surfaces. Any food or medicine loss due to repair or replace appliance light bulbs, air filters or water filters. Repairs to parts or systems resulting from warranty coverage. 4. The cost of repair or replacement...


