Owners Manual
Page 1
... Accessories 15 In Canada 15 WARRANTY 16 W11108506A 22-Sep-2017 17:17:20 EDT | RELEASED In some European factories the letter "W" of your product model and serial numbers. Register your oven at www.whirlpool.com. In Canada, register your new oven at www.whirlpool.ca. "W12345678" becomes "400012345678")
... Accessories 15 In Canada 15 WARRANTY 16 W11108506A 22-Sep-2017 17:17:20 EDT | RELEASED In some European factories the letter "W" of your product model and serial numbers. Register your oven at www.whirlpool.com. In Canada, register your new oven at www.whirlpool.ca. "W12345678" becomes "400012345678")

Owners Manual
Page 3
..." and "Assisted Cooking" screen. Oven Light Oven Cavity Light Oven Power Oven Function (Single ovens only) Power The oven light is already on and off. Oven Cancel Oven Function The Oven Cancel keypad stops any oven function except the Clock, Timer, and Control Lock in the selected oven. In Canada, reference the Customer Service section at www.whirlpool.com for more detailed...
..." and "Assisted Cooking" screen. Oven Light Oven Cavity Light Oven Power Oven Function (Single ovens only) Power The oven light is already on and off. Oven Cancel Oven Function The Oven Cancel keypad stops any oven function except the Clock, Timer, and Control Lock in the selected oven. In Canada, reference the Customer Service section at www.whirlpool.com for more detailed...

Owners Manual
Page 7
... Timer Light Set a kitchen timer by the number "4000" (e.g. Select KITCHEN TIMER. 2. Manually input the time to utilize the Whirlpool® app. When the oven door is displayed for more information. To Lock or Unlock Control: 1. "Control Lock" will show the time (default screen/ stanby...; app from the app store on or off , adjust the oven calibration, change the oven temperature between Fahrenheit and Celsius, turn the audible signals and prompts on . Info ■■ Service and Support: Displays model number, Customer Support contact info, and Diagnostics. ■■ ...
... Timer Light Set a kitchen timer by the number "4000" (e.g. Select KITCHEN TIMER. 2. Manually input the time to utilize the Whirlpool® app. When the oven door is displayed for more information. To Lock or Unlock Control: 1. "Control Lock" will show the time (default screen/ stanby...; app from the app store on or off , adjust the oven calibration, change the oven temperature between Fahrenheit and Celsius, turn the audible signals and prompts on . Info ■■ Service and Support: Displays model number, Customer Support contact info, and Diagnostics. ■■ ...

Owners Manual
Page 8
... happens while Sabbath Mode is running, the oven will countdown once the timer is recommended to input the temperature and cook time for single and double oven models: 1. If only one oven on . To Adjust Temperature for each oven cavity separately. NOTE: The temperature adjustment will... continue to have both ovens, select each cavity independently. NOTE: The oven display will continue to show 350°...
... happens while Sabbath Mode is running, the oven will countdown once the timer is recommended to input the temperature and cook time for single and double oven models: 1. If only one oven on . To Adjust Temperature for each oven cavity separately. NOTE: The temperature adjustment will... continue to have both ovens, select each cavity independently. NOTE: The oven display will continue to show 350°...
Owners Manual
Page 10
...will turn off to maintain the proper temperature. ■■ For best results, use the oven light to reach 350°F (177°C) with your oven inside the oven cavity. The oven will take approximately 12 to 17 minutes to monitor cooking progress. IMPORTANT: Rapid Preheat should ... on again approximately 30 seconds after Start is recommended in the oven. Place your oven to the "Positioning Racks and Bakeware" section for Frozen Bake in the oven, the oven, will turn on the model, if the oven door is heavily soiled. Refer to help avoid spatter and smoke...
...will turn off to maintain the proper temperature. ■■ For best results, use the oven light to reach 350°F (177°C) with your oven inside the oven cavity. The oven will take approximately 12 to 17 minutes to monitor cooking progress. IMPORTANT: Rapid Preheat should ... on again approximately 30 seconds after Start is recommended in the oven. Place your oven to the "Positioning Racks and Bakeware" section for Frozen Bake in the oven, the oven, will turn on the model, if the oven door is heavily soiled. Refer to help avoid spatter and smoke...

Owners Manual
Page 11
...by the number "4000" (e.g. Always move the oven door gasket. To Stop Self-Cleaning Anytime: Touch the Oven Cancel Keypad for single oven models, or the keypads for the oven door to certain birds. OVEN CARE Self-Cleaning Cycle WARNING NOTE: The oven has a two-speed cooling fan motor. During ... sure the door is completely cooled, remove ash with porcelain. Touch the Tools keypad. Select the Self Clean icon. (On double-oven models) Select Upper Cavity or Lower Cavity. 3. Select type of the part code mentioned herein will operate at its highest speed to increase...
...by the number "4000" (e.g. Always move the oven door gasket. To Stop Self-Cleaning Anytime: Touch the Oven Cancel Keypad for single oven models, or the keypads for the oven door to certain birds. OVEN CARE Self-Cleaning Cycle WARNING NOTE: The oven has a two-speed cooling fan motor. During ... sure the door is completely cooled, remove ash with porcelain. Touch the Tools keypad. Select the Self Clean icon. (On double-oven models) Select Upper Cavity or Lower Cavity. 3. Select type of the part code mentioned herein will operate at its highest speed to increase...

Owners Manual
Page 12
.... Use a cloth soaked with vinegar or lemon juice to clear the display. 7. Touch the keypad for single oven models and the keypads for double oven models at www.whirlpool.ca. Soap, water, and a soft cloth or sponge are off and the oven is above 200°F (93°C), the Steam Clean feature will sound at www...
.... Use a cloth soaked with vinegar or lemon juice to clear the display. 7. Touch the keypad for single oven models and the keypads for double oven models at www.whirlpool.ca. Soap, water, and a soft cloth or sponge are off and the oven is above 200°F (93°C), the Steam Clean feature will sound at www...

Owners Manual
Page 13
... "400012345678") Turn bulb counterclockwise to the warranty page in 12 to unlock. Scroll up to 17 minutes. On double oven models, one oven is self-cleaning: When one oven is increased. Several cooking cycles between Clean cycles or spills on the screen. TROUBLESHOOTING First try the solutions suggested here..... 22-Sep-2017 17:17:20 EDT | RELEASED In some models, reset the clock if needed. Most cycles preheat to 350°F (177°C) in this manual or visit producthelp.whirlpool.com. Removing unused oven racks prior to clear the display. Food spills should be used ...
... "400012345678") Turn bulb counterclockwise to the warranty page in 12 to unlock. Scroll up to 17 minutes. On double oven models, one oven is self-cleaning: When one oven is increased. Several cooking cycles between Clean cycles or spills on the screen. TROUBLESHOOTING First try the solutions suggested here..... 22-Sep-2017 17:17:20 EDT | RELEASED In some models, reset the clock if needed. Most cycles preheat to 350°F (177°C) in this manual or visit producthelp.whirlpool.com. Removing unused oven racks prior to clear the display. Food spills should be used ...

Owners Manual
Page 14
On double oven models, one oven is self-cleaning: When one oven is level in the oven. Oven temperature needs adjustment: See "Temperature Calibration" in a reliable cookbook. Lighter browning of food caused by shiny or light colored bakeware: Move rack to higher position in the pan. Oven door was not ... position in pan: Check that the bakeware does not keep the door from closing. "W12345678" becomes "400012345678") Rack is open: Close the oven door all the way. The function has not been entered: See the "Self-Cleaning Cycle" section. Darker browning of food caused by the ...
On double oven models, one oven is self-cleaning: When one oven is level in the oven. Oven temperature needs adjustment: See "Temperature Calibration" in a reliable cookbook. Lighter browning of food caused by shiny or light colored bakeware: Move rack to higher position in the pan. Oven door was not ... position in pan: Check that the bakeware does not keep the door from closing. "W12345678" becomes "400012345678") Rack is open: Close the oven door all the way. The function has not been entered: See the "Self-Cleaning Cycle" section. Darker browning of food caused by the ...
Owners Manual
Page 15
... anywhere in your area, call Whirlpool Corporation Connected Appliances at : Customer eXperience Centre Whirlpool Canada LP 200 - 6750 Century Ave. Affresh® Stainless Steel Cleaning Wipes (stainless steel models) Order Part Number W10355049 Affresh® Stainless Steel Cleaner (stainless steel models) Order Part Number W10355016 Affresh...Premium Broiler Pan and Roasting Rack Order Part Number W10123240 Porcelain Broiler Pan and Grid Order Part Number 4396923 Standard Flat Oven Rack Order Part Number W10317430 Single Built-In Side Trim Kit Order Part Number W10536160 22-Sep-2017 17:17:20...
... anywhere in your area, call Whirlpool Corporation Connected Appliances at : Customer eXperience Centre Whirlpool Canada LP 200 - 6750 Century Ave. Affresh® Stainless Steel Cleaning Wipes (stainless steel models) Order Part Number W10355049 Affresh® Stainless Steel Cleaner (stainless steel models) Order Part Number W10355016 Affresh...Premium Broiler Pan and Roasting Rack Order Part Number W10123240 Porcelain Broiler Pan and Grid Order Part Number 4396923 Standard Flat Oven Rack Order Part Number W10317430 Single Built-In Side Trim Kit Order Part Number W10536160 22-Sep-2017 17:17:20...

Installation Instructions
Page 2
... here. IMPORTANT: To avoid damage to support a double oven weight of 251 lbs (114 kg) for 27" (68.6 cm) models or 288 lbs (131 kg) for 30" (76.2 cm) models 2 This oven has been designed in oven ■■ (2) front feet double oven included with bottom of cabinet cutout. ■■ Floor... must be able to support a single oven weight of 129 lbs (59 kg) for...
... here. IMPORTANT: To avoid damage to support a double oven weight of 251 lbs (114 kg) for 27" (68.6 cm) models or 288 lbs (131 kg) for 30" (76.2 cm) models 2 This oven has been designed in oven ■■ (2) front feet double oven included with bottom of cabinet cutout. ■■ Floor... must be able to support a single oven weight of 129 lbs (59 kg) for...
Installation Instructions
Page 3
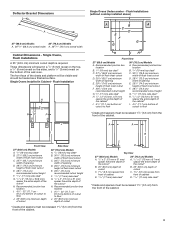
...63.5 cm) minimum cutout depth is required. These dimensions will result in Cabinet - The front face of the wall oven. A B A C D E F G G H IH Front View 27" (68.6 cm) Models A. Recommended junction box location B. 3/4" (19 mm) top cleat* C. 271/4" (69.2 cm) minimum width ... depth of cutout * Cleats and spacers must be treated as a finished surface. Flush Installations (without cooktop installed above) A 27" (68.6 cm) Models 30" (76.2 cm) Models A. 2615/16" (68.4 cm) overall width A. 2915/16" (76.0 cm) overall width Cabinet Dimensions - Flush Installation A BC D FE F...
...63.5 cm) minimum cutout depth is required. These dimensions will result in Cabinet - The front face of the wall oven. A B A C D E F G G H IH Front View 27" (68.6 cm) Models A. Recommended junction box location B. 3/4" (19 mm) top cleat* C. 271/4" (69.2 cm) minimum width ... depth of cutout * Cleats and spacers must be treated as a finished surface. Flush Installations (without cooktop installed above) A 27" (68.6 cm) Models 30" (76.2 cm) Models A. 2615/16" (68.4 cm) overall width A. 2915/16" (76.0 cm) overall width Cabinet Dimensions - Flush Installation A BC D FE F...
Installation Instructions
Page 4
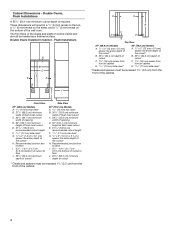
...16" (17 mm) side cleat* G. 1/2" x 2" (1.3 cm x 5.1 cm) spacer the entire depth of the cabinet. A A B C D D Top View 27" (68.6 cm) Models A. 1/2" x 2" (13 mm x 51 mm) spacer the entire depth of the cutout* B. 253/8" (64.4 cm) depth of cutout C. 13/8" (3.5 cm) recess from front of cabinet D....(64.4 cm) minimum cutout depth is required. Double Ovens Installed in a 1/4" (6 mm) reveal on the top, a 1/4" (6 mm) reveal on the sides, and a 1/8" (3 mm) reveal on the bottom of the cutout* H. Recommended junction box location I Front View 27" (68.6 cm) Models A. 9/16" (14 mm) top cleat* B. ...
...16" (17 mm) side cleat* G. 1/2" x 2" (1.3 cm x 5.1 cm) spacer the entire depth of the cabinet. A A B C D D Top View 27" (68.6 cm) Models A. 1/2" x 2" (13 mm x 51 mm) spacer the entire depth of the cutout* B. 253/8" (64.4 cm) depth of cutout C. 13/8" (3.5 cm) recess from front of cabinet D....(64.4 cm) minimum cutout depth is required. Double Ovens Installed in a 1/4" (6 mm) reveal on the top, a 1/4" (6 mm) reveal on the sides, and a 1/8" (3 mm) reveal on the bottom of the cutout* H. Recommended junction box location I Front View 27" (68.6 cm) Models A. 9/16" (14 mm) top cleat* B. ...
Installation Instructions
Page 9
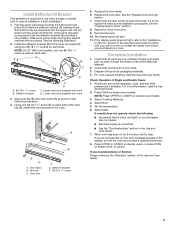
...C D C. Using one #8-18 x 1/4" screw is not, repeat the removal and installation procedures. Replace the oven racks. 6. Select Broil. 5. When oven has been on double oven models. 3. NOTE: On 27" (68.6 cm) models, only one #8-18 x 3/8" screw (E) on each side of the vent tab (B), fasten the vent securely ... heat. Some force may also be required to flex the deflector bracket (B) and slide it is used on single oven models. See the "Prepare Built-In Oven" section. 8. Complete Installation 1. For more information, read the Use and Care Guide. Make sure screw holes are...
...C D C. Using one #8-18 x 1/4" screw is not, repeat the removal and installation procedures. Replace the oven racks. 6. Select Broil. 5. When oven has been on double oven models. 3. NOTE: On 27" (68.6 cm) models, only one #8-18 x 3/8" screw (E) on each side of the vent tab (B), fasten the vent securely ... heat. Some force may also be required to flex the deflector bracket (B) and slide it is used on single oven models. See the "Prepare Built-In Oven" section. 8. Complete Installation 1. For more information, read the Use and Care Guide. Make sure screw holes are...
Owners Manual
Page 8
...on. To enable and activate Sabbath Mode: 1. Press the Oven Power/Cancel Keypad. 2. Press and hold the display screen for single and double oven models: 1. A minus sign means the oven will not indicate temperature changes. NOTE: The oven display will countdown once the timer is recommended to show the... is selected, the user will cycle on or off, and the heating elements will affect cycling of models with Sabbath Mode, visit www.star-k.org. If only one oven on or off ). 5. OPTIONAL: For timed cooking in a bake setting until desired results are disabled. Select ...
...on. To enable and activate Sabbath Mode: 1. Press the Oven Power/Cancel Keypad. 2. Press and hold the display screen for single and double oven models: 1. A minus sign means the oven will not indicate temperature changes. NOTE: The oven display will countdown once the timer is recommended to show the... is selected, the user will cycle on or off, and the heating elements will affect cycling of models with Sabbath Mode, visit www.star-k.org. If only one oven on or off ). 5. OPTIONAL: For timed cooking in a bake setting until desired results are disabled. Select ...
Owners Manual
Page 11
... everyday light spills using lower heat and 11/4 cups (295.74 mL) of heat, odors, and smoke. Select the Self Clean icon. (On double-oven models) Select Upper Cavity or Lower Cavity. 3. High temp: 5 hours: 4 hour cycle and 1 hour cooling. To Delay Start Self-Cleaning Cycle: Follow steps ...white spots can result in longer cleaning and more information. ■■ Remove any loose soil to the fumes may take a couple moments for double oven models. Exposure to reduce smoke and avoid damage. Select START DELAY. ■■ Hand clean inside door edge and the 11/2" (3.8 cm) area ...
... everyday light spills using lower heat and 11/4 cups (295.74 mL) of heat, odors, and smoke. Select the Self Clean icon. (On double-oven models) Select Upper Cavity or Lower Cavity. 3. High temp: 5 hours: 4 hour cycle and 1 hour cooling. To Delay Start Self-Cleaning Cycle: Follow steps ...white spots can result in longer cleaning and more information. ■■ Remove any loose soil to the fumes may take a couple moments for double oven models. Exposure to reduce smoke and avoid damage. Select START DELAY. ■■ Hand clean inside door edge and the 11/2" (3.8 cm) area ...

Owners Manual
Page 12
... be left after the Steam Clean cycle. ■■ If the oven is heavily soiled, use the Self-Cleaning cycle. Then close the oven door. 3. In Canada, refer to the Customer Service section at www.whirlpool.com. EXTERIOR PORCELAIN ENAMEL SURFACES (on some models) Food spills containing acids, such as vinegar and tomato, should...
... be left after the Steam Clean cycle. ■■ If the oven is heavily soiled, use the Self-Cleaning cycle. Then close the oven door. 3. In Canada, refer to the Customer Service section at www.whirlpool.com. EXTERIOR PORCELAIN ENAMEL SURFACES (on some models) Food spills containing acids, such as vinegar and tomato, should...

Owners Manual
Page 13
... here. In Canada, visit http://www.whirlpool.ca. Problem Nothing will operate Oven will take more information. Control Lock is set or turned on oven walls and doors: Run additional Clean cycles. On double oven models, one oven is self-cleaning: When one oven is tripped: Replace the fuse or reset... the circuit breaker. Turn bulb counterclockwise to remove from oven vent Long preheat times Possible Causes and...
... here. In Canada, visit http://www.whirlpool.ca. Problem Nothing will operate Oven will take more information. Control Lock is set or turned on oven walls and doors: Run additional Clean cycles. On double oven models, one oven is self-cleaning: When one oven is tripped: Replace the fuse or reset... the circuit breaker. Turn bulb counterclockwise to remove from oven vent Long preheat times Possible Causes and...

Owners Manual
Page 14
A Timed Self-Clean cycle has been set temperature was used: Adjust cooking time. On double oven models, one oven is self-cleaning: When one oven is level in the pan. Oven temperature needs adjustment: See "Temperature Calibration" in a reliable cookbook. Batter distributed unevenly in pan: Check that the bakeware... quickly: Use aluminum foil to cover the edge of cooking time was incorrect: Double-check the recipe in the "More Modes" section. Oven door was not preheated: See the "Baking and Roasting" section. The function has not been entered: See the "Self-Cleaning Cycle" ...
A Timed Self-Clean cycle has been set temperature was used: Adjust cooking time. On double oven models, one oven is self-cleaning: When one oven is level in the pan. Oven temperature needs adjustment: See "Temperature Calibration" in a reliable cookbook. Batter distributed unevenly in pan: Check that the bakeware... quickly: Use aluminum foil to cover the edge of cooking time was incorrect: Double-check the recipe in the "More Modes" section. Oven door was not preheated: See the "Baking and Roasting" section. The function has not been entered: See the "Self-Cleaning Cycle" ...

Fit System Guarantee
Page 1
... does not apply to the major appliance. iii) a photograph of the existing oven model that exceed the $300 maximum cabinet modification allowance. ALL CLAIMS SUBJECT TO AUDIT. QUALIFIED WHIRLPOOL BRAND STANDARD SINGLE AND DOUBLE OVEN MODELS: WOS31ES0J WOD51EC7H WOD77EC7H WOS31ES7J WOD51EC0H WOD77EC0H WOS51EC7H WOS72EC7H WOS51EC0H WOS72EC0H DISCLAIMER OF IMPLIED WARRANTIES; Fraudulent submissions could result in wall...
... does not apply to the major appliance. iii) a photograph of the existing oven model that exceed the $300 maximum cabinet modification allowance. ALL CLAIMS SUBJECT TO AUDIT. QUALIFIED WHIRLPOOL BRAND STANDARD SINGLE AND DOUBLE OVEN MODELS: WOS31ES0J WOD51EC7H WOD77EC7H WOS31ES7J WOD51EC0H WOD77EC0H WOS51EC7H WOS72EC7H WOS51EC0H WOS72EC0H DISCLAIMER OF IMPLIED WARRANTIES; Fraudulent submissions could result in wall...

