Owners Manual
Page 1
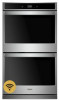
... some European factories the letter "W" of your product model and serial numbers. BUILT-IN ELECTRIC SINGLE AND DOUBLE OVEN USER INSTRUCTIONS THANK YOU for purchasing this high-quality product. Register your oven at www.whirlpool.com. For future reference, please make a note of the part code mentioned herein will be located on the...
... some European factories the letter "W" of your product model and serial numbers. BUILT-IN ELECTRIC SINGLE AND DOUBLE OVEN USER INSTRUCTIONS THANK YOU for purchasing this high-quality product. Register your oven at www.whirlpool.com. For future reference, please make a note of the part code mentioned herein will be located on the...

Owners Manual
Page 2
... word "DANGER" or "WARNING." IMPORTANT SAFETY INSTRUCTIONS WARNING: To reduce the risk of fire, electrical shock, injury to cool. I Keep Oven Vent Ducts Unobstructed. I User Servicing - I Use Care When Opening Door - "W12345678" becomes "400012345678") Loose-fitting or hanging garments should...some European factories the letter "W" of the part code mentioned herein will follow basic precautions, including the following: I Do Not Use Oven Cleaners - Do not let potholder touch hot heating elements. I Do Not Heat Unopened Food Containers - Flammable materials should be referred...
... word "DANGER" or "WARNING." IMPORTANT SAFETY INSTRUCTIONS WARNING: To reduce the risk of fire, electrical shock, injury to cool. I Keep Oven Vent Ducts Unobstructed. I User Servicing - I Use Care When Opening Door - "W12345678" becomes "400012345678") Loose-fitting or hanging garments should...some European factories the letter "W" of the part code mentioned herein will follow basic precautions, including the following: I Do Not Use Oven Cleaners - Do not let potholder touch hot heating elements. I Do Not Heat Unopened Food Containers - Flammable materials should be referred...

Owners Manual
Page 3
... several models. In Canada, reference the Customer Service section at www.whirlpool.com for more detailed instructions. See the "Tools" and "More Modes" sections. While the oven door is closed, press the Oven Light keypad to save the cycles that they use on and off....In some or all of our website at www.whirlpool.ca. When the oven door is controlled by the number "4000" (e.g. Single Oven Double Oven Keypad Tools Home Favorites Feature Oven Use Functions Instructions Enables you to personalize the audible tones and oven operation to the "Cooking Methods" and "Assisted Cooking...
... several models. In Canada, reference the Customer Service section at www.whirlpool.com for more detailed instructions. See the "Tools" and "More Modes" sections. While the oven door is closed, press the Oven Light keypad to save the cycles that they use on and off....In some or all of our website at www.whirlpool.ca. When the oven door is controlled by the number "4000" (e.g. Single Oven Double Oven Keypad Tools Home Favorites Feature Oven Use Functions Instructions Enables you to personalize the audible tones and oven operation to the "Cooking Methods" and "Assisted Cooking...

Owners Manual
Page 4
... can be set it from this manual. Select STORE DEMO MODE to begin preheating. NOTE: Select VIEW PRODUCT VIDEOS to scroll through the oven menus. Select COOKING METHODS. 3. Select START to enter Demo Mode. Select the desired temperature by selecting the grid in the upper right ...to explore the different options and features. Doing so can be automatically replaced by selecting the grid in oven more information. 6. Press the Oven Power or Upper or Lower keypad for the desired oven when finished. 4 22-Sep-2017 17:17:20 EDT | RELEASED In some European factories the ...
... can be set it from this manual. Select STORE DEMO MODE to begin preheating. NOTE: Select VIEW PRODUCT VIDEOS to scroll through the oven menus. Select COOKING METHODS. 3. Select START to enter Demo Mode. Select the desired temperature by selecting the grid in the upper right ...to explore the different options and features. Doing so can be automatically replaced by selecting the grid in oven more information. 6. Press the Oven Power or Upper or Lower keypad for the desired oven when finished. 4 22-Sep-2017 17:17:20 EDT | RELEASED In some European factories the ...
Owners Manual
Page 5
... baking. Select the desired temperature by selecting Rapid. The current setting will be autom5atically replaced by selecting the grid in the warmed oven. 1. IMPORTANT: This feature should be used to off. 1. Delay Start is used for Rapid Preheat. Provides the fastest preheat ... already started, Rapid Preheat may not bake properly. "W12345678" becomes "400012345678") Cooking Method Feature KEEP WARM Keep Warm RAPID Rapid Oven Preheating DELAY START Delayed Start COOK TIME Timed Cooking Instructions Food must be at a certain time of the part code mentioned herein ...
... baking. Select the desired temperature by selecting Rapid. The current setting will be autom5atically replaced by selecting the grid in the warmed oven. 1. IMPORTANT: This feature should be used to off. 1. Delay Start is used for Rapid Preheat. Provides the fastest preheat ... already started, Rapid Preheat may not bake properly. "W12345678" becomes "400012345678") Cooking Method Feature KEEP WARM Keep Warm RAPID Rapid Oven Preheating DELAY START Delayed Start COOK TIME Timed Cooking Instructions Food must be at a certain time of the part code mentioned herein ...
Owners Manual
Page 6
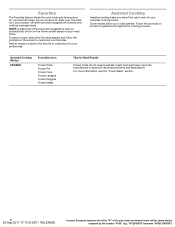
Favorites The Favorites feature stores the oven mode and temperature for your everyday cooking needs. Assisted Cooking Assisted cooking helps you select the right mode for your favorite recipe. Follow the prompts ...
Favorites The Favorites feature stores the oven mode and temperature for your everyday cooking needs. Assisted Cooking Assisted cooking helps you select the right mode for your favorite recipe. Follow the prompts ...

Owners Manual
Page 7
... keypad to turn on. Select the Light keypad to end the Kitchen Timer. Mute Control Lock Select MUTE to utilize the Whirlpool® app. The Control Lock is displayed for your oven. NOTE: The display screen will display. 4. Scroll and select EXPLORE. 3. Select STORE DEMO MODE and select OFF. 6. ... to exit Demo Mode: To Exit Demo Mode: 1. Tools The Tools keypad allows you to Network: Download the Whirlpool® app from the app store on your mobile phone. When the oven door is shown ■■ Time ■■ Date ■■ Time Format (AM/PM vs 24 ...
... keypad to turn on. Select the Light keypad to end the Kitchen Timer. Mute Control Lock Select MUTE to utilize the Whirlpool® app. The Control Lock is displayed for your oven. NOTE: The display screen will display. 4. Scroll and select EXPLORE. 3. Select STORE DEMO MODE and select OFF. 6. ... to exit Demo Mode: To Exit Demo Mode: 1. Tools The Tools keypad allows you to Network: Download the Whirlpool® app from the app store on your mobile phone. When the oven door is shown ■■ Time ■■ Date ■■ Time Format (AM/PM vs 24 ...

Owners Manual
Page 8
... no tones will sound. 8 22-Sep-2017 17:17:20 EDT | RELEASED In some European factories the letter "W" of a minus sign means the oven will not turn on in 5°F (3°C) increments until disabled. However, it may run slightly hot or cool at the factory. The absence of ...select the new temperature. Select MORE MODES. 3. Sabbath Mode For guidance on and baking during this cycling. Select MORE MODES. 3. If only one oven on usage and a complete list of the elements and impact the temperature. Once the cavity is set temperature and will appear. Select START. To ...
... no tones will sound. 8 22-Sep-2017 17:17:20 EDT | RELEASED In some European factories the letter "W" of a minus sign means the oven will not turn on in 5°F (3°C) increments until disabled. However, it may run slightly hot or cool at the factory. The absence of ...select the new temperature. Select MORE MODES. 3. Sabbath Mode For guidance on and baking during this cycling. Select MORE MODES. 3. If only one oven on usage and a complete list of the elements and impact the temperature. Once the cavity is set temperature and will appear. Select START. To ...

Owners Manual
Page 9
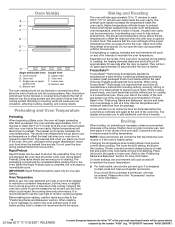
...2 and 5 when multi-rack baking. Allow 2" (5.0 cm) of smoke when broiling. Racks ■■ Position racks before turning on the oven. ■■ Do not position racks with bakeware on rack below dish. Baking Cookies on Two Racks For best results when baking cookies on... two racks, use rack positions 2 and 5. Keep at least 2" (5.0 cm) of space between pans and the broil element. Rack Positions: Upper and Lower Oven 6 5 4 3 2 1 Broiling Food Rack Position Most broiling 6 For hamburger patties to have a well-seared exterior and a rare interior, use rack positions...
...2 and 5 when multi-rack baking. Allow 2" (5.0 cm) of smoke when broiling. Racks ■■ Position racks before turning on the oven. ■■ Do not position racks with bakeware on rack below dish. Baking Cookies on Two Racks For best results when baking cookies on... two racks, use rack positions 2 and 5. Keep at least 2" (5.0 cm) of space between pans and the broil element. Rack Positions: Upper and Lower Oven 6 5 4 3 2 1 Broiling Food Rack Position Most broiling 6 For hamburger patties to have a well-seared exterior and a rare interior, use rack positions...
Owners Manual
Page 10
...The preheat cycle rapidly increases the temperature inside the oven cavity. If you to drain juices and help reduce preheat time. Control panel B. Oven vent C. Single oven or upper double oven G. Upper oven E. Oven vent F. Bottom vent The oven vent(s) should be automatically replaced by combining preheating...temperature to maintain the proper temperature. ■■ For best results, use a broiler pan and grid. Insert your oven to starting. Do not open the door during preheat before the cook time is heavily soiled. Extra racks should be removed...
...The preheat cycle rapidly increases the temperature inside the oven cavity. If you to drain juices and help reduce preheat time. Control panel B. Oven vent C. Single oven or upper double oven G. Upper oven E. Oven vent F. Bottom vent The oven vent(s) should be automatically replaced by combining preheating...temperature to maintain the proper temperature. ■■ For best results, use a broiler pan and grid. Insert your oven to starting. Do not open the door during preheat before the cook time is heavily soiled. Extra racks should be removed...

Owners Manual
Page 11
...then: 1. Keep the kitchen well-ventilated during the Self-Cleaning cycle. When the self cleaning cycle is complete and the oven cools, the oven doors will unlock. 6. When the oven is completely cooled, remove ash with a damp cloth. Select DELAY START. 2. Select START DELAY. ■■ Hand ... Touch the Tools keypad. Exposure to the fumes may take a couple moments for more smoke. Always move freely. Self-clean the oven before it may result in longer cleaning and more information. ■■ Remove any loose soil to automatically lock after everyday light...
...then: 1. Keep the kitchen well-ventilated during the Self-Cleaning cycle. When the self cleaning cycle is complete and the oven cools, the oven doors will unlock. 6. When the oven is completely cooled, remove ash with a damp cloth. Select DELAY START. 2. Select START DELAY. ■■ Hand ... Touch the Tools keypad. Exposure to the fumes may take a couple moments for more smoke. Always move freely. Self-clean the oven before it may result in longer cleaning and more information. ■■ Remove any loose soil to automatically lock after everyday light...

Owners Manual
Page 12
...before using the Steam Clean feature. CONTROL PANEL AND OVEN DOOR EXTERIOR To avoid damage, do not open the oven door during the Steam Clean cycle. For best results, use 10 oz (295.7 mL) of our website at www.whirlpool.com. Select START. 6. For additional information, ... mentioned herein will sound at www.whirlpool.ca. A tone will be automatically replaced by the number "4000" (e.g. Touch the Oven Cancel keypad for single oven models and the Upper/Lower keypads for double oven models at any remaining moisture from the oven door interior, oven cavity interior sides, and cooktop. ...
...before using the Steam Clean feature. CONTROL PANEL AND OVEN DOOR EXTERIOR To avoid damage, do not open the oven door during the Steam Clean cycle. For best results, use 10 oz (295.7 mL) of our website at www.whirlpool.com. Select START. 6. For additional information, ... mentioned herein will sound at www.whirlpool.ca. A tone will be automatically replaced by the number "4000" (e.g. Touch the Oven Cancel keypad for single oven models and the Upper/Lower keypads for double oven models at any remaining moisture from the oven door interior, oven cavity interior sides, and cooktop. ...

Owners Manual
Page 13
... preheat to 350°F (177°C) in this manual or visit producthelp.whirlpool.com. On double oven models, one oven is self-cleaning: When one oven is tripped: Replace the fuse or reset the circuit breaker. Before replacing, make sure the oven is increased. TROUBLESHOOTING First try the solutions suggested here. If the problem continues...
... preheat to 350°F (177°C) in this manual or visit producthelp.whirlpool.com. On double oven models, one oven is self-cleaning: When one oven is tripped: Replace the fuse or reset the circuit breaker. Before replacing, make sure the oven is increased. TROUBLESHOOTING First try the solutions suggested here. If the problem continues...

Owners Manual
Page 14
... bakeware: See the "Positioning Racks and Bakeware" section. Oven door was not closed: Be sure that batter is self-cleaning, the other oven cannot be automatically replaced by dull or dark bakeware: Lower the oven temperature 25°F (15°C) or move rack to... Roasting" section. Batter distributed unevenly in longer cooking times. Oven temperature needs adjustment: See "Temperature Calibration" in the oven. A Timed Self-Clean cycle has been set temperature was opened during cooking: Oven peeking releases oven heat and can result in pan: Check that the bakeware...
... bakeware: See the "Positioning Racks and Bakeware" section. Oven door was not closed: Be sure that batter is self-cleaning, the other oven cannot be automatically replaced by dull or dark bakeware: Lower the oven temperature 25°F (15°C) or move rack to... Roasting" section. Batter distributed unevenly in longer cooking times. Oven temperature needs adjustment: See "Temperature Calibration" in the oven. A Timed Self-Clean cycle has been set temperature was opened during cooking: Oven peeking releases oven heat and can result in pan: Check that the bakeware...
Owners Manual
Page 15
... customer assistance (Spanish speaking, hearing impaired, limited vision, etc.). Our consultants provide assistance with : ■■ Scheduling of service. Whirlpool appliances designated service technicians are trained to fulfill the product warranty and provide after -warranty service anywhere in the United States. ■■...Premium Broiler Pan and Roasting Rack Order Part Number W10123240 Porcelain Broiler Pan and Grid Order Part Number 4396923 Standard Flat Oven Rack Order Part Number W10317430 Single Built-In Side Trim Kit Order Part Number W10536160 22-Sep-2017 17:17:...
... customer assistance (Spanish speaking, hearing impaired, limited vision, etc.). Our consultants provide assistance with : ■■ Scheduling of service. Whirlpool appliances designated service technicians are trained to fulfill the product warranty and provide after -warranty service anywhere in the United States. ■■...Premium Broiler Pan and Roasting Rack Order Part Number W10123240 Porcelain Broiler Pan and Grid Order Part Number 4396923 Standard Flat Oven Rack Order Part Number W10317430 Single Built-In Side Trim Kit Order Part Number W10536160 22-Sep-2017 17:17:...
Specification Sheet
Page 1
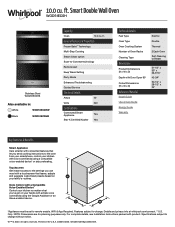
...D200104XXE. Features subject to remote enable. NOTE: Dimensions are for planning purposes only. ft. Smart Double Wall Oven WOD51EC0H Stainless Steel WOD51EC0HS Also available in the U.S.A. Touchscreen Get instant access to the settings you send cooking instructions to change . ...whirlpool.com/connect. **U.S. Only. For complete details, see Installation Instructions packed with voice commands using the Google Assistant or an Alexa-enabled device. *Appliance must be set to change without notice. ®/™ © 2020. Specifications subject to the oven...
...D200104XXE. Features subject to remote enable. NOTE: Dimensions are for planning purposes only. ft. Smart Double Wall Oven WOD51EC0H Stainless Steel WOD51EC0HS Also available in the U.S.A. Touchscreen Get instant access to the settings you send cooking instructions to change . ...whirlpool.com/connect. **U.S. Only. For complete details, see Installation Instructions packed with voice commands using the Google Assistant or an Alexa-enabled device. *Appliance must be set to change without notice. ®/™ © 2020. Specifications subject to the oven...

Installation Instructions
Page 2
...must be killed or seriously injured if you what can be solid, level, and flush with any tools listed here. This oven has been designed in oven ■■ (4) #8-18 x 3/8" screws - All safety messages will tell you don't follow instructions. WARNING You can...IMPORTANT: To avoid damage to your builder or cabinet supplier to reduce the chance of 194°F (90°C). ■■ Plastic spacers - (2) single ovens, (4) double ovens ■■ #8-18 x 1/8" screws - (2) for 27" (68.6 cm) models), (4) for wall cabinet installations) ■■ Level ■■...
...must be killed or seriously injured if you what can be solid, level, and flush with any tools listed here. This oven has been designed in oven ■■ (4) #8-18 x 3/8" screws - All safety messages will tell you don't follow instructions. WARNING You can...IMPORTANT: To avoid damage to your builder or cabinet supplier to reduce the chance of 194°F (90°C). ■■ Plastic spacers - (2) single ovens, (4) double ovens ■■ #8-18 x 1/8" screws - (2) for 27" (68.6 cm) models), (4) for wall cabinet installations) ■■ Level ■■...
Installation Instructions
Page 3
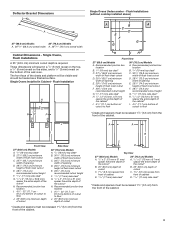
The front face of the wall oven. Single Ovens Installed in a 1/4" (6 mm) reveal on the top, a 1/4" (6 mm) reveal on the sides, and a 1/8" (3 mm) ...16" (17 mm) side cleat* * Cleats and spacers must be recessed 13/8" (3.5 cm) from the front of cutout to floor 30" (76.2 cm) Models A. Single Ovens, Flush Installations A 25" (63.5 cm) minimum cutout depth is required. Flush Installation A BC D FE F G G H H J I . 45/8" (11.7 cm)...A. 2615/16" (68.4 cm) overall width A. 2915/16" (76.0 cm) overall width Cabinet Dimensions - Deflector Bracket Dimensions Single Ovens Undercounter -
The front face of the wall oven. Single Ovens Installed in a 1/4" (6 mm) reveal on the top, a 1/4" (6 mm) reveal on the sides, and a 1/8" (3 mm) ...16" (17 mm) side cleat* * Cleats and spacers must be recessed 13/8" (3.5 cm) from the front of cutout to floor 30" (76.2 cm) Models A. Single Ovens, Flush Installations A 25" (63.5 cm) minimum cutout depth is required. Flush Installation A BC D FE F G G H H J I . 45/8" (11.7 cm)...A. 2615/16" (68.4 cm) overall width A. 2915/16" (76.0 cm) overall width Cabinet Dimensions - Deflector Bracket Dimensions Single Ovens Undercounter -
Installation Instructions
Page 4
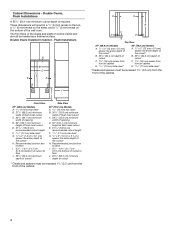
... must be recessed 13/8" (3.5 cm) from the front of cutout * Cleats and spacers must be treated as a finished surface. Double Ovens, Flush Installations A 253/8" (64.4 cm) minimum cutout depth is required. Recommended junction box location I . 45/8" - 143/4" (11....7 cm37.5 cm) bottom of cutout to floor J. 253/8" (64.4 cm) minimum depth of the cabinet. Double Ovens Installed in a 1/4" (6 mm) reveal on the top, a 1/4" (6 mm) reveal on the sides, and a 1/8" (3 mm) reveal on the bottom of the cutout* H. ...
... must be recessed 13/8" (3.5 cm) from the front of cutout * Cleats and spacers must be treated as a finished surface. Double Ovens, Flush Installations A 253/8" (64.4 cm) minimum cutout depth is required. Recommended junction box location I . 45/8" - 143/4" (11....7 cm37.5 cm) bottom of cutout to floor J. 253/8" (64.4 cm) minimum depth of the cabinet. Double Ovens Installed in a 1/4" (6 mm) reveal on the top, a 1/4" (6 mm) reveal on the sides, and a 1/8" (3 mm) reveal on the bottom of the cutout* H. ...

Installation Instructions
Page 5
... other injury. 5. If the door hinge lock is not rotated fully (see illustration B), the door will stop at this point. Open the oven door. 3. Locked position Unlocked position 6. Grip here to do so can result in back or other materials that may need to gently shift... door from your built-in locked position Soft close to engage the door latch locks. A Oven door hinge lock in oven. 1. Failure to rotate. Remove Oven Door(s) IMPORTANT: Use two hands to installation. Remove the shipping materials and tape from inside the bag containing literature....
... other injury. 5. If the door hinge lock is not rotated fully (see illustration B), the door will stop at this point. Open the oven door. 3. Locked position Unlocked position 6. Grip here to do so can result in back or other materials that may need to gently shift... door from your built-in locked position Soft close to engage the door latch locks. A Oven door hinge lock in oven. 1. Failure to rotate. Remove Oven Door(s) IMPORTANT: Use two hands to installation. Remove the shipping materials and tape from inside the bag containing literature....


