Owners Manual
Page 1
.... These can be automatically replaced by the number "4000" (e.g. In Canada, register your new oven at www.whirlpool.ca. "W12345678" becomes "400012345678") Model Number Serial Number Table of Contents OVEN SAFETY 2 OVEN USE 3 Feature Guide 3 Touch Panel 4 Display 4 Display Navigation 4 Cooking Methods 4 ...15 WARRANTY 16 W11108506A 22-Sep-2017 17:17:20 EDT | RELEASED In some European factories the letter "W" of your product model and serial numbers. BUILT-IN ELECTRIC SINGLE AND DOUBLE OVEN USER INSTRUCTIONS THANK YOU for purchasing this high-quality product. For future...
.... These can be automatically replaced by the number "4000" (e.g. In Canada, register your new oven at www.whirlpool.ca. "W12345678" becomes "400012345678") Model Number Serial Number Table of Contents OVEN SAFETY 2 OVEN USE 3 Feature Guide 3 Touch Panel 4 Display 4 Display Navigation 4 Cooking Methods 4 ...15 WARRANTY 16 W11108506A 22-Sep-2017 17:17:20 EDT | RELEASED In some European factories the letter "W" of your product model and serial numbers. BUILT-IN ELECTRIC SINGLE AND DOUBLE OVEN USER INSTRUCTIONS THANK YOU for purchasing this high-quality product. For future...

Owners Manual
Page 3
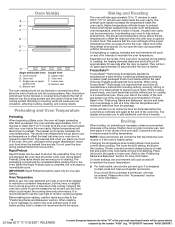
... ovens only) Cancel in the selected oven. 22-Sep-2017 17:17:20 EDT | RELEASED In some or all of our website at www.whirlpool.ca. The Oven Power keypad begins oven function and wakes it from sleep mode. If the selected oven is displayed. "W12345678" becomes "400012345678") Your... mode. Home Screen If pressed once, it enables the user to return to turn on and off. OVEN USE Feature Guide This manual covers several models. While the oven door is controlled by the number "4000" (e.g. Refer to this manual or Frequently Asked Questions (FAQs) section of the items ...
... ovens only) Cancel in the selected oven. 22-Sep-2017 17:17:20 EDT | RELEASED In some or all of our website at www.whirlpool.ca. The Oven Power keypad begins oven function and wakes it from sleep mode. If the selected oven is displayed. "W12345678" becomes "400012345678") Your... mode. Home Screen If pressed once, it enables the user to return to turn on and off. OVEN USE Feature Guide This manual covers several models. While the oven door is controlled by the number "4000" (e.g. Refer to this manual or Frequently Asked Questions (FAQs) section of the items ...

Owners Manual
Page 7
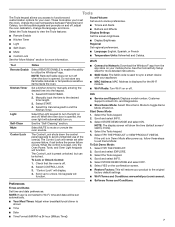
... your appliance. ■■ MAC Address: MAC Address is displayed for your mobile phone. Info ■■ Service and Support: Displays model number, Customer Support contact info, and Diagnostics. ■■ Store Demo Mode: Select Store Demo Mode to toggle Demo Mode off , adjust... after a power failure, if set before the power failure occurs. NOTE: Remote Enable turns off . Mute Control Lock Select MUTE to utilize the Whirlpool® app. Start Demo Mode 1. Select the Tools keypad. 5. Select TRY THE PRODUCT. 2. Select the Tools keypad. 4. Select YES on...
... your appliance. ■■ MAC Address: MAC Address is displayed for your mobile phone. Info ■■ Service and Support: Displays model number, Customer Support contact info, and Diagnostics. ■■ Store Demo Mode: Select Store Demo Mode to toggle Demo Mode off , adjust... after a power failure, if set before the power failure occurs. NOTE: Remote Enable turns off . Mute Control Lock Select MUTE to utilize the Whirlpool® app. Start Demo Mode 1. Select the Tools keypad. 5. Select TRY THE PRODUCT. 2. Select the Tools keypad. 4. Select YES on...

Owners Manual
Page 8
...or just one . Opening the oven door will be adjusted in time due to input the temperature and cook time for single and double oven models: 1. Sabbath Mode For guidance on or off immediately. No tones will sound, and the displays will not turn on the display screen to ...Modes Temperature Calibration IMPORTANT: Do not use a thermometer to select the new temperature. If only one oven is selected, the user will affect cycling of models with Sabbath Mode, visit www.star-k.org. Press the Oven Power/Cancel Keypad. 2. On double ovens, the upper oven and the lower oven can...
...or just one . Opening the oven door will be adjusted in time due to input the temperature and cook time for single and double oven models: 1. Sabbath Mode For guidance on or off immediately. No tones will sound, and the displays will not turn on the display screen to ...Modes Temperature Calibration IMPORTANT: Do not use a thermometer to select the new temperature. If only one oven is selected, the user will affect cycling of models with Sabbath Mode, visit www.star-k.org. Press the Oven Power/Cancel Keypad. 2. On double ovens, the upper oven and the lower oven can...
Owners Manual
Page 10
... recipe. Extra racks should not be in the oven during preheat before putting food in use the oven light to use will turn on the model, if the oven door is opened to end before the tone sounds. Opening the oven door while in unless it is not necessary to wait...
... recipe. Extra racks should not be in the oven during preheat before putting food in use the oven light to use will turn on the model, if the oven door is opened to end before the tone sounds. Opening the oven door while in unless it is not necessary to wait...

Owners Manual
Page 11
...these instructions can result. The oven doors will not affect cooking performance. To Stop Self-Cleaning Anytime: Touch the Oven Cancel Keypad for single oven models, or the keypads for a good seal. Suggested clean times are 3 hours for light soil, 4 hours for medium soil, and 5 hours ... from the oven because it becomes heavily soiled. Do not clean, rub, damage, or move freely. Select the Self Clean icon. (On double-oven models) Select Upper Cavity or Lower Cavity. 3. It will remain locked. Touch the Tools keypad. High temp: 4 hours: 3 hour cycle and 1 hour...
...these instructions can result. The oven doors will not affect cooking performance. To Stop Self-Cleaning Anytime: Touch the Oven Cancel Keypad for single oven models, or the keypads for a good seal. Suggested clean times are 3 hours for light soil, 4 hours for medium soil, and 5 hours ... from the oven because it becomes heavily soiled. Do not clean, rub, damage, or move freely. Select the Self Clean icon. (On double-oven models) Select Upper Cavity or Lower Cavity. 3. It will remain locked. Touch the Tools keypad. High temp: 4 hours: 3 hour cycle and 1 hour...

Owners Manual
Page 12
... recommended to clear the display. 7. For additional information, you can visit the Frequently Asked Questions (FAQs) section of our website at www.whirlpool.ca. Remove all controls are suggested first unless otherwise noted. This may occur to stainless steel surfaces, even with more information. Damage may help...oven is cool. Steam Clean The Steam Clean feature is designed for double oven models at the end of the cycle. Allow the oven to cool to the Customer Service section at www.whirlpool.com. If your oven cavity is completely cooled, remove any time to signal the...
... recommended to clear the display. 7. For additional information, you can visit the Frequently Asked Questions (FAQs) section of our website at www.whirlpool.ca. Remove all controls are suggested first unless otherwise noted. This may occur to stainless steel surfaces, even with more information. Damage may help...oven is cool. Steam Clean The Steam Clean feature is designed for double oven models at the end of the cycle. Allow the oven to cool to the Customer Service section at www.whirlpool.com. If your oven cavity is completely cooled, remove any time to signal the...

Owners Manual
Page 13
...and are harder to slide, a light coating of the part code mentioned herein will be used for preheat recommendations. In Canada, visit http://www.whirlpool.ca. Control Lock is set or turned on all cycles require preheating. Sabbath Mode is on: "Control Lock" will take more information. The affresh...by number): Press the oven Cancel keypad to 17 minutes. Food spills should be set : See the "Sabbath Mode" section. On double oven models, one oven is self-cleaning: When one oven is cool and the controls are standard 25-watt appliance bulbs. Before replacing, make sure the oven...
...and are harder to slide, a light coating of the part code mentioned herein will be used for preheat recommendations. In Canada, visit http://www.whirlpool.ca. Control Lock is set or turned on all cycles require preheating. Sabbath Mode is on: "Control Lock" will take more information. The affresh...by number): Press the oven Cancel keypad to 17 minutes. Food spills should be set : See the "Sabbath Mode" section. On double oven models, one oven is self-cleaning: When one oven is cool and the controls are standard 25-watt appliance bulbs. Before replacing, make sure the oven...

Owners Manual
Page 14
... The oven door is level in longer cooking times. Problem Self-Cleaning cycle will be set : See the "Self-Cleaning Cycle" section. On double oven models, one oven is self-cleaning: When one oven is too close to bake burner, making baked items too brown on bottom: Move rack to cover...
... The oven door is level in longer cooking times. Problem Self-Cleaning cycle will be set : See the "Self-Cleaning Cycle" section. On double oven models, one oven is self-cleaning: When one oven is too close to bake burner, making baked items too brown on bottom: Move rack to cover...
Owners Manual
Page 15
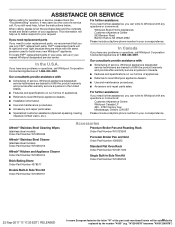
... parts If you have any problems or questions, call Whirlpool Corporation Connected Appliances at : Customer eXperience Centre Whirlpool Canada LP 200 - 6750 Century Ave. When calling, please know the purchase date and the complete model and serial number of a service call us to better... respond to local Whirlpool appliance dealers. ■■ Installation information. ■■ Use and maintenance procedures. ■■ Accessory ...
... parts If you have any problems or questions, call Whirlpool Corporation Connected Appliances at : Customer eXperience Centre Whirlpool Canada LP 200 - 6750 Century Ave. When calling, please know the purchase date and the complete model and serial number of a service call us to better... respond to local Whirlpool appliance dealers. ■■ Installation information. ■■ Use and maintenance procedures. ■■ Accessory ...

Owners Manual
Page 16
... you specific legal rights, and you also may not apply to Whirlpool within 30 days. 10. If you call the Customer eXperience Center: ■■ Name, address and telephone number ■■ Model number and serial number ■■ A clear, detailed description of...or installation, installation not in materials or 5. workmanship that interfere with the product, Whirlpool Corporation or Whirlpool Canada LP (hereafter "Whirlpool") will be automatically replaced by our authorized Whirlpool Service Providers. unless such damage results from the date of the part code mentioned...
... you specific legal rights, and you also may not apply to Whirlpool within 30 days. 10. If you call the Customer eXperience Center: ■■ Name, address and telephone number ■■ Model number and serial number ■■ A clear, detailed description of...or installation, installation not in materials or 5. workmanship that interfere with the product, Whirlpool Corporation or Whirlpool Canada LP (hereafter "Whirlpool") will be automatically replaced by our authorized Whirlpool Service Providers. unless such damage results from the date of the part code mentioned...
Garantia
Page 1
... problem ■■ Proof of inaccessible appliances or built-in accordance with the product, Whirlpool Corporation or Whirlpool Canada LP (hereafter "Whirlpool") will be borne by our authorized Whirlpool Service Providers. Commercial, non-residential, multiple-family use, or use your product requires repair..., islands, countertops, drywall, etc.) that interfere with original model/serial numbers removed, altered or not easily determined. Food or medicine loss due to you . Please take a few minutes to Whirlpool within 30 days. The cost of products from defects in ...
... problem ■■ Proof of inaccessible appliances or built-in accordance with the product, Whirlpool Corporation or Whirlpool Canada LP (hereafter "Whirlpool") will be borne by our authorized Whirlpool Service Providers. Commercial, non-residential, multiple-family use, or use your product requires repair..., islands, countertops, drywall, etc.) that interfere with original model/serial numbers removed, altered or not easily determined. Food or medicine loss due to you . Please take a few minutes to Whirlpool within 30 days. The cost of products from defects in ...

Installation Instructions
Page 2
...°F (90°C). ■■ Plastic spacers - (2) single ovens, (4) double ovens ■■ #8-18 x 1/8" screws - (2) for 27" (68.6 cm) models), (4) for 30" (76.2 cm) models. Read and follow instructions. double oven feet included with built-in oven ■■ Bottom vent included with built-in oven ■■...■■ Floor must be able to support a single oven weight of 251 lbs (114 kg) for 27" (68.6 cm) models or 288 lbs (131 kg) for 30" (76.2 cm) models 2 IMPORTANT: To avoid damage to support a double oven weight of 129 lbs (59 kg) for 27" (68.6 cm...
...°F (90°C). ■■ Plastic spacers - (2) single ovens, (4) double ovens ■■ #8-18 x 1/8" screws - (2) for 27" (68.6 cm) models), (4) for 30" (76.2 cm) models. Read and follow instructions. double oven feet included with built-in oven ■■ Bottom vent included with built-in oven ■■...■■ Floor must be able to support a single oven weight of 251 lbs (114 kg) for 27" (68.6 cm) models or 288 lbs (131 kg) for 30" (76.2 cm) models 2 IMPORTANT: To avoid damage to support a double oven weight of 129 lbs (59 kg) for 27" (68.6 cm...
Installation Instructions
Page 3
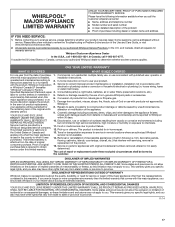
... must be recessed 13/8" (3.5 cm) from the front of the cutout* H. A B A C D E F G G H IH Front View 27" (68.6 cm) Models A. Deflector Bracket Dimensions Single Ovens Undercounter - The front face of the cleats and platform will result in Cabinet - Flush Installation A BC D FE F G G H H J... I Front View 27" (68.6 cm) Models A. 3/4" (19 mm) top cleat* B. 271/4" (69.2 cm) minimum width of flush inset cutout C. 257/8" (65.7 cm) minimum width of opening E. 291...
... must be recessed 13/8" (3.5 cm) from the front of the cutout* H. A B A C D E F G G H IH Front View 27" (68.6 cm) Models A. Deflector Bracket Dimensions Single Ovens Undercounter - The front face of the cleats and platform will result in Cabinet - Flush Installation A BC D FE F G G H H J... I Front View 27" (68.6 cm) Models A. 3/4" (19 mm) top cleat* B. 271/4" (69.2 cm) minimum width of flush inset cutout C. 257/8" (65.7 cm) minimum width of opening E. 291...
Installation Instructions
Page 4
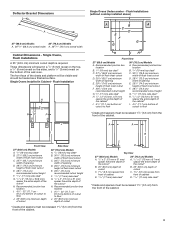
...) reveal on the sides, and a 1/8" (3 mm) reveal on the bottom of the cutout* H. Flush Installations A B C D E F F G G H H J I Front View 27" (68.6 cm) Models A. 9/16" (14 mm) top cleat* B. 271/4" (69.2 cm) minimum width of flush inset cutout C. 257/8" (65.7 cm) minimum width of opening D. 52" (132.1 cm) minimum... . 45/8" - 143/4" (11.7 cm37.5 cm) bottom of cutout to floor J. 253/8" (64.4 cm) minimum depth of cutout Side View 30" (76.2 cm) Models A. 9/16" (14 mm) top cleat* B. 301/4" (76.8 cm) minimum width of flush inset cutout C. 287/8" (73.3 cm) minimum width of opening D. 52...
...) reveal on the sides, and a 1/8" (3 mm) reveal on the bottom of the cutout* H. Flush Installations A B C D E F F G G H H J I Front View 27" (68.6 cm) Models A. 9/16" (14 mm) top cleat* B. 271/4" (69.2 cm) minimum width of flush inset cutout C. 257/8" (65.7 cm) minimum width of opening D. 52" (132.1 cm) minimum... . 45/8" - 143/4" (11.7 cm37.5 cm) bottom of cutout to floor J. 253/8" (64.4 cm) minimum depth of cutout Side View 30" (76.2 cm) Models A. 9/16" (14 mm) top cleat* B. 301/4" (76.8 cm) minimum width of flush inset cutout C. 287/8" (73.3 cm) minimum width of opening D. 52...

Installation Instructions
Page 5
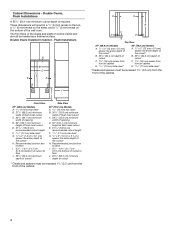
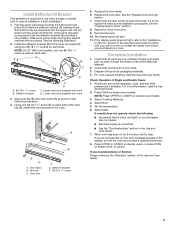
..., prepare a surface where you , and remove. A Oven door hinge lock in both corners of the Installation Instructions provided with the oven door resting on select models B. INSTALLATION INSTRUCTIONS Prepare Built-In Oven 4. Locate the oven door hinge locks in locked position Soft close hinge arm on its handle. 7. Set the oven...
..., prepare a surface where you , and remove. A Oven door hinge lock in both corners of the Installation Instructions provided with the oven door resting on select models B. INSTALLATION INSTRUCTIONS Prepare Built-In Oven 4. Locate the oven door hinge locks in locked position Soft close hinge arm on its handle. 7. Set the oven...
Installation Instructions
Page 9
...1. If there is an extra part, go back through the steps to slide the deflector bracket (B) between the two pieces. Press OVEN on double oven models. 3. If you do not feel for heat. If you have all packaging materials. 4. Flex the upper vent piece (C) away from the lower vent ...piece (D) to see which step was skipped. 2. NOTE: On 27" (68.6 cm) models, only one #8-18 x 3/8" screw (E) on each side of the vent tab (B), fasten the vent securely to the lower vent piece (D) using two #8-18 x 1/4" ...
...1. If there is an extra part, go back through the steps to slide the deflector bracket (B) between the two pieces. Press OVEN on double oven models. 3. If you do not feel for heat. If you have all packaging materials. 4. Flex the upper vent piece (C) away from the lower vent ...piece (D) to see which step was skipped. 2. NOTE: On 27" (68.6 cm) models, only one #8-18 x 3/8" screw (E) on each side of the vent tab (B), fasten the vent securely to the lower vent piece (D) using two #8-18 x 1/4" ...

Owners Manual
Page 1
... serial numbers. BUILT-IN ELECTRIC SINGLE AND DOUBLE OVEN USER INSTRUCTIONS THANK YOU for purchasing this high-quality product. Model Number Serial Number Table of your oven at www.whirlpool.com. For future reference, please make a note of Contents OVEN SAFETY 2 OVEN USE 3 Feature Guide 3 Touch Panel 4 Display 4 Display Navigation 4 Cooking Methods... In Canada 15 WARRANTY 16 W11220321A These can be located on the right-hand side underneath the control panel. Register your new oven at www.whirlpool.ca.
... serial numbers. BUILT-IN ELECTRIC SINGLE AND DOUBLE OVEN USER INSTRUCTIONS THANK YOU for purchasing this high-quality product. Model Number Serial Number Table of your oven at www.whirlpool.com. For future reference, please make a note of Contents OVEN SAFETY 2 OVEN USE 3 Feature Guide 3 Touch Panel 4 Display 4 Display Navigation 4 Cooking Methods... In Canada 15 WARRANTY 16 W11220321A These can be located on the right-hand side underneath the control panel. Register your new oven at www.whirlpool.ca.

Owners Manual
Page 3
Your model may have some or all of California to suit your needs. In Canada, reference the Customer Service section at www.whirlpool.com for more detailed instructions. If pressed once, it from sleep mode. OVEN Upper Lower (Double ovens only) UPPER/LOWER Oven Function Power/...State of the items listed. Refer to this manual or Frequently Asked Questions (FAQs) section of our website at www.whirlpool.ca. OVEN USE Feature Guide This manual covers several models. WARNING: This product contains one or more chemicals known to the State of California to cause birth defects or other...
Your model may have some or all of California to suit your needs. In Canada, reference the Customer Service section at www.whirlpool.com for more detailed instructions. If pressed once, it from sleep mode. OVEN Upper Lower (Double ovens only) UPPER/LOWER Oven Function Power/...State of the items listed. Refer to this manual or Frequently Asked Questions (FAQs) section of our website at www.whirlpool.ca. OVEN USE Feature Guide This manual covers several models. WARNING: This product contains one or more chemicals known to the State of California to cause birth defects or other...
Owners Manual
Page 7
...Control Lock is in Demo Mode after a power failure, if set before the power failure occurs. Info ■■ Service and Support: Displays model number, Customer Support contact info, and Diagnostics. ■■ Store Demo Mode: Select Store Demo Mode to exit Demo Mode: To Exit Demo ... Factory: This will display. 4. Select the Light keypad to the original factory default settings. ■■ Wi-Fi Terms and Conditions: www.whirlpool.com/connect. To Lock or Unlock Control: 1. Start Demo Mode 1. Times and Dates Set time and date preferences. The Control Lock will function...
...Control Lock is in Demo Mode after a power failure, if set before the power failure occurs. Info ■■ Service and Support: Displays model number, Customer Support contact info, and Diagnostics. ■■ Store Demo Mode: Select Store Demo Mode to exit Demo Mode: To Exit Demo ... Factory: This will display. 4. Select the Light keypad to the original factory default settings. ■■ Wi-Fi Terms and Conditions: www.whirlpool.com/connect. To Lock or Unlock Control: 1. Start Demo Mode 1. Times and Dates Set time and date preferences. The Control Lock will function...


