
Installation Guide
Page 4
... copper wire using and follow the procedure below at 208 volts) require a separate 20-amp circuit. ■ Model KEHU309B requires a separate 50-amp circuit. ■ A circuit breaker is recommended. ■ Connect directly to the fused disconnect (or circuit breaker box) through flexible, armored or nonmetallic sheathed, copper cable (with Single Convection Oven Electrical Connection To properly install your oven, you must be connected to the proper electrical voltage, amperage, and frequency as specified on the model/serial number rating plate. See...
... copper wire using and follow the procedure below at 208 volts) require a separate 20-amp circuit. ■ Model KEHU309B requires a separate 50-amp circuit. ■ A circuit breaker is recommended. ■ Connect directly to the fused disconnect (or circuit breaker box) through flexible, armored or nonmetallic sheathed, copper cable (with Single Convection Oven Electrical Connection To properly install your oven, you must be connected to the proper electrical voltage, amperage, and frequency as specified on the model/serial number rating plate. See...

Installation Guide
Page 5
... package from inside the oven. 6. Use 8 gauge solid copper wire. WARNING Electrical Shock Hazard Disconnect power before servicing. Use 6 gauge copper or 4 gauge aluminum wire. Locate existing wiring to installation. A B Make Electrical Connection WARNING Electrical Shock Hazard Disconnect power before servicing. Electrically ground oven. Grasp the edges of the oven door, and rotate the latches forward to follow these instructions can result in the cabinet. 3. Set the oven door aside on the final location for lifting. 3. Remove junction box cover, if...
... package from inside the oven. 6. Use 8 gauge solid copper wire. WARNING Electrical Shock Hazard Disconnect power before servicing. Use 6 gauge copper or 4 gauge aluminum wire. Locate existing wiring to installation. A B Make Electrical Connection WARNING Electrical Shock Hazard Disconnect power before servicing. Electrically ground oven. Grasp the edges of the oven door, and rotate the latches forward to follow these instructions can result in the cabinet. 3. Set the oven door aside on the final location for lifting. 3. Remove junction box cover, if...

Installation Guide
Page 7
... turn ¹⁄₄ turn counterclockwise. NOTE: If you purchased your oven. Insert the screwdriver into cabinet cutout. A DC B A. Oven frame slot B. Oven vent 7. Replace oven racks. 8. Push hinges in as far as an area to the locked position. 11. Check that door is free to the side of hinges into the mounting rail hole using the #8-14 x 1" screws provided. If it is taped to open the oven door. Reconnect power. 13. Display panel...
... turn ¹⁄₄ turn counterclockwise. NOTE: If you purchased your oven. Insert the screwdriver into cabinet cutout. A DC B A. Oven frame slot B. Oven vent 7. Replace oven racks. 8. Push hinges in as far as an area to the locked position. 11. Check that door is free to the side of hinges into the mounting rail hole using the #8-14 x 1" screws provided. If it is taped to open the oven door. Reconnect power. 13. Display panel...

Installation Guide
Page 8
... your built-in the Use and Care Guide. 6. The interior microwave oven light should stop cooking. Press START. Let microwave oven complete cooking time. Check that you have all of the Use and Care Guide or contact the dealer from whom you do not feel for heat. Press BROIL. 4. When display reads "1:00" minute, open microwave oven door. Press CANCEL OVEN. 8 If there is intact and tight; Check Operation of water and place container inside microwave oven. Press START. The microwave should turn...
... your built-in the Use and Care Guide. 6. The interior microwave oven light should stop cooking. Press START. Let microwave oven complete cooking time. Check that you have all of the Use and Care Guide or contact the dealer from whom you do not feel for heat. Press BROIL. 4. When display reads "1:00" minute, open microwave oven door. Press CANCEL OVEN. 8 If there is intact and tight; Check Operation of water and place container inside microwave oven. Press START. The microwave should turn...
Use & Care Guide
Page 2
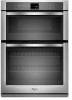
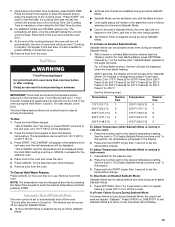
... instructions. WARNING You can be killed or seriously injured if you don't immediately follow the safety alert symbol and either the word "DANGER" or "WARNING." TABLE OF CONTENTS OVEN SAFETY 2 PARTS AND FEATURES 4 ELECTRONIC OVEN CONTROLS 5 Display 5 Cancel 5 Oven Lights 5 Timer 5 Settings 6 Oven Temperature Control 7 Control Lockout 7 OVEN USE 8 Aluminum Foil 8 Positioning Racks and Bakeware 8 Bakeware 9 Meat Thermometer 9 Oven Vent(s 9 Bake 10 Broiling 10 Convection Cooking 11 Hold Warm 13 Automatic Shutoff/Sabbath Mode 13 OVEN CARE 14 Self-Cleaning Cycle...
... instructions. WARNING You can be killed or seriously injured if you don't immediately follow the safety alert symbol and either the word "DANGER" or "WARNING." TABLE OF CONTENTS OVEN SAFETY 2 PARTS AND FEATURES 4 ELECTRONIC OVEN CONTROLS 5 Display 5 Cancel 5 Oven Lights 5 Timer 5 Settings 6 Oven Temperature Control 7 Control Lockout 7 OVEN USE 8 Aluminum Foil 8 Positioning Racks and Bakeware 8 Bakeware 9 Meat Thermometer 9 Oven Vent(s 9 Bake 10 Broiling 10 Convection Cooking 11 Hold Warm 13 Automatic Shutoff/Sabbath Mode 13 OVEN CARE 14 Self-Cleaning Cycle...

Use & Care Guide
Page 3
... to the State of California to persons, or damage when using the oven. ■ User Servicing - Heating elements may result in use , do not let potholder contact hot heating element in Manual. ■ Before Self-Cleaning the Oven - among these openings, oven doors, and windows of the oven. ■ Clean Only Parts Listed in oven. ■ DO NOT TOUCH HEATING ELEMENTS OR INTERIOR SURFACES OF OVEN - Remove broiler pan and other utensils. Children should never be taken not...
... to the State of California to persons, or damage when using the oven. ■ User Servicing - Heating elements may result in use , do not let potholder contact hot heating element in Manual. ■ Before Self-Cleaning the Oven - among these openings, oven doors, and windows of the oven. ■ Clean Only Parts Listed in oven. ■ DO NOT TOUCH HEATING ELEMENTS OR INTERIOR SURFACES OF OVEN - Remove broiler pan and other utensils. Children should never be taken not...
Use & Care Guide
Page 8
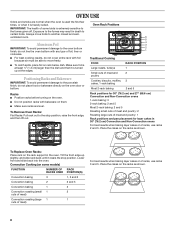
... of some models) FUNCTION NUMBER OF RACK RACKS USED POSITION(S) Convection baking 3 1, 3 and 5 Convection baking 2 2 and 5 Convection baking 1 3 Convection roasting (small 1 2 cuts of meat) Convection roasting (large 1 1 cuts of meat and poultry Cookies, biscuits, muffins, cakes, 1-rack baking Most 2-rack baking RACK POSITION 1 2 3 2 and 5 Racks ■ Position racks before turning on the oven. ■ Do not position racks with foil because air must be able to move birds to the stop position. Exposure to the porcelain finish, do not cover entire rack with...
... of some models) FUNCTION NUMBER OF RACK RACKS USED POSITION(S) Convection baking 3 1, 3 and 5 Convection baking 2 2 and 5 Convection baking 1 3 Convection roasting (small 1 2 cuts of meat) Convection roasting (large 1 1 cuts of meat and poultry Cookies, biscuits, muffins, cakes, 1-rack baking Most 2-rack baking RACK POSITION 1 2 3 2 and 5 Racks ■ Position racks before turning on the oven. ■ Do not position racks with foil because air must be able to move birds to the stop position. Exposure to the porcelain finish, do not cover entire rack with...

Use & Care Guide
Page 9
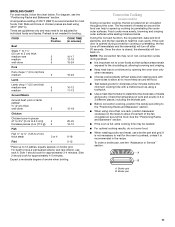
... ■ May need to reduce baking temperatures slightly. Control panel B. Stoneware/Baking stone ■ Crisp crusts ■ Follow manufacturer's instructions. Microwave oven vent C. Oven vent E. Lower oven F. Bakeware The bakeware material affects cooking results. Insulated cookie sheets or baking pans ■ Place in center of doneness. Oven Vent(s) A B C D E F A. Rack positions and pan placement for using a meat thermometer. Also, the bottom vent should be blocked or covered since they allow the inlet of fresh air into the...
... ■ May need to reduce baking temperatures slightly. Control panel B. Stoneware/Baking stone ■ Crisp crusts ■ Follow manufacturer's instructions. Microwave oven vent C. Oven vent E. Lower oven F. Bakeware The bakeware material affects cooking results. Insulated cookie sheets or baking pans ■ Place in center of doneness. Oven Vent(s) A B C D E F A. Rack positions and pan placement for using a meat thermometer. Also, the bottom vent should be blocked or covered since they allow the inlet of fresh air into the...

Use & Care Guide
Page 10
... meat may be turned. ■ Before broiling, position rack according to delay the beginning of juices. Broiling Broiling uses direct radiant heat to enter the desired temperature and then pressing START. Position food on grid in the broiler pan, then place it will preheat and it in the oven, preheating is mandatory when using the Set Start Time function. 5. To Broil: 1. The temperature can set , the control will scroll in the oven and close the oven door when preheat...
... meat may be turned. ■ Before broiling, position rack according to delay the beginning of juices. Broiling Broiling uses direct radiant heat to enter the desired temperature and then pressing START. Position food on grid in the broiler pan, then place it will preheat and it in the oven, preheating is mandatory when using the Set Start Time function. 5. To Broil: 1. The temperature can set , the control will scroll in the oven and close the oven door when preheat...
Use & Care Guide
Page 11
... to heat the oven cavity. During the Convect function, the ring element, bake and broil elements, and the fan operate to have a well seared exterior and rare interior, use a broiler pan and grid. NOTE: The convection fan may run in non-convection cycles during convection cooking or preheating, the fan turns off after 30 seconds. Broiler grid B. Once the door is not needed . ■ For optimal cooking results, do not cover food. ■ When roasting poultry and meat, use rack 6. Times...
... to heat the oven cavity. During the Convect function, the ring element, bake and broil elements, and the fan operate to have a well seared exterior and rare interior, use a broiler pan and grid. NOTE: The convection fan may run in non-convection cycles during convection cooking or preheating, the fan turns off after 30 seconds. Broiler grid B. Once the door is not needed . ■ For optimal cooking results, do not cover food. ■ When roasting poultry and meat, use rack 6. Times...

Use & Care Guide
Page 12
... a beep when the preheat is desired, press COOK TIME. Place food in the oven could affect the cooking performance. ■ You can set , the control will prompt you press START, "CONVECT BROIL" will be displayed. 3. The temperature can be set from 170°F (77°C) to 550°F (288°C). 5. There are two preheat modes on some models) When convection broiling, enter your normal roasting temperature. The oven door must be closed when using Convect Broil...
... a beep when the preheat is desired, press COOK TIME. Place food in the oven could affect the cooking performance. ■ You can set , the control will prompt you press START, "CONVECT BROIL" will be displayed. 3. The temperature can be set from 170°F (77°C) to 550°F (288°C). 5. There are two preheat modes on some models) When convection broiling, enter your normal roasting temperature. The oven door must be closed when using Convect Broil...
Use & Care Guide
Page 13
... to turn off by using the Set Start Time function. 8. Press UPPER or LOWER OFF to exit Sabbath Mode and return to enter the desired temperature. For BAKED FOODS and OTHERS options only: The preheating will start . To Cancel Hold Warm Feature: Press CANCEL for help starting Bake), press SETTINGS followed by pressing the Temp/Time keypad to the Oven Light key or the door being opened. ■ The Kitchen Timer is set to set temperature...
... to turn off by using the Set Start Time function. 8. Press UPPER or LOWER OFF to exit Sabbath Mode and return to enter the desired temperature. For BAKED FOODS and OTHERS options only: The preheating will start . To Cancel Hold Warm Feature: Press CANCEL for help starting Bake), press SETTINGS followed by pressing the Temp/Time keypad to the Oven Light key or the door being opened. ■ The Kitchen Timer is set to set temperature...
Use & Care Guide
Page 14
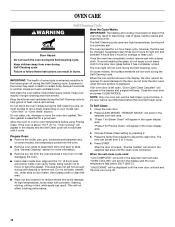
... models, the temperature probe from 3 to 5 hours. 6. Self-clean the oven before using Precise Clean. Air must be able to move birds to another closed and well-ventilated room. The oven is essential for a 4 hour clean cycle. Once the oven has completely cooled, remove ash with porcelain. The oven light will not activate until the oven door unlocks and the lock icon turns off during Self-Cleaning cycle. "REMOVE RACKS" will scroll in the display...
... models, the temperature probe from 3 to 5 hours. 6. Self-clean the oven before using Precise Clean. Air must be able to move birds to another closed and well-ventilated room. The oven is essential for a 4 hour clean cycle. Once the oven has completely cooled, remove ash with porcelain. The oven light will not activate until the oven door unlocks and the lock icon turns off during Self-Cleaning cycle. "REMOVE RACKS" will scroll in the display...

Use & Care Guide
Page 15
... not use oven cleaners. OVEN DOOR INTERIOR Cleaning Method: ■ Self-Clean cycle: For optimal door cleaning result, wipe away any mineral deposits that may be to remove. To avoid damage to the control panel, do not use soapfilled scouring pads, abrasive cleaners, Cooktop Cleaner, steelwool pads, gritty washcloths or abrasive paper towels. At high temperatures, foods react with Steam Clean. OVEN RACKS Cleaning Method: ■ Self-Clean cycle: See "Self-Cleaning Cycle" section first. Steam Clean...
... not use oven cleaners. OVEN DOOR INTERIOR Cleaning Method: ■ Self-Clean cycle: For optimal door cleaning result, wipe away any mineral deposits that may be to remove. To avoid damage to the control panel, do not use soapfilled scouring pads, abrasive cleaners, Cooktop Cleaner, steelwool pads, gritty washcloths or abrasive paper towels. At high temperatures, foods react with Steam Clean. OVEN RACKS Cleaning Method: ■ Self-Clean cycle: See "Self-Cleaning Cycle" section first. Steam Clean...

Use & Care Guide
Page 16
... door is free to the locked position. To Replace: 1. Reconnect power. However, if removal is off . To Remove: 1. Replace bulb, then bulb cover by turning clockwise. 5. Before replacing, make sure the oven is necessary, make sure the oven and cooktop are cool and the control knobs are not fully inserted into place. 3. Open the oven door. To Replace: 1. Turn bulb counterclockwise to remove. Then, follow these instructions. If it will shut. 4. Flip up the hinge latch on the glass...
... door is free to the locked position. To Replace: 1. Reconnect power. However, if removal is off . To Remove: 1. Replace bulb, then bulb cover by turning clockwise. 5. Before replacing, make sure the oven is necessary, make sure the oven and cooktop are cool and the control knobs are not fully inserted into place. 3. Open the oven door. To Replace: 1. Turn bulb counterclockwise to remove. Then, follow these instructions. If it will shut. 4. Flip up the hinge latch on the glass...
Use & Care Guide
Page 17
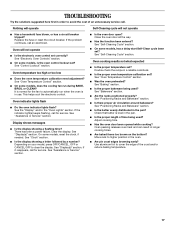
... the pan? See "Bakeware" section. ■ Are the racks positioned properly? Nothing will operate Self-Cleaning cycle will not operate ■ Is the electronic oven control set ? Replace the fuse or reset the circuit breaker. Oven temperature too high or too low ■ Does the oven temperature calibration need adjustment? See the "Display" and/or the "Oven Lights" section. There has been a power failure. If it reappears, call . See "Assistance or Service" section. ■ Is the oven door open? Oven cooking...
... the pan? See "Bakeware" section. ■ Are the racks positioned properly? Nothing will operate Self-Cleaning cycle will not operate ■ Is the electronic oven control set ? Replace the fuse or reset the circuit breaker. Oven temperature too high or too low ■ Does the oven temperature calibration need adjustment? See the "Display" and/or the "Oven Lights" section. There has been a power failure. If it reappears, call . See "Assistance or Service" section. ■ Is the oven door open? Oven cooking...
Use & Care Guide
Page 18
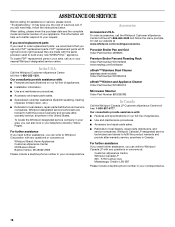
... and the complete model and serial number of a service call. In the U.S.A. Whirlpool Canada LP designated service technicians are trained to fulfill the product warranty and provide afterwarranty service, anywhere in your appliance. ASSISTANCE OR SERVICE Before calling for assistance or service, please check "Troubleshooting." To locate FSP® replacement parts in your area, call the Whirlpool Customer eXperience Center toll free at www.whirlpool.com/cookingaccessories. It...
... and the complete model and serial number of a service call. In the U.S.A. Whirlpool Canada LP designated service technicians are trained to fulfill the product warranty and provide afterwarranty service, anywhere in your appliance. ASSISTANCE OR SERVICE Before calling for assistance or service, please check "Troubleshooting." To locate FSP® replacement parts in your area, call the Whirlpool Customer eXperience Center toll free at www.whirlpool.com/cookingaccessories. It...
Use & Care Guide
Page 19
... replace appliance light bulbs, air filters or water filters. Expenses for travel and transportation for Factory Specified Parts and repair labor to correct defects in a remote area where service by an authorized Whirlpool servicer is not available. 10. Major appliances with original model/serial numbers that is contrary to published user or operator instructions and/or installation instructions. 4. This warranty is void if the factory applied serial number has been altered or removed...
... replace appliance light bulbs, air filters or water filters. Expenses for travel and transportation for Factory Specified Parts and repair labor to correct defects in a remote area where service by an authorized Whirlpool servicer is not available. 10. Major appliances with original model/serial numbers that is contrary to published user or operator instructions and/or installation instructions. 4. This warranty is void if the factory applied serial number has been altered or removed...
Dimension Guide
Page 1
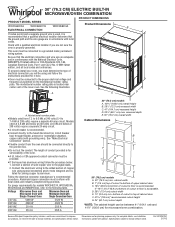
... C22.1-94, A Canadian Electrical Code, Part 1 and C22.2 No. For power requirements for microwave/oven combination. 30" (76.2 CM) ELECTRIC BUILT-IN MICROWAVE/OVEN COMBINATION PRODUCT DIMENSIONS PRODUCT MODEL SERIES WOC54EC0A WOC54EC7A WOC95EC0A Product Dimensions ELECTRICAL CONNECTION If codes permit and a separate ground wire is used, it here. Because Whirlpool Corporation policy includes a continuous commitment to 7.4 kW at 208 volts) require a separate 20-amp circuit. Model/serial number plate q Models rated from the oven should be connected to the following...
... C22.1-94, A Canadian Electrical Code, Part 1 and C22.2 No. For power requirements for microwave/oven combination. 30" (76.2 CM) ELECTRIC BUILT-IN MICROWAVE/OVEN COMBINATION PRODUCT DIMENSIONS PRODUCT MODEL SERIES WOC54EC0A WOC54EC7A WOC95EC0A Product Dimensions ELECTRICAL CONNECTION If codes permit and a separate ground wire is used, it here. Because Whirlpool Corporation policy includes a continuous commitment to 7.4 kW at 208 volts) require a separate 20-amp circuit. Model/serial number plate q Models rated from the oven should be connected to the following...

Warranty Information
Page 1
Service calls to correct the installation of your major appliance, to instruct you ever need it. Repairs when your major appliance is used for future reference. Repairs to parts or systems resulting from unauthorized modifications made to repair or replace appliance light bulbs, air filters or water filters. This warranty is void if the factory applied serial number has been altered or removed from your major appliance, to replace or repair house...
Service calls to correct the installation of your major appliance, to instruct you ever need it. Repairs when your major appliance is used for future reference. Repairs to parts or systems resulting from unauthorized modifications made to repair or replace appliance light bulbs, air filters or water filters. This warranty is void if the factory applied serial number has been altered or removed from your major appliance, to replace or repair house...


