Whirlpool WMMF7530RV Support and Manuals
Get Help and Manuals for this Whirlpool item

View All Support Options Below
Free Whirlpool WMMF7530RV manuals!
Problems with Whirlpool WMMF7530RV?
Ask a Question
Free Whirlpool WMMF7530RV manuals!
Problems with Whirlpool WMMF7530RV?
Ask a Question
Popular Whirlpool WMMF7530RV Manual Pages
Bump Out Kit Installation Instructions - Page 1
... Bump out mounting kit, for full microwave hood combination installation, please refer to replace the mounting bracket that came with your unit.
These installation instructions are deeper than 13" (33 cm) but no more than 16" (40.6 cm), use the bump out mounting kit to the owner manual that comes with the microwave hood combination.
Bump Out Kit Installation Instructions - Page 3
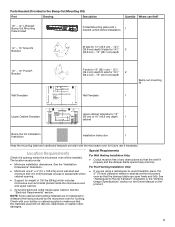
Parts Needed (Provided in the "Venting Design Specifications" section on the Owner Manual on the product.
3 NOTE: Some cabinet and building materials are using a rectangular-to-round transition piece, the 3" (76 mm) clearance needs to withstand the heat produced by the microwave oven for cooking.
For Roof Venting Installation... the opening .
■ Support for weight of any obstructions ...
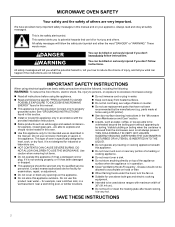
Bump Out Kit Installation Instructions - Page 4

...Depth (cabinet + door)
Stand-out Depth (cabinet + door)
A
A
B
A. (Cabinet + Door) B. Installation Dimensions
NOTE: The grounded 3 prong outlet must be inside the upper cabinet. Upper cabinet depth (with door) 13... cm)
B
A. (Cabinet + Door) B.
See the "Electrical Requirements" section on the Owner Manual on type of range/cooktop below table, the sizes in left column are flush, the size in...
Owners Manual - Page 2
... or dropped.
� This appliance should not be serviced only by the manufacturer (e.g. parts made at home using a 3D printer).
� See door surface cleaning instructions in this product near water - SAVE THESE INSTRUCTIONS
2
This symbol alerts you and others are not followed.
Do not use replacement parts that can kill or hurt you to explode...
Owners Manual - Page 3
... not store any other part of your router's capabilities, refer to the router
manufacturer's instructions. � The router to be guided through the steps to set up a user account and to operate this oven when not in use the cavity for your responsibility. You Will Need: � A home wireless router supporting Wi-Fi, 2.4 Ghz with...
Owners Manual - Page 6
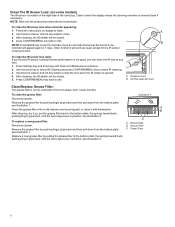
... manual clean if necessary. To replace ...a new grease filter: Disconnect power. To clean the IR sensor lens when reminder appearing:
1. A
2.
NOTE: Wait until the two tongues are in position, see illustration 2.
6
A. Remove the grease filter by pushing finger grips back and then pull down from the bottom plate,
C.
Press Settings...the instructions on...some models)
The...
Owners Manual - Page 7
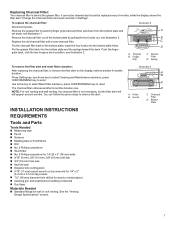
...four hooks out, see illustration 2. You can follow the above steps to enter. See the "Venting Design Specifications" section. Put the grease filter back into the bottom plate holes. Grease Filter
D. INSTALLATION INSTRUCTIONS
REQUIREMENTS
Tools and Parts
Tools Needed
� Measuring tape � Pencil � Scissors � Masking tape or thumbtacks � Drill...
Owners Manual - Page 9
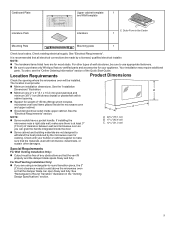
... accessories for cooking.
A C
NOTE:
� Some models have a pocket handle. Your installation may require additional
parts. A. 297/8" (76.1 cm) B. 177/8" (45.4 cm) C. 121/8" (31.3 cm)
� Some cabinet and building materials are for weight of the Quick Start Guide. To order, see the "Online Ordering Information" section of 150 lbs (68 kg) which includes...
Owners Manual - Page 11
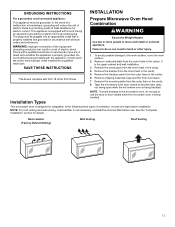
...Factory Default Setting)
Wall Venting
Roof Venting
11 GROUNDING INSTRUCTIONS
INSTALLATION
For a grounded, cord-connected appliance:
This appliance must be grounded.
Do not modify the plug provided with all local codes and ordinances.
To avoid possible damage to move and install or ... door does
not swing open while the microwave oven is equipped with Part 18 of the FCC Rules.
Owners Manual - Page 12
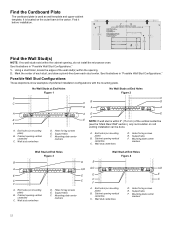
...
markers
Wall Stud at End Holes Figure 2
B
C
C
CB
D
DA
A
A
E F
A. Holes for lag screws E. Mounting plate center
markers
12
Wall stud centerlines
D. Cabinet opening , do not install the microwave oven. Support tabs F. Find it before installation.
Holes for lag screws E. Holes for lag screws E. See illustrations in "Possible Wall Stud Configurations...
Owners Manual - Page 17
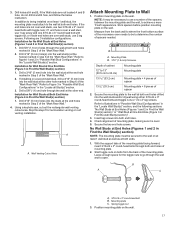
...wall studs, use a number of the "Mark Rear Wall." 2. B
A
A.
With the support tabs of the mounting plate facing forward, insert 3/16-24 x 3" round-head bolts through the wall... the below instruction. Drill 3/16" (5 mm) hole(s) into the studs at Both End Holes (Figure 4 in Find the wall Stud(s) section)" . 3. Installation for No Wall Studs at the other end. If installing on at ...
Owners Manual - Page 18
...instruction to make sure toggle nuts have opened against drywall.
A A. Spring toggle nut D. Leave enough space for Wall Venting Installation... Securely tighten all lag screws and bolts. With the support tabs of the mounting plate facing forward, insert a... wall and roof venting installation, both venting installation need to the
microwave oven, and set the screws aside. Screw...
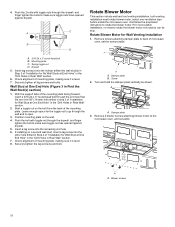
Owners Manual - Page 19

... 2 blower screws into the recessed holes in the back of the microwave oven. A
B
A.
Holes
19
A B
A. Connector
10. Lift blower motor out of microwave oven, and set aside. Blower motor wire B. Screws B. 4.
Owners Manual - Page 22
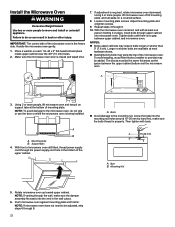
... supply cord through 6. 10. Install the Microwave Oven
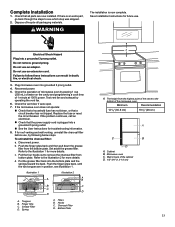
WARNING
Excessive Weight Hazard Use two or more people, lift microwave oven off of mounting plate, and set aside on a covered surface.
... to be the same thickness as the space between upper cabinet and microwave oven. A
B
A. Support tabs 4. Mounting Nut
5. Rotate microwave oven up toward upper cabinet. NOTE: If microwave oven does...
Owners Manual - Page 23
... has not tripped. Save Installation Instructions for troubleshooting information.
8. Test vent ...problem continues, call an electrician.
� Check that the power supply cord is plugged into the bottom plate and the springs toward the back. Set aside the grease filter. WARNING
The installation is an extra part...Installation
1. Do not use an extension cord. Reconnect power.
5. Replace...
Whirlpool WMMF7530RV Reviews
We have not received any reviews for Whirlpool yet.