Whirlpool WMMF7330RZ Support and Manuals
Get Help and Manuals for this Whirlpool item
View All Support Options Below
Free Whirlpool WMMF7330RZ manuals!
Problems with Whirlpool WMMF7330RZ?
Ask a Question
Free Whirlpool WMMF7330RZ manuals!
Problems with Whirlpool WMMF7330RZ?
Ask a Question
Popular Whirlpool WMMF7330RZ Manual Pages
Bump Out Kit Installation Instructions - Page 1
....6 cm), use the bump out mounting kit to the owner manual that comes with the microwave hood combination.
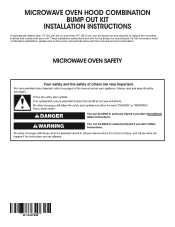
MICROWAVE OVEN HOOD COMBINATION BUMP OUT KIT
INSTALLATION INSTRUCTIONS
If cabinets are only for the Bump out mounting kit, for full microwave hood combination installation, please refer to replace the mounting bracket that came with your unit.
Bump Out Kit Installation Instructions - Page 3
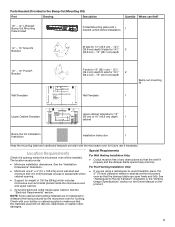
... cooking. Parts Needed (Provided in the "Venting Design Specifications" section on the Owner Manual on the product.
3
See the "Installation Dimensions" ... Location Requirements
Check the opening .
■ Support for weight of any obstructions so that the...cm) depth
1
cabinet
Bump Out Kit Installation Instruction
Installation Instruction
1
Keep the mounting plate and cardboard ...
Quick Start Guide - Page 1

... foil and some models.)
Step 1. Oven Bottom
C
NOTE: For more detailed instructions on any type of foil or liner. REPLACING CHARCOAL FILTER:
See the instructions in the Owner's Manual for details.
However, if you need to insert the accessories on in a bake setting until disabled.
MICROWAVE OVEN HOOD COMBINATION QUICK START GUIDE YWMMF7330
OPERATING INSTRUCTIONS
WARNING: To...
Owners Manual - Page 2

...hot.
are very important. for its intended use replacement parts that can happen if the instructions are able to be overheated beyond the boiling ...manual. Contact nearest authorized service facility for use above both gas and electric cooking equipment.
� Intended to properly grounded outlet. Grease should be used above ranges with the provided Installation Instructions...
Owners Manual - Page 3

... should not be adjusted or repaired by the party responsible for Connected Appliances Only
IMPORTANT: Proper installation of the FCC Rules. It...Part 15 of your responsibility. IMPORTANT SAFETY INSTRUCTIONS
When using electrical appliances basic safety precautions should be followed, including the following: WARNING: To reduce the risk of the oven. This will be guided through the steps to set...
Owners Manual - Page 6

... key back to clean the lens when the IR shelter is opened. 4.
Press Settings key and arrow key until the two tongues are in 7 days. Use the ...Replace a new grease filter by pushing finger grips back and then pull down . Clean the grease filter with dishwasher. Clean The IR Sensor Lens: (on some models)
The IR sensor is located on the underside of the cavity top. Follow the instructions...
Owners Manual - Page 7

... the grease filter. Push the finger grips back, until the two tongues are in Settings". Finger Grip
C.
Charcoal Filter
D. Remove the grease filter by pulling the four hooks out, see illustration 1. Illustration 3
A B
A. INSTALLATION INSTRUCTIONS
REQUIREMENTS
Tools and Parts
Tools Needed
� Measuring tape � Pencil � Scissors � Masking tape or thumbtacks...
Owners Manual - Page 9

... provide:
� Minimum installation dimensions. Outer Form in the "Venting Design Specifications" section.
9 It is at least 3" (7.6 cm) of any obstructions so that all electrical connections be sure to use appropriate fasteners. � Be sure to purchase only Whirlpool factory-certified parts and accessories for weight of the Quick Start Guide. B
� Minimum one...
Owners Manual - Page 11

...installed by providing a path of least resistance for adaptation to the following three types of the equipmentgrounding conductor can result in the cavity. 4.
SAVE THESE INSTRUCTIONS... Default Setting)
Wall...and install or...Installation" section for upper-cabinet and wall installation...installed...Installation Types
This microwave oven is being handled. GROUNDING INSTRUCTIONS
INSTALLATION...
Owners Manual - Page 12

... with the mounting plate. Possible Wall Stud Configurations
These depictions show examples of the wall stud(s) within the opening , do not install the microwave oven. Support tabs F. End holes (on mounting plate)
B. It is within the cabinet opening . 2.
Holes for lag screws E. Find the Cardboard Plate
The cardboard plate is used ...
Owners Manual - Page 17

...Wall." 2. Refer to go through both end holes. 4. With the support tabs of the "Mark Rear Wall." if 1 end hole is level... section)
NOTE: The mounting plate must attach to open. If installing on at least 1 wall stud, the mounting plate must be necessary... hole, do not drill A and B hole, and follow the below instruction.
or if both end holes. Mounting plate C. Using a keyhole saw...
Owners Manual - Page 18

... the wall. 4. If installing on a second wall stud, insert a lag screw into the remaining end hole. 6. And follow the propriated instruction to open.
3. A
A. A A. Spring toggle nut D. With the support tabs of mounting plate, ... at One End Hole" in the "Drill Holes in Step 2 of microwave oven, set aside.
Push the 2 bolts with toggle nut through the drywall, and finger tighten the bolts...
Owners Manual - Page 19

...
B
A
B
A. Connector 5. Lift blower motor out of the microwave. Connector
10. Reattach the 2 blower screws into the recessed holes in the back of microwave oven, and set aside.
A B
A. Blower motor wire B. Holes
19
Diagonal wire cutting pliers B. A
A. Hold the blower motor wire, put the wire through the blower motor bridge. Using diagonal...
Owners Manual - Page 22

... of the microwave oven is required, rotate microwave oven downward. A
3.
Support tabs 4. Failure to move and install or uninstall appliance. Using 2 or more people, lift microwave oven and ... thickness as the space between upper cabinet and microwave oven. With front of mounting plate, and set aside on each 1/4-20 x 3" flat-head bolt and place
inside upper cabinet near the 3/8"...
Owners Manual - Page 23

.../recycle all parts are in death, fire, or electrical shock.
3. Replace the fuse or reset the circuit breaker.
b. Set aside the ...installed. Spring
A. Bottom Plate
A
A. Check the operation of the cabinet D. 1/2"-3/4" (1.3-1.9 cm)
23 Hooks C. Plug microwave oven into a grounded 3 prong outlet.
� See the User Instructions for troubleshooting information.
8. If the problem...
Whirlpool WMMF7330RZ Reviews
We have not received any reviews for Whirlpool yet.