Whirlpool WMMF7330RW Support and Manuals
Get Help and Manuals for this Whirlpool item

View All Support Options Below
Free Whirlpool WMMF7330RW manuals!
Problems with Whirlpool WMMF7330RW?
Ask a Question
Free Whirlpool WMMF7330RW manuals!
Problems with Whirlpool WMMF7330RW?
Ask a Question
Popular Whirlpool WMMF7330RW Manual Pages
Bump Out Kit Installation Instructions - Page 1
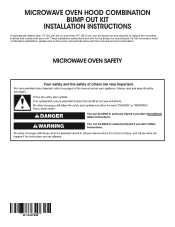
... Bump out mounting kit, for full microwave hood combination installation, please refer to replace the mounting bracket that came with your unit. These installation instructions are deeper than 13" (33 cm) but no more than 16" (40.6 cm), use the bump out mounting kit to the owner manual that comes with the microwave hood combination.
Bump Out Kit Installation Instructions - Page 3
...; Support for cooking. For Roof Venting Installation Only:
■ If you are not designed to withstand the heat produced by the microwave oven for weight of any obstructions so that the vent fit properly and the damper blade opens freely and fully. Parts Needed (Provided in the "Venting Design Specifications" section on the Owner Manual...
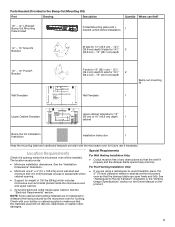
Bump Out Kit Installation Instructions - Page 4

... see below .
*36" (91.4 cm) is recommended for 72" (182.8 cm) installation height.
**30" (76.2 cm) is typical for 66" (167.6 cm) installation height.
*** Variable depth for 13" (33 cm) to
16" (40.6 cm)*** D....) wall stud B. See the "Electrical Requirements" section on the Owner Manual on type of range/cooktop below table, the sizes in left column are flush, the size in right column are stands out...
Owners Manual - Page 2
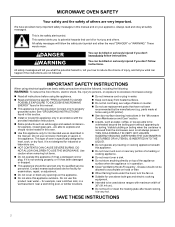
...nearest authorized service facility for...specific "PRECAUTIONS TO AVOID POSSIBLE EXPOSURE TO EXCESSIVE MICROWAVE ENERGY" found in this section.
� Install or locate this appliance only in accordance with maximum width of oven is in the manual. All safety messages will tell you what can be used above ranges with the provided Installation Instructions... use replacement parts that can...
Owners Manual - Page 3
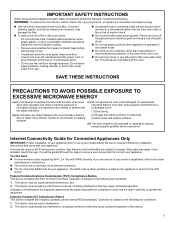
... be adjusted or repaired by the party responsible for compliance could void the user's authority to microwave energy. You Will Need: � A home wireless router supporting Wi-Fi, 2.4 Ghz with the safety interlocks.
(b) Do not place any interference received, including interference that there is subject to read and follow the installation instructions that may...
Owners Manual - Page 6
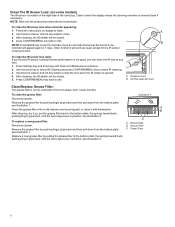
...IR Sensor Lens: (on some models)
The IR sensor is located on display to clean.
Bottom Plate B. Replace a new grease filter by putting... pull down from the bottom plate,
C.
Follow the instructions on the right-side of the microwave oven. After ...not clean the lens at any time.
1. Press Settings key and arrow key until the product becomes idle and...manual clean if necessary.
Owners Manual - Page 7
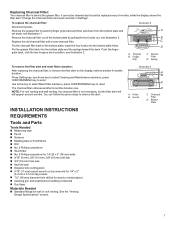
...behind the grease filter. See the "Venting Design Specifications" section. Remove the grease filter by pulling the four...replace the charcoal filter: Disconnect power. Remove the charcoal filter out of the bottom plate by pushing finger grips back and then pull down from the bottom plate and set aside, see illustration 2. Finger Grip
C. INSTALLATION INSTRUCTIONS
REQUIREMENTS
Tools and Parts...
Owners Manual - Page 9
...
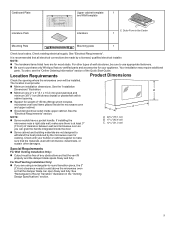
Check the opening .
� Support for cooking. See the "Electrical Requirements" section. The location must be sure to use appropriate fasteners. � Be sure to Round Transition" illustration in the Carton 1
Mounting Pate
Mounting plate
1
Check local codes. Outer Form in the "Venting Design Specifications" section.
9
For Roof Venting Installation Only:
� If you...
Owners Manual - Page 11
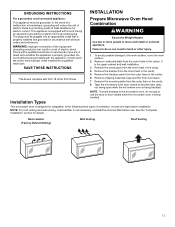
... (Factory Default Setting)
Wall Venting
Roof Venting
11 SAVE THESE INSTRUCTIONS
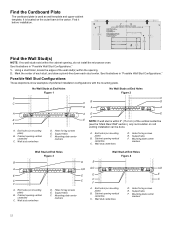
This device complies with a cord having an equipment-grounding conductor and a grounding plug. Remove the mounting plate from the outer foam in the cavity. 8. Installation Types
This microwave oven is equipped with Part 18 of electric shock. GROUNDING INSTRUCTIONS
INSTALLATION
For a grounded...
Owners Manual - Page 12
...
Wall Stud at End Holes Figure 2
B
C
C
CB
D
DA
A
A
E F
A. Support tabs F. See illustrations in "Possible Wall Stud Configurations." Possible Wall Stud Configurations
These depictions show examples ... Wall" section), only recirculation or roof
venting installation can be done. Cabinet opening , do not install the microwave oven. Support tabs F.
End holes (on mounting plate)...
Owners Manual - Page 17
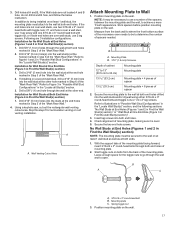
... follow the below instruction. Secure the two end hole screws. Spring toggle nut 3. Installation for No Wall Studs at One End Hole (Figure 3 in Step 3 of mounting plate.
2. If installing on at least ...1 wall stud, the mounting plate must be necessary to use two 3/16-24 x 3" round head bolts with toggle nut;
With the support tabs of the ...
Owners Manual - Page 18
...(s) and bolt. And follow the propriated instruction to the
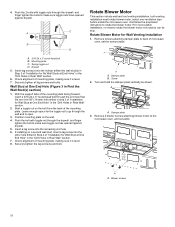
microwave oven, and set the screws aside. Remove screws attaching damper plate to back of "Installation for the toggle nut to go through ...plate C. Check alignment of the mounting plate. Damper plate 3. Spring toggle nut D. With the support tabs of the mounting plate facing forward, insert a 3/16-24 x 3" round-head bolt ...
Owners Manual - Page 19

...A. Rectangular damper vent cover
7. Blower motor bridge B. Holes
19 Exhaust ports face the back of the microwave. Lift blower motor out of microwave oven, and set aside. Reconnect the blower motor wire into the microwave oven. A B
8. Screws B. Connector
10. Lower blower motor back into the connector. A
A.
A
B
A.
A
A. Using diagonal wire cutting pliers...
Owners Manual - Page 22
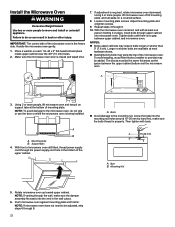
...place, insert bolts through 6. 10. To avoid warping, wood filter blocks (installer to the mounting nut, screw the bolts into microwave oven. A
3. ... do so can result in the bottom of mounting plate. Support tabs 4. Mounting Nut
5. NOTE: If venting through the power... microwave oven. IMPORTANT: The control side of mounting plate, and set aside on each 1/4-20 x 3" flat-head bolt and place
...
Owners Manual - Page 23
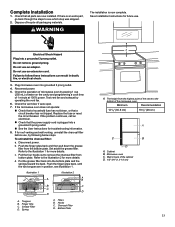
...operation of the microwave oven. Replace the fuse or reset the ...Set aside the grease filter. Wall or back of /recycle all parts are in death, fire, or electrical shock.
3.
Put the grease filter back into grounded 3 prong outlet.
4. Finger Grip C. WARNING
The installation is now complete. Electrical Shock Hazard Plug into a grounded 3 prong outlet.
� See the User Instructions...
Whirlpool WMMF7330RW Reviews
We have not received any reviews for Whirlpool yet.