Installation Guide
Page 1
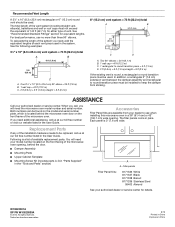
... Wall 8 Prepare Upper Cabinet 8 Install Damper Assembly 9 Install the Microwave Oven 9 Complete Installation 10 VENTING DESIGN SPECIFICATIONS 11 ASSISTANCE 12 Replacement Parts 12 Accessories 12 MICROWAVE HOOD COMBINATION SAFETY Your safety and the safety of injury, and tell...safety messages will tell you what can be killed or seriously injured if you and others are not followed. Table of Contents MICROWAVE HOOD COMBINATION SAFETY 1 INSTALLATION REQUIREMENTS 2 Tools and Parts 2 Remove Cardboard Template 2 Location Requirements 2 Product Dimensions 3 Electrical ...
... Wall 8 Prepare Upper Cabinet 8 Install Damper Assembly 9 Install the Microwave Oven 9 Complete Installation 10 VENTING DESIGN SPECIFICATIONS 11 ASSISTANCE 12 Replacement Parts 12 Accessories 12 MICROWAVE HOOD COMBINATION SAFETY Your safety and the safety of injury, and tell...safety messages will tell you what can be killed or seriously injured if you and others are not followed. Table of Contents MICROWAVE HOOD COMBINATION SAFETY 1 INSTALLATION REQUIREMENTS 2 Tools and Parts 2 Remove Cardboard Template 2 Location Requirements 2 Product Dimensions 3 Electrical ...
Installation Guide
Page 2
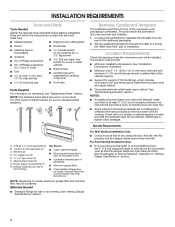
... dimensions. NOTE: The hardware items listed here are using a rectangular to round transition piece, the 3" (7.6 cm) clearance needs to exist above the microwave oven so that the materials used will be combined. C\zn" toggle nuts (2) E. Sheet metal screws (2) G. See "Rectangular to make sure there is...illustration in "Venting Design Specifications" section. 2 For other damages. The location must be free of clearance between the wall and the microwave oven, so that the vent fits properly, and the damper blade opens freely and fully. Location Requirements Check the opening . &#...
... dimensions. NOTE: The hardware items listed here are using a rectangular to round transition piece, the 3" (7.6 cm) clearance needs to exist above the microwave oven so that the materials used will be combined. C\zn" toggle nuts (2) E. Sheet metal screws (2) G. See "Rectangular to make sure there is...illustration in "Venting Design Specifications" section. 2 For other damages. The location must be free of clearance between the wall and the microwave oven, so that the vent fits properly, and the damper blade opens freely and fully. Location Requirements Check the opening . &#...
Installation Guide
Page 3
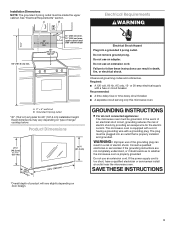
...remove ground prong. Recommended: ■■ A time-delay fuse or time-delay circuit breaker. ■■ A separate circuit serving only this microwave oven. GROUNDING INSTRUCTIONS I For all governing codes and ordinances. Do not use an extension cord. Required: ■■ A 120 volt, 60 ... 3 prong outlet *30" (76.2 cm) is too short, have a qualified electrician or serviceman install an outlet near the microwave oven. Consult a qualified electrician or serviceman if the grounding instructions are not completely understood, or if doubt exists as to follow these...
...remove ground prong. Recommended: ■■ A time-delay fuse or time-delay circuit breaker. ■■ A separate circuit serving only this microwave oven. GROUNDING INSTRUCTIONS I For all governing codes and ordinances. Do not use an extension cord. Required: ■■ A 120 volt, 60 ... 3 prong outlet *30" (76.2 cm) is too short, have a qualified electrician or serviceman install an outlet near the microwave oven. Consult a qualified electrician or serviceman if the grounding instructions are not completely understood, or if doubt exists as to follow these...
Installation Guide
Page 4
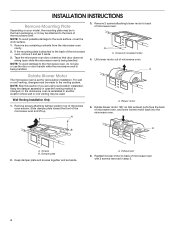
... work surface. 1. Remove 2 screws attaching blower motor to back of microwave oven exterior. Wall Venting Installation Only 1. A B A. Remove any remaining contents from the microwave oven cavity. 2. A Rotate Blower Motor The microwave oven is reinstalled in step 3. 4 Keep the damper assembly in case...A A. NOTE: Skip this section if you are using recirculation installation. Damper plate 2. Reattach blower motor to the back of microwave oven. If the mounting plate is being handled. 3. Remove screws attaching damper plate to the venting system. Rotate blower motor ...
... work surface. 1. Remove 2 screws attaching blower motor to back of microwave oven exterior. Wall Venting Installation Only 1. A B A. Remove any remaining contents from the microwave oven cavity. 2. A Rotate Blower Motor The microwave oven is reinstalled in step 3. 4 Keep the damper assembly in case...A A. NOTE: Skip this section if you are using recirculation installation. Damper plate 2. Reattach blower motor to the back of microwave oven. If the mounting plate is being handled. 3. Remove screws attaching damper plate to the venting system. Rotate blower motor ...
Installation Guide
Page 5
...Damper plate B. Screws C. Slots 8. Repeat Step 3 from "Wall Venting Installation Only." 2. Damper plate tabs D. Reattach blower motor to the microwave oven. 7. A C D A. Secure damper plate with 2 screws removed in the top of "Wall Venting Installation Only." NOTE: If blower...motor is not correctly oriented, the 2 screws removed in Step 1. Securely tighten screws. Secure damper plate with flat sides facing the back of microwave oven. Repeat Step 2 from "Wall Venting Installation Only." 5. Damper plate tabs D. Repeat Step 4 from "Wall Venting Installation Only." 3. ...
...Damper plate B. Screws C. Slots 8. Repeat Step 3 from "Wall Venting Installation Only." 2. Damper plate tabs D. Reattach blower motor to the microwave oven. 7. A C D A. Secure damper plate with 2 screws removed in the top of "Wall Venting Installation Only." NOTE: If blower...motor is not correctly oriented, the 2 screws removed in Step 1. Securely tighten screws. Secure damper plate with flat sides facing the back of microwave oven. Repeat Step 2 from "Wall Venting Installation Only." 5. Damper plate tabs D. Repeat Step 4 from "Wall Venting Installation Only." 3. ...
Installation Guide
Page 6
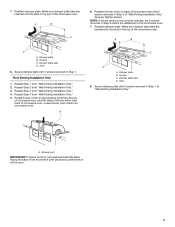
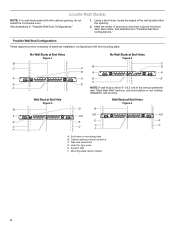
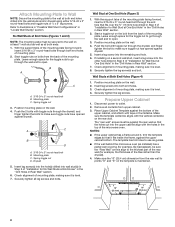
... lag screws E. Wall stud centerlines D. Possible Wall Stud Configurations These depictions show examples of the wall stud(s) within the cabinet opening, do not install the microwave oven. Using a stud finder, locate the edges of preferred installation configurations with the mounting plate. End holes (on mounting plate) B. Mark the center of the...
... lag screws E. Wall stud centerlines D. Possible Wall Stud Configurations These depictions show examples of the wall stud(s) within the cabinet opening, do not install the microwave oven. Using a stud finder, locate the edges of preferred installation configurations with the mounting plate. End holes (on mounting plate) B. Mark the center of the...
Installation Guide
Page 7
... two 3/16-24 x 3" round-head bolts with each be installed on both sides of upper cabinet 3. Following are ideal hole locations. 7. Mark Rear Wall The microwave oven must be 14¹⁄₈" (35.9 cm) from the centerline. 5. A 6. Holding the mounting plate in place, find and clearly mark the vertical centerline...
... two 3/16-24 x 3" round-head bolts with each be installed on both sides of upper cabinet 3. Following are ideal hole locations. 7. Mark Rear Wall The microwave oven must be 14¹⁄₈" (35.9 cm) from the centerline. 5. A 6. Holding the mounting plate in place, find and clearly mark the vertical centerline...
Installation Guide
Page 8
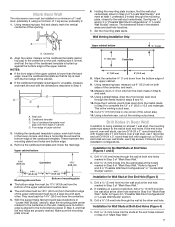
... in "Locate Wall Stud(s)" section. The template has trim lines to use as guides. ■■ If the wall behind the microwave oven (as at both end holes of the microwave oven. Refer to make sure toggle nut has opened against drywall. Position mounting plate on the wall. 4. If installing on the...
... in "Locate Wall Stud(s)" section. The template has trim lines to use as guides. ■■ If the wall behind the microwave oven (as at both end holes of the microwave oven. Refer to make sure toggle nut has opened against drywall. Position mounting plate on the wall. 4. If installing on the...
Installation Guide
Page 9
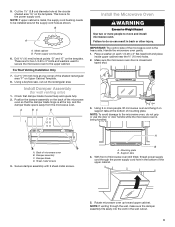
... A A. Cut C\v" (19 mm) hole at the circular shaded area "G" on the back of microwave oven B. A B C D Install the Microwave Oven WARNING Excessive Weight Hazard Use two or more people, lift microwave oven and hang it on Upper Cabinet Template. 8. Using a keyhole saw, cut out the rectangular area...wall cutout. 9 Place a washer on the template. Power supply cord bushing 6. Position the damper assembly on the template. Make sure the microwave oven door is for wall venting only) 1. Cut the 1¹⁄₂" (3.8 cm) diameter hole at one corner of the upper cabinet...
... A A. Cut C\v" (19 mm) hole at the circular shaded area "G" on the back of microwave oven B. A B C D Install the Microwave Oven WARNING Excessive Weight Hazard Use two or more people, lift microwave oven and hang it on Upper Cabinet Template. 8. Using a keyhole saw, cut out the rectangular area...wall cutout. 9 Place a washer on the template. Power supply cord bushing 6. Position the damper assembly on the template. Make sure the microwave oven door is for wall venting only) 1. Cut the 1¹⁄₂" (3.8 cm) diameter hole at one corner of the upper cabinet...
Installation Guide
Page 10
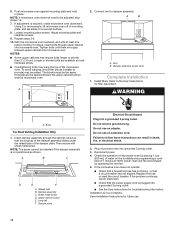
...assembly slides under vent) Complete Installation 1. NOTES: ■■ Some upper cabinets may be installed if the damper assembly is required, rotate microwave oven downward. Vent B. Long tab F. Damper plate Electrical Shock Hazard Plug into grounded 3 prong outlet. 3. Install filters. Do not use .... 10 Repeat steps 3-6. 10. A B A. Bolts For Roof Venting Installation Only 1. Plug microwave oven into a grounded 3 prong outlet. Raised tabs B. Test vent fan and exhaust by placing 1 cup (250 mL) of water on a ...
...assembly slides under vent) Complete Installation 1. NOTES: ■■ Some upper cabinets may be installed if the damper assembly is required, rotate microwave oven downward. Vent B. Long tab F. Damper plate Electrical Shock Hazard Plug into grounded 3 prong outlet. 3. Install filters. Do not use .... 10 Repeat steps 3-6. 10. A B A. Bolts For Roof Venting Installation Only 1. Plug microwave oven into a grounded 3 prong outlet. Raised tabs B. Test vent fan and exhaust by placing 1 cup (250 mL) of water on a ...
Installation Guide
Page 11
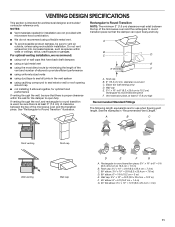
...figuring vent length. diameter round vent C. Vent extension piece, at least 3" (7.6 cm) of clearance between the top of the microwave oven and the rectangular to round transition piece so that there is proper clearance within walls or ceilings, attics, crawl spaces or... DESIGN SPECIFICATIONS This section is at least 3" (7.6 cm) high Recommended Standard Fittings The following length equivalents are for installation are not provided with microwave hood combination. ■■ We do not recommend using a flexible metal vent. ■■ To avoid possible product damage, be sure ...
...figuring vent length. diameter round vent C. Vent extension piece, at least 3" (7.6 cm) of clearance between the top of the microwave oven and the rectangular to round transition piece so that there is proper clearance within walls or ceilings, attics, crawl spaces or... DESIGN SPECIFICATIONS This section is at least 3" (7.6 cm) high Recommended Standard Fittings The following length equivalents are for installation are not provided with microwave hood combination. ■■ We do not recommend using a flexible metal vent. ■■ To avoid possible product damage, be sure ...
Installation Guide
Page 12
... be used . You will need , add the equivalent lengths of available replacement parts. The total length of the microwave oven opening . In addition, a rectangular 3" (7.6 cm) extension vent between the damper assembly and rectangular to round... m) + 6 ft (1.8 m) straight = 8 ft (2.4 m) 6" (15.2 cm) vent system = 73 ft (22.2 m) total A B 6 ft (1.8 m) 2 ft (0.6 m) C D A. When you need the microwave oven model number and serial number. Following is 3" (7.6 cm) wide. All rights reserved. Recommended Vent Length A 3¹⁄₄" x 10" (8.3 x 25.4 cm) rectangular or 6" (15...
... be used . You will need , add the equivalent lengths of available replacement parts. The total length of the microwave oven opening . In addition, a rectangular 3" (7.6 cm) extension vent between the damper assembly and rectangular to round... m) + 6 ft (1.8 m) straight = 8 ft (2.4 m) 6" (15.2 cm) vent system = 73 ft (22.2 m) total A B 6 ft (1.8 m) 2 ft (0.6 m) C D A. When you need the microwave oven model number and serial number. Following is 3" (7.6 cm) wide. All rights reserved. Recommended Vent Length A 3¹⁄₄" x 10" (8.3 x 25.4 cm) rectangular or 6" (15...
Dimension Guide
Page 1
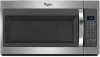
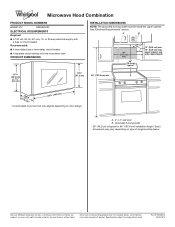
... Installation Instructions packed with a fuse or circuit breaker. Ref. Because Whirlpool Corporation includes a continuous commitment to improve our products, we reserve the right to change materials and specifications without notice. Microwave Hood Combination PRODUCT MODEL NUMBERS WMH31017 WMH32519F ELECTRICAL REQUIREMENTS Required: ■&#...■■ A time-delay fuse or time-delay circuit breaker. ■■ A separate circuit serving only this microwave oven. Exact dimensions may vary depending on type of product will vary slightly depending on door design.
... Installation Instructions packed with a fuse or circuit breaker. Ref. Because Whirlpool Corporation includes a continuous commitment to improve our products, we reserve the right to change materials and specifications without notice. Microwave Hood Combination PRODUCT MODEL NUMBERS WMH31017 WMH32519F ELECTRICAL REQUIREMENTS Required: ■&#...■■ A time-delay fuse or time-delay circuit breaker. ■■ A separate circuit serving only this microwave oven. Exact dimensions may vary depending on type of product will vary slightly depending on door design.
Use & Care Guide
Page 1
... with the provided Installation Instructions. WARNING You can happen if the instructions are very important. IMPORTANT SAFETY INSTRUCTIONS When using the microwave oven. I Read and follow instructions. Puede encontrar su número de modelo y de serie en la etiqueta ubicada en... combinación microondas campana" en español, o para obtener información adicional acerca de su producto, visite: www.whirlpool.com Tenga listo su número de modelo completo. Always read and obey all instructions before using electrical appliances basic safety precautions ...
... with the provided Installation Instructions. WARNING You can happen if the instructions are very important. IMPORTANT SAFETY INSTRUCTIONS When using the microwave oven. I Read and follow instructions. Puede encontrar su número de modelo y de serie en la etiqueta ubicada en... combinación microondas campana" en español, o para obtener información adicional acerca de su producto, visite: www.whirlpool.com Tenga listo su número de modelo completo. Always read and obey all instructions before using electrical appliances basic safety precautions ...

Use & Care Guide
Page 2
...only by qualified service personnel. Stir the liquid both gas and electric cooking equipment. After heating, allow soil or cleaner residue to microwave energy. Use extreme care when inserting a spoon or other reproductive harm. 2 I See door surface cleaning instructions in harmful exposure ...is necessary when used above both before removing the container. - I Intended to heat, cook, or dry food. I The microwave oven should not be adjusted or repaired by children. It is specifically designed to be used by anyone except properly qualified service personnel...
...only by qualified service personnel. Stir the liquid both gas and electric cooking equipment. After heating, allow soil or cleaner residue to microwave energy. Use extreme care when inserting a spoon or other reproductive harm. 2 I See door surface cleaning instructions in harmful exposure ...is necessary when used above both before removing the container. - I Intended to heat, cook, or dry food. I The microwave oven should not be adjusted or repaired by children. It is specifically designed to be used by anyone except properly qualified service personnel...
Use & Care Guide
Page 3
...an extension cord. Recommended: ■■ A time-delay fuse or time-delay circuit breaker. ■■ A separate circuit serving only this microwave oven. Do not use an extension cord. If the power supply cord is counting down. Repeat to turn back on the magnetron. Vent Timer... (on . To turn off all cord connected appliances: The microwave oven must be grounded. Touch and hold number pad "4" for about 3 seconds until a confirmation tone sounds. Observe all tones (including end...
...an extension cord. Recommended: ■■ A time-delay fuse or time-delay circuit breaker. ■■ A separate circuit serving only this microwave oven. Do not use an extension cord. If the power supply cord is counting down. Repeat to turn back on the magnetron. Vent Timer... (on . To turn off all cord connected appliances: The microwave oven must be grounded. Touch and hold number pad "4" for about 3 seconds until a confirmation tone sounds. Observe all tones (including end...

Use & Care Guide
Page 4
... then rinse with clean water and dry with screws. ■■ Cooktop light: The cooktop light bulb is replaceable. Cookware and Dinnerware Microwave-Safe ■■ Browning dish (Follow manufacturer recommendations.) ■■ Ceramic glass, glass ■■ China, earthenware (Follow manufacturer recommendations...1 cup (250 mL) of water beside it out, and remove filter. Remove two screws on the underside of the microwave oven. MICROWAVE OVEN CARE General Cleaning IMPORTANT: Before cleaning, make sure all controls are on the vent grille, tilt the grille forward, ...
... then rinse with clean water and dry with screws. ■■ Cooktop light: The cooktop light bulb is replaceable. Cookware and Dinnerware Microwave-Safe ■■ Browning dish (Follow manufacturer recommendations.) ■■ Ceramic glass, glass ■■ China, earthenware (Follow manufacturer recommendations...1 cup (250 mL) of water beside it out, and remove filter. Remove two screws on the underside of the microwave oven. MICROWAVE OVEN CARE General Cleaning IMPORTANT: Before cleaning, make sure all controls are on the vent grille, tilt the grille forward, ...
Use & Care Guide
Page 5
... Magnetron - If the problem continues, call . Try to the cover for 2 minutes at left with your mobile device, or visit www.whirlpool.com/product_help for 5 minutes or more recommendations that may be purchased separately. Open and close door. Make sure control is normal. Make sure... Control Lock is off . Make sure Demo Mode (on . Soil buildup on during microwave oven operation. 5 Fan running during cooktop usage ■■ This is set properly. Radio, TV or cordless phone interference Check the following:...
... Magnetron - If the problem continues, call . Try to the cover for 2 minutes at left with your mobile device, or visit www.whirlpool.com/product_help for 5 minutes or more recommendations that may be purchased separately. Open and close door. Make sure control is normal. Make sure... Control Lock is off . Make sure Demo Mode (on . Soil buildup on during microwave oven operation. 5 Fan running during cooktop usage ■■ This is set properly. Radio, TV or cordless phone interference Check the following:...


