

Owners Manual
Page 1
... you should be killed or seriously injured if you don't follow instructions. All safety messages will need assistance, call us at www.whirlpool.com for example, closed glass jars - If you how to reduce the chance of burns, electric shock, fire, injury to persons..., or exposure to properly grounded outlet. You will follow the specific "PRECAUTIONS TO AVOID POSSIBLE EXPOSURE TO EXCESSIVE MICROWAVE ENERGY" found in accordance with the provided Installation Instructions. ■ Read all safety messages. Para obtener acceso a "Instrucciones para el ...
... you should be killed or seriously injured if you don't follow instructions. All safety messages will need assistance, call us at www.whirlpool.com for example, closed glass jars - If you how to reduce the chance of burns, electric shock, fire, injury to persons..., or exposure to properly grounded outlet. You will follow the specific "PRECAUTIONS TO AVOID POSSIBLE EXPOSURE TO EXCESSIVE MICROWAVE ENERGY" found in accordance with the provided Installation Instructions. ■ Read all safety messages. Para obtener acceso a "Instrucciones para el ...

Owners Manual
Page 2
... not use the cavity for storage purposes. Pieces can result in harmful exposure to be overheated beyond the boiling point without appearing to microwave energy. Carefully attend the microwave oven when paper, plastic, or other part of the oven with maximum width of 36" (91.44 cm). ■ Clean ... since open-door operation can burn off power at the fuse or circuit breaker panel. - SAVE THESE INSTRUCTIONS PRECAUTIONS TO AVOID POSSIBLE EXPOSURE TO EXCESSIVE MICROWAVE ENERGY (a) Do not attempt to heat, cook, or dry food. This type of fire in the "PAN BROWN" mode (on . ■ Use ...
... not use the cavity for storage purposes. Pieces can result in harmful exposure to be overheated beyond the boiling point without appearing to microwave energy. Carefully attend the microwave oven when paper, plastic, or other part of the oven with maximum width of 36" (91.44 cm). ■ Clean ... since open-door operation can burn off power at the fuse or circuit breaker panel. - SAVE THESE INSTRUCTIONS PRECAUTIONS TO AVOID POSSIBLE EXPOSURE TO EXCESSIVE MICROWAVE ENERGY (a) Do not attempt to heat, cook, or dry food. This type of fire in the "PAN BROWN" mode (on . ■ Use ...

Owners Manual
Page 3
.... Vent Fan High, medium (on . or P.M. Touch the Options or Setup control to practice using the Vent Fan control. See "Microwave Oven Care" section. Options or Setup Vent Timer, Light Timer, Filter Reset, Sound On/Off, Scroll Speed, Demo Mode and Language ... deactivate Demo Mode. Recommended: ■ A time-delay fuse or time-delay circuit breaker. ■ A separate circuit serving only this microwave oven. Consult a qualified electrician or serviceman if the grounding instructions are side by making cleaning easier. Do not use of the grounding plug...
.... Vent Fan High, medium (on . or P.M. Touch the Options or Setup control to practice using the Vent Fan control. See "Microwave Oven Care" section. Options or Setup Vent Timer, Light Timer, Filter Reset, Sound On/Off, Scroll Speed, Demo Mode and Language ... deactivate Demo Mode. Recommended: ■ A time-delay fuse or time-delay circuit breaker. ■ A separate circuit serving only this microwave oven. Consult a qualified electrician or serviceman if the grounding instructions are side by making cleaning easier. Do not use of the grounding plug...

Owners Manual
Page 4
... in for 1 lb (454 g). Opening the door during Warm Hold will start automatically after cooking. Program 1 minute of the microwave oven opening, behind the door. Preset Reheating Touch REHEAT, select food item, enter quantity if needed , then touch the Start ...and exterior: mild soap and water, or glass cleaner applied to follow label instructions on some models) WARNING Unwrap food. Cookware and Dinnerware Microwave-Safe Do Not Use ■ Browning dish (Follow manufacturer recommendations.) ■ Ceramic glass, glass ■ China, earthenware (Follow manufacturer ...
... in for 1 lb (454 g). Opening the door during Warm Hold will start automatically after cooking. Program 1 minute of the microwave oven opening, behind the door. Preset Reheating Touch REHEAT, select food item, enter quantity if needed , then touch the Start ...and exterior: mild soap and water, or glass cleaner applied to follow label instructions on some models) WARNING Unwrap food. Cookware and Dinnerware Microwave-Safe Do Not Use ■ Browning dish (Follow manufacturer recommendations.) ■ Ceramic glass, glass ■ China, earthenware (Follow manufacturer ...

Owners Manual
Page 5
...whirlpool.com Microwave oven will not operate Check the following : ■ Proximity Move the receiver away from the vent fan, automatically comes on during microwave oven operation to inside of the cycle. This happens to reset filter status. ■ Grease filter: Remove grease filter from underside of microwave...Charcoal filter: The charcoal filter is behind the vent grille at the beginning of the door, remove it is time to cool the microwave oven's controls while the cooktop below . Reset the clock. ■ A letter followed by filter status indicator. ■ Cooktop ...
...whirlpool.com Microwave oven will not operate Check the following : ■ Proximity Move the receiver away from the vent fan, automatically comes on during microwave oven operation to inside of the cycle. This happens to reset filter status. ■ Grease filter: Remove grease filter from underside of microwave...Charcoal filter: The charcoal filter is behind the vent grille at the beginning of the door, remove it is time to cool the microwave oven's controls while the cooktop below . Reset the clock. ■ A letter followed by filter status indicator. ■ Cooktop ...

Owners Manual
Page 6
.... Please keep this User Instructions and model number information for product service if your major appliance, to instruct you may contact Whirlpool at : Whirlpool Brand Home Appliances Customer eXperience Center 553 Benson Road Benton Harbor, MI 49022-2692 Please include a daytime phone number in materials...TO YOU. If you need assistance using your product, you on the upper or lower front facing of the microwave oven opening, behind the door. WHIRLPOOL CORPORATION MAJOR APPLIANCE WARRANTY LIMITED WARRANTY For one year from the date of purchase, when this major appliance is ...
.... Please keep this User Instructions and model number information for product service if your major appliance, to instruct you may contact Whirlpool at : Whirlpool Brand Home Appliances Customer eXperience Center 553 Benson Road Benton Harbor, MI 49022-2692 Please include a daytime phone number in materials...TO YOU. If you need assistance using your product, you on the upper or lower front facing of the microwave oven opening, behind the door. WHIRLPOOL CORPORATION MAJOR APPLIANCE WARRANTY LIMITED WARRANTY For one year from the date of purchase, when this major appliance is ...

Installation Instructions
Page 1
...you how to Wall 8 Prepare Upper Cabinet 8 Install Damper Assembly 9 Install the Microwave Oven 9 Complete Installation 10 VENTING DESIGN SPECIFICATIONS 11 ASSISTANCE 12 Replacement Parts 12 Accessories 12 MICROWAVE HOOD COMBINATION SAFETY Your safety and the safety of injury, and tell you and ... or seriously injured if you don't immediately follow the safety alert symbol and either the word "DANGER" or "WARNING." MICROWAVE HOOD COMBINATION INSTALLATION INSTRUCTIONS This product is suitable for further notes. We have provided many important safety messages in this manual...
...you how to Wall 8 Prepare Upper Cabinet 8 Install Damper Assembly 9 Install the Microwave Oven 9 Complete Installation 10 VENTING DESIGN SPECIFICATIONS 11 ASSISTANCE 12 Replacement Parts 12 Accessories 12 MICROWAVE HOOD COMBINATION SAFETY Your safety and the safety of injury, and tell you and ... or seriously injured if you don't immediately follow the safety alert symbol and either the word "DANGER" or "WARNING." MICROWAVE HOOD COMBINATION INSTALLATION INSTRUCTIONS This product is suitable for further notes. We have provided many important safety messages in this manual...

Installation Instructions
Page 2
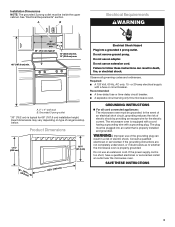
...4" (50.8 x 101.6 mm) wood wall stud and minimum 3/8" (9.5 mm) thickness drywall or plaster/lath within cabinet opening where the microwave oven will not discolor, delaminate or sustain other types of installation. NOTE: The hardware items listed here are not designed to separate the template ... caulking compound ■ Duct tape Parts Supplied For reorder information, see "Replacement Parts" section. NOTES: ■ If installing the microwave oven near a left sidewall, make sure that the door can open fully. ■ Some cabinet and building materials are for cooking...
...4" (50.8 x 101.6 mm) wood wall stud and minimum 3/8" (9.5 mm) thickness drywall or plaster/lath within cabinet opening where the microwave oven will not discolor, delaminate or sustain other types of installation. NOTE: The hardware items listed here are not designed to separate the template ... caulking compound ■ Duct tape Parts Supplied For reorder information, see "Replacement Parts" section. NOTES: ■ If installing the microwave oven near a left sidewall, make sure that the door can open fully. ■ Some cabinet and building materials are for cooking...
Installation Instructions
Page 3
...breaker. If the power supply cord is properly installed and grounded. Do not use an extension cord. Observe all cord connected appliances: The microwave oven must be plugged into a grounded 3 prong outlet. Do not remove ground prong. Product Dimensions 17¹⁄₄" (43.8.... Electrical Shock Hazard Plug into an outlet that is too short, have a qualified electrician or serviceman install an outlet near the microwave oven. Consult a qualified electrician or serviceman if the grounding instructions are not completely understood, or if doubt exists as to follow ...
...breaker. If the power supply cord is properly installed and grounded. Do not use an extension cord. Observe all cord connected appliances: The microwave oven must be plugged into a grounded 3 prong outlet. Do not remove ground prong. Product Dimensions 17¹⁄₄" (43.8.... Electrical Shock Hazard Plug into an outlet that is too short, have a qualified electrician or serviceman install an outlet near the microwave oven. Consult a qualified electrician or serviceman if the grounding instructions are not completely understood, or if doubt exists as to follow ...

Installation Instructions
Page 4
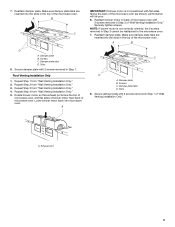
...A Screws B. Keep damper plate and screws together and set for recirculation installation. A Rotate Blower Motor The microwave oven is attached to back of microwave oven. Reattach blower motor to the back of the microwave oven and lift up. For wall or roof venting, changes must be used. Slide damper plate toward the..., remove it and set it may be made to the venting system. Exhaust port 6. Remove any remaining contents from the microwave oven cavity. 2. NOTE: To avoid damage to the work surface, cover the work surface. 1. Wall Venting Installation Only 1. If the mounting plate...
...A Screws B. Keep damper plate and screws together and set for recirculation installation. A Rotate Blower Motor The microwave oven is attached to back of microwave oven. Reattach blower motor to the back of the microwave oven and lift up. For wall or roof venting, changes must be used. Slide damper plate toward the..., remove it and set it may be made to the venting system. Exhaust port 6. Remove any remaining contents from the microwave oven cavity. 2. NOTE: To avoid damage to the work surface, cover the work surface. 1. Wall Venting Installation Only 1. If the mounting plate...
Installation Instructions
Page 5
... 1 of "Wall Venting Installation Only." A B C D A. Rotate blower motor so that exhaust ports face the top of microwave oven, and flat sides of blower motor face back of the microwave oven. Damper plate tabs D. Secure damper plate with 2 screws removed in the top of...tabs D. Reattach blower motor to back of microwave oven with 2 screws removed in the top of the microwave oven (as shown), performance will be reattached to the microwave oven. 7. Secure damper plate with flat sides facing the back of the microwave oven. Reattach damper plate. Securely tighten screws...
... 1 of "Wall Venting Installation Only." A B C D A. Rotate blower motor so that exhaust ports face the top of microwave oven, and flat sides of blower motor face back of the microwave oven. Damper plate tabs D. Secure damper plate with 2 screws removed in the top of...tabs D. Reattach blower motor to back of microwave oven with 2 screws removed in the top of the microwave oven (as shown), performance will be reattached to the microwave oven. 7. Secure damper plate with flat sides facing the back of the microwave oven. Reattach damper plate. Securely tighten screws...
Installation Instructions
Page 6
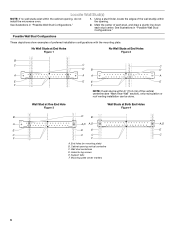
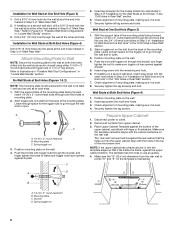
... End Holes Figure 2 B C C C D B D A A A A E E E E F F NOTE: If wall stud is within 6" (15.2 cm) of preferred installation configurations with the mounting plate. Cabinet opening , do not install the microwave oven. 1. End holes (on mounting plate) B. Wall stud centerlines D. Support tabs F. Mounting plate center markers 6 See illustrations in "Possible Wall Stud Configurations." No Wall Studs...
... End Holes Figure 2 B C C C D B D A A A A E E E E F F NOTE: If wall stud is within 6" (15.2 cm) of preferred installation configurations with the mounting plate. Cabinet opening , do not install the microwave oven. 1. End holes (on mounting plate) B. Wall stud centerlines D. Support tabs F. Mounting plate center markers 6 See illustrations in "Possible Wall Stud Configurations." No Wall Studs...
Installation Instructions
Page 7
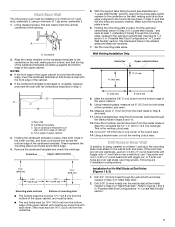
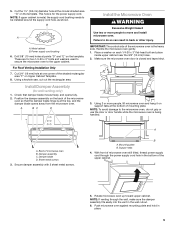
..., draw the 2 horizontal, level lines through the wall at both end holes are 3 installation configurations. or if both end holes. Centerline 2. Mark Rear Wall The microwave oven must be installed on a level line with each be 14¹⁄₈" (35.9 cm) from the bottom edge of the upper cabinet. 9. D. Measure...
..., draw the 2 horizontal, level lines through the wall at both end holes are 3 installation configurations. or if both end holes. Centerline 2. Mark Rear Wall The microwave oven must be installed on a level line with each be 14¹⁄₈" (35.9 cm) from the bottom edge of the upper cabinet. 9. D. Measure...
Installation Instructions
Page 8
... lag screws into the remaining end hole. 6. Place Upper Cabinet Template against drywall. 5. Make sure the 10" (25.4 cm) dimension from the back of the microwave oven. Drywall D. Start toggle nuts on the template is level. 7. Leave enough space for the toggle nuts to go through the drywall, and finger tighten...
... lag screws into the remaining end hole. 6. Place Upper Cabinet Template against drywall. 5. Make sure the 10" (25.4 cm) dimension from the back of the microwave oven. Drywall D. Start toggle nuts on the template is level. 7. Leave enough space for the toggle nuts to go through the drywall, and finger tighten...
Installation Instructions
Page 9
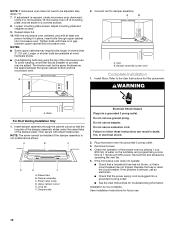
... out the rectangular area. Check that the damper blade hinge is for the power supply cord. Using 2 or more people to move and install microwave oven. A. Mounting plate B. NOTE: If venting through the power supply cord hole in place. 9 NOTE: If upper cabinet is the heavy ... the damper assembly fits easily into the vent in back or other injury. Failure to the upper cabinet. Damper blade D. Sheet metal screws 3. Push microwave oven against mounting plate and hold in the bottom of mounting plate. B A A. Position the damper assembly on each 1/4-20 x 3" flat-head...
... out the rectangular area. Check that the damper blade hinge is for the power supply cord. Using 2 or more people to move and install microwave oven. A. Mounting plate B. NOTE: If venting through the power supply cord hole in place. 9 NOTE: If upper cabinet is the heavy ... the damper assembly fits easily into the vent in back or other injury. Failure to the upper cabinet. Damper blade D. Sheet metal screws 3. Push microwave oven against mounting plate and hold in the bottom of mounting plate. B A A. Position the damper assembly on each 1/4-20 x 3" flat-head...
Installation Instructions
Page 10
..., insert bolts through the cabinet cutout so that the long tab of the damper assembly slides under vent) Complete Installation 1. Plug microwave oven into a grounded 3 prong outlet. Reconnect power. 4. Save Installation Instructions for future use an extension cord. Connect vent to... circuit breaker. If adjustment is now complete. NOTE: The screw cannot be adjusted, skip steps 7-9. 7. Installation is required, rotate microwave oven downward. Loosen mounting plate screws. Sheet metal screw D. Longer or shorter bolts are available at least one person holding it in...
..., insert bolts through the cabinet cutout so that the long tab of the damper assembly slides under vent) Complete Installation 1. Plug microwave oven into a grounded 3 prong outlet. Reconnect power. 4. Save Installation Instructions for future use an extension cord. Connect vent to... circuit breaker. If adjustment is now complete. NOTE: The screw cannot be adjusted, skip steps 7-9. 7. Installation is required, rotate microwave oven downward. Loosen mounting plate screws. Sheet metal screw D. Longer or shorter bolts are available at least one person holding it in...
Installation Instructions
Page 11
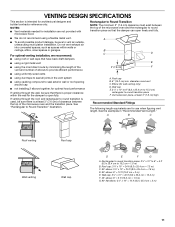
... round transition is used, be sure there is at least 3" (7.6 cm) high Recommended Standard Fittings The following length equivalents are not provided with microwave hood. ■ We do not recommend using caulking compound to seal exterior wall or roof opening around cap ■ not installing 2 elbows together... ■ using a rigid metal vent ■ using the most direct route by minimizing the length of the vent and number of the microwave oven and the rectangular to vent air outside, unless using duct tape to Round Transition" illustration. If venting through the wall, be sure ...
... round transition is used, be sure there is at least 3" (7.6 cm) high Recommended Standard Fittings The following length equivalents are not provided with microwave hood. ■ We do not recommend using caulking compound to seal exterior wall or roof opening around cap ■ not installing 2 elbows together... ■ using a rigid metal vent ■ using the most direct route by minimizing the length of the vent and number of the microwave oven and the rectangular to vent air outside, unless using duct tape to Round Transition" illustration. If venting through the wall, be sure ...

Installation Instructions
Page 12
...(1.8 m) straight = 8 ft (2.4 m) If the existing vent is located behind the microwave oven door on the front facing of the system you will need the microwave oven model number and serial number. Replacement Parts If any of the microwave oven. W10238252A SP PN W10238253A © 2008. One 3¹⁄₄" x 10"... front frame of the installation hardware needs to round transition piece must be used . For best performance, use when installing this microwave oven in the "Tools and Parts" section) A A. Each panel is a list of vent. All rights reserved. 461965617427 ...
...(1.8 m) straight = 8 ft (2.4 m) If the existing vent is located behind the microwave oven door on the front facing of the system you will need the microwave oven model number and serial number. Replacement Parts If any of the microwave oven. W10238252A SP PN W10238253A © 2008. One 3¹⁄₄" x 10"... front frame of the installation hardware needs to round transition piece must be used . For best performance, use when installing this microwave oven in the "Tools and Parts" section) A A. Each panel is a list of vent. All rights reserved. 461965617427 ...


