

Owners Manual
Page 1
...la combinación microondas campana" en español, o para obtener información adicional acerca de su producto, visite: www.whirlpool.com Tenga listo su número de modelo completo. WARNING You can be killed or seriously injured if you still need your model ... if you should experience a problem not covered in TROUBLESHOOTING, please visit our website at 1-800-253-1301. SAVE THESE INSTRUCTIONS W10182518A Microwave Hood Combination Safety Your safety and the safety of others . are very important. See "GROUNDING INSTRUCTIONS" found in this section. ■...
...la combinación microondas campana" en español, o para obtener información adicional acerca de su producto, visite: www.whirlpool.com Tenga listo su número de modelo completo. WARNING You can be killed or seriously injured if you still need your model ... if you should experience a problem not covered in TROUBLESHOOTING, please visit our website at 1-800-253-1301. SAVE THESE INSTRUCTIONS W10182518A Microwave Hood Combination Safety Your safety and the safety of others . are very important. See "GROUNDING INSTRUCTIONS" found in this section. ■...

Owners Manual
Page 2
...9632; Do not store any materials, other utensil into the container. ■ Oversized foods or oversized metal utensils should not be inserted in the microwave oven as water, coffee, or tea are placed inside the oven ignite, keep oven door closed, turn the fan on top of electric shock. ... close properly and that the oven door close supervision is not always present. Visible bubbling or boiling when the container is removed from the microwave oven is necessary when used above both before placing bags in operation. ■ When flambeing foods under the hood, turn oven off, and...
...9632; Do not store any materials, other utensil into the container. ■ Oversized foods or oversized metal utensils should not be inserted in the microwave oven as water, coffee, or tea are placed inside the oven ignite, keep oven door closed, turn the fan on top of electric shock. ... close properly and that the oven door close supervision is not always present. Visible bubbling or boiling when the container is removed from the microwave oven is necessary when used above both before placing bags in operation. ■ When flambeing foods under the hood, turn oven off, and...

Owners Manual
Page 3
... some models) functions. 3 Turntable Turntable may be turned off . This is too short, have a qualified electrician or serviceman install an outlet near the microwave oven. Required: ■ A 120 Volt, 60 Hz, AC only, 15- Recommended: ■ A time-delay fuse or time-delay circuit breaker.... ■ A separate circuit serving only this microwave oven. In the event of an electrical short circuit, grounding reduces the risk of electric shock. WARNING: Improper use an extension cord. Touch CLOCK,...
... some models) functions. 3 Turntable Turntable may be turned off . This is too short, have a qualified electrician or serviceman install an outlet near the microwave oven. Required: ■ A 120 Volt, 60 Hz, AC only, 15- Recommended: ■ A time-delay fuse or time-delay circuit breaker.... ■ A separate circuit serving only this microwave oven. In the event of an electrical short circuit, grounding reduces the risk of electric shock. WARNING: Improper use an extension cord. Touch CLOCK,...

Owners Manual
Page 4
...: mild soap and water or dishwasher. ■ Cooking rack and supports (on some models): mild soap, water and washcloth. Microwave Oven Use Manual Cooking/Stage Cooking Doneness (on some models) WARNING Unwrap food. Automatic defrost for automatic cooking functions (except Popcorn...and area where the door touches the frame clean. Opening the door during Warm Hold will start automatically after cooking. Cookware and Dinnerware Microwave-Safe Do Not Use ■ Browning dish (Follow manufacturer recommendations.) ■ Ceramic glass, glass ■ China, earthenware (Follow ...
...: mild soap and water or dishwasher. ■ Cooking rack and supports (on some models): mild soap, water and washcloth. Microwave Oven Use Manual Cooking/Stage Cooking Doneness (on some models) WARNING Unwrap food. Automatic defrost for automatic cooking functions (except Popcorn...and area where the door touches the frame clean. Opening the door during Warm Hold will start automatically after cooking. Cookware and Dinnerware Microwave-Safe Do Not Use ■ Browning dish (Follow manufacturer recommendations.) ■ Ceramic glass, glass ■ China, earthenware (Follow ...

Owners Manual
Page 5
... ■ Heavy Duty Degreaser ■ All-Purpose Appliance Cleaner ■ Stainless Steel Cleaner and Polish 5 www.whirlpool.com Microwave oven will not operate Check the following : ■ Proximity Move the receiver away from underside of microwave oven, and clean monthly, or as prompted by filter status indicator. ■ Charcoal filter: The charcoal filter...
... ■ Heavy Duty Degreaser ■ All-Purpose Appliance Cleaner ■ Stainless Steel Cleaner and Polish 5 www.whirlpool.com Microwave oven will not operate Check the following : ■ Proximity Move the receiver away from underside of microwave oven, and clean monthly, or as prompted by filter status indicator. ■ Charcoal filter: The charcoal filter...

Owners Manual
Page 6
...a manner that have access to the Internet and you need further assistance, you on the upper or lower front facing of the microwave oven opening, behind the door. Major appliances with published installation instructions. 11. This warranty is not installed in your major appliance for...MAY ALSO HAVE OTHER RIGHTS WHICH VARY FROM STATE TO STATE OR PROVINCE TO PROVINCE. You can write to Whirlpool with the product, Whirlpool Corporation or Whirlpool Canada LP (hereafter "Whirlpool") will pay for Factory Specified Parts and repair labor to correct house wiring or plumbing. 2. Outside the ...
...a manner that have access to the Internet and you need further assistance, you on the upper or lower front facing of the microwave oven opening, behind the door. Major appliances with published installation instructions. 11. This warranty is not installed in your major appliance for...MAY ALSO HAVE OTHER RIGHTS WHICH VARY FROM STATE TO STATE OR PROVINCE TO PROVINCE. You can write to Whirlpool with the product, Whirlpool Corporation or Whirlpool Canada LP (hereafter "Whirlpool") will pay for Factory Specified Parts and repair labor to correct house wiring or plumbing. 2. Outside the ...

Installation Instructions
Page 1
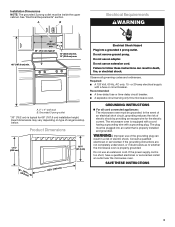
... you to reduce the chance of injury, and tell you what the potential hazard is the safety alert symbol. Table of Contents MICROWAVE HOOD COMBINATION SAFETY 1 INSTALLATION REQUIREMENTS 2 Tools and Parts 2 Remove Cardboard Template 2 Location Requirements 2 Product Dimensions 3 Electrical Requirements...Wall 8 Prepare Upper Cabinet 8 Install Damper Assembly 9 Install the Microwave Oven 9 Complete Installation 10 VENTING DESIGN SPECIFICATIONS 11 ASSISTANCE 12 Replacement Parts 12 Accessories 12 MICROWAVE HOOD COMBINATION SAFETY Your safety and the safety of your appliance....
... you to reduce the chance of injury, and tell you what the potential hazard is the safety alert symbol. Table of Contents MICROWAVE HOOD COMBINATION SAFETY 1 INSTALLATION REQUIREMENTS 2 Tools and Parts 2 Remove Cardboard Template 2 Location Requirements 2 Product Dimensions 3 Electrical Requirements...Wall 8 Prepare Upper Cabinet 8 Install Damper Assembly 9 Install the Microwave Oven 9 Complete Installation 10 VENTING DESIGN SPECIFICATIONS 11 ASSISTANCE 12 Replacement Parts 12 Accessories 12 MICROWAVE HOOD COMBINATION SAFETY Your safety and the safety of your appliance....

Installation Instructions
Page 2
...Power supply cord bushing (1) H. The piece inside upper cabinet. Set the cardboard template to the side and refer to exist above the microwave oven so that the vent fits properly, and the damper blade opens freely and fully. The location must be installed. See "Installation Dimensions...(50.8 x 101.6 mm) wood wall stud and minimum 3/8" (9.5 mm) thickness drywall or plaster/lath within cabinet opening where the microwave oven will not discolor, delaminate or sustain other types of packaging) Aluminum grease filters Charcoal filters (Depending on model, aluminum grease filter and...
...Power supply cord bushing (1) H. The piece inside upper cabinet. Set the cardboard template to the side and refer to exist above the microwave oven so that the vent fits properly, and the damper blade opens freely and fully. The location must be installed. See "Installation Dimensions...(50.8 x 101.6 mm) wood wall stud and minimum 3/8" (9.5 mm) thickness drywall or plaster/lath within cabinet opening where the microwave oven will not discolor, delaminate or sustain other types of packaging) Aluminum grease filters Charcoal filters (Depending on model, aluminum grease filter and...
Installation Instructions
Page 3
...if doubt exists as to follow these instructions can result in death, fire, or electrical shock. Do not use an extension cord. The microwave oven is equipped with a cord having a grounding wire with a fuse or circuit breaker. Electrical Shock Hazard Plug into an outlet that is... typical for the electric current. Recommended: ■ A time-delay fuse or time-delay circuit breaker. ■ A separate circuit serving only this microwave oven. A. 2" x 4" wall stud B. Do not use an extension cord. Exact dimensions may vary depending on type of electric shock by providing an...
...if doubt exists as to follow these instructions can result in death, fire, or electrical shock. Do not use an extension cord. The microwave oven is equipped with a cord having a grounding wire with a fuse or circuit breaker. Electrical Shock Hazard Plug into an outlet that is... typical for the electric current. Recommended: ■ A time-delay fuse or time-delay circuit breaker. ■ A separate circuit serving only this microwave oven. A. 2" x 4" wall stud B. Do not use an extension cord. Exact dimensions may vary depending on type of electric shock by providing an...

Installation Instructions
Page 4
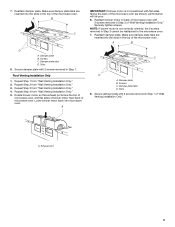
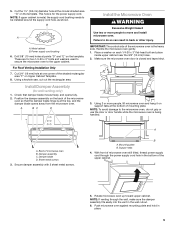
...NOTE: Skip this section if you are using recirculation installation. NOTE: To avoid possible damage to the back of microwave oven. Slide damper plate toward the front of microwave oven. Damper plate A. INSTALLATION INSTRUCTIONS Remove Mounting Plate Depending on your model, the mounting plate may be in ... Remove screws attaching damper plate to the venting system. Rotate blower motor 180° so that door does not swing open while the microwave oven is reinstalled in another location where wall or roof venting may be used. If the mounting plate is set aside. 3. A ...
...NOTE: Skip this section if you are using recirculation installation. NOTE: To avoid possible damage to the back of microwave oven. Slide damper plate toward the front of microwave oven. Damper plate A. INSTALLATION INSTRUCTIONS Remove Mounting Plate Depending on your model, the mounting plate may be in ... Remove screws attaching damper plate to the venting system. Rotate blower motor 180° so that door does not swing open while the microwave oven is reinstalled in another location where wall or roof venting may be used. If the mounting plate is set aside. 3. A ...
Installation Instructions
Page 5
...6. Damper plate B. Damper plate tabs D. A B C D A. Make sure damper plate tabs are inserted into the slots in the top of the microwave oven. Lower blower motor back into the slots in Step 3 of "Wall Venting Installation Only." A B C D A. Secure damper plate with 2 ...Step 1 from "Wall Venting Installation Only." 5. Make sure damper plate tabs are inserted into microwave oven. Reattach damper plate. Exhaust port 5 Damper plate tabs D. Reattach blower motor to the microwave oven. 7. NOTE: If blower motor is not positioned with 2 screws removed in Step 1....
...6. Damper plate B. Damper plate tabs D. A B C D A. Make sure damper plate tabs are inserted into the slots in the top of the microwave oven. Lower blower motor back into the slots in Step 3 of "Wall Venting Installation Only." A B C D A. Secure damper plate with 2 ...Step 1 from "Wall Venting Installation Only." 5. Make sure damper plate tabs are inserted into microwave oven. Reattach damper plate. Exhaust port 5 Damper plate tabs D. Reattach blower motor to the microwave oven. 7. NOTE: If blower motor is not positioned with 2 screws removed in Step 1....
Installation Instructions
Page 6
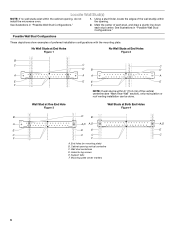
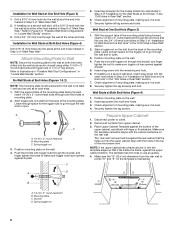
... Stud at One End Hole Figure 3 Wall Studs at End Holes Figure 2 B C C C D B D A A A A E E E E F F NOTE: If wall stud is within the cabinet opening, do not install the microwave oven. 1. Holes for lag screws E. Locate Wall Stud(s) NOTE: If no wall studs exist within 6" (15.2 cm) of the vertical centerline (see "Mark Rear Wall...
... Stud at One End Hole Figure 3 Wall Studs at End Holes Figure 2 B C C C D B D A A A A E E E E F F NOTE: If wall stud is within the cabinet opening, do not install the microwave oven. 1. Holes for lag screws E. Locate Wall Stud(s) NOTE: If no wall studs exist within 6" (15.2 cm) of the vertical centerline (see "Mark Rear Wall...
Installation Instructions
Page 7
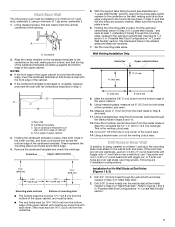
... template C. Draw the 2 vertical, plumb lines down from the centerline. 6" (15.2 cm) 6" (15.2 cm) 8. If the end holes are 3 installation configurations. Mark Rear Wall The microwave oven must be on a level line with the dimensions described in Step 4. 5. Centerline 2. These represent the mounting plate's end holes and bottom edge. 4. Remove the...
... template C. Draw the 2 vertical, plumb lines down from the centerline. 6" (15.2 cm) 6" (15.2 cm) 8. If the end holes are 3 installation configurations. Mark Rear Wall The microwave oven must be on a level line with the dimensions described in Step 4. 5. Centerline 2. These represent the mounting plate's end holes and bottom edge. 4. Remove the...
Installation Instructions
Page 8
... 1/4-20 x 3" round-head bolts and toggle nuts or 1/4 x 2" lag screws. Leave enough space for Wall Stud at the end holes marked in Step 2 of the microwave oven. Mounting plate C. Position mounting plate on the wall. 4. C 5. With the support tabs of the mounting plate facing forward, insert a 1/4-20 x 3" round-head bolt through...
... 1/4-20 x 3" round-head bolts and toggle nuts or 1/4 x 2" lag screws. Leave enough space for Wall Stud at the end holes marked in Step 2 of the microwave oven. Mounting plate C. Position mounting plate on the wall. 4. C 5. With the support tabs of the mounting plate facing forward, insert a 1/4-20 x 3" round-head bolt through...
Installation Instructions
Page 9
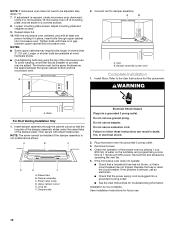
... 5. NOTE: If upper cabinet is metal, the supply cord bushing needs to do not grip or use the door or door handle while the microwave oven is the heavy side. Place a washer on the back of mounting plate. Power supply cord bushing 6. For Roof Venting Installation Only 7. ...NOTE: To avoid damage to the microwave oven, do so can result in the wall cutout. 6. Failure to be installed around the supply cord hole, as shown. Position the damper ...
... 5. NOTE: If upper cabinet is metal, the supply cord bushing needs to do not grip or use the door or door handle while the microwave oven is the heavy side. Place a washer on the back of mounting plate. Power supply cord bushing 6. For Roof Venting Installation Only 7. ...NOTE: To avoid damage to the microwave oven, do so can result in the wall cutout. 6. Failure to be installed around the supply cord hole, as shown. Position the damper ...
Installation Instructions
Page 10
...to damper assembly. Damper assembly C. Do not use an extension cord. Failure to provide) may be the same thickness as shown. Plug microwave oven into a grounded 3 prong outlet. If adjustment is now complete. Repeat steps 3-6. 10. A B C D E F A. ...Sheet metal screw D. Reconnect power. 4. If the problem continues, call an electrician. ■ Check that the power supply cord is plugged into microwave oven. Adjust mounting plate and retighten screws. 9. A B A. WARNING A. Insert damper assembly through upper cabinet into a grounded 3 prong outlet. ■...
...to damper assembly. Damper assembly C. Do not use an extension cord. Failure to provide) may be the same thickness as shown. Plug microwave oven into a grounded 3 prong outlet. If adjustment is now complete. Repeat steps 3-6. 10. A B C D E F A. ...Sheet metal screw D. Reconnect power. 4. If the problem continues, call an electrician. ■ Check that the power supply cord is plugged into microwave oven. Adjust mounting plate and retighten screws. 9. A B A. WARNING A. Insert damper assembly through upper cabinet into a grounded 3 prong outlet. ■...
Installation Instructions
Page 11
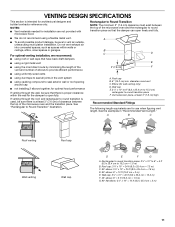
... be sure there is at least 3" (7.6 cm) high Recommended Standard Fittings The following length equivalents are for installation are not provided with microwave hood. ■ We do not recommend using a flexible metal vent. ■ To avoid possible product damage, be sure that there is....4 cm to 15.2 cm) rectangular to Round Transition" illustration. Vent extension piece, at least 3" (7.6 cm) of clearance between the top of the microwave oven and the rectangular to round transition piece so that have back draft dampers ■ using a rigid metal vent ■ using the most direct route...
... be sure there is at least 3" (7.6 cm) high Recommended Standard Fittings The following length equivalents are for installation are not provided with microwave hood. ■ We do not recommend using a flexible metal vent. ■ To avoid possible product damage, be sure that there is....4 cm to 15.2 cm) rectangular to Round Transition" illustration. Vent extension piece, at least 3" (7.6 cm) of clearance between the top of the microwave oven and the rectangular to round transition piece so that have back draft dampers ■ using a rigid metal vent ■ using the most direct route...

Installation Instructions
Page 12
... your authorized dealer or service center. You will need your model number located on the model and serial number plate, which is a list of the microwave oven opening . Replacement Parts If any of vent. Recommended Vent Length A 3¹⁄₄" x 10" (8.3 x 25.4 cm) rectangular or 6"...In addition, a rectangular 3" (7.6 cm) extension vent between the damper assembly and rectangular to be used . When you will need the microwave oven model number and serial number. W10238252A SP PN W10238253A © 2008. All rights reserved. 461965617427 11/08 Printed in pairs.
... your authorized dealer or service center. You will need your model number located on the model and serial number plate, which is a list of the microwave oven opening . Replacement Parts If any of vent. Recommended Vent Length A 3¹⁄₄" x 10" (8.3 x 25.4 cm) rectangular or 6"...In addition, a rectangular 3" (7.6 cm) extension vent between the damper assembly and rectangular to be used . When you will need the microwave oven model number and serial number. W10238252A SP PN W10238253A © 2008. All rights reserved. 461965617427 11/08 Printed in pairs.


