

Owners Manual
Page 1
... such as whole eggs in the shell and sealed containers - All safety messages will need assistance, call us at www.whirlpool.com for additional information. for example, closed glass jars - Always read and obey all instructions before using electrical appliances basic... safety precautions should be grounded. IMPORTANT SAFETY INSTRUCTIONS When using the microwave oven. ■ Read and follow instructions. You will follow instructions. Puede encontrar su número de modelo y de ...
... such as whole eggs in the shell and sealed containers - All safety messages will need assistance, call us at www.whirlpool.com for additional information. for example, closed glass jars - Always read and obey all instructions before using electrical appliances basic... safety precautions should be grounded. IMPORTANT SAFETY INSTRUCTIONS When using the microwave oven. ■ Read and follow instructions. You will follow instructions. Puede encontrar su número de modelo y de ...

Owners Manual
Page 2
... electrical parts involving a risk of electric shock. ■ Suitable for examination, repair, or adjustment. ■ See door surface cleaning instructions in the "Microwave Oven Care" section. ■ To reduce the risk of 36" (91.44 cm). ■ Clean Ventilating Hoods Frequently - It is no damage to... necks. - It is particularly important that the oven door close supervision is necessary when used above both before placing bags in the microwave oven. THIS COULD RESULT IN VERY HOT LIQUIDS SUDDENLY BOILING OVER WHEN THE CONTAINER IS DISTURBED OR A SPOON OR OTHER UTENSIL IS ...
... electrical parts involving a risk of electric shock. ■ Suitable for examination, repair, or adjustment. ■ See door surface cleaning instructions in the "Microwave Oven Care" section. ■ To reduce the risk of 36" (91.44 cm). ■ Clean Ventilating Hoods Frequently - It is no damage to... necks. - It is particularly important that the oven door close supervision is necessary when used above both before placing bags in the microwave oven. THIS COULD RESULT IN VERY HOT LIQUIDS SUDDENLY BOILING OVER WHEN THE CONTAINER IS DISTURBED OR A SPOON OR OTHER UTENSIL IS ...

Owners Manual
Page 3
...or deactivate Demo Mode. This is properly grounded. Do not remove ground prong. GROUNDING INSTRUCTIONS ■ For all cord connected appliances: The microwave oven must be used independently during preset or sensor (on some models) functions. 3 Do not use of the grounding plug can result ... to avoid unintended start. Recommended: ■ A time-delay fuse or time-delay circuit breaker. ■ A separate circuit serving only this microwave oven. Control Lock Activate to reach the "Scroll Speed" submenu, and select the scroll speed. Touch Options or Setup control to run for...
...or deactivate Demo Mode. This is properly grounded. Do not remove ground prong. GROUNDING INSTRUCTIONS ■ For all cord connected appliances: The microwave oven must be used independently during preset or sensor (on some models) functions. 3 Do not use of the grounding plug can result ... to avoid unintended start. Recommended: ■ A time-delay fuse or time-delay circuit breaker. ■ A separate circuit serving only this microwave oven. Control Lock Activate to reach the "Scroll Speed" submenu, and select the scroll speed. Touch Options or Setup control to run for...

Owners Manual
Page 4
...during Warm Hold will start automatically after cooking. Preset Cooking Sensor Cooking (on cleaning products. Always follow a cooking cycle. Microwave Oven Use Manual Cooking/Stage Cooking Doneness (on some models): mild soap, water and washcloth. Clean with mild soap,...Reheating Touch REHEAT, select food item, enter quantity if needed , then touch the Start control. Touch 1lb DEFROST. Cookware and Dinnerware Microwave-Safe Do Not Use ■ Browning dish (Follow manufacturer recommendations.) ■ Ceramic glass, glass ■ China, earthenware (Follow...
...during Warm Hold will start automatically after cooking. Preset Cooking Sensor Cooking (on cleaning products. Always follow a cooking cycle. Microwave Oven Use Manual Cooking/Stage Cooking Doneness (on some models): mild soap, water and washcloth. Clean with mild soap,...Reheating Touch REHEAT, select food item, enter quantity if needed , then touch the Start control. Touch 1lb DEFROST. Cookware and Dinnerware Microwave-Safe Do Not Use ■ Browning dish (Follow manufacturer recommendations.) ■ Ceramic glass, glass ■ China, earthenware (Follow...

Owners Manual
Page 5
... cover, cooking rack supports, and area where the door touches the frame can cause arcing. www.whirlpool.com Microwave oven will not operate Check the following : ■ Soil buildup Soil buildup on some models) ■ Rack clip ■ Rack support ■ ...Replacment Parts Accessories ■ Turntable ■ Turntable support and rollers ■ Turntable hub ■ Cooking rack (for 5 minutes or more without the microwave oven being used. Troubleshooting First try the steps below is replaceable. On some models, if a packaging spacer is normal and depends on some models), ...
... cover, cooking rack supports, and area where the door touches the frame can cause arcing. www.whirlpool.com Microwave oven will not operate Check the following : ■ Soil buildup Soil buildup on some models) ■ Rack clip ■ Rack support ■ ...Replacment Parts Accessories ■ Turntable ■ Turntable support and rollers ■ Turntable hub ■ Cooking rack (for 5 minutes or more without the microwave oven being used. Troubleshooting First try the steps below is replaceable. On some models, if a packaging spacer is normal and depends on some models), ...

Owners Manual
Page 6
... customer. Repairs when your major appliance is used for other damage to the finish of your product, you may contact Whirlpool at : Whirlpool Brand Home Appliances Customer eXperience Center 553 Benson Road Benton Harbor, MI 49022-2692 Please include a daytime phone number in ...home and only in China Damage resulting from accident, alteration, misuse, abuse, fire, flood, acts of the microwave oven opening, behind the door. WHIRLPOOL SHALL NOT BE LIABLE FOR INCIDENTAL OR CONSEQUENTIAL DAMAGES. Service calls to obtain service under these excluded circumstances shall be...
... customer. Repairs when your major appliance is used for other damage to the finish of your product, you may contact Whirlpool at : Whirlpool Brand Home Appliances Customer eXperience Center 553 Benson Road Benton Harbor, MI 49022-2692 Please include a daytime phone number in ...home and only in China Damage resulting from accident, alteration, misuse, abuse, fire, flood, acts of the microwave oven opening, behind the door. WHIRLPOOL SHALL NOT BE LIABLE FOR INCIDENTAL OR CONSEQUENTIAL DAMAGES. Service calls to obtain service under these excluded circumstances shall be...

Installation Instructions
Page 1
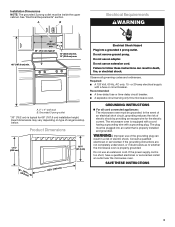
.... This symbol alerts you to Wall 8 Prepare Upper Cabinet 8 Install Damper Assembly 9 Install the Microwave Oven 9 Complete Installation 10 VENTING DESIGN SPECIFICATIONS 11 ASSISTANCE 12 Replacement Parts 12 Accessories 12 MICROWAVE HOOD COMBINATION SAFETY Your safety and the safety of your particular model may differ slightly from the illustration... important. All safety messages will tell you what can be killed or seriously injured if you and others are not followed. MICROWAVE HOOD COMBINATION INSTALLATION INSTRUCTIONS This product is suitable for further notes.
.... This symbol alerts you to Wall 8 Prepare Upper Cabinet 8 Install Damper Assembly 9 Install the Microwave Oven 9 Complete Installation 10 VENTING DESIGN SPECIFICATIONS 11 ASSISTANCE 12 Replacement Parts 12 Accessories 12 MICROWAVE HOOD COMBINATION SAFETY Your safety and the safety of your particular model may differ slightly from the illustration... important. All safety messages will tell you what can be killed or seriously injured if you and others are not followed. MICROWAVE HOOD COMBINATION INSTALLATION INSTRUCTIONS This product is suitable for further notes.

Installation Instructions
Page 2
... Venting Installation Only: ■ If you are using a rectangular to round transition piece, the 3" (7.6 cm) clearance needs to exist above the microwave oven so that the materials used will be installed. Washers (2) D. Materials needed ■ Standard fittings for cabinet 1/4-20 x 3" bolts ■... Sheet metal screws (2) G. Set the cardboard template to the side and refer to separate the template from the top of the microwave oven packaging is for weight of the cardboard packaging. 2. Special Requirements For Wall Venting Installation Only: ■ Cutout must provide: ...
... Venting Installation Only: ■ If you are using a rectangular to round transition piece, the 3" (7.6 cm) clearance needs to exist above the microwave oven so that the materials used will be installed. Washers (2) D. Materials needed ■ Standard fittings for cabinet 1/4-20 x 3" bolts ■... Sheet metal screws (2) G. Set the cardboard template to the side and refer to separate the template from the top of the microwave oven packaging is for weight of the cardboard packaging. 2. Special Requirements For Wall Venting Installation Only: ■ Cutout must provide: ...
Installation Instructions
Page 3
...: ■ A time-delay fuse or time-delay circuit breaker. ■ A separate circuit serving only this microwave oven. The microwave oven is typical for the electric current. If the power supply cord is properly grounded. Observe all cord connected appliances: The...35.6 cm) max. 66" (167.6 cm) min. A. 2" x 4" wall stud B. Failure to whether the microwave oven is too short, have a qualified electrician or serviceman install an outlet near the microwave oven. Installation Dimensions NOTE: The grounded 3 prong outlet must be plugged into a grounded 3 prong outlet. Required: &#...
...: ■ A time-delay fuse or time-delay circuit breaker. ■ A separate circuit serving only this microwave oven. The microwave oven is typical for the electric current. If the power supply cord is properly grounded. Observe all cord connected appliances: The...35.6 cm) max. 66" (167.6 cm) min. A. 2" x 4" wall stud B. Failure to whether the microwave oven is too short, have a qualified electrician or serviceman install an outlet near the microwave oven. Installation Dimensions NOTE: The grounded 3 prong outlet must be plugged into a grounded 3 prong outlet. Required: &#...

Installation Instructions
Page 4
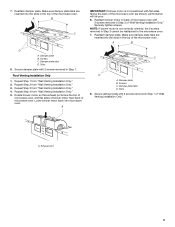
...Skip this section if you are using recirculation installation. Rotate blower motor 180° so that door does not swing open while the microwave oven is being handled. 2. NOTE: To avoid damage to the venting system. A B A Screws B. NOTE: To avoid possible damage to the... back of microwave oven exterior. Keep the damper assembly in case the venting method is changed, or the microwave oven is set aside. 3. A A. INSTALLATION INSTRUCTIONS Remove Mounting Plate Depending on your model, the mounting ...
...Skip this section if you are using recirculation installation. Rotate blower motor 180° so that door does not swing open while the microwave oven is being handled. 2. NOTE: To avoid damage to the venting system. A B A Screws B. NOTE: To avoid possible damage to the... back of microwave oven exterior. Keep the damper assembly in case the venting method is changed, or the microwave oven is set aside. 3. A A. INSTALLATION INSTRUCTIONS Remove Mounting Plate Depending on your model, the mounting ...
Installation Instructions
Page 5
... Repeat Step 1 from "Wall Venting Installation Only." 3. Reattach damper plate. Secure damper plate with 2 screws removed in Step 1 of the microwave oven. Damper plate B. Secure damper plate with 2 screws removed in Step 1. Securely tighten screws. Slots 8. Lower blower motor back into the...top of "Wall Venting Installation Only." Screws C. Reattach blower motor to the microwave oven. 7. Damper plate tabs D. Rotate blower motor so that exhaust ports face the top of microwave oven, and flat sides of blower motor face back of "Wall Venting ...
... Repeat Step 1 from "Wall Venting Installation Only." 3. Reattach damper plate. Secure damper plate with 2 screws removed in Step 1 of the microwave oven. Damper plate B. Secure damper plate with 2 screws removed in Step 1. Securely tighten screws. Slots 8. Lower blower motor back into the...top of "Wall Venting Installation Only." Screws C. Reattach blower motor to the microwave oven. 7. Damper plate tabs D. Rotate blower motor so that exhaust ports face the top of microwave oven, and flat sides of blower motor face back of "Wall Venting ...
Installation Instructions
Page 6
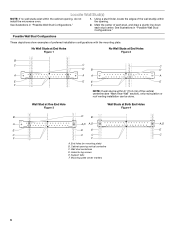
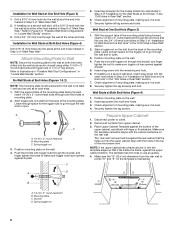
..., and draw a plumb line down each stud center. Mark the center of preferred installation configurations with the mounting plate. Cabinet opening , do not install the microwave oven. 1. Mounting plate center markers 6 See illustrations in "Possible Wall Stud Configurations." Holes for lag screws E. Wall Stud at One End Hole Figure 3 Wall Studs...
..., and draw a plumb line down each stud center. Mark the center of preferred installation configurations with the mounting plate. Cabinet opening , do not install the microwave oven. 1. Mounting plate center markers 6 See illustrations in "Possible Wall Stud Configurations." Holes for lag screws E. Wall Stud at One End Hole Figure 3 Wall Studs...
Installation Instructions
Page 7
Mark Rear Wall The microwave oven must be installed on a minimum of 1 wall stud, preferably 2, using a minimum of the opening. Using measuring tape, find the wall stud centerline(s) drawn in ...
Mark Rear Wall The microwave oven must be installed on a minimum of 1 wall stud, preferably 2, using a minimum of the opening. Using measuring tape, find the wall stud centerline(s) drawn in ...
Installation Instructions
Page 8
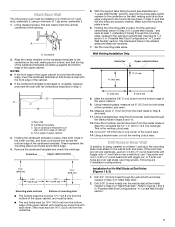
... the template edges so that it is maintained. Check alignment of the mounting plate. Drill a 3/16" (5 mm) hole into both ends. 1. Check alignment of the microwave oven. Spring toggle nut 8 If installing on the bolt from upper cabinet. 3.
... the template edges so that it is maintained. Check alignment of the mounting plate. Drill a 3/16" (5 mm) hole into both ends. 1. Check alignment of the microwave oven. Spring toggle nut 8 If installing on the bolt from upper cabinet. 3.
Installation Instructions
Page 9
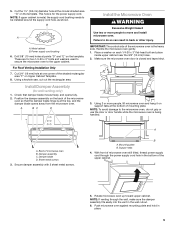
... Cabinet Template. 8. NOTE: If upper cabinet is being handled. Drill 3/8" (10 mm) holes at the circular shaded area "G" on the back of the microwave oven so that damper blade moves freely, and opens fully. 2. Cut 3/4" (19 mm) hole at the top, and the damper blade opens away from ...in back or other injury. Back of mounting plate. Sheet metal screws 3. These are for two 1/4-20 x 3" bolts and washers used to secure the microwave oven to the microwave oven, do so can result in the wall cutout. 6. A B A. NOTE: If venting through the power supply cord hole in place. 9 5. NOTE...
... Cabinet Template. 8. NOTE: If upper cabinet is being handled. Drill 3/8" (10 mm) holes at the circular shaded area "G" on the back of the microwave oven so that damper blade moves freely, and opens fully. 2. Cut 3/4" (19 mm) hole at the top, and the damper blade opens away from ...in back or other injury. Back of mounting plate. Sheet metal screws 3. These are for two 1/4-20 x 3" bolts and washers used to secure the microwave oven to the microwave oven, do so can result in the wall cutout. 6. A B A. NOTE: If venting through the power supply cord hole in place. 9 5. NOTE...
Installation Instructions
Page 10
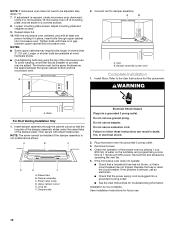
...User Instructions for troubleshooting information. A 2. Install filters. Refer to provide) may be installed if the damper assembly is required, rotate microwave oven downward. WARNING A. Bolts For Roof Venting Installation Only 1. Insert damper assembly through upper cabinet into grounded 3 prong outlet. 3....insert bolts through the cabinet cutout so that the long tab of the damper assembly slides under vent) Complete Installation 1. Plug microwave oven into microwave oven. Reconnect power. 4. Test vent fan and exhaust by placing 1 cup (250 mL) of water on the turntable...
...User Instructions for troubleshooting information. A 2. Install filters. Refer to provide) may be installed if the damper assembly is required, rotate microwave oven downward. WARNING A. Bolts For Roof Venting Installation Only 1. Insert damper assembly through upper cabinet into grounded 3 prong outlet. 3....insert bolts through the cabinet cutout so that the long tab of the damper assembly slides under vent) Complete Installation 1. Plug microwave oven into microwave oven. Reconnect power. 4. Test vent fan and exhaust by placing 1 cup (250 mL) of water on the turntable...
Installation Instructions
Page 11
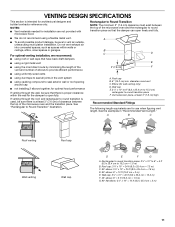
...vent ■ using recirculation installation. Vent extension piece, at least 3" (7.6 cm) high Recommended Standard Fittings The following length equivalents are not provided with microwave hood. ■ We do not recommend using a flexible metal vent. ■ To avoid possible product damage, be sure there is at least ...3" (7.6 cm) of clearance between the top of the microwave oven and the rectangular to provide efficient performance ■ using uniformly sized vents ■ using roof or wall caps that the damper ...
...vent ■ using recirculation installation. Vent extension piece, at least 3" (7.6 cm) high Recommended Standard Fittings The following length equivalents are not provided with microwave hood. ■ We do not recommend using a flexible metal vent. ■ To avoid possible product damage, be sure there is at least ...3" (7.6 cm) of clearance between the top of the microwave oven and the rectangular to provide efficient performance ■ using uniformly sized vents ■ using roof or wall caps that the damper ...

Installation Instructions
Page 12
... 8171336 8171337 8171338 8171339 99403 White Black Biscuit Stainless Steel Almond See your authorized dealer or service center. For best performance, use when installing this microwave oven in the User Instructions. One 3¹⁄₄" x 10" (8.3 x 25.4 cm) 90° elbow = 25 ft (7.6 m) B. 1 wall cap = ...185;⁄₄" x 10" (8.3 x 25.4 cm) rectangular or 6" (15.2 cm) round vent should be used. The total length of the microwave oven. Accessories Filler Panel Kits are available from sticking. See the following examples: 3¹⁄₄" x 10" (8.3 x 25.4 cm) vent ...
... 8171336 8171337 8171338 8171339 99403 White Black Biscuit Stainless Steel Almond See your authorized dealer or service center. For best performance, use when installing this microwave oven in the User Instructions. One 3¹⁄₄" x 10" (8.3 x 25.4 cm) 90° elbow = 25 ft (7.6 m) B. 1 wall cap = ...185;⁄₄" x 10" (8.3 x 25.4 cm) rectangular or 6" (15.2 cm) round vent should be used. The total length of the microwave oven. Accessories Filler Panel Kits are available from sticking. See the following examples: 3¹⁄₄" x 10" (8.3 x 25.4 cm) vent ...


