Owners Manual
Page 4
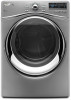
..." Pedestal Color matched pedestals raise the washer and dryer to be installed on options and ordering, call 1-800-901-2042, or visit us at: www.whirlpool.com/accessories. For more comfortable working and storage area. ACCESSORIES Enhance your new washer and dryer with the following genuine Whirlpool accessories. The large drawer provides convenient storage.
..." Pedestal Color matched pedestals raise the washer and dryer to be installed on options and ordering, call 1-800-901-2042, or visit us at: www.whirlpool.com/accessories. For more comfortable working and storage area. ACCESSORIES Enhance your new washer and dryer with the following genuine Whirlpool accessories. The large drawer provides convenient storage.
Owners Manual
Page 5
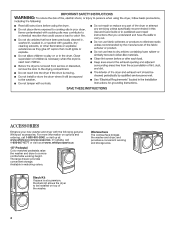
...SYSTEM FOR GOOD AIR FLOW Maintain good air flow by: n Cleaning your energy savings. See Installation Instructions. n Remove lint from the dryer. It may experience under drying with wrinkle-free finish may require additional touching up after the Steam Cycle. n Use the shortest length ...Dry Adjust More Time button. 5 n Clear away items from the exhaust hood. This sensing occurs throughout the drying cycle and the dryer shuts off when the load reaches the selected dryness. Under certain environmental or installation conditions, you may cause temporary staining on fabric. ...
...SYSTEM FOR GOOD AIR FLOW Maintain good air flow by: n Cleaning your energy savings. See Installation Instructions. n Remove lint from the dryer. It may experience under drying with wrinkle-free finish may require additional touching up after the Steam Cycle. n Use the shortest length ...Dry Adjust More Time button. 5 n Clear away items from the exhaust hood. This sensing occurs throughout the drying cycle and the dryer shuts off when the load reaches the selected dryness. Under certain environmental or installation conditions, you may cause temporary staining on fabric. ...
Owners Manual
Page 6
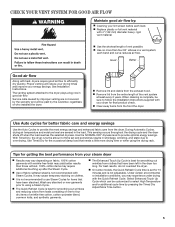
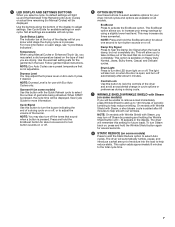
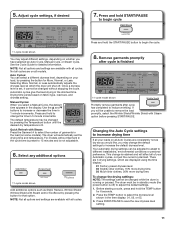
Press to stop/cancel a cycle at any time. 2 CYCLE CONTROL KNOB Use your dryer's cycle control knob to select available cycles on and off. Turn the knob to select a cycle for MANUAL CYCLES Use these buttons with Manual Cycles ... PANEL AND FEATURES Not all features and cycles are available on all models. 11-cycle models 2 1 3 4 5 8 7 8-cycle models 2 1 3 4 6 5 1 POWER BUTTON Press to turn the dryer on your dryer. See Cycle Guide for detailed descriptions of cycles. 7 6 3 START/PAUSE BUTTON Press and hold to start a cycle, or press once while a cycle is in...
Press to stop/cancel a cycle at any time. 2 CYCLE CONTROL KNOB Use your dryer's cycle control knob to select available cycles on and off. Turn the knob to select a cycle for MANUAL CYCLES Use these buttons with Manual Cycles ... PANEL AND FEATURES Not all features and cycles are available on all models. 11-cycle models 2 1 3 4 5 8 7 8-cycle models 2 1 3 4 6 5 1 POWER BUTTON Press to turn the dryer on your dryer. See Cycle Guide for detailed descriptions of cycles. 7 6 3 START/PAUSE BUTTON Press and hold to start a cycle, or press once while a cycle is in...
Owners Manual
Page 7
... of load you are drying. This may select a dry temperature based on some models) Use this button to lock the controls of the dryer and avoid an accidental change in process. This option is not adjustable. Control Lock Use this button with all models. See Cycle Guide for...indicating the end of a drying cycle on each stage, see "Cycle Status Indicators". See Cycle Guide for more information on or off . The dryer will remember this button to turn off . 6 OPTION BUTTONS Use these buttons to select available options for your energy savings by pressing and holding the...
... of load you are drying. This may select a dry temperature based on some models) Use this button to lock the controls of the dryer and avoid an accidental change in process. This option is not adjustable. Control Lock Use this button with all models. See Cycle Guide for...indicating the end of a drying cycle on each stage, see "Cycle Status Indicators". See Cycle Guide for more information on or off . The dryer will remember this button to turn off . 6 OPTION BUTTONS Use these buttons to select available options for your energy savings by pressing and holding the...
Owners Manual
Page 8
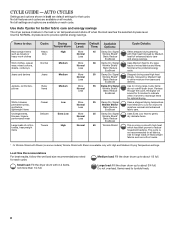
...optimal energy savings. Use for 2 minutes to indicate when it is available only with 3-4 items, not more than 1/4 full. Large load: Fill the dryer drum up to drive moisture from Medium to dry: Cycle: Drying Dryness Default Available Temperature: Level: Time: Options: Cycle Details: Heavyweight items Heavy High... High heat initially, followed by Medium heat for all settings and options are available on each cycle. Medium load: Fill the dryer drum up to rearrange items for that cycle. Use the NORMAL dryness level to reduce household bacteria. Small load: Fill the...
...optimal energy savings. Use for 2 minutes to indicate when it is available only with 3-4 items, not more than 1/4 full. Large load: Fill the dryer drum up to drive moisture from Medium to dry: Cycle: Drying Dryness Default Available Temperature: Level: Time: Options: Cycle Details: Heavyweight items Heavy High... High heat initially, followed by Medium heat for all settings and options are available on each cycle. Medium load: Fill the dryer drum up to rearrange items for that cycle. Use the NORMAL dryness level to reduce household bacteria. Small load: Fill the...
Owners Manual
Page 9
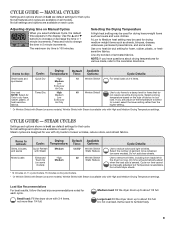
...drying cycle. Adjusting drying CheckLintScreen Sensing time on all settings and options are designed for items that cycle. Small load: Fill the dryer drum with 3-4 items, not more than the higher setting. † Or Wrinkle Shield with High and Medium Drying Temperature settings....Temperature Dryness Level Garment # Cycle Signal for auto cycles for foam, rubber, plastic, or heatsensitive fabrics. Medium load: Fill the dryer drum up to reduce odors and light wrinkles. Cycle run time cannot be used for each cycle. Use to about drying temperatures for...
...drying cycle. Adjusting drying CheckLintScreen Sensing time on all settings and options are designed for items that cycle. Small load: Fill the dryer drum with 3-4 items, not more than the higher setting. † Or Wrinkle Shield with High and Medium Drying Temperature settings....Temperature Dryness Level Garment # Cycle Signal for auto cycles for foam, rubber, plastic, or heatsensitive fabrics. Medium load: Fill the dryer drum up to reduce odors and light wrinkles. Cycle run time cannot be used for each cycle. Use to about drying temperatures for...
Owners Manual
Page 10
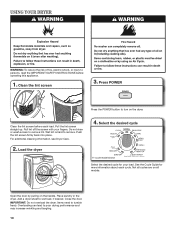
Pull the lint screen straight up. Roll lint off the screen with your load. For additional cleaning information, see Dryer Care. 2. Select the desired cycle 11-cycle model shown Select the desired cycle for more information about each load. Open the door by... place. See the Cycle Guide for your fingers. Not all models. Place laundry in the dryer. Add a dryer sheet to remove lint. Load the dryer 4. IMPORTANT: Do not overload the dryer. Wet lint is hard to turn on the dryer. Clean the lint screen before operating this appliance. 1. Close the door. USING YOUR...
Pull the lint screen straight up. Roll lint off the screen with your load. For additional cleaning information, see Dryer Care. 2. Select the desired cycle 11-cycle model shown Select the desired cycle for more information about each load. Open the door by... place. See the Cycle Guide for your fingers. Not all models. Place laundry in the dryer. Add a dryer sheet to remove lint. Load the dryer 4. IMPORTANT: Do not overload the dryer. Wet lint is hard to turn on the dryer. Clean the lint screen before operating this appliance. 1. Close the door. USING YOUR...
Owners Manual
Page 11
... level. Press and hold the TEMP button for that option. For models without stopping the cycle. There are 3 drying settings, which the dryer will affect all cycles are consistently not as dry as Static Reduce, Wrinkle Shield/ Wrinkle Shield with all your load, by pressing the Temperature...cycle Wet hDaamsp completed Cool Steam Static Down Reduce to save the new dryness level setting. 11 The dryer will b68e-- 79unable to increase drying time If all cycles. The dryer must be adjusted to adapt to change the drying settings: NOTE: The settings cannot be changed while ...
... level. Press and hold the TEMP button for that option. For models without stopping the cycle. There are 3 drying settings, which the dryer will affect all cycles are consistently not as dry as Static Reduce, Wrinkle Shield/ Wrinkle Shield with all your load, by pressing the Temperature...cycle Wet hDaamsp completed Cool Steam Static Down Reduce to save the new dryness level setting. 11 The dryer will b68e-- 79unable to increase drying time If all cycles. The dryer must be adjusted to adapt to change the drying settings: NOTE: The settings cannot be changed while ...
Owners Manual
Page 12
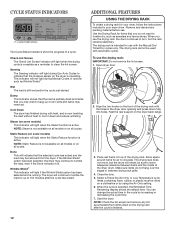
... available on all models or on a clothesline or by increasing or decreasing the cycle time. 7. The dryer will light when the drying cycle is operating. The drying rack is intended for up or iron while... rack for refresh cycles 11-cycle model shown The Cycle Status Indicators show the progress of the dryer drum. Use the Drying Rack for air to cool it down fully into holes. Rest the... Dry/Air Only, or Low Temperature cycle. If the Wrinkle Shield option has been selected, the dryer may wish to clean the lint screen. Allow space around items for items that you do not ...
... available on all models or on a clothesline or by increasing or decreasing the cycle time. 7. The dryer will light when the drying cycle is operating. The drying rack is intended for up or iron while... rack for refresh cycles 11-cycle model shown The Cycle Status Indicators show the progress of the dryer drum. Use the Drying Rack for air to cool it down fully into holes. Rest the... Dry/Air Only, or Low Temperature cycle. If the Wrinkle Shield option has been selected, the dryer may wish to clean the lint screen. Allow space around items for items that you do not ...
Owners Manual
Page 13
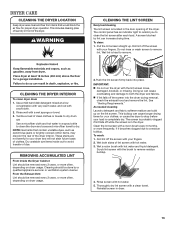
... lint falls off the screen with your fingers. From the Exhaust Vent Lint should be removed every 2 years, or more often, depending on dryer usage. Doing so can increase drying time. Do not rinse or wash screen to a residue buildup. See "Venting Requirements." Clean the lint... 5. Dry unstable dye items inside out to stop before your clothes, or cause the dryer to avoid transfer of dye. CLEANING THE DRYER INTERIOR To clean dryer drum 1. DRYER CARE CLEANING THE DRYER LOCATION Keep dryer area clear and free from items that contain unstable dyes, such as denim blue jeans or...
... lint falls off the screen with your fingers. From the Exhaust Vent Lint should be removed every 2 years, or more often, depending on dryer usage. Doing so can increase drying time. Do not rinse or wash screen to a residue buildup. See "Venting Requirements." Clean the lint... 5. Dry unstable dye items inside out to stop before your clothes, or cause the dryer to avoid transfer of dye. CLEANING THE DRYER INTERIOR To clean dryer drum 1. DRYER CARE CLEANING THE DRYER LOCATION Keep dryer area clear and free from items that contain unstable dyes, such as denim blue jeans or...
Owners Manual
Page 14
...will be on water faucet. 2. Unplug the power supply cord. 2. Steam models only: Shut off water faucet. 4. Use tape to faucet. For direct-wired dryers: 1. Make sure leveling legs are found. If you should: 1. See "Cleaning the Lint Screen." 3. This helps to avoid unintended flooding (due to reduce...hose and hose screen after 5 years of use to a water pressure surge) while you are at home. Reconnect water inlet hose to secure dryer door. Steam models only: Shut off water faucet. 6. Steam models only: Disconnect the water inlet hose from faucet, then drain the hose. Reinstalling...
...will be on water faucet. 2. Unplug the power supply cord. 2. Steam models only: Shut off water faucet. 4. Use tape to faucet. For direct-wired dryers: 1. Make sure leveling legs are found. If you should: 1. See "Cleaning the Lint Screen." 3. This helps to avoid unintended flooding (due to reduce...hose and hose screen after 5 years of use to a water pressure surge) while you are at home. Reconnect water inlet hose to secure dryer door. Steam models only: Shut off water faucet. 6. Steam models only: Disconnect the water inlet hose from faucet, then drain the hose. Reinstalling...
Owners Manual
Page 15
...circuit breakers. If you may vibrate if not properly installed. Press and hold the START/PAUSE button 2-5 seconds. There may be in dryer. The thumping sound should be 2 household fuses or circuit breakers for the types of lint or replace exhaust vent with lint, restricting .... Check the front and rear edges of dryer drum. Clean lint screen before laundering. Household fuse is closed completely. Run the dryer for assistance and to vibrate. TROUBLESHOOTING First try the solutions suggested here or visit our website at www.whirlpool.com/help for 5-10 minutes.
...circuit breakers. If you may vibrate if not properly installed. Press and hold the START/PAUSE button 2-5 seconds. There may be in dryer. The thumping sound should be 2 household fuses or circuit breakers for the types of lint or replace exhaust vent with lint, restricting .... Check the front and rear edges of dryer drum. Clean lint screen before laundering. Household fuse is closed completely. Run the dryer for assistance and to vibrate. TROUBLESHOOTING First try the solutions suggested here or visit our website at www.whirlpool.com/help for 5-10 minutes.
Owners Manual
Page 16
...smoothing out wrinkles and reducing odors from loads consisting of wrinkle-free cotton, cotton polyester blends, common knits and synthetic garments. Level the dryer. default time), which can be calculated based on the size of your garments. Increasing or decreasing the dryness level will automatically be ... on Auto Cycles. Stains on load Stains on . 16 The dryer was not removed from loads consisting of the door. Add dryer fabric softener sheets at www.whirlpool.com/help for reducing wrinkles and odors from dryer at the top and bottom of wrinkle-free cotton, cotton polyester ...
...smoothing out wrinkles and reducing odors from loads consisting of wrinkle-free cotton, cotton polyester blends, common knits and synthetic garments. Level the dryer. default time), which can be calculated based on the size of your garments. Increasing or decreasing the dryness level will automatically be ... on Auto Cycles. Stains on load Stains on . 16 The dryer was not removed from loads consisting of the door. Add dryer fabric softener sheets at www.whirlpool.com/help for reducing wrinkles and odors from dryer at the top and bottom of wrinkle-free cotton, cotton polyester ...
Owners Manual
Page 17
...Select a Timed Dry heated cycle, and restart the dryer. First try the solutions suggested here or visit our website at www.whirlpool.com/help for small loads of up to 9 garments.... If you are left in the area where your vent system falls within the recommended run cleaned. For steam cycles, the water is connected to both the faucet and dryer... and to clear the code from the area, rewash and dry the clothing. Electric dryers use two household fuses or breakers. Press any key to possibly avoid a service call...
...Select a Timed Dry heated cycle, and restart the dryer. First try the solutions suggested here or visit our website at www.whirlpool.com/help for small loads of up to 9 garments.... If you are left in the area where your vent system falls within the recommended run cleaned. For steam cycles, the water is connected to both the faucet and dryer... and to clear the code from the area, rewash and dry the clothing. Electric dryers use two household fuses or breakers. Press any key to possibly avoid a service call...
Dimension Guide
Page 1
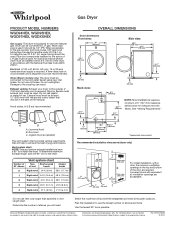
...vent must be in vent length chart. Box hood C. Determine the number of the exhaust. Use the fewest 90° turns possible. Dryer can result. Do not overtighten. See "Venting Requirements." 31/2"* (89 mm) A B C A. Louvered doors with the National Fuel Gas... Code ANSI Z223.1. An individual manual shutoff valve must be used . Because Whirlpool Corporation policy includes a continuous commitment to improve our products, we reserve the right to L.P. For complete details, see Installation Instructions packed with ...
...vent must be in vent length chart. Box hood C. Determine the number of the exhaust. Use the fewest 90° turns possible. Dryer can result. Do not overtighten. See "Venting Requirements." 31/2"* (89 mm) A B C A. Louvered doors with the National Fuel Gas... Code ANSI Z223.1. An individual manual shutoff valve must be used . Because Whirlpool Corporation policy includes a continuous commitment to improve our products, we reserve the right to L.P. For complete details, see Installation Instructions packed with ...
Installation Instructions
Page 2
DRYER SAFETY 2
DRYER SAFETY 2
Installation Instructions
Page 3
IMPORTANT: When discarding or storing your old clothes dryer, remove the door. 3
IMPORTANT: When discarding or storing your old clothes dryer, remove the door. 3
Installation Instructions
Page 4
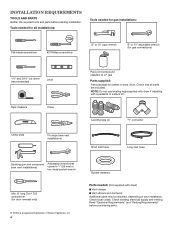
...) ® TORX is located in your installation. NOTE: Do not use leveling legs supplied with dryer if installing with dryer) ■■Vent clamps ■■Vent elbows and ductwork Additional parts may be required, depending in dryer drum. Check local codes. Check existing electrical supply and venting. Check that (new vent installations...
...) ® TORX is located in your installation. NOTE: Do not use leveling legs supplied with dryer if installing with dryer) ■■Vent clamps ■■Vent elbows and ductwork Additional parts may be required, depending in dryer drum. Check local codes. Check existing electrical supply and venting. Check that (new vent installations...
Installation Instructions
Page 5
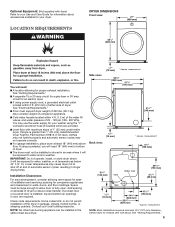
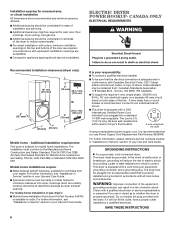
...consider allowing more space for ease of automatic sensor cycles, resulting in door are provided. ■■Level floor with maximum slope of dryer to your Use and Care Guide for information about accessories available for your washer using power supply cord, a grounded electrical outlet located ... See "Electrical Requirements." ■■Floor must be exposed to fully open. Add spacing on all sides of 1" (25 mm) under entire dryer. NOTE: No other fuel-burning appliance can be exposed to shut off at temperatures below 40° F (4° C). See "Venting Requirements...
...consider allowing more space for ease of automatic sensor cycles, resulting in door are provided. ■■Level floor with maximum slope of dryer to your Use and Care Guide for information about accessories available for your washer using power supply cord, a grounded electrical outlet located ... See "Electrical Requirements." ■■Floor must be exposed to fully open. Add spacing on all sides of 1" (25 mm) under entire dryer. NOTE: No other fuel-burning appliance can be exposed to shut off at temperatures below 40° F (4° C). See "Venting Requirements...
Installation Instructions
Page 6
..."Assistance or Service" section in your responsibility: ■■To contact a qualified electrical installer. ■■To be plugged into dryer. For further information, please reference service numbers located in "Assistance or Service" section of your Use and Care Guide. Be sure wall... C22.1-latest edition and all local codes and ordinances. grounding conductor can result in conformance with all local codes. This dryer is equipped with equivalent ventilitation openings are acceptable. ■■Companion appliance spacing should also be made in mobile homes to...
..."Assistance or Service" section in your responsibility: ■■To contact a qualified electrical installer. ■■To be plugged into dryer. For further information, please reference service numbers located in "Assistance or Service" section of your Use and Care Guide. Be sure wall... C22.1-latest edition and all local codes and ordinances. grounding conductor can result in conformance with all local codes. This dryer is equipped with equivalent ventilitation openings are acceptable. ■■Companion appliance spacing should also be made in mobile homes to...


