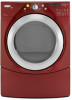
Whirlpool WGD9450WR Support and Manuals
Get Help and Manuals for this Whirlpool item
View All Support Options Below
Free Whirlpool WGD9450WR manuals!
Problems with Whirlpool WGD9450WR?
Ask a Question
Free Whirlpool WGD9450WR manuals!
Problems with Whirlpool WGD9450WR?
Ask a Question
Most Recent Whirlpool WGD9450WR Questions

Whirlpool Dryer Will Not Come On Just The Panel Lights Up How Do We Reset It
Whirlpool dryer will not come on just the panel lights up how do we reset it
Whirlpool dryer will not come on just the panel lights up how do we reset it
(Posted by Jwaldrop1975 8 years ago)
Popular Whirlpool WGD9450WR Manual Pages
Installation Instructions - Page 2
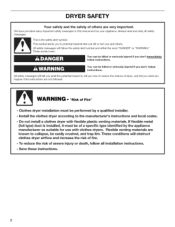
... if you what can be killed or seriously injured if you to the manufacturer's instructions and local codes. - We have provided many important safety messages in this manual and on your appliance. Flexible venting materials are very important.
Do not install a clothes dryer with flexible plastic venting materials, if flexible metal
(foil type) duct is the...
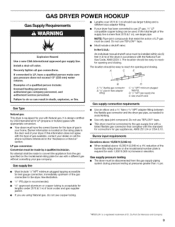
Installation Instructions - Page 3
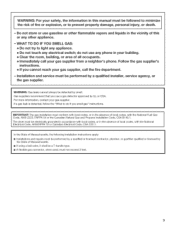
... a gas leak is detected, follow the "What to light any appliance. = Do not touch any other flammable vapors and liquids in the State of Massachusetts, the following installation instructions apply: m installations and repairs must conform with local codes, or in the absence of Massachusetts. The dryer must not exceed 3 feet. WHAT TO DO iF YOU SMELL GAS...
Installation Instructions - Page 4
...need 18" (460 mm) to do not permit, installation of 20-100 psi (137.9-689.6 kPa).
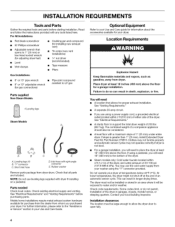
Do not operate your dryer. Check code requirements. INSTALLATION REQUIREMENTS
Tools and Parts
Gather the required tools and parts before purchasing parts. Read and follow the instructions provided with a maximum slope of a companion appliance should also be exposed to open fully.
4
This...
Installation Instructions - Page 5
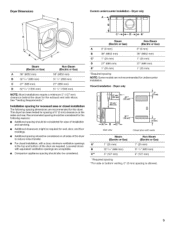
... Most installations require a minimum 5" (127 mm) clearance behind the dryer for the following spacing dimensions are ... all sides of installation and servicing.
• Additional clearances might be ...dryer to reduce noise transfer.
Dryer only
Itl . ,
T-_, 14 max. Installation spacing for this dryer.
D- I 18" min.*
48" 2* (310crn2")--_
-_qA*_- Companion appliance...
Installation Instructions - Page 6
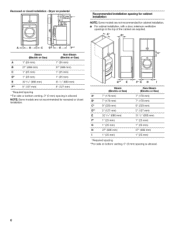
... with a door, minimum ventilation openings in the top of the cabinet are not recommended for cabinet installation.
Dryer on pedestal
Recommended installation spacing for cabinet installation
NOTE: Some models are not recommended for recessed or closet installation.
00 C*
F* G H
I
Steam (Electric or Gas)
A*
7" (178 mm)
B*
7" (178 mm)
C*
9" (229 mm)
D**
5" (127 mm)
E
32 9/16...
Installation Instructions - Page 7
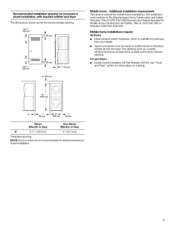
...and Parts" section for information on ordering.
! \__J/ i i
I J..:..:.....
._- 1" _ {25 mm)
_- 27"-_ (686 mm)
(25 ram)
Steam (Electric or Gas)
Non-Steam (Electric or Gas)
A*
5 1/2"(140 mm)
5" (127 mm)
*Required spacing NOTE: Some models are for stacked recessed or closet installation. Recommended installation spacing for recessed or closet installation, with stacked washer and dryer...
Installation Instructions - Page 8
... is properly installed and grounded in
conformance with the Canadian Electrical Code, C22.1-1atest edition and all local codes and ordinances. GROUNDING iNSTRUCTiONS
[] For a grounded, cord-connected dryer: This dryer must be grounded. The plug must be plugged into an appropriate outlet that you are in the "Assistance or Service" section. SAVE THESE INSTRUCTIONS
4-wire receptacle 14...
Installation Instructions - Page 9
... Type
Natural gas: This dryer is located on the model/serial rating plate for LP (propane or butane) gases with appropriate conversion. • Your dryer must be easy to convert the appliance from the gas specified on the rating plate in the door well of the dryer in the "Assistance or Service" section. If this information...
Installation Instructions - Page 10
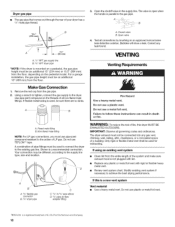
...a garage installation, the ...dryer has a 3/8" male pipe thread.
3. Closed valve B. t®TEFLON is a recommended connection. Using a wrench to tighten, connect the gas supply to follow these instructions can result in the supply line. If using an existing vent system
• Clean lint from the gas pipe. 2.
g
VENTING
Venting Requirements
Fire Hazard Use a heavy metal vent. Review...
Installation Instructions - Page 11
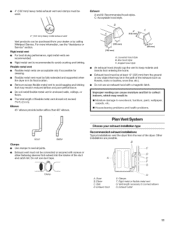
...• Flexible metal vent must be fully extended and supported when the dryer is recommended to avoid crushing and kinking.
Exhaust A ... exhaust installation type Recommended exhaust installations Typical installations vent the dryer from your dealer or by calling Whirlpool Service.
Louvered...problems and health problems.
Good
Better
Clamps Use clamps to seal all joints.
Installation Instructions - Page 12
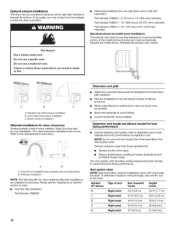
... to follow these instructions can be securely fastened to exhaust out the right side, left side or through the bottom. Bottom exhaust installation
Alternate installations for purchase. Periscope installation
NOTE: The following vent system chart to determine type of vent material and hood combinations acceptable to order. • Over-the-Top Installation:
Part Number 4396028
Determine...
Installation Instructions - Page 13
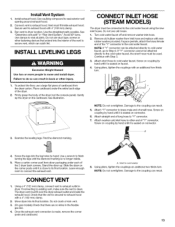
... to the coupling can be attached directly to cold water faucet, go to its final location. Find the diamond marking.
4. Screw the legs into its final location. Stand the dryer up. The dryer vent must be used. Inlet to move and install dryer. NOTE: Do not overtighten. Install Vent System
1. Use the straightest path possible. Do...
Installation Instructions - Page 14
... on .
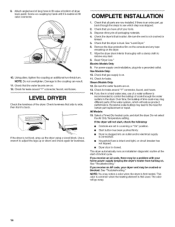
13. This dryer automatically runs an installation diagnostic routine at bottom of its first cycle. See "Troubleshooting." NOTE: You may be a problem with a damp cloth to adjust the legs up the dryer using a wood block. Check for certain part replacement or repair. See "Troubleshooting." Wipe the dryer drum interior thoroughly with your dryer vent may notice a odor...
Installation Instructions - Page 15
... fuse has blown or circuit breaker has tripped.
If the problem continues, call an electrician.
• "AF" (low airflow condition): The dryer will not run when this diagnostic code is properly installed.
TROUBLESHOOTING
First try the solutions suggested here and possibly avoid the cost of a service call an electrician.
• Is the correct power supply available...
Installation Instructions - Page 16
... movement, clean exhaust system of the door.
See the Installation Instructions.
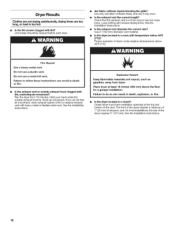
16 See the Installation Instructions. Explosion Hazard
Keep flammable materials and vapors, such as gasoline, away from dryer. Is the exhaust vent diameter the correct size?
Place dryer at the top and bottom of lint or replace exhaust vent with lint, restricting air movement? Failure to...
Whirlpool WGD9450WR Reviews
We have not received any reviews for Whirlpool yet.