Use and Care Guide
Page 2
... symbol and either the word "DANGER" or "WARNING." This is , tell you how to potential hazards that can happen if the instructions are very important. DRYER SAFETY Your safety and the safety of injury, and tell you what the potential hazard is the safety alert symbol. WARNING You can be killed...
... symbol and either the word "DANGER" or "WARNING." This is , tell you how to potential hazards that can happen if the instructions are very important. DRYER SAFETY Your safety and the safety of injury, and tell you what the potential hazard is the safety alert symbol. WARNING You can be killed...
Use and Care Guide
Page 3
...building, or area of local codes, with the National Electrical Code, ANSI/NFPA 70. 3 IMPORTANT: The gas installation must be performed by a qualified installer, service agency, or the gas supplier. Do not store or use any electrical switch; Installation and service must conform with local codes, or... in the absence of fire or explosion, or to prevent property damage, personal injury, or death. - The dryer must be electrically grounded in ...
...building, or area of local codes, with the National Electrical Code, ANSI/NFPA 70. 3 IMPORTANT: The gas installation must be performed by a qualified installer, service agency, or the gas supplier. Do not store or use any electrical switch; Installation and service must conform with local codes, or... in the absence of fire or explosion, or to prevent property damage, personal injury, or death. - The dryer must be electrically grounded in ...
Use and Care Guide
Page 4
... type of how to do if you use your gas supplier. For a summary of oil on it (including cooking oils). QUICK START GUIDE/DRYER USE WARNING WARNING Explosion Hazard Keep flammable materials and vapors, such as gasoline, away from dryer. Do not dry anything flammable on it (even ...after washing). For more information, contact your dryer following installation, see the QUICK START GUIDE on a clothesline or by UL or CSA. WARNING: Gas leaks cannot always be dried on the next page...
... type of how to do if you use your gas supplier. For a summary of oil on it (including cooking oils). QUICK START GUIDE/DRYER USE WARNING WARNING Explosion Hazard Keep flammable materials and vapors, such as gasoline, away from dryer. Do not dry anything flammable on it (even ...after washing). For more information, contact your dryer following installation, see the QUICK START GUIDE on a clothesline or by UL or CSA. WARNING: Gas leaks cannot always be dried on the next page...
Use and Care Guide
Page 5
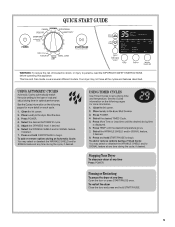
... described. Open the door or press START/PAUSE once. Select the WRINKLE SHIELD and/or SIGNAL feature, if desired. 7. USING AUTOMATIC CYCLES Press POWER. Your dryer may select or deselect the WRINKLE SHIELD and/or SIGNAL feature at any time during the cycle, if desired. To add or remove options during...
... described. Open the door or press START/PAUSE once. Select the WRINKLE SHIELD and/or SIGNAL feature, if desired. 7. USING AUTOMATIC CYCLES Press POWER. Your dryer may select or deselect the WRINKLE SHIELD and/or SIGNAL feature at any time during the cycle, if desired. To add or remove options during...
Use and Care Guide
Page 7
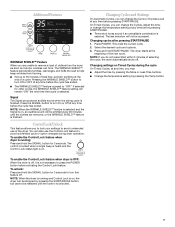
...off . Control Lock/Unlock This feature allows you to lock your settings to "OFF." To enable the Control Lock feature when dryer is OFF: When the dryer is off, it stops, wrinkles can change the temperature setting at any time before activating the Control Lock feature. Additional Features ...SHIELD™ feature is finished. The WRINKLE SHIELD™ feature periodically tumbles, rearranges, and fluffs the load to help keep wrinkles from the dryer as soon as it is not necessary to press the POWER button before the cycle has ended. ■ The WRINKLE SHIELD™ feature ...
...off . Control Lock/Unlock This feature allows you to lock your settings to "OFF." To enable the Control Lock feature when dryer is OFF: When the dryer is off, it stops, wrinkles can change the temperature setting at any time before activating the Control Lock feature. Additional Features ...SHIELD™ feature is finished. The WRINKLE SHIELD™ feature periodically tumbles, rearranges, and fluffs the load to help keep wrinkles from the dryer as soon as it is not necessary to press the POWER button before the cycle has ended. ■ The WRINKLE SHIELD™ feature ...
Use and Care Guide
Page 8
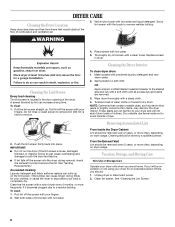
... . Clean the lint screen with a nylon brush every 6 months, or more frequently, if it becomes clogged due to remove. 2. Wet both the dryer and fabrics. ■ If lint falls off the screen into place. Wipe drum thoroughly with a clean towel. See "Cleaning the Lint Screen." 8 ...Cleaning the Lint Screen Every load cleaning The lint screen is hard to a residue buildup. To clean 1. Wet lint is located in dryer. See "Venting Requirements." As needed cleaning Laundry detergent and fabric softener residue can cause longer drying times for an extended period of time, ...
... . Clean the lint screen with a nylon brush every 6 months, or more frequently, if it becomes clogged due to remove. 2. Wet both the dryer and fabrics. ■ If lint falls off the screen into place. Wipe drum thoroughly with a clean towel. See "Cleaning the Lint Screen." 8 ...Cleaning the Lint Screen Every load cleaning The lint screen is hard to a residue buildup. To clean 1. Wet lint is located in dryer. See "Venting Requirements." As needed cleaning Laundry detergent and fabric softener residue can cause longer drying times for an extended period of time, ...
Use and Care Guide
Page 9
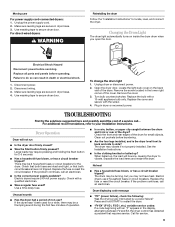
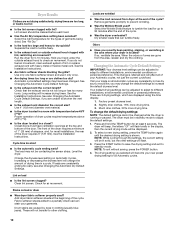
... (power failure), check the following: Was the drying cycle interrupted by a power failure? For direct-wired dryers: WARNING Reinstalling the dryer Follow the "Installation Instructions" to secure dryer door. Unplug dryer or disconnect power. 2. Plug in death or electrical shock. 1. There may be 2 household fuses or ...Unplug the power supply cord. 2. Use masking tape to locate, level, and connect the dryer. Separate the load items and restart the dryer. Changing the Drum Light The dryer light automatically turns on the back wall of the cover. Make sure leveling legs are secure...
... (power failure), check the following: Was the drying cycle interrupted by a power failure? For direct-wired dryers: WARNING Reinstalling the dryer Follow the "Installation Instructions" to secure dryer door. Unplug dryer or disconnect power. 2. Plug in death or electrical shock. 1. There may be 2 household fuses or ...Unplug the power supply cord. 2. Use masking tape to locate, level, and connect the dryer. Separate the load items and restart the dryer. Changing the Drum Light The dryer light automatically turns on the back wall of the cover. Make sure leveling legs are secure...
Use and Care Guide
Page 10
...drying settings, which are clothes too dry? Press and hold the TEMP button for the types of the cycle. ■ Was the dryer overloaded? NOTE: While cycling through the settings, the current setting will be adjusted to adapt to different installations, environmental conditions or personal... blue jeans). NOTE: To exit without saving, press the POWER button. 4. Separate the load to increase the default dryness level. Hold your dryer is located? Factory preset dryness level. 2. Much drier clothes, 30% more drying time. 3. Slightly drier clothes, 15% more drying time....
...drying settings, which are clothes too dry? Press and hold the TEMP button for the types of the cycle. ■ Was the dryer overloaded? NOTE: While cycling through the settings, the current setting will be adjusted to adapt to different installations, environmental conditions or personal... blue jeans). NOTE: To exit without saving, press the POWER button. 4. Separate the load to increase the default dryness level. Hold your dryer is located? Factory preset dryness level. 2. Much drier clothes, 30% more drying time. 3. Slightly drier clothes, 15% more drying time....


