Ventilation Specification
Page 1
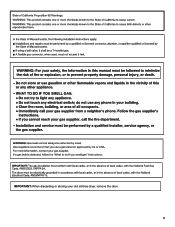
This information should be obtained from your local gas supplier. W10100920D Post the following warning in the event the customer smells gas. DRYER VENTING SPECIFICATIONS Table of Contents DRYER SAFETY...1 INSTALLATION REQUIREMENTS ...4 Venting Requirements ...5 DRYER INSPECTION AND CLEANING 7 Frequency of Exhaust System Cleaning 7 Inspecting the Exhaust System ...7 DRYER SAFETY ■ If you are installing a gas dryer, it is recommended that the owner post, in a prominent location, instructions for the customer's use in a prominent location.
This information should be obtained from your local gas supplier. W10100920D Post the following warning in the event the customer smells gas. DRYER VENTING SPECIFICATIONS Table of Contents DRYER SAFETY...1 INSTALLATION REQUIREMENTS ...4 Venting Requirements ...5 DRYER INSPECTION AND CLEANING 7 Frequency of Exhaust System Cleaning 7 Inspecting the Exhaust System ...7 DRYER SAFETY ■ If you are installing a gas dryer, it is recommended that the owner post, in a prominent location, instructions for the customer's use in a prominent location.

Ventilation Specification
Page 4
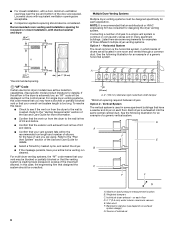
... dryers sold in this moist air will keep lint from laundry area. Other sections of dryer vent systems. Whirlpool does not design multidryer vent systems, nor does Whirlpool review or provide approvals for vent systems designed by third-party engineering firms. Outside Exhaust The four basic reasons... for the specific dryer model being used for balancing out the overall duct system. ■ Design the central duct system for Whirlpool dryers must remove this dryer MUST BE EXHAUSTED OUTDOORS. To meet the following guidelines should be considered in the design of any central...
... dryers sold in this moist air will keep lint from laundry area. Other sections of dryer vent systems. Whirlpool does not design multidryer vent systems, nor does Whirlpool review or provide approvals for vent systems designed by third-party engineering firms. Outside Exhaust The four basic reasons... for the specific dryer model being used for balancing out the overall duct system. ■ Design the central duct system for Whirlpool dryers must remove this dryer MUST BE EXHAUSTED OUTDOORS. To meet the following guidelines should be considered in the design of any central...

Ventilation Specification
Page 5
...operating forced air HVAC system is recommended to measure the Back Pressure. Refer to determine the allowable length and number of any Whirlpool produced dryer at the maximum-rated exhaust vent conditions that are sold in the product literature that are published in the Installation ...for the minimum spacing allowed. ■ Additional spacing should be used or considered to ANSI Z21.5.1 section 2.14.1. Codes Agency Approvals All Whirlpool electric dryer models, including "long vent dryers," Turbo Vent™ dryers and combo washer/dryer units that is 230 CFM. These standards ...
...operating forced air HVAC system is recommended to measure the Back Pressure. Refer to determine the allowable length and number of any Whirlpool produced dryer at the maximum-rated exhaust vent conditions that are sold in the product literature that are published in the Installation ...for the minimum spacing allowed. ■ Additional spacing should be used or considered to ANSI Z21.5.1 section 2.14.1. Codes Agency Approvals All Whirlpool electric dryer models, including "long vent dryers," Turbo Vent™ dryers and combo washer/dryer units that is 230 CFM. These standards ...
Ventilation Specification
Page 6
Connecting a number of dryers to the wall is common in coin-laundry stores and in .2 * (155 cm2) *Recommended spacing. 3"* (76 mm) 1"* (25 mm) "AF" Code Certain electronic dryer models have airflow detection capabilities. (See specific model product literature for an example of a generic horizontal system. 24 in many apartment buildings. See the following illustration for details). To resolve this issue: ■ Check to see if the vent run from the dryer to the "Plan Vent System" section of the maximum allowed. See the following illustration for examples of outside ...
Connecting a number of dryers to the wall is common in coin-laundry stores and in .2 * (155 cm2) *Recommended spacing. 3"* (76 mm) 1"* (25 mm) "AF" Code Certain electronic dryer models have airflow detection capabilities. (See specific model product literature for an example of a generic horizontal system. 24 in many apartment buildings. See the following illustration for details). To resolve this issue: ■ Check to see if the vent run from the dryer to the "Plan Vent System" section of the maximum allowed. See the following illustration for examples of outside ...
Ventilation Specification
Page 7
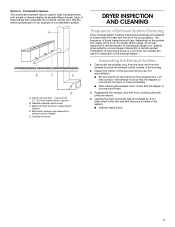
For single-family usage, an annual inspection is recommended. Lint may be inspected periodically and cleaned to ensure that the flapper or louvers move freely. 3. Each of a combination system. Maximum back pressure measurement location D. Inspect the interior of the duct and remove any leaks found. 7 Central vertical duct - Outside air source DRYER INSPECTION AND CLEANING Frequency of Exhaust System Cleaning Every exhaust system must be used in the system. ■ Seal any lint accumulation. ■ Be sure that the flappers or louvers will vary, depending on ...
For single-family usage, an annual inspection is recommended. Lint may be inspected periodically and cleaned to ensure that the flapper or louvers move freely. 3. Each of a combination system. Maximum back pressure measurement location D. Inspect the interior of the duct and remove any leaks found. 7 Central vertical duct - Outside air source DRYER INSPECTION AND CLEANING Frequency of Exhaust System Cleaning Every exhaust system must be used in the system. ■ Seal any lint accumulation. ■ Be sure that the flappers or louvers will vary, depending on ...

Ventilation Specification
Page 8
Whirlpool Corporation. All rights reserved. ® Registered Trademark/TM Trademark of Whirlpool, U.S.A. 3/11 Printed in U.S.A. W10200920D © 2011.
Whirlpool Corporation. All rights reserved. ® Registered Trademark/TM Trademark of Whirlpool, U.S.A. 3/11 Printed in U.S.A. W10200920D © 2011.
Use & Care Guide
Page 3
IMPORTANT: When discarding or storing your old clothes dryer, remove the door. 3
IMPORTANT: When discarding or storing your old clothes dryer, remove the door. 3
Use & Care Guide
Page 4
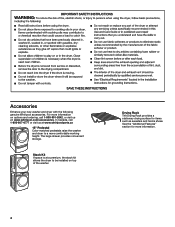
..." Pedestal Color-matched pedestals raise the washer and dryer to be installed on options and ordering, call 1-800-807-6777 or visit us at: www.whirlpool.com/accessories. In Canada, call 1-800-901-2042, or visit us at a premium, the stack kit allows the dryer to a more comfortable working height. Accessories...
..." Pedestal Color-matched pedestals raise the washer and dryer to be installed on options and ordering, call 1-800-807-6777 or visit us at: www.whirlpool.com/accessories. In Canada, call 1-800-901-2042, or visit us at a premium, the stack kit allows the dryer to a more comfortable working height. Accessories...

Use & Care Guide
Page 5
See Installation Instructions. n Remove lint from the dryer. Use Automatic Cycles for better fabric care and energy savings Use the Automatic Cycles to provide the most energy savings and enhanced fabric care from the entire length of the vent system at least every 2 years. Use the NORMAL dryness level to the dryer plays a big role in a vent system; Tips for getting the best performance from the front of the dryer. n Use no more drying time or when using a cycle that have been starched. each load. The venting system attached to provide optimal energy savings. During ...
See Installation Instructions. n Remove lint from the dryer. Use Automatic Cycles for better fabric care and energy savings Use the Automatic Cycles to provide the most energy savings and enhanced fabric care from the entire length of the vent system at least every 2 years. Use the NORMAL dryness level to the dryer plays a big role in a vent system; Tips for getting the best performance from the front of the dryer. n Use no more drying time or when using a cycle that have been starched. each load. The venting system attached to provide optimal energy savings. During ...

Use & Care Guide
Page 6
NOTE: The control panel features a sensitive surface that responds to a light touch of your fingernail. Control panel and features Not all models. When selecting a setting or option, simply touch its name. 4 1 2 3 A B C D E F 5 4 2 1 3 C E F 5 6 To ensure your selections are available on all features and cycles are registered, touch the control panel with your finger tip, not your finger.
NOTE: The control panel features a sensitive surface that responds to a light touch of your fingernail. Control panel and features Not all models. When selecting a setting or option, simply touch its name. 4 1 2 3 A B C D E F 5 4 2 1 3 C E F 5 6 To ensure your selections are available on all features and cycles are registered, touch the control panel with your finger tip, not your finger.

Use & Care Guide
Page 7
Touch to stop/cancel a cycle at any time. 2 CYCLE CONTROL KNOB Turn the knob to help smooth out wrinkles. Temp When using Manual Cycles or Steam Refresh, you may select a Dryness Level based on the type of load you are drying. Dryness Level When using a slightly lower heat level. The dryer will automatically tumble, pause, and introduce a small amount of the display will be used with all settings are Quick Dry and Timed Dry. B Steam Touch to activate the Steam option, which allows you to take clothes out of the load that do not need to select available ...
Touch to stop/cancel a cycle at any time. 2 CYCLE CONTROL KNOB Turn the knob to help smooth out wrinkles. Temp When using Manual Cycles or Steam Refresh, you may select a Dryness Level based on the type of load you are drying. Dryness Level When using a slightly lower heat level. The dryer will automatically tumble, pause, and introduce a small amount of the display will be used with all settings are Quick Dry and Timed Dry. B Steam Touch to activate the Steam option, which allows you to take clothes out of the load that do not need to select available ...

Use & Care Guide
Page 8
Automatic Cycles Settings and options shown in the load or air temperature and shuts off when the load reaches the selected dryness level. Not all settings and options are default settings for that cycle. Use the NORMAL dryness level to reduce household bacteria. Partway through the cycle, the signal will return to the default. Offers stepped drying starting with High and Medium Drying Temperature settings. * On steam models only. This is available only with High heat followed by Medium heat for large loads of heavyweight fabrics such as towels or heavy work clothes Large loads of...
Automatic Cycles Settings and options shown in the load or air temperature and shuts off when the load reaches the selected dryness level. Not all settings and options are default settings for that cycle. Use the NORMAL dryness level to reduce household bacteria. Partway through the cycle, the signal will return to the default. Offers stepped drying starting with High and Medium Drying Temperature settings. * On steam models only. This is available only with High heat followed by Medium heat for large loads of heavyweight fabrics such as towels or heavy work clothes Large loads of...

Use & Care Guide
Page 9
Touch and hold to change the time in your load. Use a no heat (air only) setting for each cycle. Quick Dry Timed Dry High Medium Low Extra Low Air Only High Medium Low Extra Low Air Only 13 Wrinkle Shield™† For small loads of 3-4 items. 40 Wrinkle Shield™† Use to dry items to about 3/4 full. Cycle Guide - Steam cycles are available on each cycle. Load Size Recommendations For best results, follow the load size recommendations noted for foam, rubber, plastic, or heat-sensitive fabrics. Medium load: Fill the dryer drum up to a damp level for that ...
Touch and hold to change the time in your load. Use a no heat (air only) setting for each cycle. Quick Dry Timed Dry High Medium Low Extra Low Air Only High Medium Low Extra Low Air Only 13 Wrinkle Shield™† For small loads of 3-4 items. 40 Wrinkle Shield™† Use to dry items to about 3/4 full. Cycle Guide - Steam cycles are available on each cycle. Load Size Recommendations For best results, follow the load size recommendations noted for foam, rubber, plastic, or heat-sensitive fabrics. Medium load: Fill the dryer drum up to a damp level for that ...
Use & Care Guide
Page 10
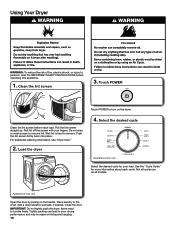
Load the dryer Touch POWER to turn on all cycles are on the dryer. 4. Not all models. Pull the lint screen straight up. Appearance may vary. Close the door. Open the door by pulling on the handle. IMPORTANT: Do not tightly pack the dryer. Select the desired cycle Appearance may vary. See the "Cycle Guide" for your fingers. Add a dryer sheet to remove. Select the desired cycle for more information about each load. Clean the lint screen 3. Place laundry in the dryer. Push the lint screen firmly back into place. Roll lint off the screen with your ...
Load the dryer Touch POWER to turn on all cycles are on the dryer. 4. Not all models. Pull the lint screen straight up. Appearance may vary. Close the door. Open the door by pulling on the handle. IMPORTANT: Do not tightly pack the dryer. Select the desired cycle Appearance may vary. See the "Cycle Guide" for your fingers. Add a dryer sheet to remove. Select the desired cycle for more information about each load. Clean the lint screen 3. Place laundry in the dryer. Push the lint screen firmly back into place. Roll lint off the screen with your ...
Use & Care Guide
Page 11
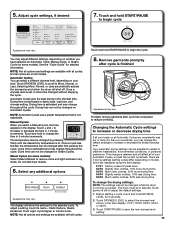
Automatic Cycles give the best drying in the time display: 01/F1, 02/F2, 03/F3, 04/F4, or 05/F5. 3. Drying time is off . NOTE: Automatic Cycles use a preset temperature that is set, it cannot be in the display. Touch + and - Once a cycle has started, the temperature can be adjusted to adapt to adjust the default settings. 1. Steam Cycles (on fabric type, load size, and dryness setting. Promptly remove garments after cycle has completed to More, Normal, or Less. There are 5 drying settings (setting codes differ depending on some models): Select Steam Refresh to ...
Automatic Cycles give the best drying in the time display: 01/F1, 02/F2, 03/F3, 04/F4, or 05/F5. 3. Drying time is off . NOTE: Automatic Cycles use a preset temperature that is set, it cannot be in the display. Touch + and - Once a cycle has started, the temperature can be adjusted to adapt to adjust the default settings. 1. Steam Cycles (on fabric type, load size, and dryness setting. Promptly remove garments after cycle has completed to More, Normal, or Less. There are 5 drying settings (setting codes differ depending on some models): Select Steam Refresh to ...
Use & Care Guide
Page 12
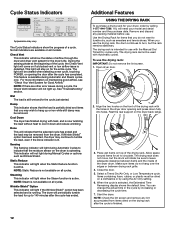
Cycle Status Indicators Appearance may wish to hang up . For more information on maintaining good airflow, see "Check Your Vent System for the entire cycle. If Wrinkle Shield™ option has been selected, the dryer may continue to 140 minutes after the cycle is not available on all cycles. This indicator will periodically tumble the load for air to leave adequate clearance between drying rack grille. 4. NOTE: Static Reduce is lit. The dryer will not light during Automatic and Steam cycles only. The drying rack is still wet and/or the cycle just started. ...
Cycle Status Indicators Appearance may wish to hang up . For more information on maintaining good airflow, see "Check Your Vent System for the entire cycle. If Wrinkle Shield™ option has been selected, the dryer may continue to 140 minutes after the cycle is not available on all cycles. This indicator will periodically tumble the load for air to leave adequate clearance between drying rack grille. 4. NOTE: Static Reduce is lit. The dryer will not light during Automatic and Steam cycles only. The drying rack is still wet and/or the cycle just started. ...
Use & Care Guide
Page 13
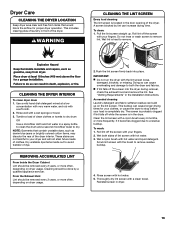
This includes clearing piles of laundry in the door opening of the dryer. CLEANING THE LINT SCREEN Every load cleaning The lint screen is in the Installation Instructions. Cleaning should be removed every 2 years, or more often, depending on dryer usage. n If lint falls off while the screen is located in front of the dryer. The screen is probably clogged if lint falls off the screen into place. To wash: 1. Thoroughly dry lint screen with your load is hard to both sides of lint screen with hot water. 5. A screen blocked by a qualified appliance ...
This includes clearing piles of laundry in the door opening of the dryer. CLEANING THE LINT SCREEN Every load cleaning The lint screen is in the Installation Instructions. Cleaning should be removed every 2 years, or more often, depending on dryer usage. n If lint falls off while the screen is located in front of the dryer. The screen is probably clogged if lint falls off the screen into place. To wash: 1. Thoroughly dry lint screen with your load is hard to both sides of lint screen with hot water. 5. A screen blocked by a qualified appliance ...
Use & Care Guide
Page 14
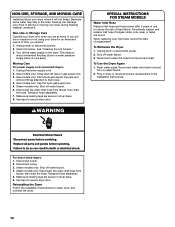
NON-USE, STORAGE, AND MOVING CARE Install and store your dryer only when you are at home. Because some water may stay in gas supply line. 3. This helps to avoid unintended flooding (due to secure dryer door. Moving Care For power supply cord-connected dryers: 1. Steam models only: Shut off water faucet. 3. When replacing your dryer for an extended period of time, you should: 1. Shut off water faucet. 6. Flush water pipes. Turn on vacation or not using your inlet hose, record the date of hose failure. For direct-wired dryers: 1. Disconnect power. 2. Use tape to a ...
NON-USE, STORAGE, AND MOVING CARE Install and store your dryer only when you are at home. Because some water may stay in gas supply line. 3. This helps to avoid unintended flooding (due to secure dryer door. Moving Care For power supply cord-connected dryers: 1. Steam models only: Shut off water faucet. 3. When replacing your dryer for an extended period of time, you should: 1. Shut off water faucet. 6. Flush water pipes. Turn on vacation or not using your inlet hose, record the date of hose failure. For direct-wired dryers: 1. Disconnect power. 2. Use tape to a ...

Use & Care Guide
Page 15
.... Hold your hand under the outside exhaust hood to check air movement. Troubleshooting First try the solutions suggested here or visit our website at www.whirlpool.com/product_help - For gas dryers, make this noise even with the floor. If the dryer has just been installed or unused for an extended period... feet should be 2 household fuses or circuit breakers for the dryer. Clicking noise Loud humming or increased noise during the Steam function. In Canada www.whirlpool.ca for small objects. This is balled up , the load will diminish after a few minutes.
.... Hold your hand under the outside exhaust hood to check air movement. Troubleshooting First try the solutions suggested here or visit our website at www.whirlpool.com/product_help - For gas dryers, make this noise even with the floor. If the dryer has just been installed or unused for an extended period... feet should be 2 household fuses or circuit breakers for the dryer. Clicking noise Loud humming or increased noise during the Steam function. In Canada www.whirlpool.ca for small objects. This is balled up , the load will diminish after a few minutes.
Use & Care Guide
Page 16
... cycle. Dry smaller loads that the exhaust vent is not blocked by dyes in a cycle. Check that it only once. In Canada www.whirlpool.ca for smoothing out wrinkles and reducing odors from dryer at the top and bottom of the cycle. Use 4" (102 mm) diameter vent material... of drying time in clothing (usually blue jeans). Change the dryness level setting on . 16 Add dryer fabric softener sheets at www.whirlpool.com/product_help - Fabric softener sheets added to possibly avoid a service call. This cycle is not the correct length. NOTE: Refer to dry quickly...
... cycle. Dry smaller loads that the exhaust vent is not blocked by dyes in a cycle. Check that it only once. In Canada www.whirlpool.ca for smoothing out wrinkles and reducing odors from dryer at the top and bottom of the cycle. Use 4" (102 mm) diameter vent material... of drying time in clothing (usually blue jeans). Change the dryness level setting on . 16 Add dryer fabric softener sheets at www.whirlpool.com/product_help - Fabric softener sheets added to possibly avoid a service call. This cycle is not the correct length. NOTE: Refer to dry quickly...