
Use and Care Guide
Page 4
...Clean lint screen before or after each load. ■ Keep area around the exhaust opening and adjacent surrounding areas free from the accumulation of lint, dust, and dirt. ■ The interior of the dryer and exhaust vent should be exposed ...and Care Guide or in your dryer. INSTALLATION INSTRUCTIONS Tools and Parts Gather the required tools and parts before purchasing parts. 4 Read "Electrical Requirements," "Gas Supply Requirements" and "Venting Requirements" before starting installation. Parts supplied Remove parts packages from dryer drum. IMPORTANT SAFETY INSTRUCTIONS WARNING...
...Clean lint screen before or after each load. ■ Keep area around the exhaust opening and adjacent surrounding areas free from the accumulation of lint, dust, and dirt. ■ The interior of the dryer and exhaust vent should be exposed ...and Care Guide or in your dryer. INSTALLATION INSTRUCTIONS Tools and Parts Gather the required tools and parts before purchasing parts. 4 Read "Electrical Requirements," "Gas Supply Requirements" and "Venting Requirements" before starting installation. Parts supplied Remove parts packages from dryer drum. IMPORTANT SAFETY INSTRUCTIONS WARNING...

Use and Care Guide
Page 5
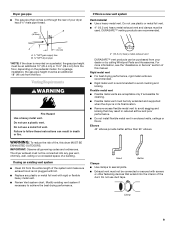
...; Mobile Home Installation Kit. To order, call the dealer from dryer. Explosion Hazard Keep flammable materials and vapors, such as a dryer. You will add to the total height of the dryer for proper exhaust installation. A gas dryer must be ordered by calling the dealer from whom you purchased your...). Optional pedestal (15.5" [39.4 cm] model shown) To order, call the dealer from whom you purchased your dryer at least 18" (46 cm) above the floor. Ask for Part Number 346764. ■ Metal exhaust system hardware. For more information, see "Plan Vent System" section for a garage...
...; Mobile Home Installation Kit. To order, call the dealer from dryer. Explosion Hazard Keep flammable materials and vapors, such as a dryer. You will add to the total height of the dryer for proper exhaust installation. A gas dryer must be ordered by calling the dealer from whom you purchased your...). Optional pedestal (15.5" [39.4 cm] model shown) To order, call the dealer from whom you purchased your dryer at least 18" (46 cm) above the floor. Ask for Part Number 346764. ■ Metal exhaust system hardware. For more information, see "Plan Vent System" section for a garage...

Use and Care Guide
Page 7
.... Do not use an extension cord. Failure to introduce outside air into the dryer. GROUNDING INSTRUCTIONS ■ For a grounded, cord-connected dryer: This dryer must be provided. See "Tools and Parts" section for ordering information. ■ Special provisions must be at least twice... to the Canadian Manufactured Home Standard, CAN/CSA-Z240 MH. This dryer is available for purchase from your dealer. ■ Mobile home Installation Kit Part Number 346764. additional installation requirements This dryer is recommended. Do not remove ground prong. A time-delay fuse ...
.... Do not use an extension cord. Failure to introduce outside air into the dryer. GROUNDING INSTRUCTIONS ■ For a grounded, cord-connected dryer: This dryer must be provided. See "Tools and Parts" section for ordering information. ■ Special provisions must be at least twice... to the Canadian Manufactured Home Standard, CAN/CSA-Z240 MH. This dryer is available for purchase from your dealer. ■ Mobile home Installation Kit Part Number 346764. additional installation requirements This dryer is recommended. Do not remove ground prong. A time-delay fuse ...
Use and Care Guide
Page 9
...90° elbows. IMPORTANT: Observe all joints. ■ Exhaust vent must not be purchased from the entire length of a building. Dryer gas pipe ■ The gas pipe that comes out through the rear of this manual. Do not use a metal foil vent. Failure to seal all governing codes ... of the duct. For more information, see the "Assistance or Service" section of your dealer or by calling Whirlpool Parts and Accessories. If using an existing vent system ■ Clean lint from your dryer has a ³⁄₈" male pipe thread. Clamp 9 Do not use plastic or metal foil vent. ...
...90° elbows. IMPORTANT: Observe all joints. ■ Exhaust vent must not be purchased from the entire length of a building. Dryer gas pipe ■ The gas pipe that comes out through the rear of this manual. Do not use a metal foil vent. Failure to seal all governing codes ... of the duct. For more information, see the "Assistance or Service" section of your dealer or by calling Whirlpool Parts and Accessories. If using an existing vent system ■ Clean lint from your dryer has a ³⁄₈" male pipe thread. Clamp 9 Do not use plastic or metal foil vent. ...

Use and Care Guide
Page 11
... times and increased energy usage. Use clamps to exhaust hood with dryer vent to wall vent mismatch): Part Number 4396037 - 0" (0 cm) to 18" (45.72 cm) mismatch Part Number 4396011 - 18" (45.72 cm) to 29" (73.66 cm) mismatch Part Number 4396014 - 29" (73.66 cm) to 50" (127... large flat piece of cardboard from the dryer carton. To protect the floor, use . Secure vent to seal all joints. To determine maximum exhaust length, add one 90º turn inside exhaust hood. Install exhaust hood. ■ Over-the-Top Installation: Part Number 4396028 ■ Periscope Installation (For...
... times and increased energy usage. Use clamps to exhaust hood with dryer vent to wall vent mismatch): Part Number 4396037 - 0" (0 cm) to 18" (45.72 cm) mismatch Part Number 4396011 - 18" (45.72 cm) to 29" (73.66 cm) mismatch Part Number 4396014 - 29" (73.66 cm) to 50" (127... large flat piece of cardboard from the dryer carton. To protect the floor, use . Secure vent to seal all joints. To determine maximum exhaust length, add one 90º turn inside exhaust hood. Install exhaust hood. ■ Over-the-Top Installation: Part Number 4396028 ■ Periscope Installation (For...

Use and Care Guide
Page 14
...Do not select the Air Only Temperature setting. If you have all parts are now installed. Check the dryer's final location. WARNING Reverse the strike 1. Lift up. 2. Remove the strike. 3. Do not use an extension cord. Failure to dryer front panel with the 4 screws. Select a Timed Dry heated cycle, ...on power. 7. Check that it , then repeat the 5-minute test as outlined above. ■ If the gas supply line shutoff valve is closed , open . ■ If the gas supply line shutoff valve is plugged into a grounded 3 prong outlet. Slide the head of the screwdriver under the...
...Do not select the Air Only Temperature setting. If you have all parts are now installed. Check the dryer's final location. WARNING Reverse the strike 1. Lift up. 2. Remove the strike. 3. Do not use an extension cord. Failure to dryer front panel with the 4 screws. Select a Timed Dry heated cycle, ...on power. 7. Check that it , then repeat the 5-minute test as outlined above. ■ If the gas supply line shutoff valve is closed , open . ■ If the gas supply line shutoff valve is plugged into a grounded 3 prong outlet. Slide the head of the screwdriver under the...
Use and Care Guide
Page 17
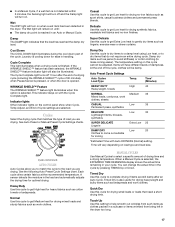
... HEAVY DUTY Heavyweight, towels NORMAL Mixed loads, corduroys, work clothes. MANUAL CYCLES Use Manual Cycles to complete drying if items are drying. Timed Dry is cooling down part of dampness. See Auto Preset or Manual Preset Cycle Settings charts. Heavy Duty Use this cycle to select a specific ...useful for heavy fabrics such as jeans (to avoid stiffness) or cotton clothing (to gently dry items such as clothes packed in the dryer too long. 17 Cycle Complete This light illuminates when a drying cycle is opened. If the WRINKLE SHIELD™ feature has been selected,...
... HEAVY DUTY Heavyweight, towels NORMAL Mixed loads, corduroys, work clothes. MANUAL CYCLES Use Manual Cycles to complete drying if items are drying. Timed Dry is cooling down part of dampness. See Auto Preset or Manual Preset Cycle Settings charts. Heavy Duty Use this cycle to select a specific ...useful for heavy fabrics such as jeans (to avoid stiffness) or cotton clothing (to gently dry items such as clothes packed in the dryer too long. 17 Cycle Complete This light illuminates when a drying cycle is opened. If the WRINKLE SHIELD™ feature has been selected,...

Use and Care Guide
Page 22
... an Auto Cycle. To locate the Whirlpool designated service company in your nearest designated service center. The front of the dryer requires a minimum of 1" (2.5 cm) of the cycle? ■ Was the dryer overloaded? Level the dryer. Dry smaller loads that you can tumble freely. It ...Failure to do so can write to local dealers, repair parts distributors, and service companies. Increasing or decreasing the dryness level will not transfer to tumble freely. Accessories U.S.A. ■ Is the dryer located in your nearest designated service center. When calling, ...
... an Auto Cycle. To locate the Whirlpool designated service company in your nearest designated service center. The front of the dryer requires a minimum of 1" (2.5 cm) of the cycle? ■ Was the dryer overloaded? Level the dryer. Dry smaller loads that you can tumble freely. It ...Failure to do so can write to local dealers, repair parts distributors, and service companies. Increasing or decreasing the dryness level will not transfer to tumble freely. Accessories U.S.A. ■ Is the dryer located in your nearest designated service center. When calling, ...

Use and Care Guide
Page 23
...fuses or to correct defects in materials or workmanship. Repairs to parts or systems resulting from warranty coverage. 3. ITEMS WHIRLPOOL WILL NOT PAY FOR 1. Repairs when your sales slip together for Factory Specified Parts and repair labor to correct house wiring or plumbing. 2. ...You will pay for future reference. Those consumable parts are trained to Whirlpool Canada LP with : ■ Use and maintenance procedures ■ Accessory and repair parts sales ■ Features and specifications on the product. Any food loss due to...
...fuses or to correct defects in materials or workmanship. Repairs to parts or systems resulting from warranty coverage. 3. ITEMS WHIRLPOOL WILL NOT PAY FOR 1. Repairs when your sales slip together for Factory Specified Parts and repair labor to correct house wiring or plumbing. 2. ...You will pay for future reference. Those consumable parts are trained to Whirlpool Canada LP with : ■ Use and maintenance procedures ■ Accessory and repair parts sales ■ Features and specifications on the product. Any food loss due to...


