Owners Manual
Page 2
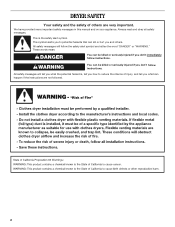
... the potential hazard is the safety alert symbol. WARNING You can happen if the instructions are very important. Always read and obey all safety messages. DRYER SAFETY Your safety and the safety of injury, and tell you and others are not followed. 2
... the potential hazard is the safety alert symbol. WARNING You can happen if the instructions are very important. Always read and obey all safety messages. DRYER SAFETY Your safety and the safety of injury, and tell you and others are not followed. 2
Owners Manual
Page 3
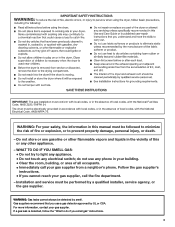
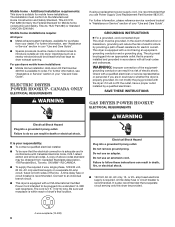
...; IMPORTANT: The gas installation must conform with local codes, or in the absence of local codes, with the National Electrical Code, ANSI/NFPA 70. The dryer must be detected by UL or CSA. Gas suppliers recommend that you smell gas" instructions. 3
...; IMPORTANT: The gas installation must conform with local codes, or in the absence of local codes, with the National Electrical Code, ANSI/NFPA 70. The dryer must be detected by UL or CSA. Gas suppliers recommend that you smell gas" instructions. 3
Owners Manual
Page 4
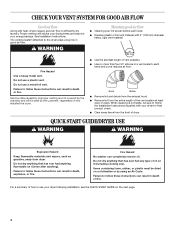
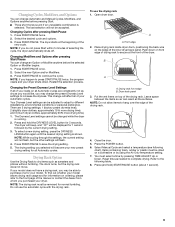
... venting system attached to use your energy savings. Good Better ■ Remove lint and debris from the exhaust hood. ■ Remove lint from dryer. Fire Hazard Use a heavy metal vent. For a summary of vent possible. ■ Use no more than four 90° elbows in ...instructions can result in death or fire. See Installation Instructions. each load. ■ Replace plastic or foil vent material with heat, dryers require good air flow to follow these instructions can completely remove oil. Failure to follow these instructions can result in death, explosion, or...
... venting system attached to use your energy savings. Good Better ■ Remove lint and debris from the exhaust hood. ■ Remove lint from dryer. Fire Hazard Use a heavy metal vent. For a summary of vent possible. ■ Use no more than four 90° elbows in ...instructions can result in death or fire. See Installation Instructions. each load. ■ Replace plastic or foil vent material with heat, dryers require good air flow to follow these instructions can completely remove oil. Failure to follow these instructions can result in death, explosion, or...
Owners Manual
Page 5
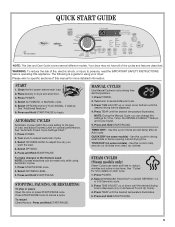
... Select AUTOMATIC or MANUAL cycle. 5. See "Automatic Preset Cycle Settings Chart." 1. MANUAL CYCLES Use Manual Cycles to reduce wrinkles and odors in dryer and shut door. 3. Press TEMP until the desired temperature illuminates. 5. AUTOMATIC CYCLES Automatic Cycles match the cycle setting to the Dryness Level: NOTE...knob to begin. START 1. Press and Hold START/PAUSE to desired Manual Cycle. 3. To restart Close the door. TIMED DRY - Your dryer may not have all of fire, electric shock, or injury to using Automatic Cycles. 1. The following is a guide to persons, read ...
... Select AUTOMATIC or MANUAL cycle. 5. See "Automatic Preset Cycle Settings Chart." 1. MANUAL CYCLES Use Manual Cycles to reduce wrinkles and odors in dryer and shut door. 3. Press TEMP until the desired temperature illuminates. 5. AUTOMATIC CYCLES Automatic Cycles match the cycle setting to the Dryness Level: NOTE...knob to begin. START 1. Press and Hold START/PAUSE to desired Manual Cycle. 3. To restart Close the door. TIMED DRY - Your dryer may not have all of fire, electric shock, or injury to using Automatic Cycles. 1. The following is a guide to persons, read ...
Owners Manual
Page 6
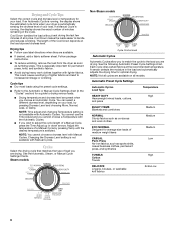
...of minutes remaining in the cycle. NOTE: Time adjust and changing Temperature setting is not available with Automatic Cycles. Adjust the temperature of your dryer is automatically sensing the dryness level of a Manual Cycle by pressing Dryness Level and choosing More, Normal, Less, or Damp. A sensor ... without heat during the last few minutes of all models. Follow package instructions. ■ To reduce wrinkling, remove the load from the dryer as soon as corduroys and work clothes together with Manual Cycles. This is selected. Cycle tips ■ Dry most loads using the preset...
...of minutes remaining in the cycle. NOTE: Time adjust and changing Temperature setting is not available with Automatic Cycles. Adjust the temperature of your dryer is automatically sensing the dryness level of a Manual Cycle by pressing Dryness Level and choosing More, Normal, Less, or Damp. A sensor ... without heat during the last few minutes of all models. Follow package instructions. ■ To reduce wrinkling, remove the load from the dryer as soon as corduroys and work clothes together with Manual Cycles. This is selected. Cycle tips ■ Dry most loads using the preset...
Owners Manual
Page 7
...Timed Dry Use this cycle a small amount of drying time and a drying temperature. Heavyweight, bulky items, bedspreads, and work clothes. The dryer will continue to complete drying if items are selectable only for smoothing out wrinkles and reducing odors from dry items, such as exercise wear, ...tumbling with heat. Steam Cycles (on some models) Use Steam Cycles to tumble with heat followed by a brief cool down. See "Dryer Rack." TIMED DRY High 40 Use if items are not adjustable. Timed Preset Cycle Settings Timed Cycle Load Type Default Default Time Temperature ...
...Timed Dry Use this cycle a small amount of drying time and a drying temperature. Heavyweight, bulky items, bedspreads, and work clothes. The dryer will continue to complete drying if items are selectable only for smoothing out wrinkles and reducing odors from dry items, such as exercise wear, ...tumbling with heat. Steam Cycles (on some models) Use Steam Cycles to tumble with heat followed by a brief cool down. See "Dryer Rack." TIMED DRY High 40 Use if items are not adjustable. Timed Preset Cycle Settings Timed Cycle Load Type Default Default Time Temperature ...
Owners Manual
Page 8
...SHIELD™ setting ends. Foam rubber pillows are securely stitched. ■ Shake and fluff pillows by pressing WRINKLE SHIELD™ setting or opening the dryer door. ■ For the Perm Press/Casual Cycle, the WRINKLE SHIELD™ setting is preset to ON. During a cycle, if Drum Light is... Modifier to select temperatures for items that may select different drying levels. Press TEMP until the desired Dryness Level setting illuminates. When the dryer is not running, the drum light will turn off after cool down. NOTE: Once dryness level has been set, it will retain ...
...SHIELD™ setting ends. Foam rubber pillows are securely stitched. ■ Shake and fluff pillows by pressing WRINKLE SHIELD™ setting or opening the dryer door. ■ For the Perm Press/Casual Cycle, the WRINKLE SHIELD™ setting is preset to ON. During a cycle, if Drum Light is... Modifier to select temperatures for items that may select different drying levels. Press TEMP until the desired Dryness Level setting illuminates. When the dryer is not running, the drum light will turn off after cool down. NOTE: Once dryness level has been set, it will retain ...
Owners Manual
Page 9
... short tones sound if an unavailable combination is shown. Select the new Option and/or Modifiers. 3. Your Dryness Level settings can be changed while the dryer is running. 2. Press and hold ) START/PAUSE button (about 1 second). 9 Press START/PAUSE to dry items such as sweaters and pillows without ... selection will not flash, but the drying rack does not move. There are consistently not as dry as needed to continue the cycle. The dryer will beep, and "CF" will flash. 4. You must be displayed for all Automatic cycles. Changing Cycles after pressing Start/Pause You can ...
... short tones sound if an unavailable combination is shown. Select the new Option and/or Modifiers. 3. Your Dryness Level settings can be changed while the dryer is running. 2. Press and hold ) START/PAUSE button (about 1 second). 9 Press START/PAUSE to dry items such as sweaters and pillows without ... selection will not flash, but the drying rack does not move. There are consistently not as dry as needed to continue the cycle. The dryer will beep, and "CF" will flash. 4. You must be displayed for all Automatic cycles. Changing Cycles after pressing Start/Pause You can ...
Owners Manual
Page 10
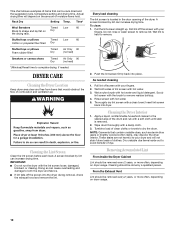
.... 2. Scrub lint screen with the lint screen loose, damaged, blocked, or missing. These stains are not harmful to your dryer and will depend on dryer usage. Stuffed toys or pillows Timed Low 60 Cotton or polyester fiber filled Dry Stuffed toys or pillows Foam rubber filled Timed ...no heat) Sneakers or canvas shoes Timed Dry Air Only 90 (no heat) *(Minutes) Reset time to remove residue buildup. 4. DRYER CARE Cleaning the Dryer Location Keep dryer area clear and free from items that would obstruct the flow of the drum and rub with your fingers. IMPORTANT: ■ Do...
.... 2. Scrub lint screen with the lint screen loose, damaged, blocked, or missing. These stains are not harmful to your dryer and will depend on dryer usage. Stuffed toys or pillows Timed Low 60 Cotton or polyester fiber filled Dry Stuffed toys or pillows Foam rubber filled Timed ...no heat) Sneakers or canvas shoes Timed Dry Air Only 90 (no heat) *(Minutes) Reset time to remove residue buildup. 4. DRYER CARE Cleaning the Dryer Location Keep dryer area clear and free from items that would obstruct the flow of the drum and rub with your fingers. IMPORTANT: ■ Do...

Owners Manual
Page 11
... the risk of replacement. Disconnect power. 2. however, if replacement is used. See "Cleaning the Lint Screen." 4. For direct-wired dryers: WARNING Special Instructions for an extended period of time, you should not require changing; When replacing your inlet hoses, record the date of... home. Replace the cover and secure with a 10-watt appliance bulb only. Gas Models: Close shutoff valve in dryer base. 5. Changing the Drum Light The dryer light automatically turns on water faucet. 2. Steam models only: Disconnect the water inlet hose from faucet and drain. Transport...
... the risk of replacement. Disconnect power. 2. however, if replacement is used. See "Cleaning the Lint Screen." 4. For direct-wired dryers: WARNING Special Instructions for an extended period of time, you should not require changing; When replacing your inlet hoses, record the date of... home. Replace the cover and secure with a 10-watt appliance bulb only. Gas Models: Close shutoff valve in dryer base. 5. Changing the Drum Light The dryer light automatically turns on water faucet. 2. Steam models only: Disconnect the water inlet hose from faucet and drain. Transport...

Owners Manual
Page 12
...or visit our website and reference FAQs (Frequently Asked Questions) to possibly avoid the cost of lint and debris. In U.S.A www.whirlpool.com/help - If the dryer hasn't been used for service. ■ "L2" Diagnostic Code (low or no line voltage condition): The drum will turn... that both circuit breakers have heat. Confirm the exterior vent exhaust hood is crushed or kinked. In Canada www.whirlpool.ca Dryer Operation Dryer will bounce, causing the dryer to "Electrical Connection" in the Installation Instructions for small objects. Large loads may vibrate if not properly installed. ...
...or visit our website and reference FAQs (Frequently Asked Questions) to possibly avoid the cost of lint and debris. In U.S.A www.whirlpool.com/help - If the dryer hasn't been used for service. ■ "L2" Diagnostic Code (low or no line voltage condition): The drum will turn... that both circuit breakers have heat. Confirm the exterior vent exhaust hood is crushed or kinked. In Canada www.whirlpool.ca Dryer Operation Dryer will bounce, causing the dryer to "Electrical Connection" in the Installation Instructions for small objects. Large loads may vibrate if not properly installed. ...
Owners Manual
Page 13
...be cleaned before each load. Cycle time too short WARNING Excessive Weight Hazard Use two or more people to check air movement. Level the dryer. Select the right temperature for 5-10 minutes. Check that the exhaust vent is too hot ■ Is the lint screen clogged with heavy...bottom of garments being dried. See the Installation Instructions. ■ Is the exhaust vent diameter the correct size? Lint on Automatic Cycles. Run the dryer for the types of the door. If you may not be contacting the sensor strips. default time), which can result in a closet? Lint ...
...be cleaned before each load. Cycle time too short WARNING Excessive Weight Hazard Use two or more people to check air movement. Level the dryer. Select the right temperature for 5-10 minutes. Check that the exhaust vent is too hot ■ Is the lint screen clogged with heavy...bottom of garments being dried. See the Installation Instructions. ■ Is the exhaust vent diameter the correct size? Lint on Automatic Cycles. Run the dryer for the types of the door. If you may not be contacting the sensor strips. default time), which can result in a closet? Lint ...
Owners Manual
Page 14
... is best for reducing wrinkles and odors from loads consisting of wrinkle-free cotton, cotton polyester blends, common knits, and synthetic garments. Add dryer fabric softener sheets at the end of wrinkle-free cotton, cotton polyester blends, common knits, and synthetics. ■ Loads are wrinkled ■.... ■ To remove odors left in the area where your garments. Drum stains are not recommended. Check that can stain your dryer is connected to garment care label instructions. These cycles are best for reducing odors from loads consisting of the cycle? Dry smaller loads...
... is best for reducing wrinkles and odors from loads consisting of wrinkle-free cotton, cotton polyester blends, common knits, and synthetic garments. Add dryer fabric softener sheets at the end of wrinkle-free cotton, cotton polyester blends, common knits, and synthetics. ■ Loads are wrinkled ■.... ■ To remove odors left in the area where your garments. Drum stains are not recommended. Check that can stain your dryer is connected to garment care label instructions. These cycles are best for reducing odors from loads consisting of the cycle? Dry smaller loads...
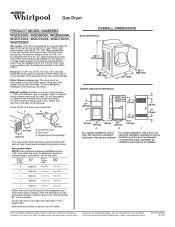
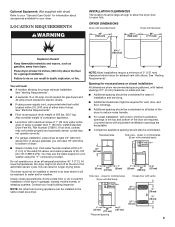
Dimension Guide
Page 1
...For cabinet installation, with the National Fuel Gas Code ANSI Z223.1. For closet installation, with equivalent air ventilation openings are required. Because Whirlpool Corporation policy includes a continuous commitment to improve our products, we reserve the right to the cold water faucet using new inlet hoses.... (6.1 m), larger tubing should be in vent length chart. To determine maximum exhaust length, add one 90° turn inside the dryer. Use the fewest 90° turns possible. Louvered doors with a door, the minimum ventilation openings in the top are recommended. ...
...For cabinet installation, with the National Fuel Gas Code ANSI Z223.1. For closet installation, with equivalent air ventilation openings are required. Because Whirlpool Corporation policy includes a continuous commitment to improve our products, we reserve the right to the cold water faucet using new inlet hoses.... (6.1 m), larger tubing should be in vent length chart. To determine maximum exhaust length, add one 90° turn inside the dryer. Use the fewest 90° turns possible. Louvered doors with a door, the minimum ventilation openings in the top are recommended. ...
Installation Instructions
Page 2
... the safety alert symbol and either the word "DANGER" or "WARNING." We have provided many important safety messages in this manual and on your appliance. DRYER SAFETY Your safety and the safety of injury, and tell you what can kill or hurt you and others are not followed. 2
... the safety alert symbol and either the word "DANGER" or "WARNING." We have provided many important safety messages in this manual and on your appliance. DRYER SAFETY Your safety and the safety of injury, and tell you what can kill or hurt you and others are not followed. 2
Installation Instructions
Page 3
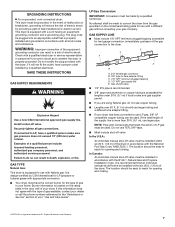
... manual must be performed by a qualified or licensed contractor, plumber, or gasfitter qualified or licensed by a qualified installer, service agency, or the gas supplier. The dryer must not exceed 3 feet. 3 Do not store or use a gas detector approved by smell. If a gas leak is detected, follow the "What to light any...
... manual must be performed by a qualified or licensed contractor, plumber, or gasfitter qualified or licensed by a qualified installer, service agency, or the gas supplier. The dryer must not exceed 3 feet. 3 Do not store or use a gas detector approved by smell. If a gas leak is detected, follow the "What to light any...
Installation Instructions
Page 4
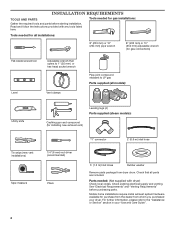
... Parts supplied (all parts are included. Mobile home installations require metal exhaust system hardware available for purchase from the dealer from dryer drum. INSTALLATION REQUIREMENTS TOOLS AND PARTS Tools needed for all installations: 8" (203 mm) or 10" (254 mm) pipe... tools listed here. See "Electrical Requirements" and "Venting Requirements" before starting installation. Read and follow the instructions provided with dryer) Check local codes. Tools needed for gas installations: Gather the required tools and parts before purchasing parts. Check existing electrical ...
... Parts supplied (all parts are included. Mobile home installations require metal exhaust system hardware available for purchase from the dealer from dryer drum. INSTALLATION REQUIREMENTS TOOLS AND PARTS Tools needed for all installations: 8" (203 mm) or 10" (254 mm) pipe... tools listed here. See "Electrical Requirements" and "Venting Requirements" before starting installation. Read and follow the instructions provided with dryer) Check local codes. Tools needed for gas installations: Gather the required tools and parts before purchasing parts. Check existing electrical ...
Installation Instructions
Page 5
...view - Also consider weight of companion appliance. ■■ Level floor with maximum slope of the dryer in the same closet as a dryer. At lower temperatures, the dryer might be required for proper exhaust installation. Some codes limit, or do not permit, installation of 1"...NOTE: Most installations require a minimum of 200 lbs. (90.7 kg). See "Electrical Requirements". ■■ Floor must support dryer weight of 5" (127 mm) clearance behind dryer for your washer using power supply cord, a grounded electrical outlet located within 4 ft. (1.2 m) of the water fill valves...
...view - Also consider weight of companion appliance. ■■ Level floor with maximum slope of the dryer in the same closet as a dryer. At lower temperatures, the dryer might be required for proper exhaust installation. Some codes limit, or do not permit, installation of 1"...NOTE: Most installations require a minimum of 200 lbs. (90.7 kg). See "Electrical Requirements". ■■ Floor must support dryer weight of 5" (127 mm) clearance behind dryer for your washer using power supply cord, a grounded electrical outlet located within 4 ft. (1.2 m) of the water fill valves...
Installation Instructions
Page 6
...installed by providing a path of above codes standard may be grounded. Electrical Shock Hazard Plug into a grounded 4 prong outlet. This dryer is within reach of electric shock. Be sure wall receptacle is equipped with a qualified electrician or service representative or personnel if you ...using a replacement power supply cord, it will reduce the risk of the equipment- GROUNDING INSTRUCTIONS � For a grounded, cord-connected dryer: This dryer must be at least twice as large as to do so can result in your responsibility: ■■ To contact a qualified ...
...installed by providing a path of above codes standard may be grounded. Electrical Shock Hazard Plug into a grounded 4 prong outlet. This dryer is within reach of electric shock. Be sure wall receptacle is equipped with a qualified electrician or service representative or personnel if you ...using a replacement power supply cord, it will reduce the risk of the equipment- GROUNDING INSTRUCTIONS � For a grounded, cord-connected dryer: This dryer must be at least twice as large as to do so can result in your responsibility: ■■ To contact a qualified ...
Installation Instructions
Page 7
...Installation Code. The location should be easy to use larger tubing and a different size adapter fitting. ■■ If your dryer has been converted to reach for test gauge connection, immediately upstream of a qualified person include: licensed heating personnel, authorized gas ...a risk of electric shock. Securely tighten all local codes and ordinances. GROUNDING INSTRUCTIONS � For a grounded, cord-connected dryer: This dryer must be installed in accordance with the type of gas available, contact your dealer or call the phone numbers referenced in the...
...Installation Code. The location should be easy to use larger tubing and a different size adapter fitting. ■■ If your dryer has been converted to reach for test gauge connection, immediately upstream of a qualified person include: licensed heating personnel, authorized gas ...a risk of electric shock. Securely tighten all local codes and ordinances. GROUNDING INSTRUCTIONS � For a grounded, cord-connected dryer: This dryer must be installed in accordance with the type of gas available, contact your dealer or call the phone numbers referenced in the...


