Whirlpool WGD6605MC Support and Manuals
Get Help and Manuals for this Whirlpool item

View All Support Options Below
Free Whirlpool WGD6605MC manuals!
Problems with Whirlpool WGD6605MC?
Ask a Question
Free Whirlpool WGD6605MC manuals!
Problems with Whirlpool WGD6605MC?
Ask a Question
Popular Whirlpool WGD6605MC Manual Pages
Door Reversal Guide - Page 2
...
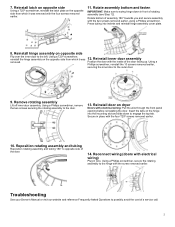
Reposition rotating assembly and tubing 180° to opposite side of a service call.
2 Reconnect wiring (doors with electrical
wiring)
Plug in place with electrical wiring: Pull the wire through the front panel opening before reinstalling the door. Troubleshooting
See your Owner's Manual or visit our website and reference Frequently Asked Questions to engage...
Quick Start Guide - Page 1

...detailed installation instruction and maintenance information, winter storage, and transportation tips, please see the Owner's Manual included with Automatic Cycles only.
NOTE: Dryness is partially dried and items that you will default on a clothesline or by approximately 40 minutes, which will be cleared upon completion of periodic tumbling to the Highest temperature setting. Damp...
Owners Manual - Page 2

... exposed to the weather.
� Do not tamper with controls.
� Do not repair or replace any part of the appliance or attempt any servicing unless specifically recommended in the usermaintenance instructions or in published user-repair instructions that have not been recommended by qualified service personnel.
� Do not place items exposed to the drying compartment.
� Do...
Owners Manual - Page 3

... duct is installed, it must be of a specific type identified by a qualified installer. − Install the clothes...Installation and service must be easily crushed, and trap lint. Install all installation instructions. − Save these instructions. "Risk of Fire"
− Clothes dryer installation...'s instructions and local codes. − Do not install a clothes dryer with flexible plastic venting...
Owners Manual - Page 5

...fire. Use a microfiber cloth and very warm water in the Installation Instructions.
� Clean space where lint screen is completely dry.... removed every 2 years, or more often, depending on model. Using a vacuum, gently remove any lint that contain ..., or missing. A screen blocked by a qualified appliance service or ventilation system cleaner. Failure to remove.
These stains are...
Owners Manual - Page 6

...supply line. 5. To clean or repair venting, contact a venting specialist.
Disconnect the
water inlet hose from the front of who installed the dryer. Replace the bulb with a 10 W appliance...models)" for Good Airflow
WARNING
Fire Hazard Use a heavy metal vent. Remove the cover.
� Use no more than four 90° elbows in gas supply line. 4. Failure to follow these instructions...
Owners Manual - Page 8

... hardware available for your dryer. Add spacing on some models):
Available Accessories:
Accessories and replacement parts are included. Check code requirements.
See "Electrical Requirements" and "Venting Requirements" before purchasing parts. Contact your Quick Start Guide. IMPORTANT: Do not operate your installation. The combined weight of a companion appliance should also...
Owners Manual - Page 9

...Part 280) or the Standard for wall, door, and
floor moldings. � Additional spacing of 1" (25 mm) on all sides of the dryer is suitable for straight-back venting only.
Do not use an adapter.
U.S.A. For steam models only, inlet hose must conform to reduce noise transfer. � For closet installation...considered for ease of
installation and servicing. � Additional ...
Owners Manual - Page 10

... connector: � If local codes permit, use PTFE plumber's tape. � Must include shutoff valve. The plug must be made to the dryer. � 1/2" IPS pipe is recommended. � 3/8" approved aluminum or copper tubing is properly grounded. GROUNDING INSTRUCTIONS
For a grounded, cord-connected appliance: This appliance must be installed within six (6) ft (1.8 m) of...
Owners Manual - Page 13

...Guide. Vent products can result in the "Vent System Chart." Plan Vent System
Recommended exhaust installations:
Typical installations...governing codes and ... and supported in final...installing the dryer.
� Make sure external exhaust hoods outside debris.
� Replace plastic of fire, this dryer MUST BE EXHAUSTED OUTDOORS. Dryer B. Vent length necessary to follow these instructions...
Owners Manual - Page 14

...turn inside the dryer.
Bottom exhaust installation (available only on
select 27"-wide models). Refer to Quick Start Guide for mobile home installations:
Exhaust vent must be converted to ...; Plan installation to follow these instructions can be securely fastened to the chart.
14 To determine maximum exhaust length, add one offset elbow)
Periscope installation
Determine vent...
Owners Manual - Page 15

...Do not use of box/louvered hoods will improve venting regardless of length. Record hose installation or replacement dates on connector.
3. Damage to exhaust hood with 4" (102 mm) clamp. ...tighten the couplings an additional two-thirds turn . Install Vent System
1. Connect Inlet Hoses
For vented, non-steam models, skip to the type code located on faucet. Damage to secure vent, because ...
Owners Manual - Page 17

... your Quick Start Guide. NOTE: You ...models)
To Install: Place the skirt to the need for details. Install and remove base trim (on . � Check for leaks around "Y" connector, faucet, and hoses. � If you live in your dryer vent may notice an odor when dryer is
recommended to a leftside opening, see online "Dryer Door Reversal Instructions" for certain part replacement or repair...
Dimension Guide - Page 2

DETAILED PLANNING DIMENSIONS
WARNING: To reduce the risk of fire, electric shock, or injury to persons, read the IMPORTANT SAFETY INSTRUCTIONS and INSTALLATION INSTRUCTIONS, located in (max) 39 43∕8 - D E C
mm (min) 968 686 778 89 258
mm (max...(min) 381∕8 27 305∕8 31∕2 103∕16
in your appliance's Owner's Manual, before installing and operating this appliance.
Dimension Guide - Page 4

... ease of the dryer is recommended to reduce noise transfer. Ƀ For closet installation, with equivalent ventilations openings are required. Louvered doors
with a door, minimum ventilation ...wall, door, and floor moldings. Ƀ Additional spacing of 1" (25 mm) on all sides of installation and servicing. Ƀ Additional clearances might be considered.
14" max (356 mm)
18" (460 mm)
3"...
Whirlpool WGD6605MC Reviews
We have not received any reviews for Whirlpool yet.