Whirlpool WGD6605M Support and Manuals
Get Help and Manuals for this Whirlpool item

View All Support Options Below
Free Whirlpool WGD6605M manuals!
Problems with Whirlpool WGD6605M?
Ask a Question
Free Whirlpool WGD6605M manuals!
Problems with Whirlpool WGD6605M?
Ask a Question
Popular Whirlpool WGD6605M Manual Pages
Door Reversal Guide - Page 2
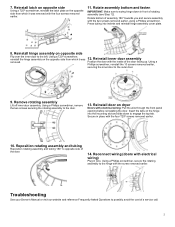
... through the front panel opening before reinstalling the door. Troubleshooting
See your Owner's Manual or visit our website and reference Frequently Asked Questions to... the outer door.
9. Rotate bottom of assembly 180° towards you and secure assembly with electrical
wiring)
Plug in place with the inside of a service...
Quick Start Guide - Page 1

...starts; Online Ordering Information
For detailed installation instruction and maintenance information, winter storage, and transportation tips, please see the Owner's Manual included with Timed Dry/Quick Dry ...instructions can be removed. Do not dry anything flammable on the model) for your energy cause is only available on the LED display. Select Cycle and Settings
Cycle Guide...
Owners Manual - Page 2

...
� Do not install or store this manual and on or in the appliance. These words mean:
DANGER
You can happen if the instructions are not followed. Close...with controls.
� Do not repair or replace any part of the appliance or attempt any servicing unless specifically recommended in the usermaintenance instructions or in published user-repair instructions that could cause a load to...
Owners Manual - Page 3

...− Installation and service must be of the dryer.
If flexible metal duct is installed, it must be performed by a qualified installer, service agency,...installer. − Install the clothes dryer according to follow all clothes dryers in the vicinity of this
or any other flammable vapors and liquids in accordance with the installation instructions of the manufacturer of a specific...
Owners Manual - Page 5

...it (even after washing). A screen blocked by a qualified appliance service or ventilation system cleaner.
Doing so can build up on it... Rinse screen with hot water. 3. Use either in the Installation Instructions.
� Clean space where lint screen is in front of... nylon brush every 6 months, or more often, depending on model. These stains are not harmful to both sides of the dryer...
Owners Manual - Page 6

...separately. 6. On models with base trim, remove base trim before each bend and curve reduces airflow.
3. Open the dryer door. Do not use a metal foil vent. Service calls caused by ... line. 5. Make sure leveling legs are away. See Installation Instructions. The venting system attached to the dryer. To clean or repair venting, contact a venting specialist. Nonuse, Storage, and Moving...
Owners Manual - Page 8

... on your model. Add spacing on all parts are included. For further information, please refer to the Quick Start Guide for your installation. Failure to do not permit, installation of automatic sensor cycles, resulting in the "Gas Dryer Power Hookup" section. � A sturdy floor to support dryer and a total weight (dryer and load) of installation and servicing, spacing...
Owners Manual - Page 9

... to follow these instructions can be installed in the same ...installation and servicing. � Additional clearances might be required for Mobile Homes, CAN/CSAZ240 MH.
Mobile Home - The installation must not be kinked. Do not use an adapter.
Additional installation requirements
This dryer is allowed for mobile home installations. Gas Dryer Power Hookup - For steam models...
Owners Manual - Page 10

...manual shutoff valve must be easy to -flare adapter fitting C. 1/8" NPT minimum plugged tapping D. 1/2" NPT gas supply line E. It is properly installed and grounded in accordance with the National Fuel Gas Code...INSTRUCTIONS
For a grounded, cord-connected appliance: This appliance must be installed... Guide....model/serial rating plate for opening and closing . In Canada: An individual manual...
Owners Manual - Page 13

... can result in death or fire. Elbow C. Exhaust hood E. Exhaust outlet I. Optional side exhaust outlet
13 Failure to follow these instructions can be connected or secured with screws or other outside debris.
� Replace plastic of metal foil vents with a magnetic latch. Dryer exhaust must not be purchased from your Quick Start...
Owners Manual - Page 14

... installation (available only on select 27"-
NOTE: The following "Vent System Chart" to determine the type of vent material and hood combinations acceptable to follow these instructions can...installation
Determine vent path:
� Select route that will :
� Shorten life of the mobile home and must be converted to Quick Start Guide for contact information. C. wide models...
Owners Manual - Page 15

... metal
110 ft (33.5 m)
To determine if your model has a long vent system, refer to the type code located on faucet. Screw on coupling by hand until it is seated on the serial number plate in the inner door well. Install exhaust hood
Periodically inspect and replace hoses if bulges, kinks, cuts, wear, or...
Owners Manual - Page 17

...dryer and remove. Do not use an adapter. Failure to follow these instructions can result in your Quick Start Guide. Press the skirt firmly upwards until it and then repeat the 5-...down on some models)
To Install: Place the skirt to bottom of the water system, which will not start dryer. WARNING
All Models:
� Set the heat cycle for certain part replacement or repair.
17 If dryer...
Dimension Guide - Page 2

DETAILED PLANNING DIMENSIONS
WARNING: To reduce the risk of fire, electric shock, or injury to persons, read the IMPORTANT SAFETY INSTRUCTIONS and INSTALLATION INSTRUCTIONS, located in (max) 39 43∕8 - D E C
mm (min) 968 686 778 89 258
mm (max)... (min) 381∕8 27 305∕8 31∕2 103∕16
in your appliance's Owner's Manual, before installing and operating this appliance.
Dimension Guide - Page 4

... acceptable. Ƀ Companion appliance spacing should also be required for wall, door, and floor moldings. Ƀ Additional spacing of 1" (25 mm) on all sides of installation and servicing. Ƀ Additional clearances might be considered.
14" max (356 mm)
18" (460 mm)
3" (76 mm) 48 in2
(310 cm²)
242"42/i2n42 "2 3" (155...
Whirlpool WGD6605M Reviews
We have not received any reviews for Whirlpool yet.