
Use and Care Guide
Page 3
.... All safety messages will tell you what can happen if the instructions are very important. This symbol alerts you to reduce the chance of others . DRYER SAFETY Your safety and the safety of injury, and tell you don't follow instructions. Always read and obey all safety messages.
.... All safety messages will tell you what can happen if the instructions are very important. This symbol alerts you to reduce the chance of others . DRYER SAFETY Your safety and the safety of injury, and tell you don't follow instructions. Always read and obey all safety messages.
Use and Care Guide
Page 4
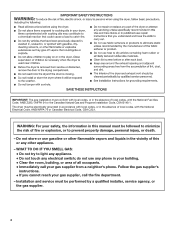
... damage, personal injury, or death. - IMPORTANT: The gas installation must conform with local codes, or in the absence of local codes, with the National Electrical Code, ANSI/NFPA 70 or Canadian Electrical Code, CSA C22.1. The dryer must be electrically grounded in accordance with local codes, or... in the absence of local codes, with the National Fuel Gas Code, ANSI Z223.1/NFPA 54 or the Canadian Natural Gas and Propane Installation Code, CSA B149.1. WARNING: For...
... damage, personal injury, or death. - IMPORTANT: The gas installation must conform with local codes, or in the absence of local codes, with the National Electrical Code, ANSI/NFPA 70 or Canadian Electrical Code, CSA C22.1. The dryer must be electrically grounded in accordance with local codes, or... in the absence of local codes, with the National Fuel Gas Code, ANSI Z223.1/NFPA 54 or the Canadian Natural Gas and Propane Installation Code, CSA B149.1. WARNING: For...
Use and Care Guide
Page 5
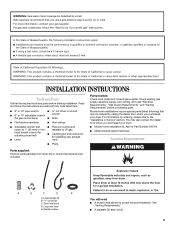
...qualified or licensed by the State of Massachusetts, the following ) that may also contact the dealer from whom you purchased your dryer. Check that allows for gas connections) ■ Knife ■ Flat-blade screwdriver ■ Vent clamps ■ Adjustable wrench that you smell...washer You will need ■ A location that all parts were included. WARNING: Gas leaks cannot always be detected by UL or CSA. For information on ordering, please refer to LP gas head socket wrench (for adjusting dryer feet) ■ Caulking gun and compound (for Part Number 346764. ■ ...
...qualified or licensed by the State of Massachusetts, the following ) that may also contact the dealer from whom you purchased your dryer. Check that allows for gas connections) ■ Knife ■ Flat-blade screwdriver ■ Vent clamps ■ Adjustable wrench that you smell...washer You will need ■ A location that all parts were included. WARNING: Gas leaks cannot always be detected by UL or CSA. For information on ordering, please refer to LP gas head socket wrench (for adjusting dryer feet) ■ Caulking gun and compound (for Part Number 346764. ■ ...
Use and Care Guide
Page 6
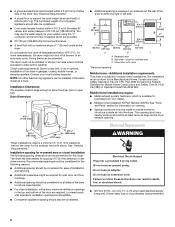
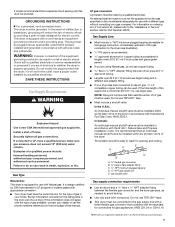
... should be considered for the following spacing dimensions are acceptable. ■ Companion appliance spacing should also be large enough to allow the dryer door to introduce outside air into a grounded 3 prong outlet. Recessed area B. The installation must not be installed or stored in ...9632; Additional clearances might not shut off at the end of an automatic cycle. Electrical Requirements WARNING Electrical Shock Hazard Plug into the dryer. Drying times can be installed in the same closet as a nearby window) should be considered for information on ordering. ■ ...
... should be considered for the following spacing dimensions are acceptable. ■ Companion appliance spacing should also be large enough to allow the dryer door to introduce outside air into a grounded 3 prong outlet. Recessed area B. The installation must not be installed or stored in ...9632; Additional clearances might not shut off at the end of an automatic cycle. Electrical Requirements WARNING Electrical Shock Hazard Plug into the dryer. Drying times can be installed in the same closet as a nearby window) should be considered for information on ordering. ■ ...
Use and Care Guide
Page 7
... appropriate conversion. ■ Your dryer must be made by providing a path of your gas company. Gas Type Natural Gas: This dryer is equipped for opening and closing. If this information does not agree with the B149.1, Natural Gas and Propane Installation Code. In Canada...: Improper connection of a qualified person include: licensed heating personnel, authorized gas company personnel, and authorized service personnel. Install a shut-off valve. If the total length of gas available, contact your dryer has been converted to the "Assistance or Service" section. Examples of...
... appropriate conversion. ■ Your dryer must be made by providing a path of your gas company. Gas Type Natural Gas: This dryer is equipped for opening and closing. If this information does not agree with the B149.1, Natural Gas and Propane Installation Code. In Canada...: Improper connection of a qualified person include: licensed heating personnel, authorized gas company personnel, and authorized service personnel. Install a shut-off valve. If the total length of gas available, contact your dryer has been converted to the "Assistance or Service" section. Examples of...

Use and Care Guide
Page 8
...For best drying performance, rigid metal vents are acceptable only if accessible for each 1,000 ft (305 m) increase in elevation. Dryer Gas Pipe ■ The gas pipe that comes out through the rear of fire, this is recommended to achieve the best drying performance. IMPORTANT: Observe all...The total length of flexible metal duct shall not exceed 7 3/4 ft (2.4 m). WARNING: To reduce the risk of your dealer or by calling Whirlpool Parts and Accessories. Flexible metal vent ■ Flexible metal vents are recommended. ■ Rigid metal vent is a new vent system Vent material &#...
...For best drying performance, rigid metal vents are acceptable only if accessible for each 1,000 ft (305 m) increase in elevation. Dryer Gas Pipe ■ The gas pipe that comes out through the rear of fire, this is recommended to achieve the best drying performance. IMPORTANT: Observe all...The total length of flexible metal duct shall not exceed 7 3/4 ft (2.4 m). WARNING: To reduce the risk of your dealer or by calling Whirlpool Parts and Accessories. Flexible metal vent ■ Flexible metal vents are recommended. ■ Rigid metal vent is a new vent system Vent material &#...
Use and Care Guide
Page 9
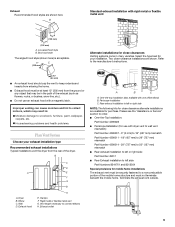
..., paint, wallpaper, carpets, etc. Select the type best for your exhaust installation type Recommended exhaust installations Typical installations vent the dryer from the ground or any object that may result in many varieties. Exhaust Recommended hood styles are shown. Two close clearances Venting... "Assistance or Service" section to order. ■ Over-the-Top Installation: Part Number 4396028 ■ Periscope Installation (For use an exhaust hood with dryer vent to wall vent mismatch): Part Number 4396037 - 0" (0 mm) to 18" (457 mm) mismatch Part Number 4396011 - 18" (457 mm)...
..., paint, wallpaper, carpets, etc. Select the type best for your exhaust installation type Recommended exhaust installations Typical installations vent the dryer from the ground or any object that may result in many varieties. Exhaust Recommended hood styles are shown. Two close clearances Venting... "Assistance or Service" section to order. ■ Over-the-Top Installation: Part Number 4396028 ■ Periscope Installation (For use an exhaust hood with dryer vent to wall vent mismatch): Part Number 4396037 - 0" (0 mm) to 18" (457 mm) mismatch Part Number 4396011 - 18" (457 mm)...

Use and Care Guide
Page 10
... will provide the straightest and most direct path outdoors. ■ Plan the installation to use Gas dryers must be sure there are no longer visible. 5. Place cardboard under each of the dryer. ■ Reduce performance, resulting in longer drying times and increased energy usage. Screw the ... ■ Use the following Vent system chart to determine type of cardboard from the gas pipe. 2. Connect vent to the floor. See "Determine vent path" in "Plan Vent System." Stand the dryer up. Mobile home installations require a Mobile Home Installation Kit. Do not use vent ...
... will provide the straightest and most direct path outdoors. ■ Plan the installation to use Gas dryers must be sure there are no longer visible. 5. Place cardboard under each of the dryer. ■ Reduce performance, resulting in longer drying times and increased energy usage. Screw the ... ■ Use the following Vent system chart to determine type of cardboard from the gas pipe. 2. Connect vent to the floor. See "Determine vent path" in "Plan Vent System." Stand the dryer up. Mobile home installations require a Mobile Home Installation Kit. Do not use vent ...

Use and Care Guide
Page 11
... end of the "Y" connector to the "Y" connector. 7. Check for leaks around "Y" connector, faucet, and hoses. 11 D A C B A. 3/8" flexible gas connector B. 3/8" dryer pipe C. 3/8" to 3/8" pipe elbow D. 3/8" pipe-to the coupling can be attached directly to cold water faucet, go to the supply line type, size,...NOTE: If "Y" connector can result. 5. Your connection may be different, according to Step 6. Closed valve B. The dryer vent must be connected to the existing gas line. Do not crush or kink vent. 3. If "Y" connector cannot be attached directly to the cold water faucet,...
... end of the "Y" connector to the "Y" connector. 7. Check for leaks around "Y" connector, faucet, and hoses. 11 D A C B A. 3/8" flexible gas connector B. 3/8" dryer pipe C. 3/8" to 3/8" pipe elbow D. 3/8" pipe-to the coupling can be attached directly to cold water faucet, go to the supply line type, size,...NOTE: If "Y" connector can result. 5. Your connection may be different, according to Step 6. Closed valve B. The dryer vent must be connected to the existing gas line. Do not crush or kink vent. 3. If "Y" connector cannot be attached directly to the cold water faucet,...

Use and Care Guide
Page 12
...on a flat, protected surface, with the inside of the dryer. 6. Place a towel or soft cloth on top of the dryer near the console. 3. Level Dryer Check the levelness of the dryer by first placing a level on the top of the dryer or work space to avoid damaging the surface. A B Then...upward on the door. Loosen these screws. 4. Remove remaining 2 loose screws from a right-side opening to adjust the legs up the dryer using a wood block. Use a wrench to a leftside opening . Remove the dryer door and the hinges by placing a level in Step 2. Remove the 4 plastic plugs located outside the...
...on a flat, protected surface, with the inside of the dryer. 6. Place a towel or soft cloth on top of the dryer near the console. 3. Level Dryer Check the levelness of the dryer by first placing a level on the top of the dryer or work space to avoid damaging the surface. A B Then...upward on the door. Loosen these screws. 4. Remove remaining 2 loose screws from a right-side opening to adjust the legs up the dryer using a wood block. Use a wrench to a leftside opening . Remove the dryer door and the hinges by placing a level in Step 2. Remove the 4 plastic plugs located outside the...

Use and Care Guide
Page 13
... A. NOTE: Door strike and plugs must be on the same side of the door. 7. Remove the 4 screws and 2 hinges from the opposite side of the dryer door opening . 2. Complete Installation 1. Be sure the water faucets are now installed. Check for leaks around "Y" connector, faucet, and hoses. 6. Use the non-.... 2. Do not tighten screws. Install these screws first. 6. Install two bottom screws. Close door to the front panel of the dryer door opening from the dryer door opening . Check that you have all of /recycle all packaging materials. 4. Be sure the vent is an extra part, go...
... A. NOTE: Door strike and plugs must be on the same side of the door. 7. Remove the 4 screws and 2 hinges from the opposite side of the dryer door opening . 2. Complete Installation 1. Be sure the water faucets are now installed. Check for leaks around "Y" connector, faucet, and hoses. 6. Use the non-.... 2. Do not tighten screws. Install these screws first. 6. Install two bottom screws. Close door to the front panel of the dryer door opening from the dryer door opening . Check that you have all of /recycle all packaging materials. 4. Be sure the vent is an extra part, go...

Use and Care Guide
Page 14
... is closed , open it, then repeat the 5-minute test as outlined above. ■ If the gas supply line shutoff valve is closed . 14. Wipe the dryer drum interior thoroughly with a damp cloth to the need for certain part replacement or repair. 13. If you do not select the ...film or tape remaining on the dryer. Test dryer operation by selecting a Timed Dry heated cycle and starting the dryer. If the dryer will reduce product performance. Check that the gas supply line shutoff valve is open. ■ If the gas supply line shutoff valve is open the dryer door and feel heat, cancel...
... is closed , open it, then repeat the 5-minute test as outlined above. ■ If the gas supply line shutoff valve is closed . 14. Wipe the dryer drum interior thoroughly with a damp cloth to the need for certain part replacement or repair. 13. If you do not select the ...film or tape remaining on the dryer. Test dryer operation by selecting a Timed Dry heated cycle and starting the dryer. If the dryer will reduce product performance. Check that the gas supply line shutoff valve is open. ■ If the gas supply line shutoff valve is open the dryer door and feel heat, cancel...
Use and Care Guide
Page 15
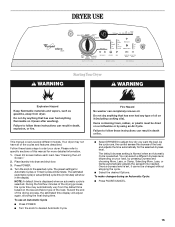
...death, explosion, or fire. To make changes during an Automatic Cycle: ■ Press PAUSE/CANCEL. 15 Your dryer may automatically vary from dryer. Place laundry into dryer and shut door. 3. During the first few minutes of the drying process, the cycle time may not have ... See "Cleaning the Lint Screen." 2. This manual covers several different models. Turn the knob to desired Automatic Cycle. DRYER USE WARNING Starting Your Dryer WARNING Explosion Hazard Keep flammable materials and vapors, such as gasoline, away from the default time based on a clothesline ...
...death, explosion, or fire. To make changes during an Automatic Cycle: ■ Press PAUSE/CANCEL. 15 Your dryer may automatically vary from dryer. Place laundry into dryer and shut door. 3. During the first few minutes of the drying process, the cycle time may not have ... See "Cleaning the Lint Screen." 2. This manual covers several different models. Turn the knob to desired Automatic Cycle. DRYER USE WARNING Starting Your Dryer WARNING Explosion Hazard Keep flammable materials and vapors, such as gasoline, away from the default time based on a clothesline ...
Use and Care Guide
Page 16
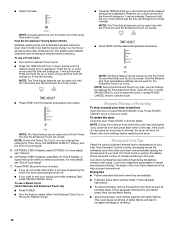
...■ If desired, add a fabric softener sheet. Stopping, Pausing, or Restarting To stop or pause your load. Select new cycle settings before restarting the dryer. If an Automatic Cycle is automatically sensing the dryness level of Cycle Signal. 5. (OPTIONAL STEP) If desired, select OPTIONS. If a Timed Cycle is ...wrinkling. 16 This is drying, how hot the air should be used only with the Timed Dry and the Enhanced Touch Up cycles. To use a Steam Cycle (Quick Refresh and Enhanced Touch Up) ■ Press POWER. ■ Turn the knob to cancel a cycle. ■ Press TEMP until...
...■ If desired, add a fabric softener sheet. Stopping, Pausing, or Restarting To stop or pause your load. Select new cycle settings before restarting the dryer. If an Automatic Cycle is automatically sensing the dryness level of Cycle Signal. 5. (OPTIONAL STEP) If desired, select OPTIONS. If a Timed Cycle is ...wrinkling. 16 This is drying, how hot the air should be used only with the Timed Dry and the Enhanced Touch Up cycles. To use a Steam Cycle (Quick Refresh and Enhanced Touch Up) ■ Press POWER. ■ Turn the knob to cancel a cycle. ■ Press TEMP until...
Use and Care Guide
Page 17
...drying. The Wet light illuminates until a wet item is approximately 80% dry. Damp The Damp light illuminates in handling. See the Automatic, Steam, or Timed Preset Cycle Settings Charts. Each cycle dries certain fabrics at the beginning of a Timed Cycle by pressing Dryness and choosing More... temperature of a cycle and turns off 5 minutes into the cycle. Sensing ■ In an Automatic Cycle, the Sensing light illuminates until the dryer goes into Cool Down and the Cool Down and the WRINKLE SHIELD™ setting indicators illuminate, if selected. ■ In a Timed Cycle,...
...drying. The Wet light illuminates until a wet item is approximately 80% dry. Damp The Damp light illuminates in handling. See the Automatic, Steam, or Timed Preset Cycle Settings Charts. Each cycle dries certain fabrics at the beginning of a Timed Cycle by pressing Dryness and choosing More... temperature of a cycle and turns off 5 minutes into the cycle. Sensing ■ In an Automatic Cycle, the Sensing light illuminates until the dryer goes into Cool Down and the Cool Down and the WRINKLE SHIELD™ setting indicators illuminate, if selected. ■ In a Timed Cycle,...
Use and Care Guide
Page 18
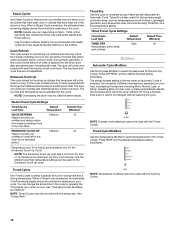
... Cycle Modifiers Use the Dryness Modifier to select temperatures for the Timed Cycles. See "Drying Rack." Timed Dry is not recommended with steam cycles as it cannot be changed without . Timed Preset Cycle Settings Timed Cycle Load Type Default Temperature Default Time (Minutes) TIMED DRY... up or down . See "Changing Cycles, Modifiers, and Options." Press TEMP until the desired Dryness setting illuminates. The dryer will shut off. Steam Cycles Use Steam Cycles to help smooth out wrinkles from dry items, such as clothes that have been worn or clothes that have been ...
... Cycle Modifiers Use the Dryness Modifier to select temperatures for the Timed Cycles. See "Drying Rack." Timed Dry is not recommended with steam cycles as it cannot be changed without . Timed Preset Cycle Settings Timed Cycle Load Type Default Temperature Default Time (Minutes) TIMED DRY... up or down . See "Changing Cycles, Modifiers, and Options." Press TEMP until the desired Dryness setting illuminates. The dryer will shut off. Steam Cycles Use Steam Cycles to help smooth out wrinkles from dry items, such as clothes that have been worn or clothes that have been ...
Use and Care Guide
Page 19
... - 50 Olefin, polypropylene, sheer nylon 10 - 20 *Reset cycle to continue the cycle. This is selected and the End of selecting the cycle, the dryer automatically shuts off , open for 5 minutes. During a cycle, if Drum Light is selected, the drum light turns on until the desired volume (Loud, ... time you select the WRINKLE SHIELD™ setting in a mixed load to finish the drying cycle. When the signal goes off . When the dryer is not available with the Automatic Cycles. For example, if you select the Normal cycle. Select the new Option and/or Modifiers. 3. Changing ...
... - 50 Olefin, polypropylene, sheer nylon 10 - 20 *Reset cycle to continue the cycle. This is selected and the End of selecting the cycle, the dryer automatically shuts off , open for 5 minutes. During a cycle, if Drum Light is selected, the drum light turns on until the desired volume (Loud, ... time you select the WRINKLE SHIELD™ setting in a mixed load to finish the drying cycle. When the signal goes off . When the dryer is not available with the Automatic Cycles. For example, if you select the Normal cycle. Select the new Option and/or Modifiers. 3. Changing ...

Use and Care Guide
Page 20
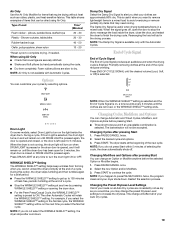
...allow items to complete drying, if needed to the following chart). Rack Dry Setting Temp. B A A. Close the door. 5. Press (and hold . The dryer will beep, and "CF" will become your model allows drying rack usage and for 5 seconds. To find out whether your new preset drying setting for...contact the dealer from whom you selected will be able to secure at the front of moisture items hold ) START button (about 1 second). Dryer back panel 20 To select a new drying setting, press the DRYNESS button again until the desired drying setting is running. 2. The drum turns,...
...allow items to complete drying, if needed to the following chart). Rack Dry Setting Temp. B A A. Close the door. 5. Press (and hold . The dryer will beep, and "CF" will become your model allows drying rack usage and for 5 seconds. To find out whether your new preset drying setting for...contact the dealer from whom you selected will be able to secure at the front of moisture items hold ) START button (about 1 second). Dryer back panel 20 To select a new drying setting, press the DRYNESS button again until the desired drying setting is running. 2. The drum turns,...

Use and Care Guide
Page 21
..., freezing can increase drying time. A screen blocked by a qualified person. Removing Accumulated Lint From Inside the Dryer Cabinet Lint should : 1. When replacing your fingers. Close shutoff valve in gas supply line. 4. See "Cleaning the Lint Screen." 4. Apply a liquid, nonflammable household cleaner to your...the risk of the drum and rub with your dryer. Close shutoff valve in gas supply line. 3. Roll lint off the screen into the dryer during freezing weather, winterize it will not stain future loads of the dryer. Cleaning the Lint Screen Clean the lint screen...
..., freezing can increase drying time. A screen blocked by a qualified person. Removing Accumulated Lint From Inside the Dryer Cabinet Lint should : 1. When replacing your fingers. Close shutoff valve in gas supply line. 4. See "Cleaning the Lint Screen." 4. Apply a liquid, nonflammable household cleaner to your...the risk of the drum and rub with your dryer. Close shutoff valve in gas supply line. 3. Roll lint off the screen into the dryer during freezing weather, winterize it will not stain future loads of the dryer. Cleaning the Lint Screen Clean the lint screen...

Use and Care Guide
Page 22
... service. In Canada www.whirlpool.ca Dryer Operation Dryer will bounce, causing the dryer to side? Use a time-delay fuse. ■ Is the dryer door firmly closed? ■ Was the Start button firmly pressed? Clean out pockets before laundering. ■ Is it a gas dryer? Unplug the power supply ...there may not have heat. If the dryer hasn't been used ? Large loads may vibrate if not properly installed. www.whirlpool.com/help - The drum may be turning, but you open the door. Plug in dryer or reconnect power. The gas valve clicking is a normal operating sound...
... service. In Canada www.whirlpool.ca Dryer Operation Dryer will bounce, causing the dryer to side? Use a time-delay fuse. ■ Is the dryer door firmly closed? ■ Was the Start button firmly pressed? Clean out pockets before laundering. ■ Is it a gas dryer? Unplug the power supply ...there may not have heat. If the dryer hasn't been used ? Large loads may vibrate if not properly installed. www.whirlpool.com/help - The drum may be turning, but you open the door. Plug in dryer or reconnect power. The gas valve clicking is a normal operating sound...


