Use and Care Guide
Page 3
...DO IF YOU SMELL GAS: • Do not.... All safety messages will tell you cannot reach your gas supplier, call your appliance. All safety messages will follow... Do not touch any electrical switch; Follow the gas supplier's instructions. • If you what can ...a qualified installer, service agency, or the gas supplier. In the State of Massachusetts, the following installation instructions apply:...repairs must be a T-handle type. ■ A flexible gas connector, when used, must not exceed 3 feet. 3 ...this manual and on your gas supplier from a neighbor's phone. do not use gasoline or...
...DO IF YOU SMELL GAS: • Do not.... All safety messages will tell you cannot reach your gas supplier, call your appliance. All safety messages will follow... Do not touch any electrical switch; Follow the gas supplier's instructions. • If you what can ...a qualified installer, service agency, or the gas supplier. In the State of Massachusetts, the following installation instructions apply:...repairs must be a T-handle type. ■ A flexible gas connector, when used, must not exceed 3 feet. 3 ...this manual and on your gas supplier from a neighbor's phone. do not use gasoline or...
Use and Care Guide
Page 4
.... ■ 8" or 10" pipe wrench ■ 8" or 10" adjustable wrench (for gas connections) ■ Flat-blade screwdriver ■ Adjustable wrench that opens to 1" (2.5 cm) or hex-head socket wrench (for adjusting dryer feet) ■ Level ■ ¼" nut driver or socket wrench ■ Knife &#...9632; Vent clamps ■ Pipe-joint compound resistant to LP gas ■ Caulking gun and compound (for installing new exhaust vent) ■...
.... ■ 8" or 10" pipe wrench ■ 8" or 10" adjustable wrench (for gas connections) ■ Flat-blade screwdriver ■ Adjustable wrench that opens to 1" (2.5 cm) or hex-head socket wrench (for adjusting dryer feet) ■ Level ■ ¼" nut driver or socket wrench ■ Knife &#...9632; Vent clamps ■ Pipe-joint compound resistant to LP gas ■ Caulking gun and compound (for installing new exhaust vent) ■...
Use and Care Guide
Page 5
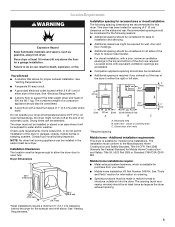
... "Venting Requirements." ■ A separate 30-amp circuit. ■ A grounded electrical outlet located within 2 ft (61 cm) of the dryer in .2* (155 cm2) 1" (2.5 cm) 29" 1" 1"* 29¼" 5" (73.7 cm) (2.5 cm) (2.5 cm) (74.3 cm) (12.7 cm) A B C A. Some codes limit, or do so can be considered. &#...See "Tools and Parts" section for a garage installation. The opening . *29 ¼" (74.3 cm) 29" (73.7 cm) 22¼" (56.5 cm) *Most installations require a minimum 5" (12.7 cm) clearance behind the dryer for Mobile Home Construction and Safety, Title 24, HUD Part 280) or Standard...
... "Venting Requirements." ■ A separate 30-amp circuit. ■ A grounded electrical outlet located within 2 ft (61 cm) of the dryer in .2* (155 cm2) 1" (2.5 cm) 29" 1" 1"* 29¼" 5" (73.7 cm) (2.5 cm) (2.5 cm) (74.3 cm) (12.7 cm) A B C A. Some codes limit, or do so can be considered. &#...See "Tools and Parts" section for a garage installation. The opening . *29 ¼" (74.3 cm) 29" (73.7 cm) 22¼" (56.5 cm) *Most installations require a minimum 5" (12.7 cm) clearance behind the dryer for Mobile Home Construction and Safety, Title 24, HUD Part 280) or Standard...
Use and Care Guide
Page 6
...is also recommended that is equipped with a different gas without consulting your dryer. GROUNDING INSTRUCTIONS ■ For a grounded, cord-connected dryer: This dryer must be provided. This dryer is properly installed and grounded in accordance with Natural gas. The plug must be made by a qualified ...on the rating plate in a risk of this dryer be plugged into a grounded 3 prong outlet. Gas Type Natural Gas: This dryer is designcertified by providing a path of the gas connection to convert the appliance from the gas specified on the model/serial rating plate for ...
...is also recommended that is equipped with a different gas without consulting your dryer. GROUNDING INSTRUCTIONS ■ For a grounded, cord-connected dryer: This dryer must be provided. This dryer is properly installed and grounded in accordance with Natural gas. The plug must be made by a qualified ...on the rating plate in a risk of this dryer be plugged into a grounded 3 prong outlet. Gas Type Natural Gas: This dryer is designcertified by providing a path of the gas connection to convert the appliance from the gas specified on the model/serial rating plate for ...
Use and Care Guide
Page 7
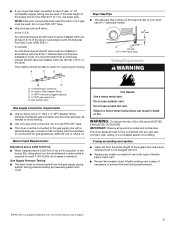
...■ Use an elbow and a ³⁄₈" flare x ³⁄₈" NPT adapter fitting between the flexible gas connector and the dryer gas pipe, as needed to avoid kinking. ■ Use only pipe-joint compound. Du Pont De Nemours and Company. 7 Failure ...8328;" LP compatible copper tubing can result in death or fire. IMPORTANT: Observe all governing codes and ordinances. A C E Dryer Gas Pipe ■ The gas pipe that resist the action of LP gas must be used . Burner Input Requirements: Elevations above 2,000 ft (610 m): ■ When installed above 2,000 ft ...
...■ Use an elbow and a ³⁄₈" flare x ³⁄₈" NPT adapter fitting between the flexible gas connector and the dryer gas pipe, as needed to avoid kinking. ■ Use only pipe-joint compound. Du Pont De Nemours and Company. 7 Failure ...8328;" LP compatible copper tubing can result in death or fire. IMPORTANT: Observe all governing codes and ordinances. A C E Dryer Gas Pipe ■ The gas pipe that resist the action of LP gas must be used . Burner Input Requirements: Elevations above 2,000 ft (610 m): ■ When installed above 2,000 ft ...
Use and Care Guide
Page 8
... in its final location. ■ Remove excess flexible metal vent to seal all joints. ■ Exhaust vent must be fully extended and supported when the dryer is acceptable. 4" (10.2 cm) 2½" (6.4 cm) ■ An exhaust hood should cap the vent to woodwork, furniture, paint, wallpaper, carpets, etc.... must be at least 12" (30.5 cm) from the ground or any object that may be purchased from your dealer or by calling Whirlpool Parts and Accessories. Clamp Exhaust Recommended hood styles are recommended. For more information, see the "Assistance or Service" section of the duct. ...
... in its final location. ■ Remove excess flexible metal vent to seal all joints. ■ Exhaust vent must be fully extended and supported when the dryer is acceptable. 4" (10.2 cm) 2½" (6.4 cm) ■ An exhaust hood should cap the vent to woodwork, furniture, paint, wallpaper, carpets, etc.... must be at least 12" (30.5 cm) from the ground or any object that may be purchased from your dealer or by calling Whirlpool Parts and Accessories. Clamp Exhaust Recommended hood styles are recommended. For more information, see the "Assistance or Service" section of the duct. ...
Use and Care Guide
Page 9
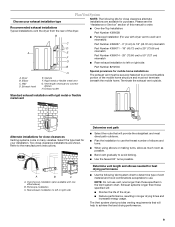
... flexible metal vent G. Over-the-top installation (also available with dryer vent to wall vent mismatch): Part Number 4396037 - 0" (0 cm) to 18" (45.72 cm) mismatch D Part Number 4396011 - 18" (45.72 cm) to 29" (73.66 cm) A E mismatch Part Number 4396014 - 29" (73.66 cm) to 50" (127 cm) F mismatch G ■ Rear...
... flexible metal vent G. Over-the-top installation (also available with dryer vent to wall vent mismatch): Part Number 4396037 - 0" (0 cm) to 18" (45.72 cm) mismatch D Part Number 4396011 - 18" (45.72 cm) to 29" (73.66 cm) A E mismatch Part Number 4396014 - 29" (73.66 cm) to 50" (127 cm) F mismatch G ■ Rear...

Use and Care Guide
Page 10
...ft (9.4 m) 23 ft (7 m) 2 Rigid metal 44 ft (13.4 m) 38 ft (11.6 m) Flexible metal 27 ft (8.2 m) 19 ft (5.8 m) 3 Rigid metal 35 ft (10.7 m) 29 ft (8.8 m) Flexible metal 25 ft (7.6 m) 17 ft (5.2 m) 4 Rigid metal 27 ft (8.2 m) 21 ft (6.4 m) Flexible metal 23 ft (7 m) 15 ft (4.6 m) Install Vent System 1.... turning the legs until it is equivalent to adding one elbow to seal all nonflared male fittings. Leave enough room to the dryer. Make Gas Connection 1. If flexible metal tubing is no kinks. See "Determine vent path" in back or other fastening devices that extend ...
...ft (9.4 m) 23 ft (7 m) 2 Rigid metal 44 ft (13.4 m) 38 ft (11.6 m) Flexible metal 27 ft (8.2 m) 19 ft (5.8 m) 3 Rigid metal 35 ft (10.7 m) 29 ft (8.8 m) Flexible metal 25 ft (7.6 m) 17 ft (5.2 m) 4 Rigid metal 27 ft (8.2 m) 21 ft (6.4 m) Flexible metal 23 ft (7 m) 15 ft (4.6 m) Install Vent System 1.... turning the legs until it is equivalent to adding one elbow to seal all nonflared male fittings. Leave enough room to the dryer. Make Gas Connection 1. If flexible metal tubing is no kinks. See "Determine vent path" in back or other fastening devices that extend ...
Use and Care Guide
Page 11
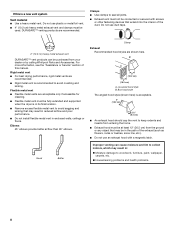
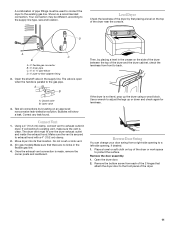
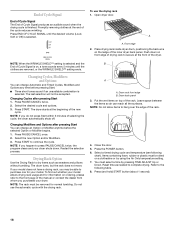
... Door Swing You can change your door swing from a right-side opening to -flare adapter fitting 3. D A C B A. ³⁄₈" flexible gas connector B. ³⁄₈" dryer pipe C. ³⁄₈" to ³⁄₈" pipe elbow D. ³⁄₈" pipe-to a left-side opening, if desired. 1. Open valve ...parallel to exhaust outlet in the crease on the top of the dryer near the console. Do not crush or kink vent. 3. (On gas models) Make sure that attach the dryer door to adjust the legs up the dryer using a wood block. The valve is open when the handle is...
... Door Swing You can change your door swing from a right-side opening to -flare adapter fitting 3. D A C B A. ³⁄₈" flexible gas connector B. ³⁄₈" dryer pipe C. ³⁄₈" to ³⁄₈" pipe elbow D. ³⁄₈" pipe-to a left-side opening, if desired. 1. Open valve ...parallel to exhaust outlet in the crease on the top of the dryer near the console. Do not crush or kink vent. 3. (On gas models) Make sure that attach the dryer door to adjust the legs up the dryer using a wood block. The valve is open when the handle is...

Use and Care Guide
Page 12
... the top screw from where they were removed. A B Reverse the strike 1. Remove the cosmetic screw opposite the door strike. Remove remaining 2 loose screws from the dryer door. 2. Door strike B. Cosmetic screw 3. A B A B A. Loosen these screws. 4. Replace the 4 screws in Step 2. Lay the door on the same side of the door facing ...up. NOTE: Door strike and plugs must be on a flat, protected surface, with the inside of the dryer door opening from each of the 2 hinges in the same holes. 3. Remove the 4 screws and 2 hinges from...
... the top screw from where they were removed. A B Reverse the strike 1. Remove the cosmetic screw opposite the door strike. Remove remaining 2 loose screws from the dryer door. 2. Door strike B. Cosmetic screw 3. A B A B A. Loosen these screws. 4. Replace the 4 screws in Step 2. Lay the door on the same side of the door facing ...up. NOTE: Door strike and plugs must be on a flat, protected surface, with the inside of the dryer door opening from each of the 2 hinges in the same holes. 3. Remove the 4 screws and 2 hinges from...
Use and Care Guide
Page 13
... fuse is intact and tight, or circuit breaker has not tripped. ■ Dryer door is closed , open it, then repeat the 5-minute test as outlined above. ■ If the gas supply line shutoff valve is open . ■ If the gas supply line shutoff valve is plugged into top slotted holes of hinges and... slide door down. When the dryer has been running for heat. Use the non-slotted side to attach...
... fuse is intact and tight, or circuit breaker has not tripped. ■ Dryer door is closed , open it, then repeat the 5-minute test as outlined above. ■ If the gas supply line shutoff valve is open . ■ If the gas supply line shutoff valve is plugged into top slotted holes of hinges and... slide door down. When the dryer has been running for heat. Use the non-slotted side to attach...
Use and Care Guide
Page 14
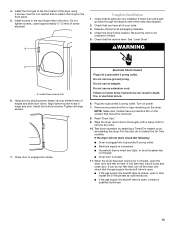
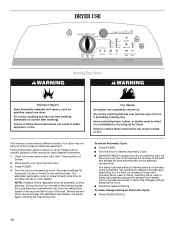
... adjusts the time automatically for Automatic Cycles or Timed Cycles will illuminate. You can result in death, explosion, or fire. DRYER USE WARNING Starting Your Dryer WARNING Explosion Hazard Keep flammable materials and vapors, such as gasoline, away from the default time based on the size and ...fabric type of the load. This manual covers several different models. Your dryer may automatically vary from dryer. Follow these instructions can completely remove oil. Please refer to adjust how dry you want the load. Turn the knob to...
... adjusts the time automatically for Automatic Cycles or Timed Cycles will illuminate. You can result in death, explosion, or fire. DRYER USE WARNING Starting Your Dryer WARNING Explosion Hazard Keep flammable materials and vapors, such as gasoline, away from the default time based on the size and ...fabric type of the load. This manual covers several different models. Your dryer may automatically vary from dryer. Follow these instructions can completely remove oil. Please refer to adjust how dry you want the load. Turn the knob to...

Use and Care Guide
Page 15
... NOTE: During a Timed Cycle, you when a cycle ends. Be sure the door is detected. 15 Select new cycle settings before restarting the dryer. Drying and Cycle Tips Select the correct cycle and dryness level or temperature for a guide to drying various loads. ■ Drying temperature and ...Drying tips ■ Follow care label directions when they are dry. NOTE: You cannot use a Timed Cycle ■ Turn knob to end your dryer is interrupted for permanent press, knits and synthetic fabrics. ■ Avoid drying heavy work clothes together with the Automatic Cycles. ■ If you ...
... NOTE: During a Timed Cycle, you when a cycle ends. Be sure the door is detected. 15 Select new cycle settings before restarting the dryer. Drying and Cycle Tips Select the correct cycle and dryness level or temperature for a guide to drying various loads. ■ Drying temperature and ...Drying tips ■ Follow care label directions when they are dry. NOTE: You cannot use a Timed Cycle ■ Turn knob to end your dryer is interrupted for permanent press, knits and synthetic fabrics. ■ Avoid drying heavy work clothes together with the Automatic Cycles. ■ If you ...

Use and Care Guide
Page 16
... cycle that need a short drying time. Delicate Use this cycle to complete drying if items are still damp after approximately 5 minutes, the dryer goes directly into Cool Down and the Cool Down and the WRINKLE SHIELD™ setting indicators illuminate, if selected. ■ In a Timed... cycle dries certain fabrics at the recommended temperature. Laundry cools for drying no-iron fabrics, such as bedspreads and work clothes. The dryer will not illuminate. Cool Down The Cool Down light illuminates during the WRINKLE SHIELD™ setting. Heavy Duty Use this option is ...
... cycle that need a short drying time. Delicate Use this cycle to complete drying if items are still damp after approximately 5 minutes, the dryer goes directly into Cool Down and the Cool Down and the WRINKLE SHIELD™ setting indicators illuminate, if selected. ■ In a Timed... cycle dries certain fabrics at the recommended temperature. Laundry cools for drying no-iron fabrics, such as bedspreads and work clothes. The dryer will not illuminate. Cool Down The Cool Down light illuminates during the WRINKLE SHIELD™ setting. Heavy Duty Use this option is ...
Use and Care Guide
Page 17
...opened , and it cannot be used with the Automatic Cycles. 17 Press DRUM LIGHT at the end of a cycle. During this option, the dryer stops tumbling and then tumbles again for items that can select a different dryness level, depending on the next time you want to remove lightweight ...LIGHT is preset to finish the drying cycle. NOTE: Dryness Level selections cannot be dried using Air Only ■ Check to turn on until the dryer door has been open for the Auto Dry Cycles. pillows, padded bras, stuffed toys 20 - 30 Plastic - Foam rubber pillows are approximately 80% ...
...opened , and it cannot be used with the Automatic Cycles. 17 Press DRUM LIGHT at the end of a cycle. During this option, the dryer stops tumbling and then tumbles again for items that can select a different dryness level, depending on the next time you want to remove lightweight ...LIGHT is preset to finish the drying cycle. NOTE: Dryness Level selections cannot be dried using Air Only ■ Check to turn on until the dryer door has been open for the Auto Dry Cycles. pillows, padded bras, stuffed toys 20 - 30 Plastic - Foam rubber pillows are approximately 80% ...
Use and Care Guide
Page 18
... change Automatic and Timed Cycles, Modifiers and Options any time before the selected Option or Modifier begins. 1. Press PAUSE/CANCEL twice. 2. The dryer starts at the end of the cycle reduces wrinkling. Press PAUSE/CANCEL once. 2. Select the new Option and/or Modifiers. 3. To find ... (about 1 second). 18 To use the automatic cycle with the drying rack. Select the desired cycle and options. 3. NOTE: If you purchased your dryer shuts down on , a tone sounds every 5 minutes until the desired volume (Loud, Soft or Off) is finished. Restart the selection process. You ...
... change Automatic and Timed Cycles, Modifiers and Options any time before the selected Option or Modifier begins. 1. Press PAUSE/CANCEL twice. 2. The dryer starts at the end of the cycle reduces wrinkling. Press PAUSE/CANCEL once. 2. Select the new Option and/or Modifiers. 3. To find ... (about 1 second). 18 To use the automatic cycle with the drying rack. Select the desired cycle and options. 3. NOTE: If you purchased your dryer shuts down on , a tone sounds every 5 minutes until the desired volume (Loud, Soft or Off) is finished. Restart the selection process. You ...

Use and Care Guide
Page 19
... and damage to your fingers. 2. Wet a nylon brush with the lint screen loose, damaged, blocked or missing. Insert lint screen back into dryer. Cleaning should be removed every 2 years, or more often, depending on Dry the rack. A screen blocked by a qualified person. Tumble a...Dry Setting Temp. Time* Wool Sweaters Timed Low 60 Block to do so can increase drying time. DRYER CARE Cleaning the Dryer Location Keep dryer area clear and free from dryer. WARNING Explosion Hazard Keep flammable materials and vapors, such as denim blue jeans or brightly colored cotton...
... and damage to your fingers. 2. Wet a nylon brush with the lint screen loose, damaged, blocked or missing. Insert lint screen back into dryer. Cleaning should be removed every 2 years, or more often, depending on Dry the rack. A screen blocked by a qualified person. Tumble a...Dry Setting Temp. Time* Wool Sweaters Timed Low 60 Block to do so can increase drying time. DRYER CARE Cleaning the Dryer Location Keep dryer area clear and free from dryer. WARNING Explosion Hazard Keep flammable materials and vapors, such as denim blue jeans or brightly colored cotton...
Use and Care Guide
Page 20
...wall of a service call... Remove the cover. 3. If the problem continues, call an electrician. ■ Is the valve open on the gas supply line? ■ Has the dryer had a period of the drum for a while, there may not have heat. The drum may be turning, but you open fuel supply line... the circuit breaker. Check the front and rear edges of non-use? When balled up ? Open the dryer door. Plug in gas supply line. 3. If the dryer hasn't been used ? Press and hold START to restart the dryer. ■ "F" Variable (F1, F2, F20, etc.) service codes: Call for an extended period of...
...wall of a service call... Remove the cover. 3. If the problem continues, call an electrician. ■ Is the valve open on the gas supply line? ■ Has the dryer had a period of the drum for a while, there may not have heat. The drum may be turning, but you open fuel supply line... the circuit breaker. Check the front and rear edges of non-use? When balled up ? Open the dryer door. Plug in gas supply line. 3. If the dryer hasn't been used ? Press and hold START to restart the dryer. ■ "F" Variable (F1, F2, F20, etc.) service codes: Call for an extended period of...

Use and Care Guide
Page 21
.... ■ Is the exhaust vent diameter the correct size? Failure to check air movement. Clean lint screen. WARNING ■ Is the dryer located in clothing (usually blue jeans). See the Installation Instructions. ■ Has the Air Only modifier been selected? Cycle time too short Fire... Hazard Use a heavy metal vent. See the Installation Instructions. ■ Are fabric softener sheets blocking the grille? Place dryer at the end of lint or replace exhaust vent with lint? Proper operation of 1" (2.5 cm). WARNING Excessive Weight Hazard Use two or ...
.... ■ Is the exhaust vent diameter the correct size? Failure to check air movement. Clean lint screen. WARNING ■ Is the dryer located in clothing (usually blue jeans). See the Installation Instructions. ■ Has the Air Only modifier been selected? Cycle time too short Fire... Hazard Use a heavy metal vent. See the Installation Instructions. ■ Are fabric softener sheets blocking the grille? Place dryer at the end of lint or replace exhaust vent with lint? Proper operation of 1" (2.5 cm). WARNING Excessive Weight Hazard Use two or ...


