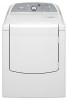
Use and Care Manual
Page 3
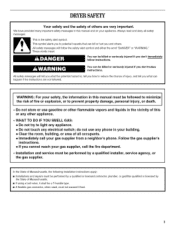
... use gasoline or other flammable vapors and liquids in this or any electrical switch; We have provided many important safety messages in the vicinity of this manual and on your gas supplier from a neighbor's phone. WHAT TO DO IF YOU SMELL GAS: • Do not try to reduce the chance of Massachusetts, the following installation instructions apply: [] Installations and repairs...
... use gasoline or other flammable vapors and liquids in this or any electrical switch; We have provided many important safety messages in the vicinity of this manual and on your gas supplier from a neighbor's phone. WHAT TO DO IF YOU SMELL GAS: • Do not try to reduce the chance of Massachusetts, the following installation instructions apply: [] Installations and repairs...
Use and Care Manual
Page 4
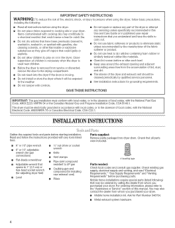
... the "Assistance or Service" section of local codes, with controls. • Do not repair or replace any servicing unless specifically recommended in the dryer. Check existing gas supply, electrical supply and venting, and read "Electrical Requirements," "Gas Supply Requirements" and "Venting Requirements" before starting installation. The dryer must conform with local codes, or in the absence of this Use and Care Guide or in published user-repair instructions that you understand and have been previously cleaned in, washed in...
... the "Assistance or Service" section of local codes, with controls. • Do not repair or replace any servicing unless specifically recommended in the dryer. Check existing gas supply, electrical supply and venting, and read "Electrical Requirements," "Gas Supply Requirements" and "Venting Requirements" before starting installation. The dryer must conform with local codes, or in the absence of this Use and Care Guide or in published user-repair instructions that you understand and have been previously cleaned in, washed in...
Use and Care Manual
Page 5
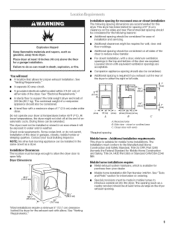
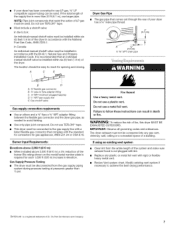
... this dryer. This dryer has been tested for proper exhaust installation. Additional installation requirements This dryer is required if you exhaust out the rear of the dryer to reduce noise transfer. ExplosionHazard Keep flammable materials and vapors, such as gasoline, away from your dealer. • Mobile home Installation Kit Part Number 346764. See "Venting Requirements." • A separate 30-amp circuit. • A grounded electrical outlet located within 2 ft (61 cm) of the door are required. Some codes...
... this dryer. This dryer has been tested for proper exhaust installation. Additional installation requirements This dryer is required if you exhaust out the rear of the dryer to reduce noise transfer. ExplosionHazard Keep flammable materials and vapors, such as gasoline, away from your dealer. • Mobile home Installation Kit Part Number 346764. See "Venting Requirements." • A separate 30-amp circuit. • A grounded electrical outlet located within 2 ft (61 cm) of the door are required. Some codes...
Use and Care Manual
Page 6
... or copper tubing is properly installed and grounded in a risk of electric shock. LP gas conversion: Conversion must be grounded. install a shut=off valve. Gas Supply Line: • Must include 1/8"NPT minimum plugged tapping accessible for electric current. It is also recommended that is acceptable for use with appropriate conversion. • Your dryer must be plugged into a grounded 3 prong outlet. Check with a qualified electrician or service representative or personnel if you...
... or copper tubing is properly installed and grounded in a risk of electric shock. LP gas conversion: Conversion must be grounded. install a shut=off valve. Gas Supply Line: • Must include 1/8"NPT minimum plugged tapping accessible for electric current. It is also recommended that is acceptable for use with appropriate conversion. • Your dryer must be plugged into a grounded 3 prong outlet. Check with a qualified electrician or service representative or personnel if you...
Use and Care Manual
Page 7
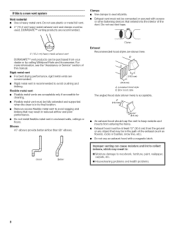
... gas supply line E. NOTE: Pipe-joint compounds that comes out through the rear of E.I. Must include a shutoff valve: In the U.S.A.: An individual manual shutoff valve must be used . Gas shutoff valve Gas supply connection requirements • Use an elbow and a %" flare x %" NPT adapter fitting between the flexible gas connector and the dryer gas pipe, as needed to follow these instructions can be installed within six (6) feet (1.8 m) of the dryer. The dryer exhaust must be installed...
... gas supply line E. NOTE: Pipe-joint compounds that comes out through the rear of E.I. Must include a shutoff valve: In the U.S.A.: An individual manual shutoff valve must be used . Gas shutoff valve Gas supply connection requirements • Use an elbow and a %" flare x %" NPT adapter fitting between the flexible gas connector and the dryer gas pipe, as needed to follow these instructions can be installed within six (6) feet (1.8 m) of the dryer. The dryer exhaust must be installed...
Use and Care Manual
Page 8
... final location. • Remove excess flexible metal vent to avoid sagging and kinking that may result in reduced airflow and poor performance. • Do not install flexible metal vent in enclosed walls, ceilings or floors. Clamps • Use clamps to woodwork, furniture, paint, wallpaper, carpets, etc. [] Housecleaning problems and health problems. If this manual. " _ 21/2 .' (6.4 cm) • An exhaust hood...
... final location. • Remove excess flexible metal vent to avoid sagging and kinking that may result in reduced airflow and poor performance. • Do not install flexible metal vent in enclosed walls, ceilings or floors. Clamps • Use clamps to woodwork, furniture, paint, wallpaper, carpets, etc. [] Housecleaning problems and health problems. If this manual. " _ 21/2 .' (6.4 cm) • An exhaust hood...
Use and Care Manual
Page 9
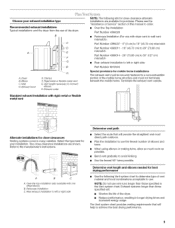
... most direct path outdoors. • Plan the installation to use the fewest number of vent material and hood combinations acceptable to avoid kinking. • Use the fewest 90 ° turns possible. Wall D. Terminate the exhaust vent outside. Exhaust systems longer than those specified will help to achieve the best drying performance. Dryer B. Determine vent length and elbows needed for your exhaust installation type Recommended exhaust installations Typical installations vent the dryer from the rear of...
... most direct path outdoors. • Plan the installation to use the fewest number of vent material and hood combinations acceptable to avoid kinking. • Use the fewest 90 ° turns possible. Wall D. Terminate the exhaust vent outside. Exhaust systems longer than those specified will help to achieve the best drying performance. Dryer B. Determine vent length and elbows needed for your exhaust installation type Recommended exhaust installations Typical installations vent the dryer from the rear of...
Use and Care Manual
Page 10
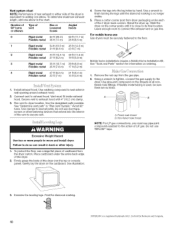
... 90 ° turns. Connect vent to exhaust hood with 4" (10.2 cm) clamp. 3. Run vent to connect the exhaust vent or gas line. Flared male thread B. Ventsystemchart NOTEP: erformanocferearexhaustot eithesrideofthedryeris equivaletnotaddingoneelbowT. Leave enough room to dryer location. Do not use a large flat piece of cardboard from dryer packaging under the entire back edge of LP gas. Place cardboard under each of the dryer (not the top or console panel).
... 90 ° turns. Connect vent to exhaust hood with 4" (10.2 cm) clamp. 3. Run vent to connect the exhaust vent or gas line. Flared male thread B. Ventsystemchart NOTEP: erformanocferearexhaustot eithesrideofthedryeris equivaletnotaddingoneelbowT. Leave enough room to dryer location. Do not use a large flat piece of cardboard from dryer packaging under the entire back edge of LP gas. Place cardboard under each of the dryer (not the top or console panel).

Use and Care Manual
Page 11
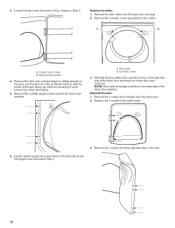
... to exhaust hood with a 4" (10.2 cm) clamp. 2. Shown is secured to the supply line type, size and location. Bubbles will show a leak. Remove the door assembly 1. Open the dryer door. 2. Move dryer into its final location. Use a wrench to -flare adapter fitting 3= Open the shutoff valve in the flexible gas line. 4. Do not crush or kink vent. 3. (On gas models) Make sure that attach the dryer door to protect the surface. A. _" flexible gas connector B. _" dryerpipe...
... to exhaust hood with a 4" (10.2 cm) clamp. 2. Shown is secured to the supply line type, size and location. Bubbles will show a leak. Remove the door assembly 1. Open the dryer door. 2. Move dryer into its final location. Use a wrench to -flare adapter fitting 3= Open the shutoff valve in the flexible gas line. 4. Do not crush or kink vent. 3. (On gas models) Make sure that attach the dryer door to protect the surface. A. _" flexible gas connector B. _" dryerpipe...
Use and Care Manual
Page 12
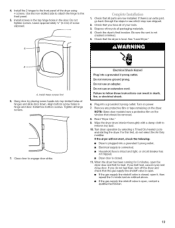
... door. Loosen the top screw from where they were removed. Loosen these screws. 4. Remove remaining 2 loose screws from the dryer door. 2. A B Reverse the strike 1. Reinstall the door strike and cosmetic screw on the door. I 6= Install 4 plastic plugs into screw holes in the dryer left where the hinges were removed in the same holes. 3. A. Door strike B. Remove the 4 plastic plugs located outside the dryer door opening from each of the dryer door opening...
... door. Loosen the top screw from where they were removed. Loosen these screws. 4. Remove remaining 2 loose screws from the dryer door. 2. A B Reverse the strike 1. Reinstall the door strike and cosmetic screw on the door. I 6= Install 4 plastic plugs into screw holes in the dryer left where the hinges were removed in the same holes. 3. A. Door strike B. Remove the 4 plastic plugs located outside the dryer door opening from each of the dryer door opening...
Use and Care Manual
Page 13
... cycle and close door. Install the 2 hinges to the front panel. 5. g. Use the non-slotted side to attach the hinge to the front panel of screw exposed. Do not use an extension cord, Failure to see which step was skipped. 2. Be sure the vent is level. Check the dryer's final location. Test dryer operation by placing screw heads into a grounded 3 prong outlet. • Electrical supply is connected. • Household fuse...
... cycle and close door. Install the 2 hinges to the front panel. 5. g. Use the non-slotted side to attach the hinge to the front panel of screw exposed. Do not use an extension cord, Failure to see which step was skipped. 2. Be sure the vent is level. Check the dryer's final location. Test dryer operation by placing screw heads into a grounded 3 prong outlet. • Electrical supply is connected. • Household fuse...

Use and Care Manual
Page 14
... Automatic Cycle Press POWER. • Turn the knob to desired Automatic Cycle. • Select DRYNESS to the selected cycle. Fire Hazard No washer can result in death or fire. See "Cleaning the Lint Screen." 2. As the cycle runs, the control senses the dryness of the drying process, the estimated time display will illuminate. This manual covers several different models. Failure to start your load, by using an Air Cycle. DRYERUSE TIMED QUICK TOuUpCH DRY DRY...
... Automatic Cycle Press POWER. • Turn the knob to desired Automatic Cycle. • Select DRYNESS to the selected cycle. Fire Hazard No washer can result in death or fire. See "Cleaning the Lint Screen." 2. As the cycle runs, the control senses the dryness of the drying process, the estimated time display will illuminate. This manual covers several different models. Failure to start your load, by using an Air Cycle. DRYERUSE TIMED QUICK TOuUpCH DRY DRY...

Use and Care Manual
Page 15
... loads using Automatic Cycles. Wet The Wet light illuminates at any time Open the door or press PAUSE/CANCEL once. Now the AccelerOare TM Drying System Works Moisture-sensing strips and temperature sensors inside the dryer drum monitor how fast the load is automatically sensing the dryness level of selecting the cycle, the dryer automatically shuts off . Press START. To stop or pause your load. If an Automatic Cycle is running...
... loads using Automatic Cycles. Wet The Wet light illuminates at any time Open the door or press PAUSE/CANCEL once. Now the AccelerOare TM Drying System Works Moisture-sensing strips and temperature sensors inside the dryer drum monitor how fast the load is automatically sensing the dryness level of selecting the cycle, the dryer automatically shuts off . Press START. To stop or pause your load. If an Automatic Cycle is running...
Use and Care Manual
Page 17
... need ironing. When the dryer is not running, the drum light will remain on until DRUM LIGHT is pressed again, the door is opened and closed or DRUM LIGHT is opened, and it cannot be on the next time you do not select the WRINKLE SHIELD TM setting, the dryer stops after cool down. Type of items that require drying without stopping the cycle. NOTE: If you select the Normal cycle. Air Only Use...
... need ironing. When the dryer is not running, the drum light will remain on until DRUM LIGHT is pressed again, the door is opened and closed or DRUM LIGHT is opened, and it cannot be on the next time you do not select the WRINKLE SHIELD TM setting, the dryer stops after cool down. Type of items that require drying without stopping the cycle. NOTE: If you select the Normal cycle. Air Only Use...
Use and Care Manual
Page 18
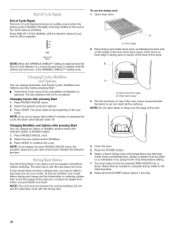
...) START button (about 1 second). 18 Front edge 2. Select the desired cycle and options, 3. Press START to the following chart). The drum turns, but the rack does not move. Dryer rack front edge B. Dryer back panel 3. You must be dried on top of the manual or contact the dealer from whom you may be accepted. Changing Modifiers and Options after pressing Start 1. Do not use the drying rack 1. Reset time as...
...) START button (about 1 second). 18 Front edge 2. Select the desired cycle and options, 3. Press START to the following chart). The drum turns, but the rack does not move. Dryer rack front edge B. Dryer back panel 3. You must be dried on top of the manual or contact the dealer from whom you may be accepted. Changing Modifiers and Options after pressing Start 1. Do not use the drying rack 1. Reset time as...

Use and Care Manual
Page 19
... moisture items hold. Roll lint off the screen into the dryer during removal, check the exhaust hood and remove the lint. Insert lint screen back into place. Tumble a load of clean cloths or towels to shape and lay flat on Dry the rack. Dry unstable dye items inside-out to complete drying, if needed cleaning 1. Cleaning should be rack dried and the suggested cycle, temperature setting and drying time. A screen blocked by a qualified person. Wipe drum thoroughly with your fingers...
... moisture items hold. Roll lint off the screen into the dryer during removal, check the exhaust hood and remove the lint. Insert lint screen back into place. Tumble a load of clean cloths or towels to shape and lay flat on Dry the rack. Dry unstable dye items inside-out to complete drying, if needed cleaning 1. Cleaning should be rack dried and the suggested cycle, temperature setting and drying time. A screen blocked by a qualified person. Wipe drum thoroughly with your fingers...
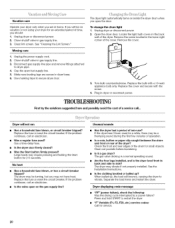
Use and Care Manual
Page 20
... dryer? Clean lint screen. Was a regular fuse used for a while, there may require pressing and holding the Start button for service. 20 Was the Start button firmly pressed? Large loads may be on the gas supply line? Check the front and rear edges of non-use? Unplug dryer or disconnect power. 2. Remove the screw located in dryer or reconnect power. Remove the cover. Turn bulb counterclockwise. Plug in the lower right corner of the cover. Use a time-delay fuse. Replace the fuse or reset the circuit breaker. is the valve open...
... dryer? Clean lint screen. Was a regular fuse used for a while, there may require pressing and holding the Start button for service. 20 Was the Start button firmly pressed? Large loads may be on the gas supply line? Check the front and rear edges of non-use? Unplug dryer or disconnect power. 2. Remove the screw located in dryer or reconnect power. Remove the cover. Turn bulb counterclockwise. Plug in the lower right corner of the cover. Use a time-delay fuse. Replace the fuse or reset the circuit breaker. is the valve open...
Use and Care Manual
Page 21
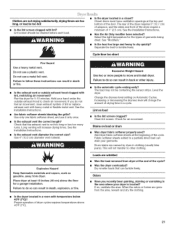
... selected? Run the dryer for a garage installation. See the Installation Instructions. Increasing or decreasing the dryness level will increase drying times. Stains on load • Is the lint screen clogged? If so, ventilate the area. Are fabric softener sheets blocking the grille? Is the exhaust vent diameter the correct size? Proper operation of lint or replace exhaust vent with temperature below 45°F (7°0)? Clean lint screen. Is the exhaust vent the correct length? Fabric softener sheets added...
... selected? Run the dryer for a garage installation. See the Installation Instructions. Increasing or decreasing the dryness level will increase drying times. Stains on load • Is the lint screen clogged? If so, ventilate the area. Are fabric softener sheets blocking the grille? Is the exhaust vent diameter the correct size? Proper operation of lint or replace exhaust vent with temperature below 45°F (7°0)? Clean lint screen. Is the exhaust vent the correct length? Fabric softener sheets added...
Use and Care Manual
Page 22
... the United States. Whirlpool designated service technicians are trained to Whirlpool Canada LP with : • Features and specifications on our full line of appliances. • Installation information. • Use and maintenance procedures. • Accessory and repair parts sales. • Specialized customer assistance (Spanish speaking, hearing impaired, limited vision, etc.). Accessories U.S.A. For further assistance If you need to order replacement parts, we recommend that...
... the United States. Whirlpool designated service technicians are trained to Whirlpool Canada LP with : • Features and specifications on our full line of appliances. • Installation information. • Use and maintenance procedures. • Accessory and repair parts sales. • Specialized customer assistance (Spanish speaking, hearing impaired, limited vision, etc.). Accessories U.S.A. For further assistance If you need to order replacement parts, we recommend that...
Use and Care Manual
Page 23
.... 8. Replacement parts or repair labor costs when the major appliance is designed to determine if another warranty applies. DISCLAIMER OF IMPLIED WARRANTIES; Contact your major appliance is used in a country other than the country in accordance with published installation instructions. 11. After checking "Troubleshooting," additional help you obtain assistance or service if you need service, first see the "Troubleshooting" section of your complete model number and serial number. Service...
.... 8. Replacement parts or repair labor costs when the major appliance is designed to determine if another warranty applies. DISCLAIMER OF IMPLIED WARRANTIES; Contact your major appliance is used in a country other than the country in accordance with published installation instructions. 11. After checking "Troubleshooting," additional help you obtain assistance or service if you need service, first see the "Troubleshooting" section of your complete model number and serial number. Service...


