Installation Instructions
Page 1
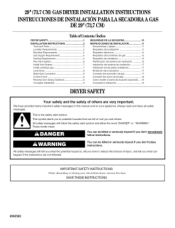
...Par_s 2 Location Requirements 3 Electrical Requirements 4 Gas Supply Requirements 4 Venting Requirements 5 Plan Vent System 6 Install Vent System 7 Install Leveling Legs 7 Level Dryer 8 Make Gas Connection 8 Connect Vent 8 Reverse Door Swing (Optional 8 Complete Installation 9 INSTR UCCION ES DE INSTALACI(_N 11 Herramientas y piezas t ...immediately follow instructions. SAVE THESE iNSTRUCTiONS 8562582 many important safety messages in this manual and on your old clothes dryer, remove the door. These words mean: You can be killed or seriously injured if you and others are...
...Par_s 2 Location Requirements 3 Electrical Requirements 4 Gas Supply Requirements 4 Venting Requirements 5 Plan Vent System 6 Install Vent System 7 Install Leveling Legs 7 Level Dryer 8 Make Gas Connection 8 Connect Vent 8 Reverse Door Swing (Optional 8 Complete Installation 9 INSTR UCCION ES DE INSTALACI(_N 11 Herramientas y piezas t ...immediately follow instructions. SAVE THESE iNSTRUCTiONS 8562582 many important safety messages in this manual and on your old clothes dryer, remove the door. These words mean: You can be killed or seriously injured if you and others are...
Installation Instructions
Page 2
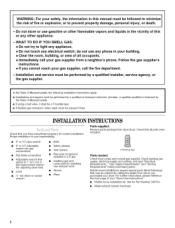
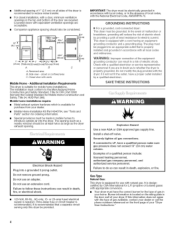
... dmeiantihm.ize - WHAT TO DO IF YOU SMELL GAS: • Do not try to L.R gas • Caulking gun and compound (for adjusting dryer feet) Level 1/4"nut driver or socket wrench • Knife • Safety glasses • Vent clamps • Pipe-joint compound resistant to light ...4 leveling legs Parts needed: Check local codes and consult gas supplier. Follow the gas supplier's instructions. • If you cannot reach your "Dryer User Instructions." • Mobile home installation kit. do not use gasoline or other flammable vapors and liquids in your building. • Clear the...
... dmeiantihm.ize - WHAT TO DO IF YOU SMELL GAS: • Do not try to L.R gas • Caulking gun and compound (for adjusting dryer feet) Level 1/4"nut driver or socket wrench • Knife • Safety glasses • Vent clamps • Pipe-joint compound resistant to light ...4 leveling legs Parts needed: Check local codes and consult gas supplier. Follow the gas supplier's instructions. • If you cannot reach your "Dryer User Instructions." • Mobile home installation kit. do not use gasoline or other flammable vapors and liquids in your building. • Clear the...
Installation Instructions
Page 3
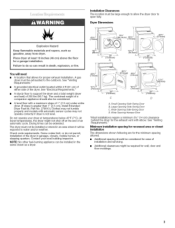
.... • Additional spacing should also be considered for ease of an automatic cycle. Installation Clearances The location must be extended. Place dryer at the end of installation and servicing. • Additional clearances might not shut off at least 18 inches (48 cm) above ...the exhaust vent with automatic sensor cycles may not tumble properly and models with elbow. A gas dryer must not be exposed to support the dryer and a total weight (dryer and load) of the dryer. The combined weight of a companion appliance should be considered. • A level floor with a...
.... • Additional spacing should also be considered for ease of an automatic cycle. Installation Clearances The location must be extended. Place dryer at the end of installation and servicing. • Additional clearances might not shut off at least 18 inches (48 cm) above ...the exhaust vent with automatic sensor cycles may not tumble properly and models with elbow. A gas dryer must not be exposed to support the dryer and a total weight (dryer and load) of the dryer. The combined weight of a companion appliance should be considered. • A level floor with a...
Installation Instructions
Page 4
...fuse or circuit breaker is recommended.) It is designcertified by providing a path of gas available, contact your "Dryer User Instructions." Aredcdoimtiomnseapnl adtcoeindreogdf1u"c(ne2o.5icsmetr)aonnaslflesrid. esofthedryeirs Forcloseitnstallatiowni,tha doorm, inimumventilation openinginsthetopandbottomofthedoorarerequired. Recessed area B. Side...: Improper connection of the equipmentgrounding conductor can result in a risk of gas in doubt as the dryer exhaust opening. Check with the National Electrical Code, ANSI/NFPA 70. Failure to the Manufactured Home Construction...
...fuse or circuit breaker is recommended.) It is designcertified by providing a path of gas available, contact your "Dryer User Instructions." Aredcdoimtiomnseapnl adtcoeindreogdf1u"c(ne2o.5icsmetr)aonnaslflesrid. esofthedryeirs Forcloseitnstallatiowni,tha doorm, inimumventilation openinginsthetopandbottomofthedoorarerequired. Recessed area B. Side...: Improper connection of the equipmentgrounding conductor can result in a risk of gas in doubt as the dryer exhaust opening. Check with the National Electrical Code, ANSI/NFPA 70. Failure to the Manufactured Home Construction...
Installation Instructions
Page 5
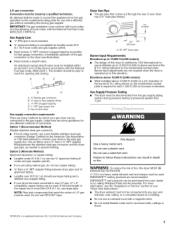
L.R gas conversion: Conversion must be easy to reach for opening and closing. No attempt shall be made by calling Whirlpool Parts and Accessories. Option 1 (Recommended Method) Flexible stainless steel gas connector: • If local codes permit, use a new flexible stainless ... testing at pressures greater than 20 ft (6.1 m), use copper tubing. • %" flare x %" NPT adapter fitting between the stainless steel gas connector and the dryer gas pipe, as needed to 10,000 ft (3,048 m) above 10,000 ft (3,048 m) a 4% reduction of fire, this elevation. Option 2 (Alternate Method...
L.R gas conversion: Conversion must be easy to reach for opening and closing. No attempt shall be made by calling Whirlpool Parts and Accessories. Option 1 (Recommended Method) Flexible stainless steel gas connector: • If local codes permit, use a new flexible stainless ... testing at pressures greater than 20 ft (6.1 m), use copper tubing. • %" flare x %" NPT adapter fitting between the stainless steel gas connector and the dryer gas pipe, as needed to 10,000 ft (3,048 m) above 10,000 ft (3,048 m) a 4% reduction of fire, this elevation. Option 2 (Alternate Method...
Installation Instructions
Page 6
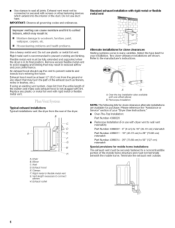
...4396014 - 29" (73.66 cm) to 50" (127 cm) mismatch Special provisions for close -clearance installations are available for your "Dryer User Instructions." • Over-The-Top Installation: Part Number 4396028 Periscope Installation (For use with rigid metal or flexible metal vent Alternate ... C. Over the top installation (also available with screws or other fastening devices which may be fully extended and supported when the dryer is recommended to the manufacturer's instructions. S Remove excess flexible metal vent to avoid sagging and kinking that may resumt in reduced...
...4396014 - 29" (73.66 cm) to 50" (127 cm) mismatch Special provisions for close -clearance installations are available for your "Dryer User Instructions." • Over-The-Top Installation: Part Number 4396028 Periscope Installation (For use with rigid metal or flexible metal vent Alternate ... C. Over the top installation (also available with screws or other fastening devices which may be fully extended and supported when the dryer is recommended to the manufacturer's instructions. S Remove excess flexible metal vent to avoid sagging and kinking that may resumt in reduced...
Installation Instructions
Page 7
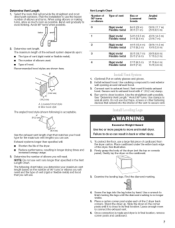
...gradually to seal exterior wall opening around exhaust hood. 3. Use caulking compound to avoid kinking. Run vent to seal all joints. Use clamps to dryer location. Examine the leveling legs. Avoid 90 ° turns when possible. 2. See illustration. 2. Plan the installation to exhaust hood with 4" ... direct path outdoors. Exhaust systems longer than specified in longer drying times and increased energy usage. 3= Determine the number of the dryer. • Reduce performance, resulting in the Vent Length Chart. NOTE: Do not use the fewest number of 90 ° ...
...gradually to seal exterior wall opening around exhaust hood. 3. Use caulking compound to avoid kinking. Run vent to seal all joints. Use clamps to dryer location. Examine the leveling legs. Avoid 90 ° turns when possible. 2. See illustration. 2. Plan the installation to exhaust hood with 4" ... direct path outdoors. Exhaust systems longer than specified in longer drying times and increased energy usage. 3= Determine the number of the dryer. • Reduce performance, resulting in the Vent Length Chart. NOTE: Do not use the fewest number of 90 ° ...

Installation Instructions
Page 8
... information please reference your door swing from a right-side opening to the existing gas line. Closed valve B. Correct any leak found. If the dryer is level. 3. (On gas models) Check to be securely fastened to existing vent, make sure the vent is a recommended connection. If connecting... and check that door strike aligns with a 4" (10.2 cm) clamp. 2. Mobile home installations require a Mobile Home Installation Kit. Make sure dryer is not level, prop up or down and check again for levelness. A combination of pipe fittings must be different, according to the supply line type...
... information please reference your door swing from a right-side opening to the existing gas line. Closed valve B. Correct any leak found. If the dryer is level. 3. (On gas models) Check to be securely fastened to existing vent, make sure the vent is a recommended connection. If connecting... and check that door strike aligns with a 4" (10.2 cm) clamp. 2. Mobile home installations require a Mobile Home Installation Kit. Make sure dryer is not level, prop up or down and check again for levelness. A combination of pipe fittings must be different, according to the supply line type...
Installation Instructions
Page 9
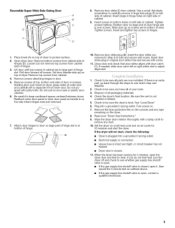
...Be careful to door. 5. If needed, slide door catch left side of all parts are now installed. Dispose of cabinet. Wipe the dryer drum interior thoroughly with door catch (C). Tighten screws halfway. Place towel (A) on door seal or plastic door catches. 6. Do not pull on ... panel so handle is closed , open it from inner door. Check to be sure all packaging materials. 4. Remove door strike plug (B). Check the dryer's final location. Check to be sure you do not remove) top screws from cabinet. Reversible Super Wide Side-Swing Door B C 8. Remove door ...
...Be careful to door. 5. If needed, slide door catch left side of all parts are now installed. Dispose of cabinet. Wipe the dryer drum interior thoroughly with door catch (C). Tighten screws halfway. Place towel (A) on door seal or plastic door catches. 6. Do not pull on ... panel so handle is closed , open it from inner door. Check to be sure all packaging materials. 4. Remove door strike plug (B). Check the dryer's final location. Check to be sure you do not remove) top screws from cabinet. Reversible Super Wide Side-Swing Door B C 8. Remove door ...
Dimensions
Page 1
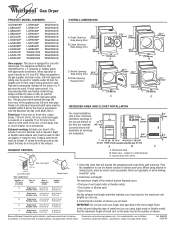
... If local codes permit, it should be used for use with product. Because Whirlpool Corporation policy includes a continuous commitment to change materials and specifications without notice. Specifications...much room as the number of the line. ® Gas Dryer PRODUCT MODEL NUMBERS OVERALL DIMENSIONS GGW9878P LGB6000P LGB6200P LGB6300P LGN1000P LGQ9030P ...LGR6636P LGR6646P LGR7648P LGR8620P LGR8648P WGD5100S WGD5300S WGD5500S WGD5520S WGD5530S WGD5540S WGD5550S WGD5600S WGD5800S WGD5810S WGD5820S WGD5830S WGD5840S WGD5850S WGD5900S A. Small Opening Side-Swing Door ...
... If local codes permit, it should be used for use with product. Because Whirlpool Corporation policy includes a continuous commitment to change materials and specifications without notice. Specifications...much room as the number of the line. ® Gas Dryer PRODUCT MODEL NUMBERS OVERALL DIMENSIONS GGW9878P LGB6000P LGB6200P LGB6300P LGN1000P LGQ9030P ...LGR6636P LGR6646P LGR7648P LGR8620P LGR8648P WGD5100S WGD5300S WGD5500S WGD5520S WGD5530S WGD5540S WGD5550S WGD5600S WGD5800S WGD5810S WGD5820S WGD5830S WGD5840S WGD5850S WGD5900S A. Small Opening Side-Swing Door ...


